Unless you opted for a PCI Passthrough method for your network cards (only recommended for advanced users), we will use the more standard and more widely used method of setting up two virtual switches in Proxmox, one for LAN and the other for WAN, and then assign network cards, accordingly.
1. Configure the LAN interface
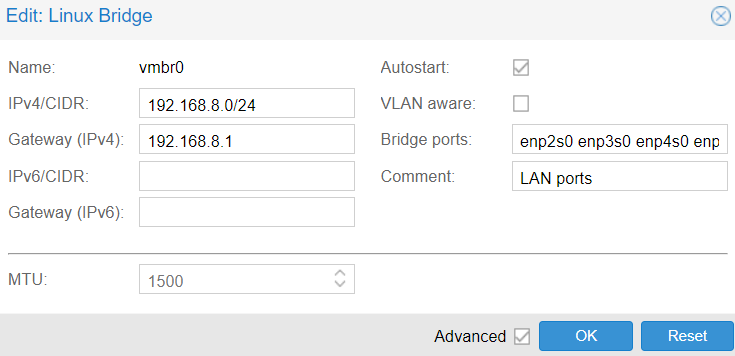
- Under Datacenter -> proxmox, go to Network. Find vmbr0, which will contain the management port selected during the proxmox’s installation.
- Create an IPv4 range, e.g. 192.168.1.1/24
- Set up the IPv4 gateway to be the IP address of the OPNSense VM, e.g. 192.168.1.1
- Check that the LAN interface has an IPv4 and gateway addresses assigned (should be the starting number of the network that we will assign to OPNSense, not to Proxmox!).
- Edit the ‘bridge ports’ section and add additional ports that your server will use for the LAN (e.g. on a 6 port QOTOM, if we use port no.1 for WAN, this would be: enp2s0 enp3s0 enp4s0 enp5s0 enp6s0 (only space as a delimiter between pot numbers).
- Add a comment such as ‘LAN’ for future reference.
2. Configure the WAN interface
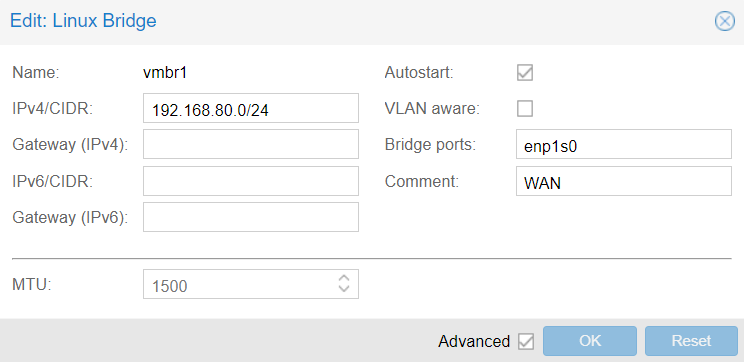
- Create a new Linux Bridge (e.g. vSwitch in ESXi terminology) .
- Assign the remaining WAN port to it, e.g. enp1s0 .
- Assign it an IPv4 address and a comment (no gateway to be specified since that is defined in the LAN bridge).
3. Final network configuration state
Below you can find an example overview of the ‘Network’ tab in Proxmox after the above was set up. Note that the virtual bridges are auto-started and so the inidividual ports do not need to be.
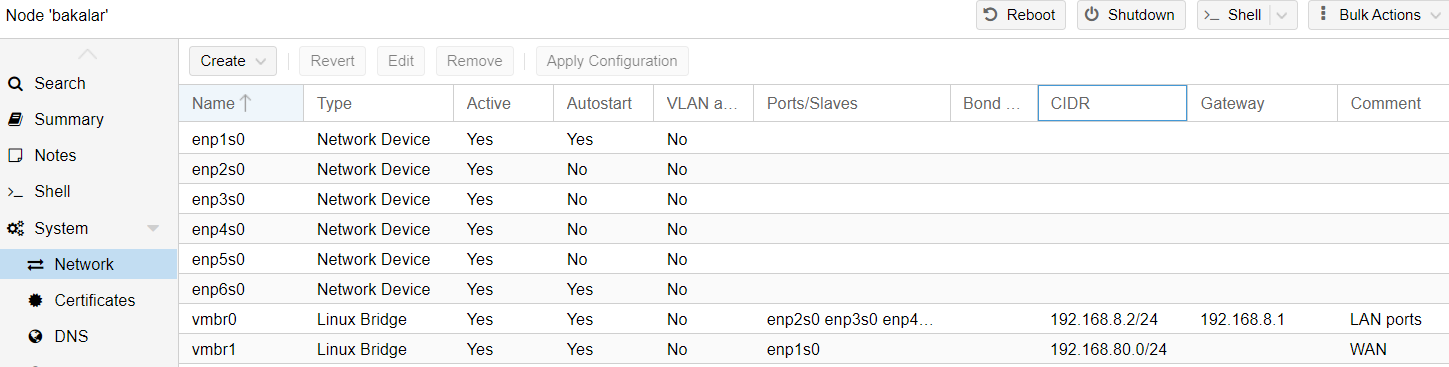
Finally, restart your Proxmox server for changes to take an effect.
Note: In case you get locked out, connect directly to the server (e.g. with QOTOM, an HDMI cable, keyboard and mouse) and use the command line interface in /etc/network/interfaces . After all, Proxmox runs on a standard Debian distro and so changes can be made there, directly, esp. in case of a lock out 🙂
3 comments
How would you do this differently if using PCI pass through?
Hi Ed, I have not tested it with PCI passthrough yet, I have to focus on a different project at the moment. If you end up looking it up and would like to contribute, I would be happy to grant you editor rights to this tutorial and co-authorship recognition 🙂 Jan
1. So after this configuration my server with PVE on it will have internet? It can be safely connected directly to a router on the wan physical interface, and the other physical interface can be used to connect to a laptop?
2. Can I replace opnsense with a pfsense vm, and obtain the same result?
3. I want to create a DMZ network of vms. If I apply these configurations, will I be able to do so, and how, exactly, because I would need a pfsense firewall for that structure. Or I can use the same?
4. Can I add more virtual interfaces to one? Like you did for vmbr0, where you assigned more, in step 1 ( enp2s0 enp3s0..)
Thank you!