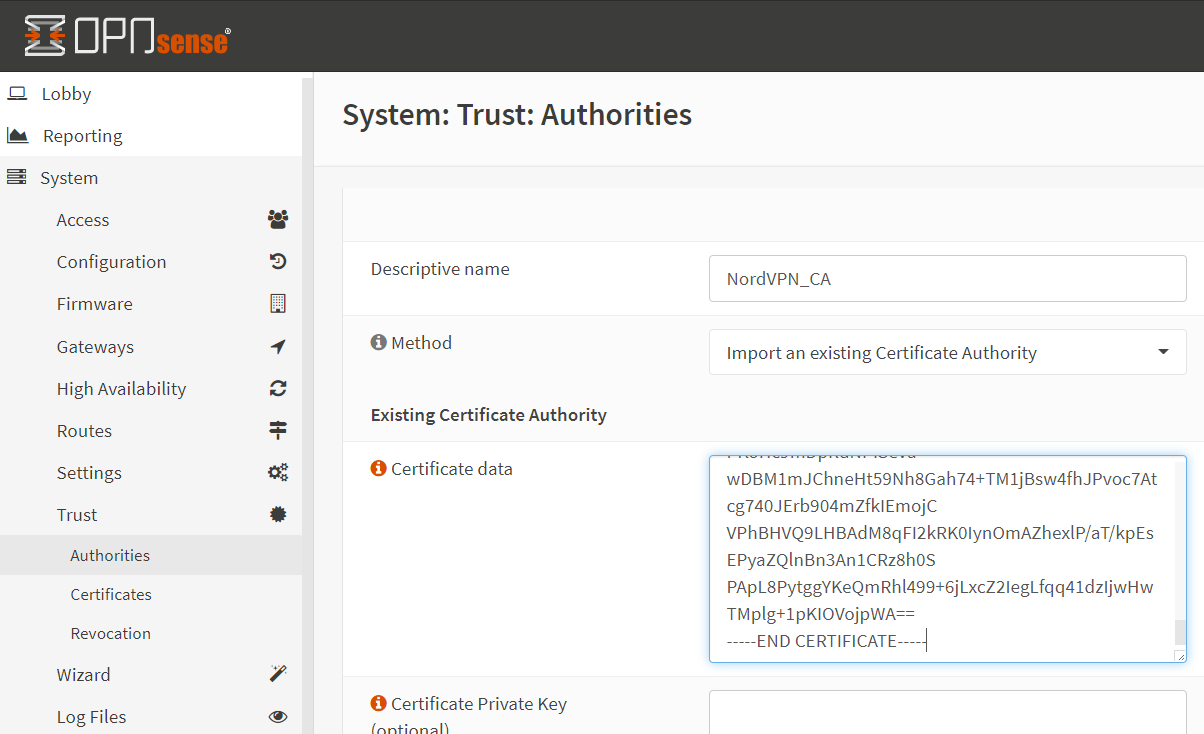
Bachelor Tech
  • Home
  • Tutorials
  • Portfolio
  • About Jan
  • Contact Jan

NordVPN installation on OPNSense

by Jan Bachelor October 18, 2020

  1. Import the Certificate Authority in OPNSense:
    • In OPNSense, go to ‘System’ -> ‘Trust’ -> ‘Authorities’ and click on the + sign.
    • Provide an identifiable name (just for yourself) such as NordVPN_CA
    • Copy paste the following certificate information, leave all else blank and click on Save (taken from here):

Click here to view the certificate
-----BEGIN CERTIFICATE-----
MIIFCjCCAvKgAwIBAgIBATANBgkqhkiG9w0BAQ0FADA5MQswCQYDVQQGEwJQQTEQ
MA4GA1UEChMHTm9yZFZQTjEYMBYGA1UEAxMPTm9yZFZQTiBSb290IENBMB4XDTE2
MDEwMTAwMDAwMFoXDTM1MTIzMTIzNTk1OVowOTELMAkGA1UEBhMCUEExEDAOBgNV
BAoTB05vcmRWUE4xGDAWBgNVBAMTD05vcmRWUE4gUm9vdCBDQTCCAiIwDQYJKoZI
hvcNAQEBBQADggIPADCCAgoCggIBAMkr/BYhyo0F2upsIMXwC6QvkZps3NN2/eQF
kfQIS1gql0aejsKsEnmY0Kaon8uZCTXPsRH1gQNgg5D2gixdd1mJUvV3dE3y9FJr
XMoDkXdCGBodvKJyU6lcfEVF6/UxHcbBguZK9UtRHS9eJYm3rpL/5huQMCppX7kU
eQ8dpCwd3iKITqwd1ZudDqsWaU0vqzC2H55IyaZ/5/TnCk31Q1UP6BksbbuRcwOV
skEDsm6YoWDnn/IIzGOYnFJRzQH5jTz3j1QBvRIuQuBuvUkfhx1FEwhwZigrcxXu
MP+QgM54kezgziJUaZcOM2zF3lvrwMvXDMfNeIoJABv9ljw969xQ8czQCU5lMVmA
37ltv5Ec9U5hZuwk/9QO1Z+d/r6Jx0mlurS8gnCAKJgwa3kyZw6e4FZ8mYL4vpRR
hPdvRTWCMJkeB4yBHyhxUmTRgJHm6YR3D6hcFAc9cQcTEl/I60tMdz33G6m0O42s
Qt/+AR3YCY/RusWVBJB/qNS94EtNtj8iaebCQW1jHAhvGmFILVR9lzD0EzWKHkvy
WEjmUVRgCDd6Ne3eFRNS73gdv/C3l5boYySeu4exkEYVxVRn8DhCxs0MnkMHWFK6
MyzXCCn+JnWFDYPfDKHvpff/kLDobtPBf+Lbch5wQy9quY27xaj0XwLyjOltpiST
LWae/Q4vAgMBAAGjHTAbMAwGA1UdEwQFMAMBAf8wCwYDVR0PBAQDAgEGMA0GCSqG
SIb3DQEBDQUAA4ICAQC9fUL2sZPxIN2mD32VeNySTgZlCEdVmlq471o/bDMP4B8g
nQesFRtXY2ZCjs50Jm73B2LViL9qlREmI6vE5IC8IsRBJSV4ce1WYxyXro5rmVg/
k6a10rlsbK/eg//GHoJxDdXDOokLUSnxt7gk3QKpX6eCdh67p0PuWm/7WUJQxH2S
DxsT9vB/iZriTIEe/ILoOQF0Aqp7AgNCcLcLAmbxXQkXYCCSB35Vp06u+eTWjG0/
pyS5V14stGtw+fA0DJp5ZJV4eqJ5LqxMlYvEZ/qKTEdoCeaXv2QEmN6dVqjDoTAo
k0t5u4YRXzEVCfXAC3ocplNdtCA72wjFJcSbfif4BSC8bDACTXtnPC7nD0VndZLp
+RiNLeiENhk0oTC+UVdSc+n2nJOzkCK0vYu0Ads4JGIB7g8IB3z2t9ICmsWrgnhd
NdcOe15BincrGA8avQ1cWXsfIKEjbrnEuEk9b5jel6NfHtPKoHc9mDpRdNPISeVa
wDBM1mJChneHt59Nh8Gah74+TM1jBsw4fhJPvoc7Atcg740JErb904mZfkIEmojC
VPhBHVQ9LHBAdM8qFI2kRK0IynOmAZhexlP/aT/kpEsEPyaZQlnBn3An1CRz8h0S
PApL8PytggYKeQmRhl499+6jLxcZ2IegLfqq41dzIjwHwTMplg+1pKIOVojpWA==
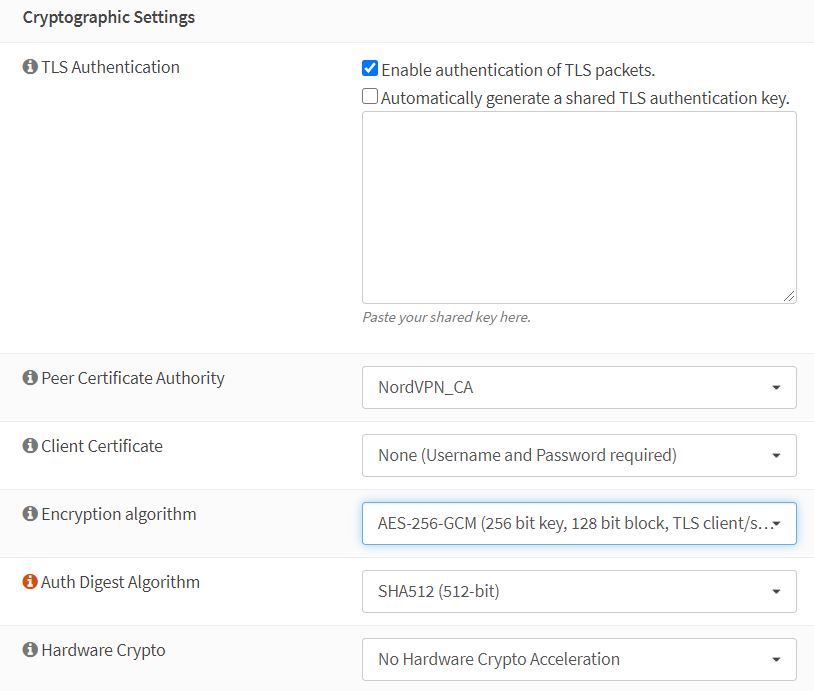
-----END CERTIFICATE-----
First part of the NordVPN client set up
  1. Now it’s time to add info about the VPN provider and utilize the CA certificate that we defined earlier. In OPNSense, go to ‘VPN’ -> ‘Clients’ and click on the ‘+ Add’ button.
  • General Information section:
  •  
Proceed as per the screenshot below (or click here to expand the text):
  • Disabled: leave unchecked
  • Description: add something meaningul such as ‘NordVPN UK server’.
  • Server mode: Peer to Peer (SSL / TLS)
  • Protocol: UDP4 (to enforce IPv4 only since IPV6 is not currently supported)
  • Device mode: tun
  • Interface: any
  • Remote server:
    • Host or address: uk1977.nordvpn.com (select your server here)
    • Port: 1194
    • Leave the ‘Select remote server at random’ unticked unless you add more and prefer that
  • Retry DNS resolution: Tick the box to ‘Infinitely resolve remote server’
  • Proxy host or address: leave blank
  • Proxy port: leave leave blank
  • Proxy authentication extra options: none
  • Local port: leave blank
  •  
VPN Client set up - General Settings in OPNSense for NordVPN
  • User Authentication Settings:
    • Find your credentials from NordVPN’s website here (Dashboard -> NordVPN -> scroll down to ‘Advanced Configuration’.
    • In OPNSense, fill in the username and password as requested.
    • Renegotiate time: leave blank
User Authentication Settings
  • Cryptographic Settings:
    • TLS Authentication:
      • Enable authentication of TLS packet: tick
      • Automatically generate shared TLS authentication key: untick and copy paste this:
Click here to expand:
-----BEGIN OpenVPN Static key V1-----
e685bdaf659a25a200e2b9e39e51ff03
0fc72cf1ce07232bd8b2be5e6c670143
f51e937e670eee09d4f2ea5a6e4e6996
5db852c275351b86fc4ca892d78ae002
d6f70d029bd79c4d1c26cf14e9588033
cf639f8a74809f29f72b9d58f9b8f5fe
fc7938eade40e9fed6cb92184abb2cc1
0eb1a296df243b251df0643d53724cdb
5a92a1d6cb817804c4a9319b57d53be5
80815bcfcb2df55018cc83fc43bc7ff8
2d51f9b88364776ee9d12fc85cc7ea5b
9741c4f598c485316db066d52db4540e
212e1518a9bd4828219e24b20d88f598
a196c9de96012090e333519ae18d3509
9427e7b372d348d352dc4c85e18cd4b9
3f8a56ddb2e64eb67adfc9b337157ff4
-----END OpenVPN Static key V1-----
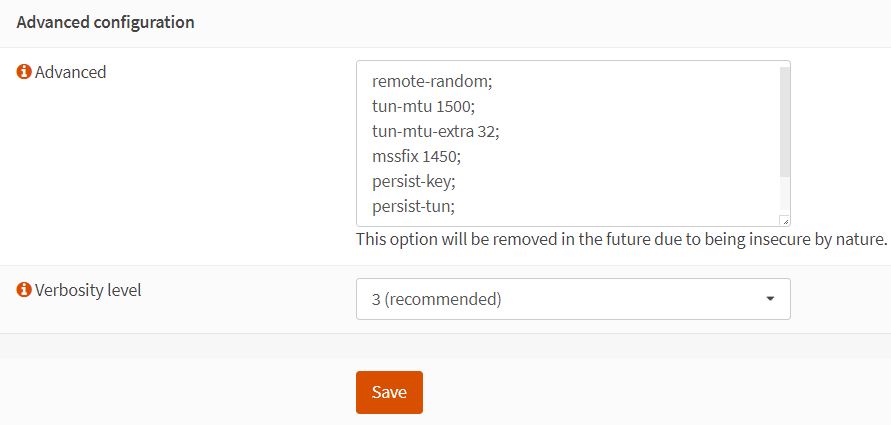
      • Peer certificate authority: choose your CA ceriticate
      • Client Certificate: None (Username and Password required)
      • Encryption Algorytm: AES-256-GCM (256 bit key, 128 bit block, TLS client/server mode only)
      • Auth Digest Algorythm: SHA512
      • Hardware Crypto: No hardware crypto acceleration
Cryptograhpic Settings
    • Tunnel Settings:
      • Leave all blank until
      • Compression: Disabled – No compression
      • Disable IPv6: tick
      • Don’t pull routes: tick
      • Don’t add/remove routes: tick
Tunnel Settings
    • Advanced configuration:
      • Copy paste the following parameters:
Click here to expand:
remote-random;
tun-mtu 1500;
tun-mtu-extra 32;
mssfix 1450;
persist-key;
persist-tun;
reneg-sec 0;
remote-cert-tls server;
      • Verbosity level: 3 (recommended)
Advanced Configuration

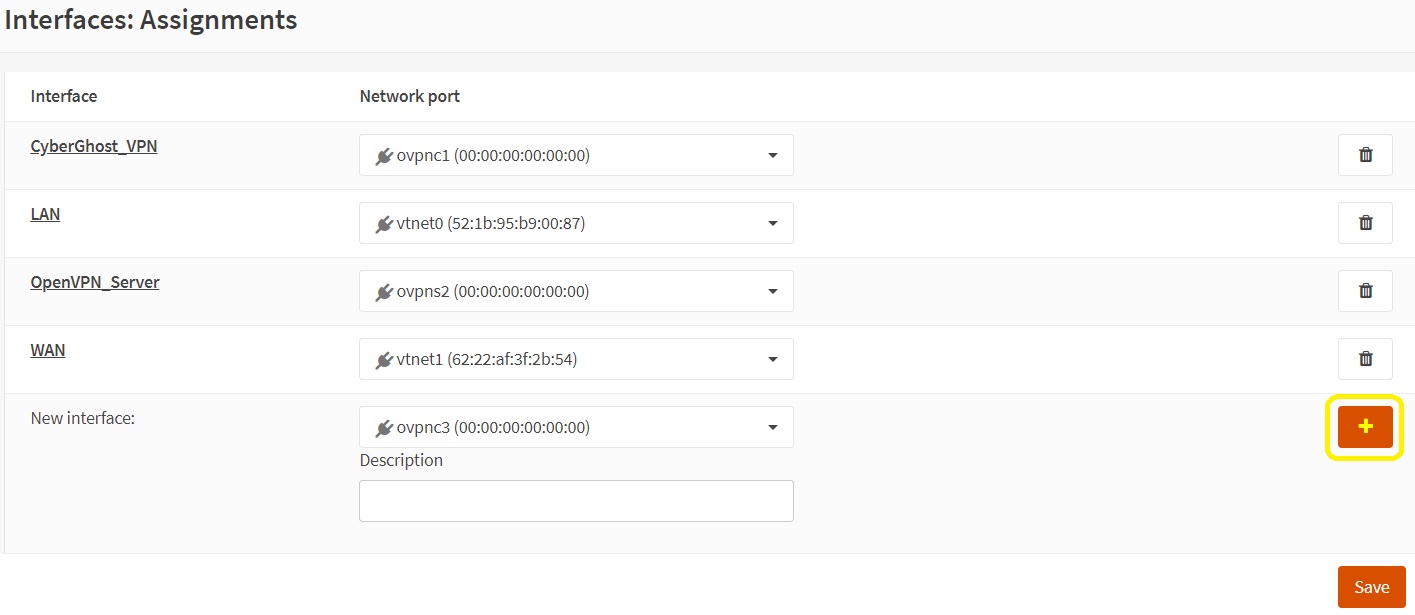
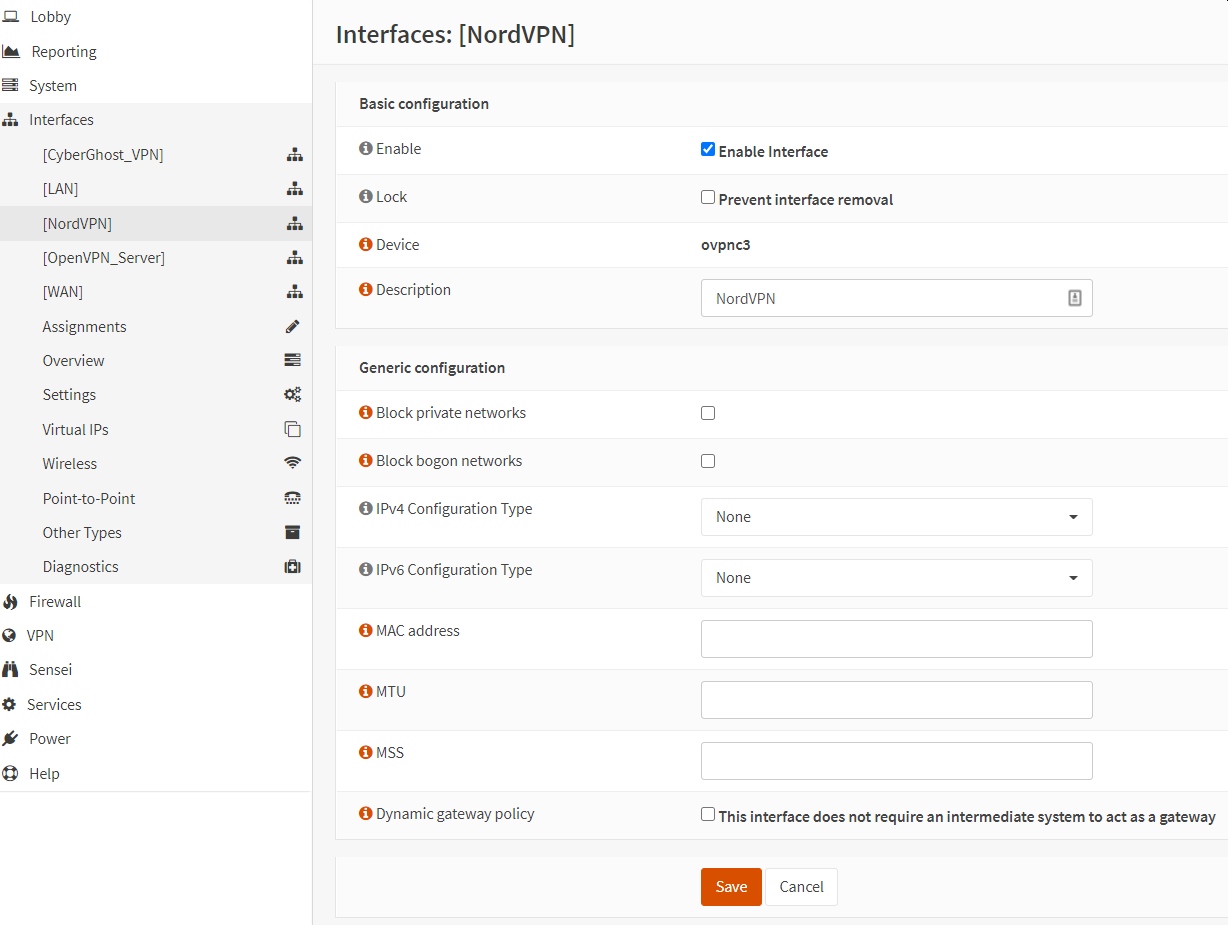
3. Create a new virtual interface

  • In OPNSense, go to ‘Interfaces’ -> ‘Assignments’.
  • You will notice a new interface named ‘ovpnc1’ (the number can differ).  Click on the + sign to add it.
Add the newly created virtual interface
  • Click on the ‘Save’ button and then click on the new interface.
Proceed as per the screenshot below (or click here to expand the text):
  • Enable: tick
  • Lock: leave unticked
  • Description: change to something more meaningful such as ‘Nord VPN’.
  • Block private networks: leave unticked
  • Block bogon networks: leave unticked
  • IPv4 Configuration Type: None
  • IPv6 Configuration Type: None
  • Leave all else blank and click on the “Save’ button and then on ‘Apply changes’.

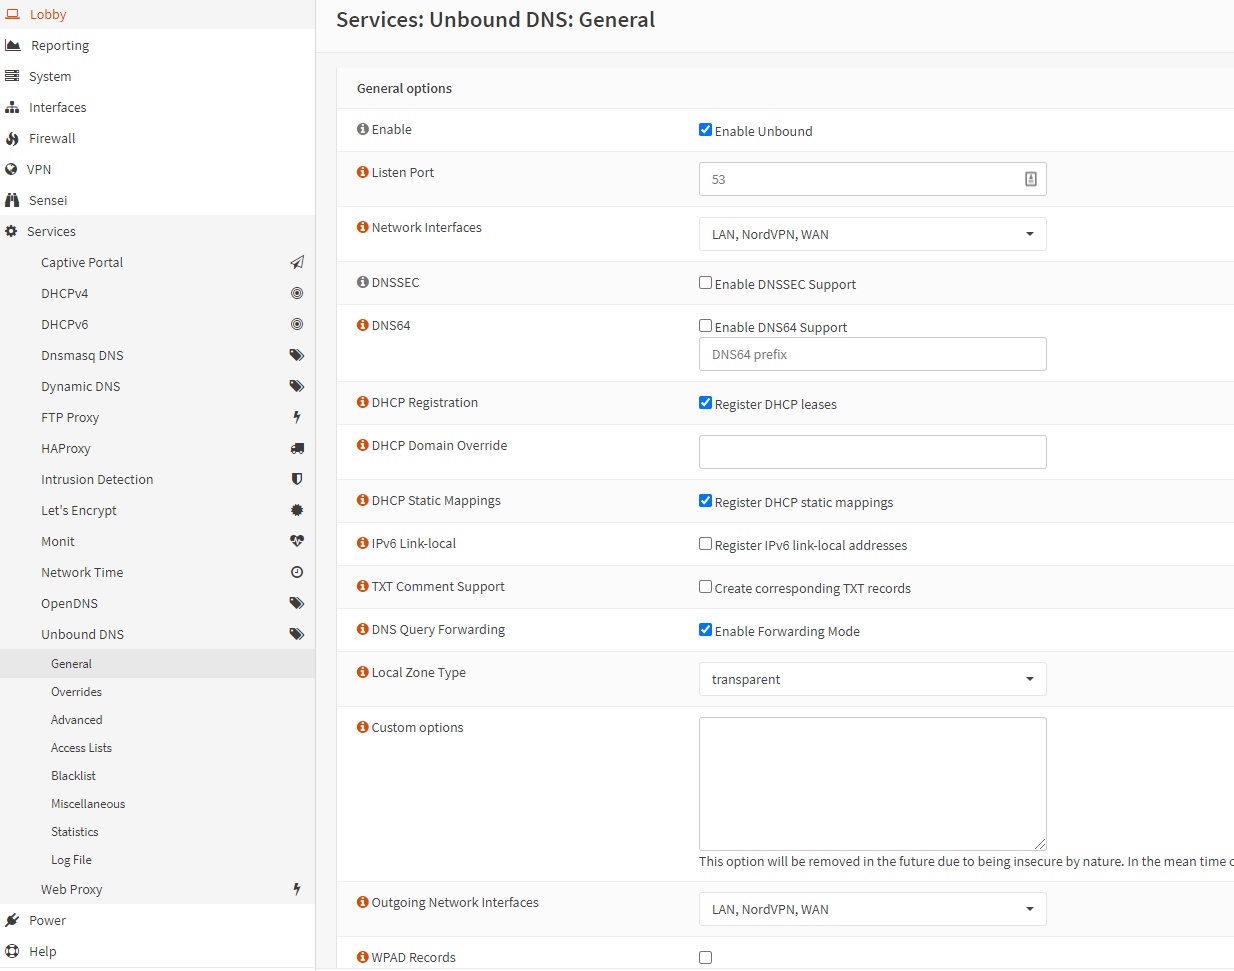
4. Set up Unbound DNS services

  • In OPNSense, go to ‘Services’ -> ‘Unbound DNS’ -> ‘General’.
Proceed as per the screenshot below (or click here to expand the text):
  • Enable: tick ‘Enabled Unbound’
  • Listen port: leave blank (or 53)
  • Network interfaces: select all interfaces (or as you see fit)
  • DNSSEC: leave unticked
  • DNS64: leave unticked
  • DHCP Registration: tick to ‘Register DHCP leases’
  • DHCP Domain Override: leave blank
  • DHCP Static Mappings: tick
  • IPv6 Link-local: untick
  • TXT Comment Support: leave unticked
  • DNS Query Forwarding: tick
  • Local Zone Type: transparent
  • Click on the ‘Advanced’ button
  • Custom options: leave blank
  • Outgoing network interfaces: select all interfaces (or at least NordVPN’s)
  • WPAD Records: leave unticked
  • Click on the ‘Save’ button and then on ‘Apply changes’
Unbound Settings uin OPNSense
  • To further support hiding identify, we will need to enable a few more advanced Unbound DNS parameters.
  • In OPNSense, go to ‘Services’ – ‘Unbound’ -> ‘Advanced’.
Proceed as per the screenshot below (or click here to expand the text):
  • Tick the first four boxes, that is:
    • Hide Identity: tick
    • Hide version:  tick
    • Prefetch support: tick
    • Prefetch DNS key Support: tick
  • Leave the rest as-is, click on ‘Save’ and then ‘Apply changes’.
Unbound DNS advanced settings - tick the first four and leave the rest as-is.

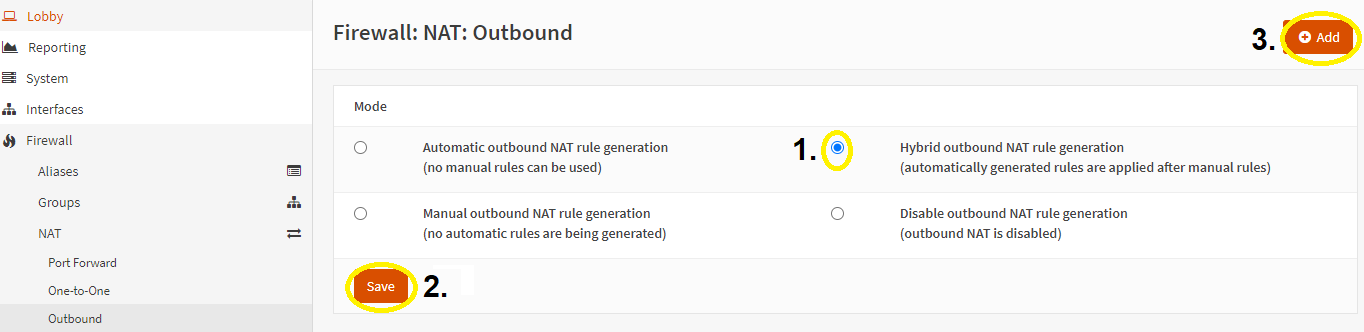
5. Set up outbound NAT rule

  • The idea of this step is to set that outgoing traffic should go via the VPN’s interface.
  • In OPNSense, go to ‘Firewall’ -> “NAT’ -> ‘Outbound’. Select ‘Hybrid outbound NAT rule generation (automatically generated rules are applied after manual rules)’. Click on ‘Save’ and then ‘Apply changes’.
Initial NAT Outbound Settings
  • Click on the ‘+ Add’ button (while in the ‘Firewall: NAT Ounbound page’). The only thing to modify in there is the ‘Interface’ – set it to your new interface, e.g. ‘Nord VPN’. Leave the rest as-is, click on ‘Save’ and ‘Apply changes’.
Add an outbound NAT interface (to allow traffic to go through it). Leave all other options as default.

Sources:

  1. Official NordVPN’s manual
  2. Selective routing – NordVPN’s manual (for pFsense)
  3. OPNSense’s forum – 1
Is it worth getting VPN on OPNSense?
Multi-WAN Set Up in Proxmox & OPNSense
Back to: Build Your Own Router – Proxmox, OPNSense, OpenVPN server and a VPN client all in one!

Leave a Comment Cancel Reply

Save my name, email, and website in this browser for the next time I comment.

This site uses Akismet to reduce spam. Learn how your comment data is processed.

0 comment 0 FacebookWhatsappEmail

Build Your Own Router – Proxmox, OPNSense, OpenVPN server and a VPN client all in one!

  • Previous
  • Next
Collapse
Expand
  • Hardware Considerations
  • Disabling default Proxmox firewall
  • OPNSense VM Set Up
  • OPNSense Installation
  • PCI Passthrough Set Up (Optional)
  • WAN / LAN Set Up (Before OPNSense Installation)
  • Initial OPNSense Set up in Web GUI
  • Dynamic DNS Set Up with DuckDNS on OPNSense
  • Choosing a VPN provider for your OPNSense
  • Is it worth getting VPN on OPNSense?
  • NordVPN installation on OPNSense
  • Multi-WAN Set Up in Proxmox & OPNSense

Search for articles

Other Tips

  • How to mount an NFS share (such as from FreeNAS) from an Android box
  • How to download a Windows 10 ISO on a Windows device – easy work-around

Other Tutorials

  • Build Your Own Router - Proxmox, OPNSense, OpenVPN server and a VPN client all in one!
    12 Steps
  • Dynamically Populate Gravity Forms from Google Sheets (GSheets APIv4)
    6 Steps

Recent Comments

  • Jan Bachelor on Use Integromat to get computer IDs from user email in JamF ProHi Robert, the static groups were created in the p…
  • Robert Petitto on Use Integromat to get computer IDs from user email in JamF ProCan you share how you'd use Make (integromat) to a…
  • Martin on Part 1 – What do we want to do + Required technology (bank feed)This tutorial deserves more credit, I've not seen…
  • Jan Bachelor on WAN / LAN Set Up (Before OPNSense Installation)Hi Ed, I have not tested it with PCI passthrough y…
  • Ed on OPNSense VM Set UpIn step 4 firewall you turned off firewall, should…

Tags

chrome iso windows

Categories

  • Android
  • FreeNAS
  • Linux
  • Windows

Recent Posts

  • How to mount an NFS share (such as from FreeNAS) from an Android box

  • How to download a Windows 10 ISO on a Windows device – easy work-around

Facebook Twitter Instagram Pinterest Linkedin Youtube

@2019 - All Right Reserved. Designed and Developed by PenciDesign

Bachelor Tech
  • Home
  • Tutorials
  • Portfolio
  • About Jan
  • Contact Jan