Bachelor Tech
  • Home
  • Tutorials
  • Portfolio
  • About Jan
  • Contact Jan

PCI Passthrough Set Up (Optional)

by Jan Bachelor September 22, 2020

Last Updated on September 22, 2020 by Jan Bachelor

In case you would like to set up a direct access to a component (e.g. a network card, HDMI port on your Qotom, etc.) for a VM, you would need to set up PCI passthrough. Below, we will set it up for a network card.

Pre-requisites:

  • Your VM is already created (so that you can tell its ID, e.g. 1020.
  • CPU that supports it (all modern CPUs have it)

Disadvantages: This is an experimental feature. If you plan to share the physical network port with another VM, then do no use this option.

Advantages: Provides a bit more performance. On top of that, it should protect you from Spectre and Meltdown type of vulnerabilities.

1. Firstly, verify your CPU supports hostap (virtualization). Note that this only applies to Intel CPUs (AMDs do not reveal it). Go to Datacenter -> proxmox (your node) -> right click and run Shell . Run this command: 

[shell]dmesg | grep ecap[/shell]

If one of the outputs for ecap contains an ‘f’ (hexadecimal), then all is good.

Verify that your CPU supports PCI Passthrough

2. Run the ‘lspci’ command to determine which PCI device number (e.g. 01,02,03) you want to set up PCI(-E) passthrough for. For QOTOM that comes with multiple network ports, the port number should correspond with the label on the device. You can use the ‘grep’ command with it to narrow t down.

Output from ‘lscpi’ where gigabit network cards are filtered through grep

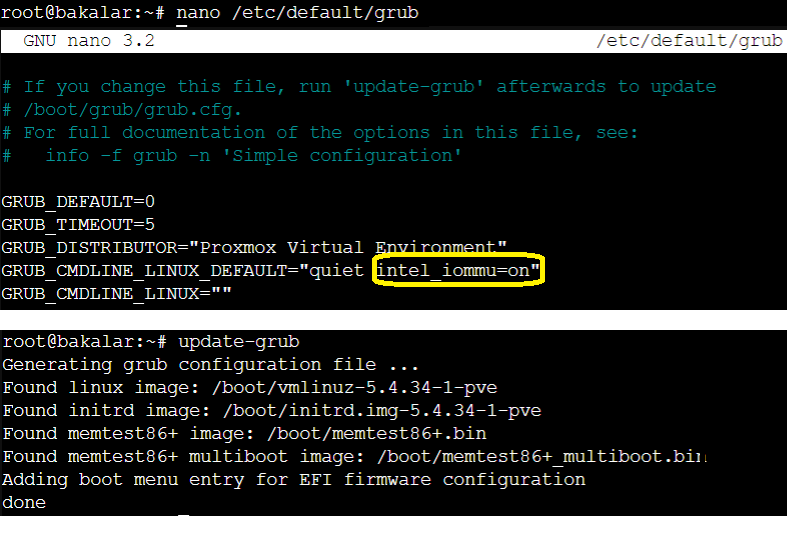
3. Edit /etc/default/grub – modify the line there to this (Intel CPUs): 

[shell]GRUB_CMDLINE_LINUX_DEFAULT=”quiet intel_iommu=on”[/shell]

  • Then run ‘update-grub’ to reload the config.

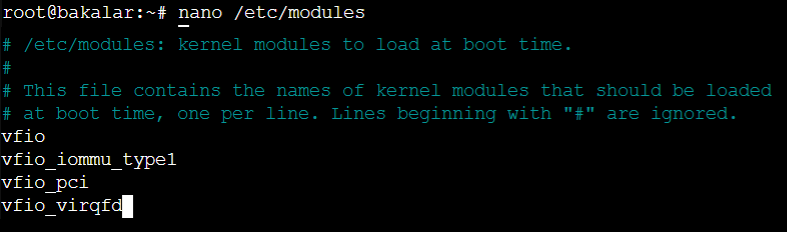
4. Then in /etc/modules, add the following lines at the end of the file:

  • vfio
  • vfio_iommu_type1
  • vfio_pci
  • vfio_virqfd
Updating the /etc/modules file

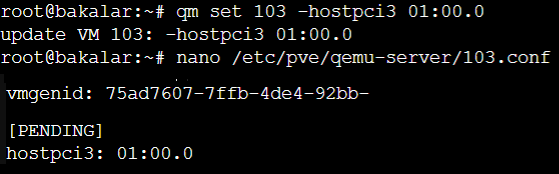
5. Now, we will need to specify for which VM will the settings apply.

  • Edit the .conf file for the respective VM that you want to set up passthrough for (as outputted by the ‘lspci’ command). While it is possible to direct edit the /etc/pve/qemu-server/<yourVM_ID>.conf file, in order to ensure no syntax errors, it is best to use the command made for it:

[shell]qm set VMID -hostpci3 01:00.0[/shell]

Run the ‘qm set’ command with the ID of the VM you want to set up passthrough for. Then verify it in the .conf file

6. Run the following command to refresh the initramfs:

[shell]update-initramfs -u -k all[/shell]

Update initramfs before rebooting

7. Reboot your Proxmox host (remember to gracefully shut down any VMs and containers running – manual way is always better).

TO BE ADDED:

  • VERIFICATION STEPS
  • PREVENTATIVE MEASURE TO ENSURE PROXMOX CANNOT USE THE DEVICE (BLACKLISTING)

Sources:

  • Official Proxmox Wiki for PCI + PCI(e) passthrough
  • Fuzzy IT Logic blog

OPNSense Installation
WAN / LAN Set Up (Before OPNSense Installation)
Back to: Build Your Own Router – Proxmox, OPNSense, OpenVPN server and a VPN client all in one!

Leave a Comment Cancel Reply

Save my name, email, and website in this browser for the next time I comment.

This site uses Akismet to reduce spam. Learn how your comment data is processed.

0 comment 0 FacebookWhatsappEmail

Build Your Own Router – Proxmox, OPNSense, OpenVPN server and a VPN client all in one!

  • Previous
  • Next
Collapse
Expand
  • Hardware Considerations
  • Disabling default Proxmox firewall
  • OPNSense VM Set Up
  • OPNSense Installation
  • PCI Passthrough Set Up (Optional)
  • WAN / LAN Set Up (Before OPNSense Installation)
  • Initial OPNSense Set up in Web GUI
  • Dynamic DNS Set Up with DuckDNS on OPNSense
  • Choosing a VPN provider for your OPNSense
  • Is it worth getting VPN on OPNSense?
  • NordVPN installation on OPNSense
  • Multi-WAN Set Up in Proxmox & OPNSense

Search for articles

Other Tips

  • How to mount an NFS share (such as from FreeNAS) from an Android box
  • How to download a Windows 10 ISO on a Windows device – easy work-around

Other Tutorials

  • Build Your Own Router - Proxmox, OPNSense, OpenVPN server and a VPN client all in one!
    12 Steps
  • Dynamically Populate Gravity Forms from Google Sheets (GSheets APIv4)
    6 Steps

Recent Comments

  • Jan Bachelor on Use Integromat to get computer IDs from user email in JamF ProHi Robert, the static groups were created in the p…
  • Robert Petitto on Use Integromat to get computer IDs from user email in JamF ProCan you share how you'd use Make (integromat) to a…
  • Martin on Part 1 – What do we want to do + Required technology (bank feed)This tutorial deserves more credit, I've not seen…
  • Jan Bachelor on WAN / LAN Set Up (Before OPNSense Installation)Hi Ed, I have not tested it with PCI passthrough y…
  • Ed on OPNSense VM Set UpIn step 4 firewall you turned off firewall, should…

Tags

chrome iso windows

Categories

  • Android
  • FreeNAS
  • Linux
  • Windows

Recent Posts

  • How to mount an NFS share (such as from FreeNAS) from an Android box

  • How to download a Windows 10 ISO on a Windows device – easy work-around

Facebook Twitter Instagram Pinterest Linkedin Youtube

@2019 - All Right Reserved. Designed and Developed by PenciDesign

Bachelor Tech
  • Home
  • Tutorials
  • Portfolio
  • About Jan
  • Contact Jan