Length: 60 minutes
Pre-requisities for this step (same as in the previously)
- A bank-provided comma (or other-delimited) CSV file export of transactions.
- A Google Workspace business account (you could replace it with an O365 account, instead, to conver the comma delimited CSV file to a spreadsheet format).
- An Integromat account (a free subscription will work).
- A WordPress site with Gravity Forms installed.
- RESP API allowed in Gravity Forms’ settings with a generated customer key and secret to allow a submission of a Gravity form from Integromat. We will basically pre-fill the form on behalf of the user.
Purpose of this step – submit individual expenses as child forms for each employee

- So far, we have downloaded the .CSV file from the bank, uploaded it to GDrive as a spreadsheet, analyzed the names of the employees who made some expenses that day and checked whether a parent Gravity form has been already created for them – and if not, one is created.
- Now we will analyze the spreadsheet further by going through each expense and silently submitting each expense for each employee. We will fill in what we can and the rest will be up to the employee to provide (e.g. for which project the expense for, business justification, etc.).
Split the route and condition the processing only when all names have been processed

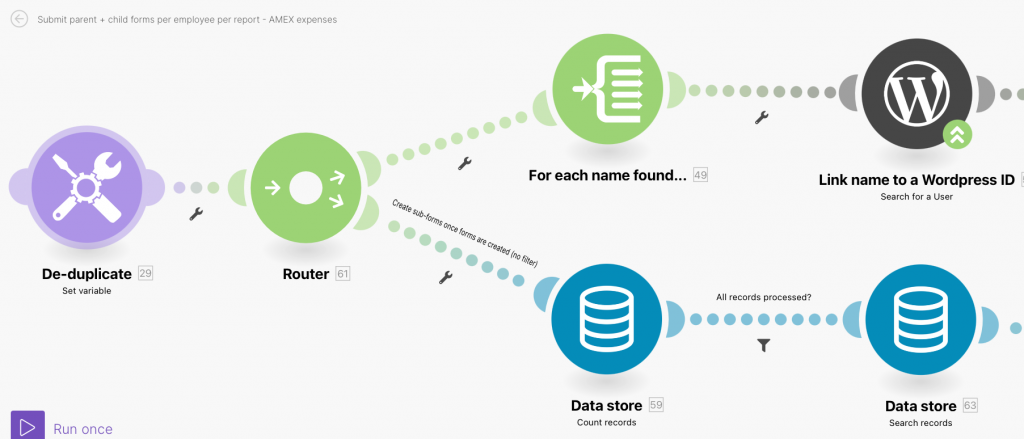
- Add a router between the ‘De-duplicate’ and ‘For each name found’ tiles.
- In the new route, add a ‘Data Store’ tile that simply counts records for ‘Expenses to be created’ data store that we defined earlier.
- Add another Data Store tile that searches through all the records of the ‘Expenses to be created’ data store.
- Most importantly, add a filter between the two data store tiles that will prevent the workflow from proceeding further until the sum of processed records (i.e. employee names) matches the amount of names that we have previously defined in the ‘De-duplicate’ step.

Capture all expenses (card payments) for each employee

- Create an Iterator and place into it the value from the search records data store tile made just before it.
- Create a filter that will filter out any record that contains ‘INVALID RECORD’ text in it – this is to avoid processing non-expenses.
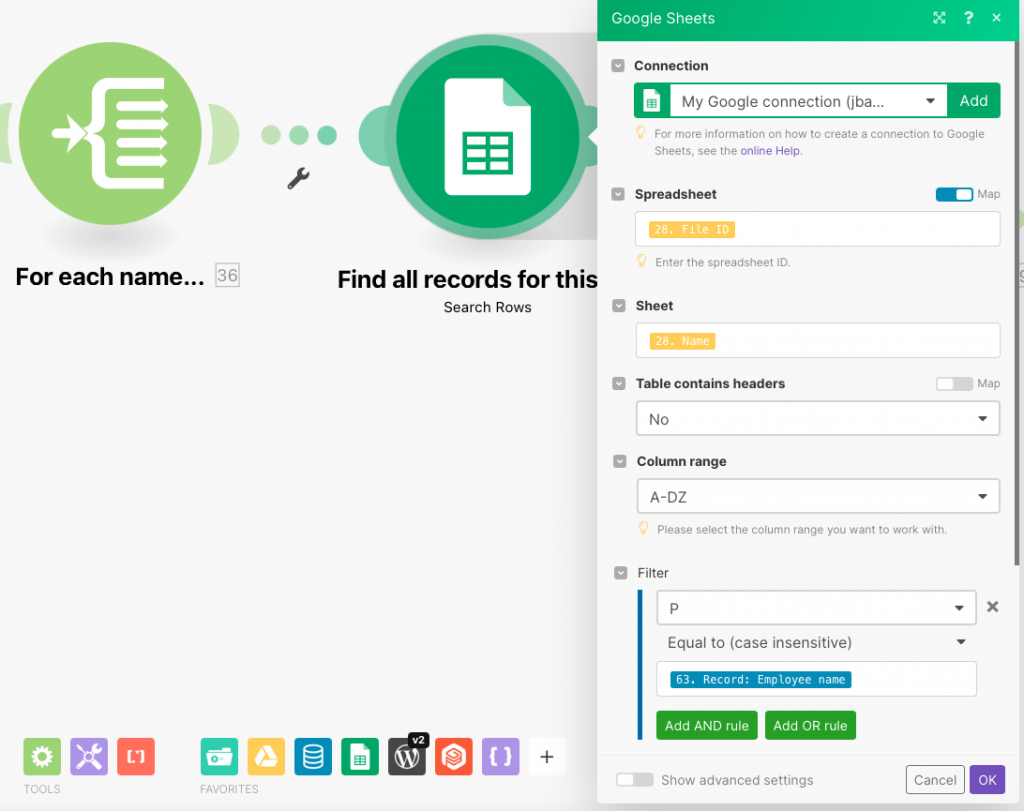
- After the Iterator tile, add a Google Sheets – Search rows that have been renamed in this workflow to ‘Find all records for this CC’. In our example, it is the P column that contains the list of employees that made some expense (keep in mind that this will likely differ for each bank). Make sure to increase the maximum number of returned results, since an employee may have more than the ten default transactions a day (assuming the bank export is provided daily).
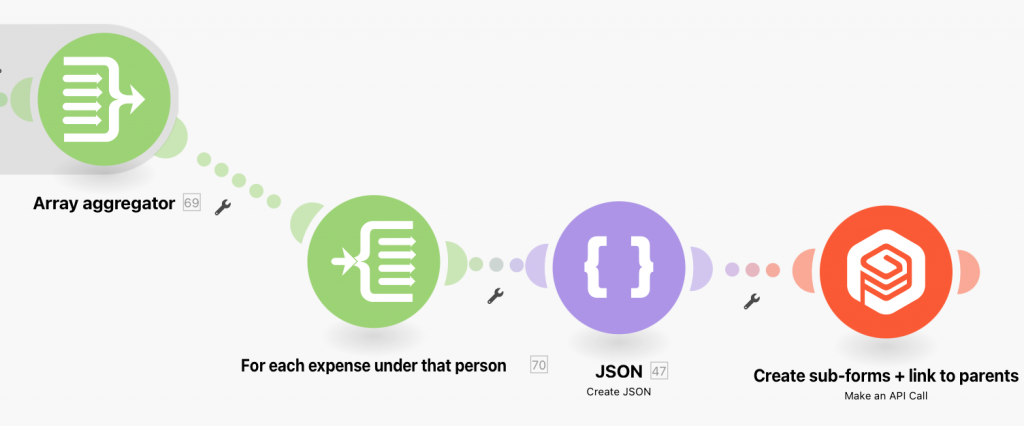
- Add an Array Aggregate tile and select which columns you would like to aggregate. In our example (an AMEX bank feed), these are fields P (employee’s name), Z (transaction date), AG (transaction amount in cents), AO (local charge amount in cents – in case the transaction was done in a different currency), BF (transaction description) and DS (vendor details).
For each expense of that employee, submit a Gravity form using Gravity Forms API

- Add yet another(!) Iterator tile. In this sub-cycle, we will process the aggregated values from teh previous tile.
- In the next step, we will create a JSON-formatted data structure that we will use to fill in our Gravity child form for that expense. Add a JSON tile called ‘Create JSON’ and create a data structure – all fields will be text fields, none of them needs to be required, as shown below:
- form_id –> ID of the child form, which, in our case, is 46.
- created_by –> for the WordPress ID of the employee (not their name!)
- submitee’s name –> employee’s name
- amount charged –> in our case, this is the AO column from the spreadsheet divided by 100 (since the value from the bank in our case is in USD cents)
- local charge amount –> same as above for local currency if another one was used
- charged on –> date of charge (keep it as a text value)
- supplier name –> in our case, this is the DS column from the spreadsheet
- transaction description –> in our case, this is the BF column from the spreadsheet
- expense_type –> to be filled in later by the employee inside Gravity
- job –> type of project, to be filled in later by the employee
- business justification –> as above
- receipt yes or not –> as above
- file attachment –> as above, an employee is to upload the receipt
- gpnf_entry_parent –> the entry ID of the parent form – we will load the value saved in the Data Store
- gpnf_entry_parent_form –> the ID of the parent form field, which is 47 in our case
- gpnf_entry_nested_form_field –> the field ID in the parent form where child entries are shown
- Submit the entry to WordPress via Gravity Forms API. Add a ‘Gravity Forms’ tile called ‘Make an API call’. The URL (API endpoint) is ‘entries’ and HTTP query type is POST. Add the JSON string into the body of the API call.
- The entries API endpoint submits a form without performing any additional steps (i.e. things like post submission hooks do not work here, which is good in our case).


