Bachelor Tech
  • Home
  • Tutorials
  • Portfolio
  • About Jan
  • Contact Jan

Part 4a – Integromat Workflow – Fetch data from FTPS and filter it out

by Jan Bachelor April 17, 2022

Last Updated on April 17, 2022 by Jan Bachelor

Length: 45 minutes|Difficulty: Standard
Table of Contents
  • Pre-requisities for this step
  • Examine the CSV file name structure
  • Create a new (free) Integromat scenario.

Pre-requisities for this step

Assuming that the bank (in our case, American Express) pushes the data onto an FTPS server to which you get access, we will need to pull the .CSV file that contains the employees’ expenses and convert it into a spreadsheet file – we will use Google Sheets.

  • A bank-provided comma (or other-delimited) CSV file export of transactions.
  • A Google Workspace business account (you could replace it with an O365 account, instead, to conver the comma delimited CSV file to a spreadsheet format).
  • An Integromat account (a free subscription will work).

Examine the CSV file name structure

In case of AMEX, the bank outputs their .CSV formatted file using this file name convention: R1123296_B000387511_GL9999_001_20220328060907_0021

What is important for us is the ‘GL9999’ part (part of the account number to make sure we fetch the right type of data) and then the date format ‘20220328060907‘- YYYYMMDDHHMMSS (year, month, day, hour, minute, seconds). We want to capture these two and save them into variables and then upload them to Google Sheet to be converted from .CSV into Google Sheets, so that we can work with the data further in the later parts of this tutorial.

Integromat workflow to download the .CSV file from the bank and covert it to Google Sheets to work with it further.

Create a new (free) Integromat scenario.

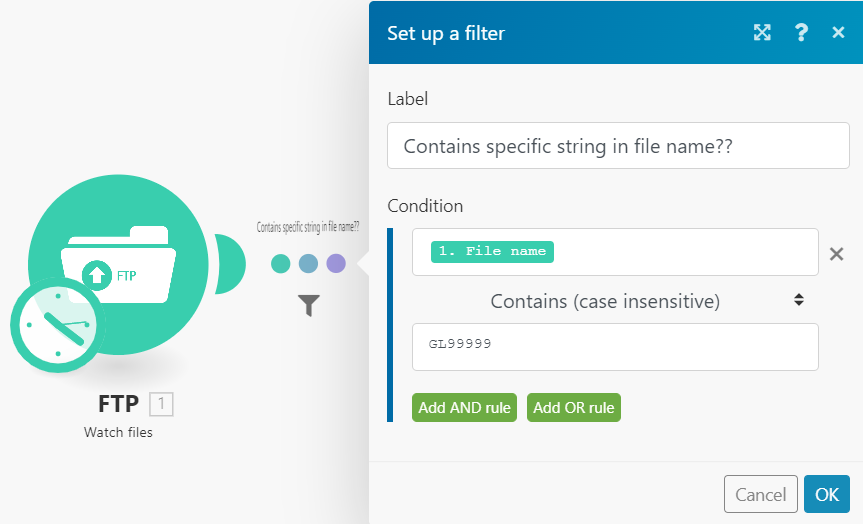
  1. FTP module (Watch files) – add the FTPS details provided to you by the bank. In case of AMEX, the new files are stored in the ‘sent’ folder.
FTPS tile settings
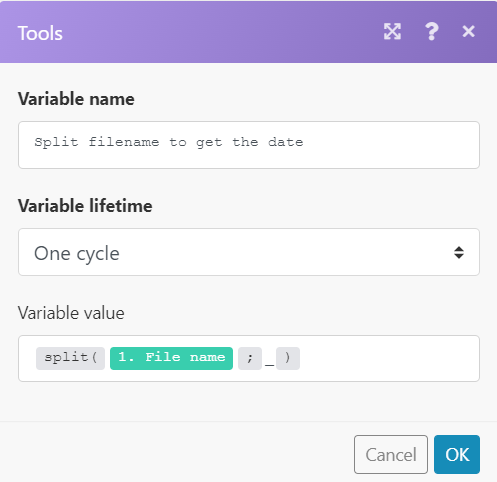
  1. Set variable – Fetch file name (use a function called split() to divide the file name into individual parts).
Split function for the file name.
  1. Create a filter between the first two tiles that will ensure that files that do not contain the required account name are ignored.
Filter to further ignore file names that are related to other bank accounts.
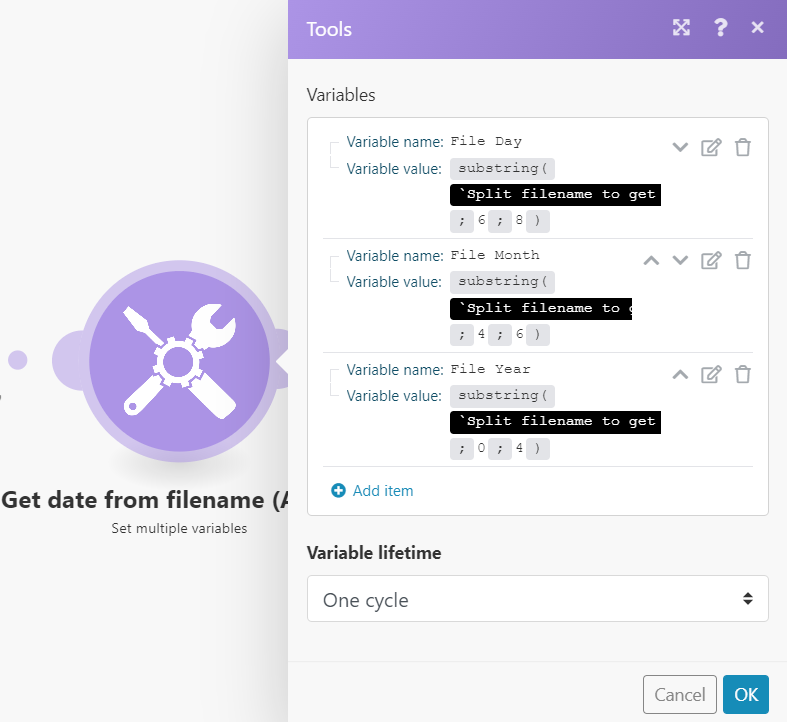
  1. Add a tile called ‘Set multiple variables’ to determine details for the file name using the substring() function. This function is not smart, it just robotically splits the file name based on the divider that you set.
    • File day: {{substring(2.Split filename to get the date[5]; 6; 8)}}
    • File month: {{substring(2.Split filename to get the date[5]; 4; 6)}}
    • File year: {{substring(2.Split filename to get the date[5]; 0; 4)}}
Multi variable tile to set the year, month and date of the file name (to be used later when we upload the file to GSheets).
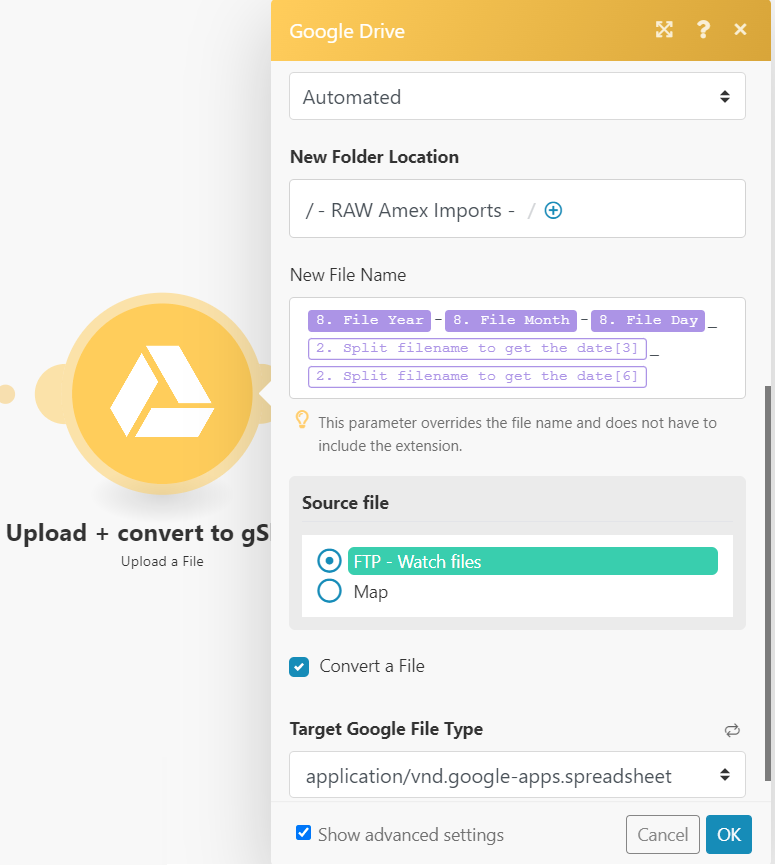
  1. Add a tile for Google Drive called ‘Upload a file’.
    • Add your company Google account (if you have one)
    • Select where to upload it to, i.e. in our case, it is a shared drive called ‘Automated’ into a folder call ‘- RAW AMEX Imports -‘.
    • The file name can be in this format: {{8.File Year}}-{{8.File Month}}-{{8.File Day}}{{2.Split filename to get the date[3]}}{{2.Split filename to get the date[6]}}
    • For Target Google File type, choose application/vnd.google-apps.spreadsheet. This will automatically convert the .CSV file into a spreadsheet format. The assumption is that the file is delimited by commas (some banks provide the file in ASCII format just with spaces, in which case, ask them to provide with a comma delimiter).
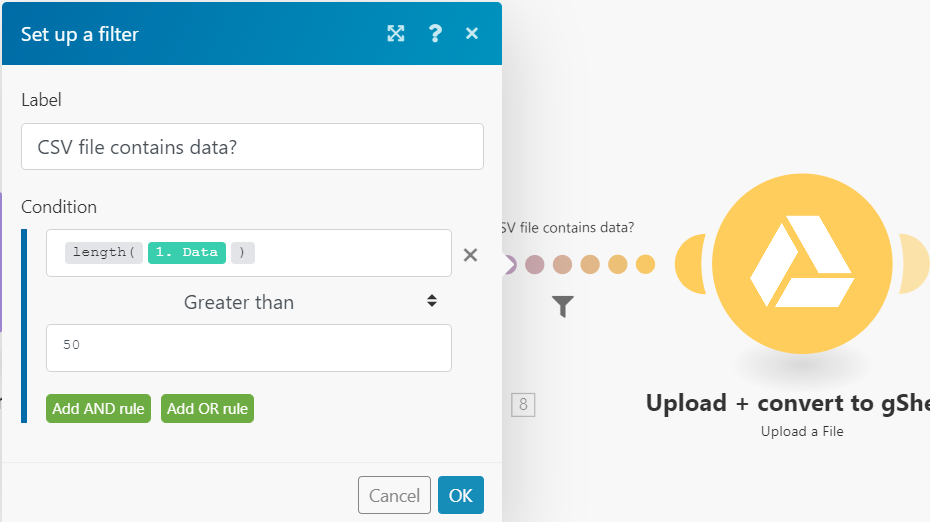
  1. Just in case the file is rather empty, to avoid processing a file without data later, add a filter in between the last two tiles:
This filter checks the CSV file to ensure that it contains at least 50 characters as a precaution for empty files.
Part 3 - Design the parent form for individual expenses (Gravity Forms)
Part 4b - Integromat Workflow - Submit the parent gravity form from Integromat
Back to: Concur Alternative: Import Employees’ Credit Card Expenses to WordPress via an automated bank feed – Gravity Form/Flow & Make.com (Integromat)

Leave a Comment Cancel Reply

Save my name, email, and website in this browser for the next time I comment.

This site uses Akismet to reduce spam. Learn how your comment data is processed.

0 comment 0 FacebookWhatsappEmail

Concur Alternative: Import Employees’ Credit Card Expenses to WordPress via an automated bank feed – Gravity Form/Flow & Make.com (Integromat)

  • Previous
  • Next
Collapse
Expand
  • Part 1 - What do we want to do + Required technology (bank feed)
  • Part 2 - Design the child form for expenses (Gravity Forms)
  • Part 3 - Design the parent form for individual expenses (Gravity Forms)
  • Part 4a - Integromat Workflow - Fetch data from FTPS and filter it out
  • Part 4b - Integromat Workflow - Submit the parent gravity form from Integromat
  • Part 4c - Integromat Workflow - Create child forms in Gravity from Integromat

Search for articles

Other Tips

  • How to mount an NFS share (such as from FreeNAS) from an Android box
  • How to download a Windows 10 ISO on a Windows device – easy work-around

Other Tutorials

  • Build Your Own Router - Proxmox, OPNSense, OpenVPN server and a VPN client all in one!
    12 Steps
  • Dynamically Populate Gravity Forms from Google Sheets (GSheets APIv4)
    6 Steps

Recent Comments

  • Jan Bachelor on Use Integromat to get computer IDs from user email in JamF ProHi Robert, the static groups were created in the p…
  • Robert Petitto on Use Integromat to get computer IDs from user email in JamF ProCan you share how you'd use Make (integromat) to a…
  • Martin on Part 1 – What do we want to do + Required technology (bank feed)This tutorial deserves more credit, I've not seen…
  • Jan Bachelor on WAN / LAN Set Up (Before OPNSense Installation)Hi Ed, I have not tested it with PCI passthrough y…
  • Ed on OPNSense VM Set UpIn step 4 firewall you turned off firewall, should…

Tags

chrome iso windows

Categories

  • Android
  • FreeNAS
  • Linux
  • Windows

Recent Posts

  • How to mount an NFS share (such as from FreeNAS) from an Android box

  • How to download a Windows 10 ISO on a Windows device – easy work-around

Facebook Twitter Instagram Pinterest Linkedin Youtube

@2019 - All Right Reserved. Designed and Developed by PenciDesign

Bachelor Tech
  • Home
  • Tutorials
  • Portfolio
  • About Jan
  • Contact Jan