How to join two Proxmox nodes into a cluster (PVE 8.x / 9.x)
October 2, 2025
Table of Contents
Pre-requisites
- Each node is on the same major version (while it is technically possible to join them when they differ, you may encounter unexpected challenges if there are architectural differences between them in relation to the clustering stack, such as pmxcfs (users an in-memory SQLite database for config replication) and corosync (node messaging and quorum calculations) or the dependent libraries such as *pve-ha-manager** (a perl module that handles splits and failures).
- They can talk to each other on the local network. If possible, connect them directly, the guide below will expand on how.
- They can resolve each other's hostnames. This is not a hard requirement, Proxmox's own docs confirm clustering works fine over IP addresses alone and actually recommend referencing nodes by IP in the cluster configuration.
Connect the Proxmox nodes via a direct physical line
- Let's say that each Proxmox node has an available physical interface via which they can communicate with each other. In the case below, it is enp3s0, i.e. the third port on the device.
- Instead of relying on LAN communication via a router, we can connect them directly. This way, even if the LAN comms fails, they can still talk to each other regardless of what happens on the network.
- Firstly, have a look at your Proxmox node to see what interface is available. You might need to free one up to use it for this dedicated line. In the case below, the physical ports 3-6 are used for LAN traffic. We will need to remove port no. 3 to free it for another virtual interface.
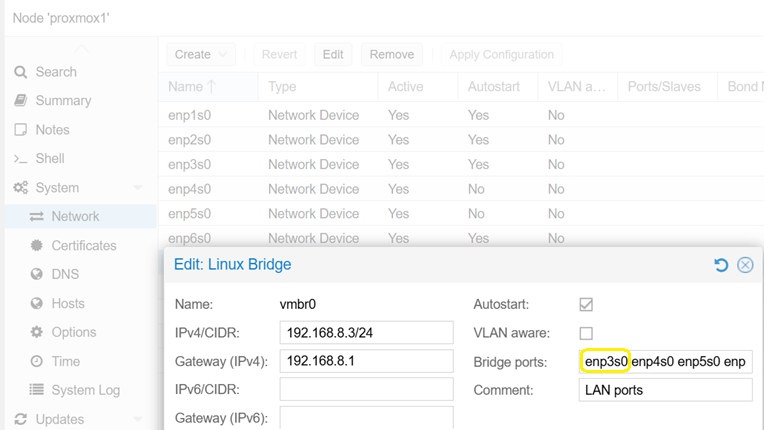
- Under the node (proxmox1) → System → Network, click on the 'Create' button and select 'Linux bridge'.
- Provide the IPv4/CIDR information that applies to the specific node. Since we just need two nodes, we can use the /30 subnet, which allows for 2 hosts (since one is the network address and the other the broadcast address). If you plan to add more nodes, you can set up the subnet to something larger, such as /29 (up to 6 usable hosts) or /28 (up to 16 usable hosts).
- Write down the name of the physical interface that you decided to use beforehand. In this case, it is enp3s0, i.e. the third NIC on the device.
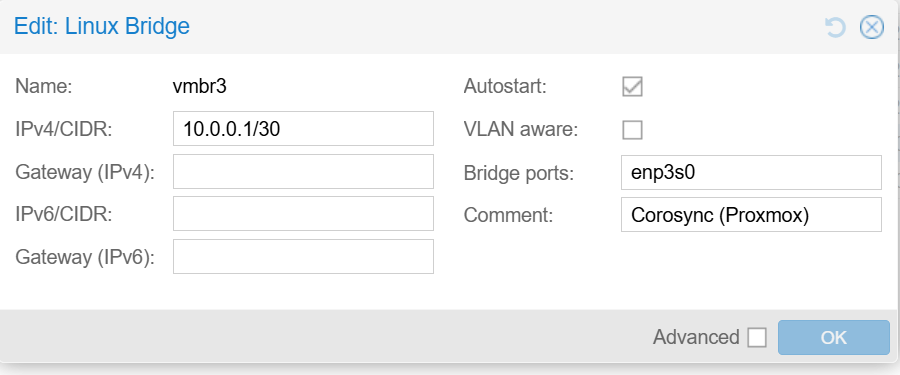
- Do the same on the second node with the difference that the IPv4/CIDR is different in the fourth octet, i.e. 10.0.0.2/30. The port number can be different, although having a mirrored setup is easier in the long run.
Ensure that they can talk to each other
- Check that the nodes have proper names and can reach each other. See this article on how to rename a node.
- From the shell of each node, add the connection in the /etc/hosts file:
jan@proxmox1:~$ sudo nano /etc/hosts

# Add these two lines (adjust it to the IPs and names that you use):
10.0.0.1 proxmox1
10.0.0.2 proxmox2- Do the same on the second node.
- After saving it, run a test from each:
jan@proxmox1:~$ ping proxmox2
PING proxmox2.bakalar.priv (10.0.0.2) 56(84) bytes of data.
64 bytes from proxmox2 (10.0.0.2): icmp_seq=1 ttl=64 time=1.06 ms

jan@proxmox2:~$ ping proxmox1
PING proxmox1.bakalar.priv (10.0.0.1) 56(84) bytes of data.
64 bytes from proxmox1 (10.0.0.1): icmp_seq=1 ttl=64 time=0.260 ms
Create a PVE cluster
- On version 8.x, initiate a cluster with the first node as its only member. In this case, I named the cluster 'home', feel free to change the name:
sudo pvecm create home- You can then review the corosync.conf file to see what it produced:
jan@proxmox1:~$ sudo nano /etc/pve/corosync.conf- In case a different IP was used because the Proxmox nodes are interconnected via another interface, you can change the IP address to match the one that you dedicated under the 'ring0_addr'.
- Then connect to the second node and run the following:
jan@proxmox2:~$ sudo pvecm add proxmox1- Review the output. We can see that:
- You need to log in with the first node's root password.
- Accept the connection.
- If you have them connected via more than just that one link, you might end up with a different IP address than expected.
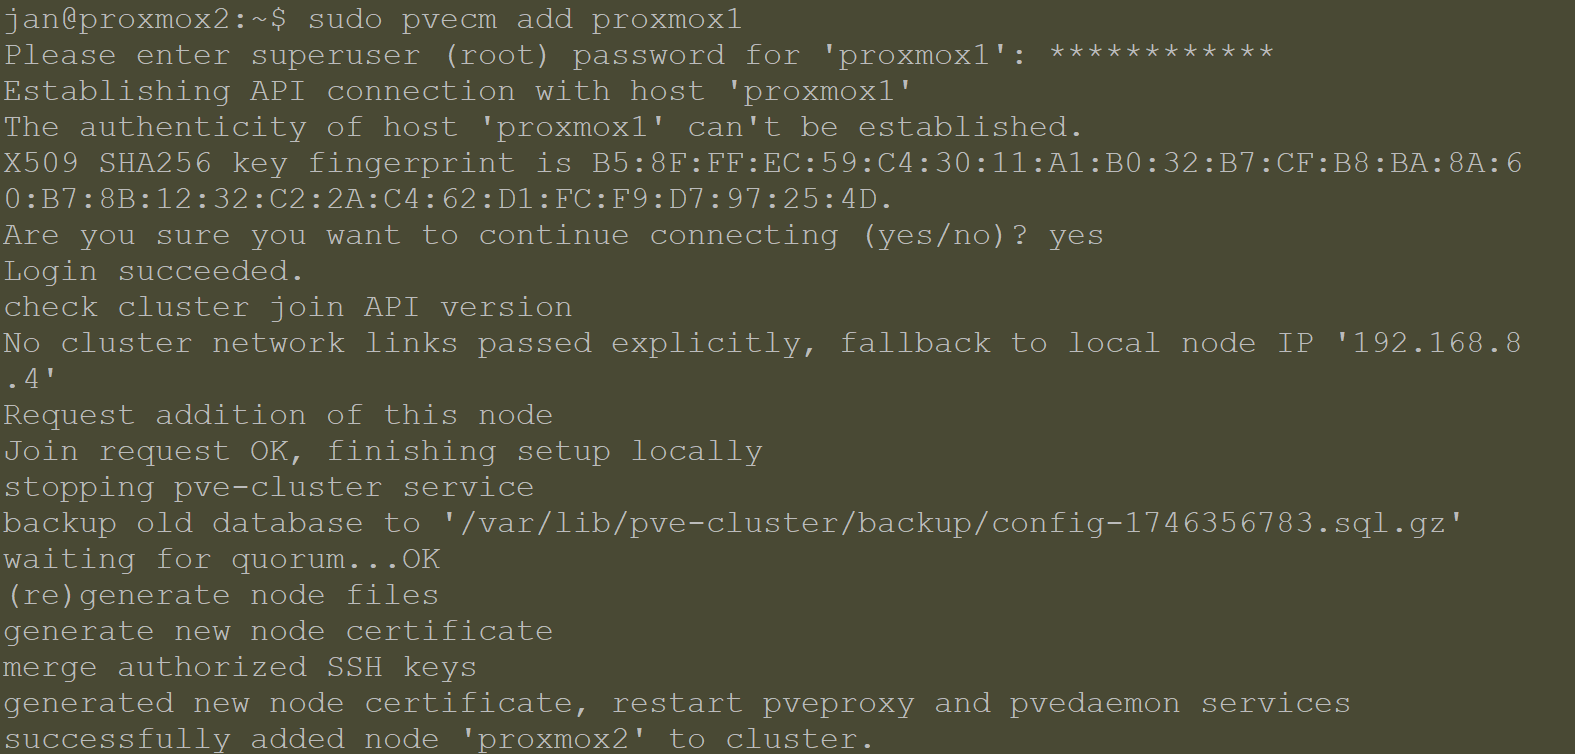
- Review the /etc/pve/corosync.conf file one more time:
jan@proxmox1:~$ sudo nano /etc/pve/corosync.conf

logging {
  debug: off
  to_syslog: yes
}

nodelist {
  node {
    name: proxmox1
    nodeid: 1
    quorum_votes: 1
    ring0_addr: 10.0.0.1
  }
  node {
    name: proxmox2
    nodeid: 2
    quorum_votes: 1
    ring0_addr: 10.0.0.2
  }
}

quorum {
  provider: corosync_votequorum
}

totem {
  cluster_name: home
  config_version: 2
  interface {
    linknumber: 0
  }
  ip_version: ipv4-6
  link_mode: passive
  secauth: on
  version: 2
}Enjoying this tutorial?
This site is a non-profit project. If it saved you some time, you can support it by getting Jan some coffee.
☕ Buy me a coffee
Comments