Backup Proxmox VMs & Containers into S3-compatible storage
November 4, 2024
Table of Contents
Proxmox is a great hypervisor tool and has recently been gaining on popularity also due to the fiasco that occurred with VMWare and its product fueled by Broadcom’s poor marketing and elimination of perpetual licenses, which forces every customer to pay regular subscription fees.
Let’s say you have VMs and containers set up and have done snapshots occasionally before larger system upgrades. Perhaps you even have regular backups set up onto an attached USB drive. But what if your place goes into flames or a thief breaks in and takes all your goodies? That is when off-site backups can do the job.
Overview of Cloud Storage Providers’ Pricing
Isn’t cloud storage for backups too expensive? Well, it depends on how much data you have and how often you need to restore it. Let’s say you have 2 TB of data and at most, you would want to restore something once every quarter. There are several options you can consider - let’s start with AWS S3 - note that pricing depends on your region and is subject to change:
AWS Backup & Restoration Costs
- AWS S3 Standard - Infrequent Access - $0.0125 per GB x 2 TB = $25.60 monthly.
- AWS S3 One Zone - Infrequent Access - $0.01 per GB x 2 TB = $20.48 monthly.
- AWS S3 Glacier Flexible Retrieval (restore time of up to 12 hours) - $0.0036 per GB x 2 TB = $7.37 monthly
The challenge with AWS is that the above options charge you for retrieval costs (typically $0.01 to $0.03 per GB) and while they do not typically charge for ingress (incoming data to S3) costs, they charge for egress (outgoing from S3) - again, the charges vary from $0.01 to $0.03 per GB. So a full data restoration would cost you somewhere between $40 to $120. And some of us like more predictable costs than that.
Other S3-compatible providers
- iDrive e2 - while they offer standard S3 storage, there are no costs related to data retrievals and transfers in and out. So for 2 TB of data, we pay $79 a year ($39.50 with their first year discount). With the full price in mind, that is $6.58 per month, so even cheaper than Glacier Flexible Retrieval!

- Scaleway - a provider that is growing in popularity. Keep in mind that they charge per hour per GB, but the costs are still quite predictable. For 2 TB in One Zone, we would be paying 24.5 EUR, so nearly $27 monthly. In addition, egress fees apply at $0.01 after the first 75 GB monthly. That is more than S3 Standard Infrequent tier! But do not lose hope just yet. Their Glacier version is priced at 0.002 EUR per GB per month (roughly), which makes it about 4 EUR (4.5 USD) monthly.
Google Cloud Storage options
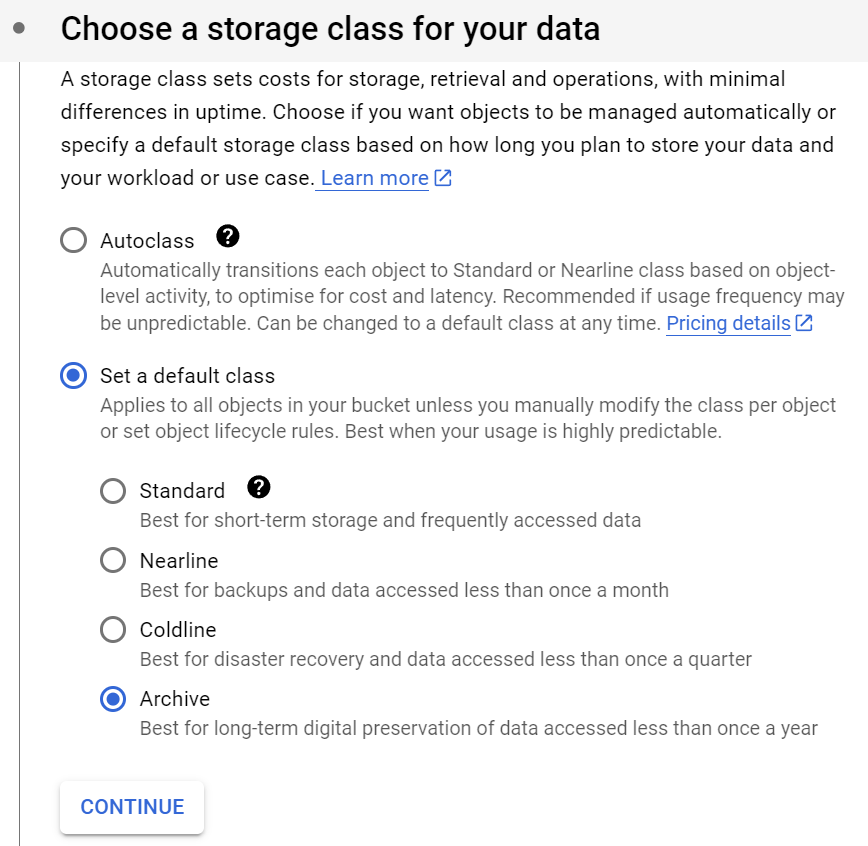
- Coldline - the cheapest regional options start at $0.004 per GB per month = $8.2 monthly.
- Archive - the cheapest regional options start at $0.0012 per GB per month = $2.5 monthly.
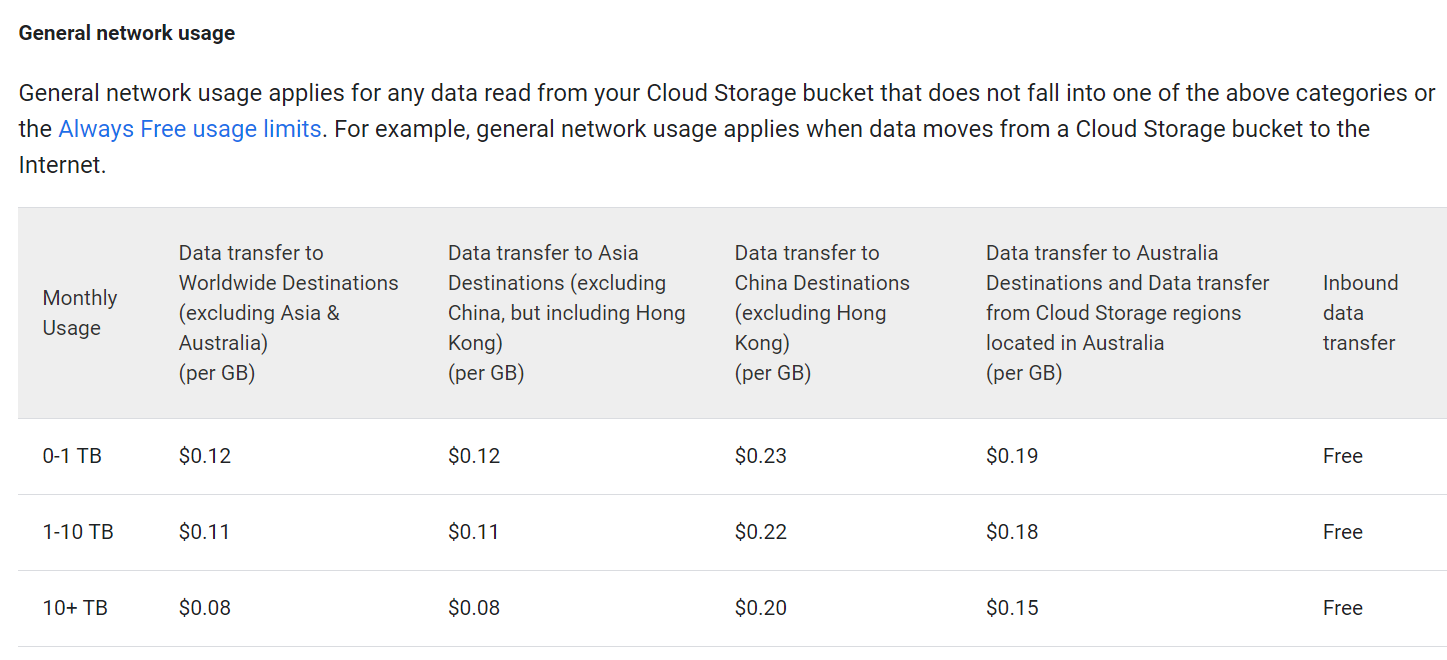
- While inbound (ingress) transfer is free like with AWS, they charge for outbound (egress) traffic. So if you were to run a full data restoration of your 2 TB, you would pay $0.11 per GB, a whopping $225 within Europe and North America! Needless to say, in China and Australia, the costs are notably more expensive. So getting data in there and keeping it is cheap but only go for this option if you do not expect retrievals often.
- Then you also get charged for so-called Operation charges that are divided into Class A and Class B actions. In the storage terms, Class A actions are operations related to listing, copying and deleting objects in a bucket, whereas Class B actions are uploads and downloads. The otherwise very affordable Archive storage is more expensive for operations, which makes sense - it is expected that we dump the data and leave it there for a long time without accessing it. So let’s think about an example. Assuming that we have about 2,000 objects in the bucket, we would pay between $0.1 to $0.15, so it is barely noticeable.
Overall, while Google’s Cloud Storage may appeal with its cheaper Coldline and Archive pricing, the moment you need to restore it (egress costs), you end up paying a lot more - which may be fine for long-term ‘archival’ backups, such as if your house burns down and you have nothing left.


Bucket Set Up - e2
If you choose iDrive’s e2 storage, you will appreciate the most predictable pricing on ‘hot’ storage - with no restoration costs.
In relation to Proxmox, we need to decide whether we will leave versioning / trimming of older backup versions on the bucket management policy side or handle it from Proxmox directly. If you have multiple Proxmox hosts in clusters, you might appreciate not having to worry about setting up each node but leaving it on the bucket side to manage the lifecycle.
1) In e2, create a bucket:
- Region - your closest
- Bucket name - something easy to understand, such as proxmox
- Default encryption - up to you
- Versioning - turn this on so that older copies of a backup file are kept if a job ever overwrites or deletes an object by mistake, giving you a way to roll back instead of losing it for good.
Bucket Set Up - Google Archive Storage
- Go to the GCP Console and create a new project.
- Then move to the Storage tab and click on the ‘Create’ button to create a new bucket.
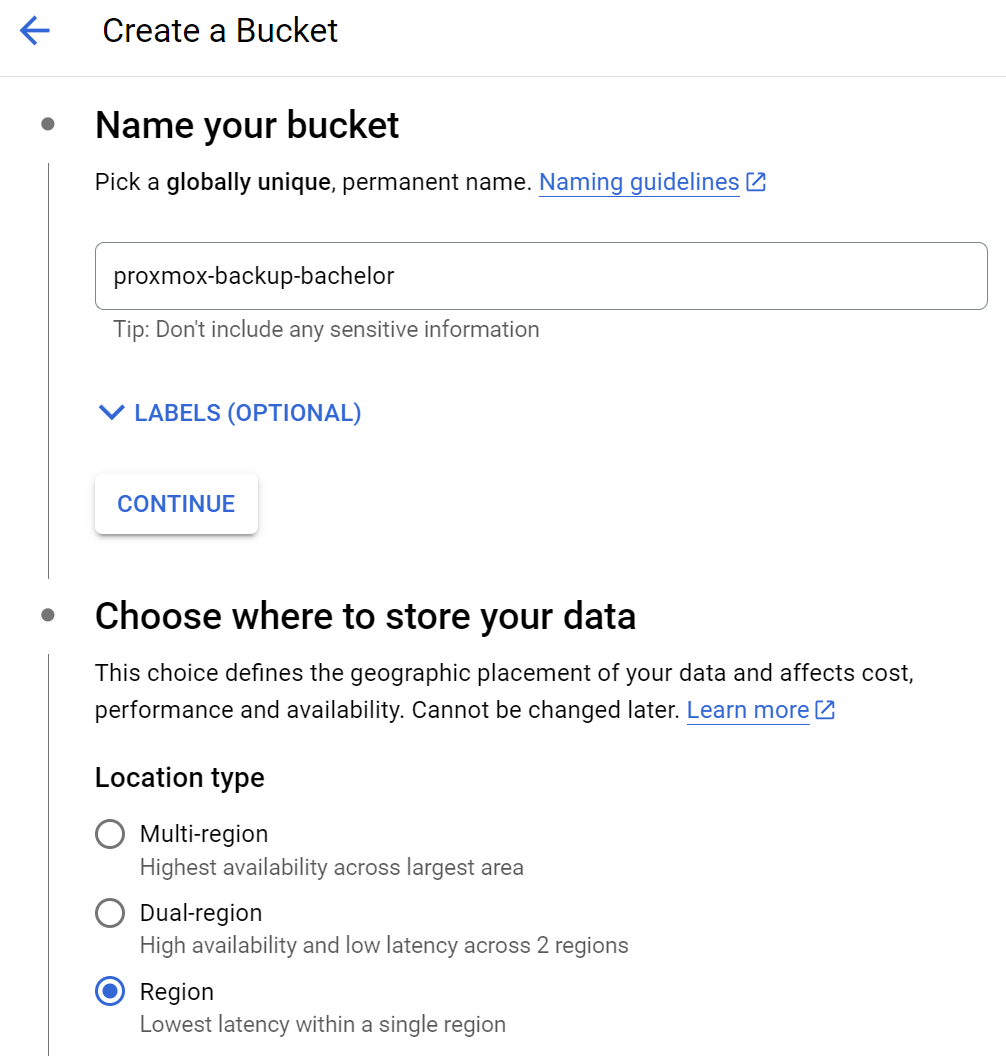
- Give a bucket unique name and for where to store your data, choose a single ‘Region’ to keep the costs down.
- For Storage Class, choose ‘Archive’ or ‘Coldline’ as you prefer.
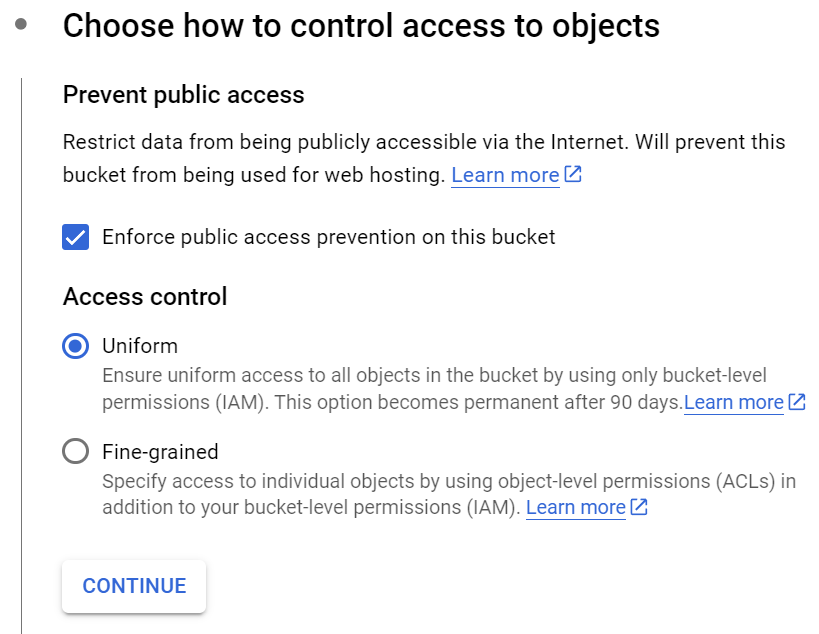
- Object protection - Uniform will be sufficient in our case.
- Data Protection - up to your needs but if we are controlling the backup retention from Proxmox, then we do not need GCP for that. Then click on the ‘Create’ button.
- The important takeaways are that (a) public access is prevented by default (since this bucket will not be used as a website) and (b) that we have some encryption on it and have selected the right tier.

rClone Set up - connect to your GCP bucket
-
Now head to your Proxmox server and connect to it ideally via SSH to run the following commands. If you do not have rclone installed, run:
- apt-get install rclone -y
- rclone version
-
If you get a version of 1.5x, then rclone authentication during config will not work and a manual upgrade of rclone is required first. Run the following (assuming you are connected to Proxmox’s terminal as root):
-v ; curl https://rclone.org/install.sh | bash- rclone version
-
Then start the rclone config process (as per rclone’s GCP documentation):
- rclone config
- n for New Remote
- Name it - such as proxmox-gcp
- Choose Google Cloud Storage (option number 16 but that can change in newer versions of rclone).
- client_id -> skip, press enter
- client_secret -> skip, press enter
- project-number -> Find out in the ‘Project Settings’ section in GCP
- user_project -> skip, press enter
- service_account_file -> skip, press enter
- anonymous -> we want false, so press enter
- object_acl -> we only want the owner to get access, so press enter or choose 4
- bucket_acl -> we want the private option (option 2)
- bucket_policy_only -> leave default (press enter)
- location -> select the location in which you created the bucket
- storage_class -> choose your storage tier that you selected during the bucket creation process, such as Archive (option 6)
- env_auth -> press 1 and enter
- Edit advance confirg? -> type n and press enter
- Use Web Browser to authenticate rclone -> type n and press enter
- Use advanced config? -> type n and press enter
- Now you will need to download rclone on your actual personal computer (or a remote server with a browser) and open terminal there. Let’s say you are running Windows, then:
- Download the package from rclone
- Unpack the zip file somewhere easy to find (such as C:\temp\rclone)
- Open the command line or PowerShell and run the cd commands to get there (such as ‘cd C:\temp\rclone’).
- Test that rclone works by running ‘rclone version’
- Copy paste the command supplied by your Proxmox server, it starts with ‘rclone authorize’. Your browser will open to complete the authentication. Once done, the browser window can be closed - check your terminal window that will read ‘Paste the following into your remote machine --→’.
- Copy paste the token and paste it into Proxmox to complete the process.
- Lastly, confirm that ‘It is okay’ by pressing y and enter.
-
Now you can verify that the GCP bucket is accessible:
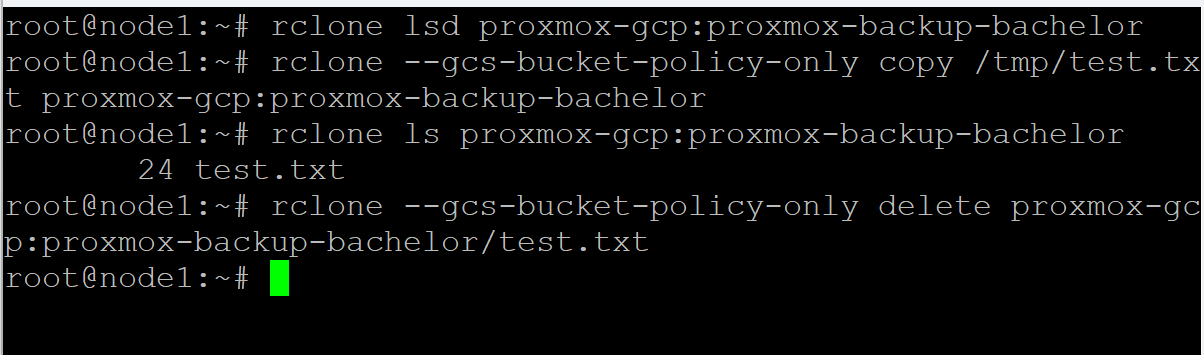
- Run ‘rclone lsd remotename:bucketname’, e.g. ‘rclone lsd proxmox-gcp:proxmox-backup-bachelor’. It should show nothing as the bucket was just created and is empty (lsd = list directories).
- Run a ‘touch /tmp/test.txt’ and then try copying a file to it such as ‘rclone --gcs-bucket-policy-only copy /tmp/test.txt proxmox-gcp:proxmox-backup-bachelor’ (the output should, again, be nothing).
- Then run ‘rclone ls proxmox-gcp:proxmox-backup-bachelor’ to view that the file is on it. You should see the file listed.
- Lastly, let’s delete the file to verify that we have delete permissions on the buckets’ objects, too. Run ‘rclone --gcs-bucket-policy-only delete proxmox-gcp:proxmox-backup-bachelor/test.txt’.
Auto-mount your bucket on reboot + log rotation set up (Ubuntu)
- Now it would be great to set up auto-mounting of the remote storage upon each reboot and test it.
- To auto-mount it on boot, we will need to create a little script (daemon / service). Assuming we are in Ubuntu > 16.04:
- nano /etc/systemd/system/rclone-gcp.service
- To auto-mount it on boot, we will need to create a little script (daemon / service). Assuming we are in Ubuntu > 16.04:
[Unit]
Description=Rclone GCP mount
Wants=network-online.target
After=network-online.target

[Service]
Type=notify
ExecStart=/bin/rclone mount proxmox-gcp:proxmox-backup-bachelor /mnt/gcp \
    --config=/root/.config/rclone/rclone.conf \
  --allow-non-empty \
  --gcs-bucket-policy-only \
  --dir-cache-time 1000h \
  --vfs-cache-mode writes \
  --vfs-cache-max-size 40G \
  --vfs-cache-max-age 24h \
  --log-file /var/log/rclone-gcp.log \
  --log-level INFO
ExecStop=/bin/fusermount -uz /mnt/gcp
Restart=on-failure
User=root
Group=root

[Install]
WantedBy=default.target
Note
To explain what each parameter means:
- --allow-non-empty: Allows mounting over an existing folder that has data in it. While it is usually not recommended, it prevents a situation where, if the mount fails, you would be saving your backups on the local drive and filling it up.
- --gcs-bucket-policy-only: Utilize bucket policy rather than IAM and other options - this is GCP's modern, endorsed approach.
- --dir-cache-time 1000h: Sets how long directory entries are cached for. 1000h means 1000 hours. This helps improve performance by reducing the number of API calls.
- --vfs-cache-mode writes: Enables caching of files for writing. Imagine you take a snapshot of a VM that runs critical networking infrastructure services like pfSense, OPNSense or pihole. Unless you have it set up in high availability (HA), for the duration of the snapshot that is being copied straight to the cloud, the VM/container will be unavailable. It is better to take the snapshot locally into a cache folder and then copy it over to the cloud storage afterward.
- --vfs-cache-max-age 24h: Sets the maximum age of objects in the cache for up to 24 hours.
- --log-level INFO: From which level down should the log be recording. The hierarchy is as follows: DEBUG, INFO, NOTICE, ERROR and CRITICAL. Only keep in mind that after some time, the log may get quite large, so once everything is working as expected, it is best to change it to ERROR.
- In order to make sure that the log file does not get too full and there is some log rotation in place, since we are on Ubuntu, let's utilize its native logrotate app:
- Create a logrotate file: nano /etc/logrotate.d/rclone-gcp
/var/log/rclone-gcp.log {
    monthly
    rotate 12
    compress
    delaycompress
    missingok
    notifempty
    create 644 root root
}- Then run
sudo logrotate --debug /etc/logrotate.conf- You should find a record that says something like this:
rotating pattern: /var/log/rclone-gcp.log  monthly (12 rotations)
empty log files are not rotated, old logs are removed
considering log /var/log/rclone-gcp.log
Creating new state
Now: 2024-08-14 09:52
Last rotated at 2024-08-14 09:00
log does not need rotating (log has already been rotated)- Now enable and start the rclone mount service so it comes up automatically on every reboot:
systemctl enable rclone-gcp.service
systemctl start rclone-gcp.service
systemctl status rclone-gcp.service- If you see a failure, then go back to the script to make sure you have not left some blank spaces. You can even test the ExecStart command in your terminal to confirm that it works and to see what error you get. Once you modify the script, make sure to run ‘systemctl daemon-reload’ to save the change to RAM and then you can start the service again.
Mount Storage on Proxmox + Set up Regular Backups
- To mount this storage in Proxmox to make it available for backups via the WebGUI:
- Create a mounting directory, e.g. ‘mkdir /mnt/gcp’
- Install the necessary fuse3 drivers by running ‘apt-get install fuse3’
- Run a test mount: ‘rclone mount proxmox-gcp: /mnt/gcp’
- Note that the screen will freeze - that is because the command is running in the active SSH session.
- On your computer, open Proxmox’s web interface and go to Datacenter → Storage → Add. Choose ‘Directory’ as the option.
- Make sure to select all the items from the ‘Content’ list
- You can ignore the ‘Retention’ tab as we will configure it in another section.


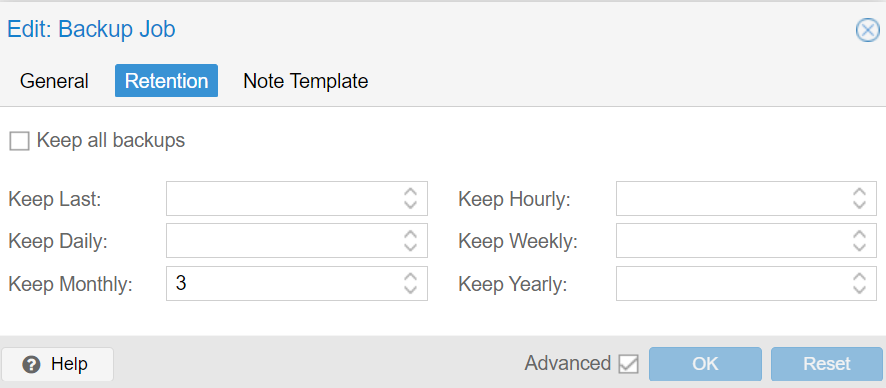
Then you can configure your backups from the DataCenter view (or from Proxmox Data Center Manager).
Enjoying this tutorial?
This site is a non-profit project. If it saved you some time, you can support it by getting Jan some coffee.
☕ Buy me a coffee
Comments