Bachelor Tech
  • Home
  • Tutorials
  • Portfolio
  • About Jan
  • Contact Jan

Access JamF Pro via Classic API – test connection with Postman

by Jan Bachelor April 26, 2021

Last Updated on April 26, 2021 by Jan Bachelor

Table of Contents
  1. Identify your instance’s URL and credentials for API access
  2. Import Classic API collection into Postman
  3. Look up a user via Postman
  4. Sources

Identify your instance’s URL and credentials for API access

In order to be able to talk to our JamF Pro instance, the first thing we will need is to clarify what is our instance’s URL and what username and password can be used for API access.

  1. Create a username and password for API access in JamF Pro:
    • Log into your JamF Pro instance and go to ‘Management Settings’ -> ‘System Settings’ -> ‘Jamf Pro User Accounts & Groups’.
    • Create a new Standard Account such as ‘API_Access’ and set privileges to ‘Custom’.
    • Leave ‘Access Status’ as enabled.
    • Fill in the other fields such as name and password.
    • Confirm by clicking on the ‘Save’ button.
Create new credentials that will be used for API access (part 1/2)
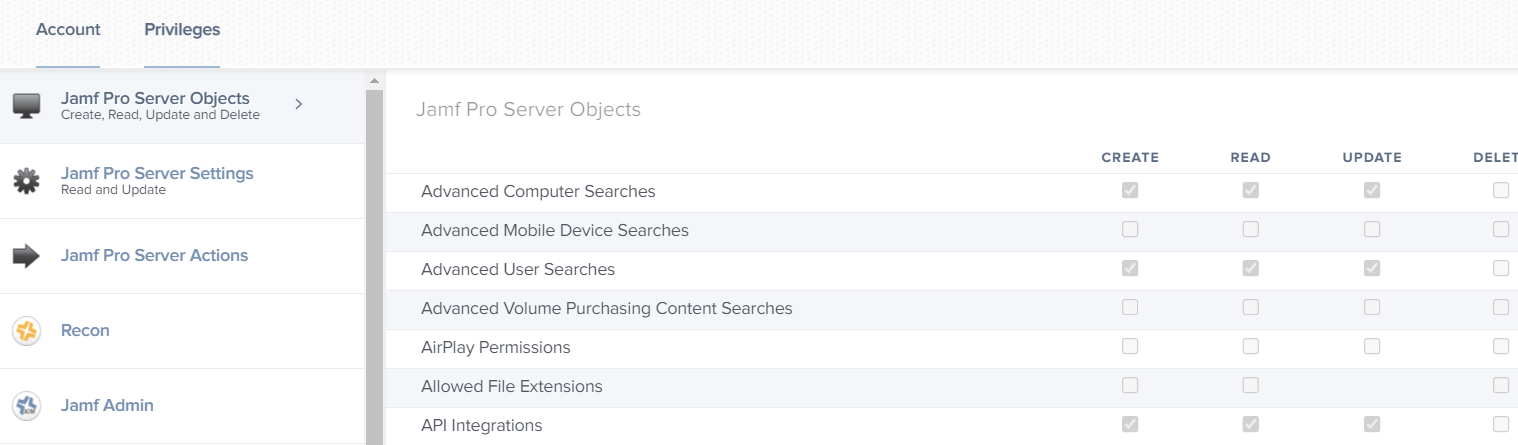
  1. Assign the new credentials API-related privileges:
    • Assign access to this account based on what actions you will need to perform with it. For example, if you want it to perform advanced computer searches , then find the item with the same name and tick the box in the second column for read-only permissions.
    • Generally, it is recommended to grant read-only permissions for ‘Users’ (to be able to look up user IDs), read-only+update permission for ‘Computers’, grant read+update Static User Groups and have read-only access to ‘Policies’ – but all of this very much depends on the tasks you are looking to perform.
Assign the new credentials access levels (part 2/2)

Import Classic API collection into Postman

  • Create a free account or log into your existing Postman account. This service helps us to test various HTTP requests.
  • Create a workspace there and import classic API commands collection into Postman (or check their GitHub site).
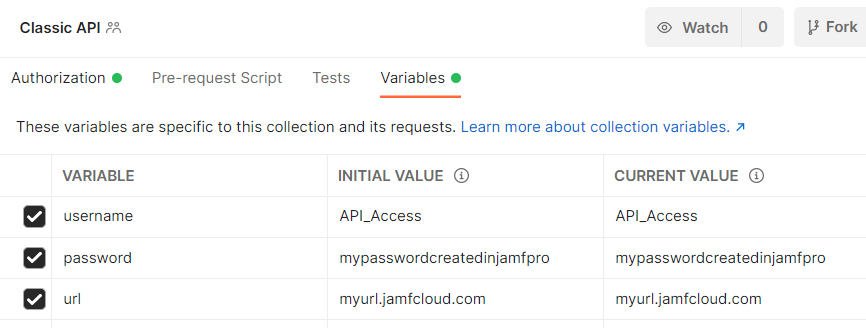
  • Click on the ‘Classic API’ heading in Postman and go to the ‘Variables’ section. Fill in the variables.

Look up a user via Postman

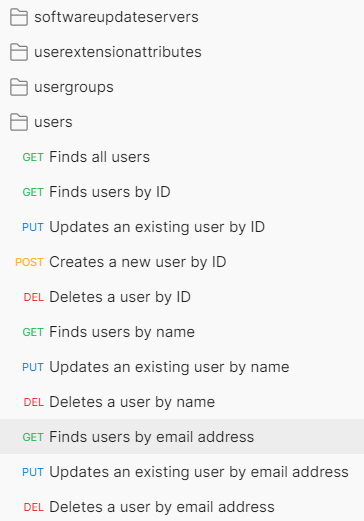
  • For the purpose of the demonstration, let’s try to look up a user based on their email address. In Postman, find the item called ‘Finds user by email address’.
Click on the ‘Find user by email address’ item
  • Fill in the email address in the ‘Path Variable’ section.
Fill in the email address in the ‘Path Variables’ section.
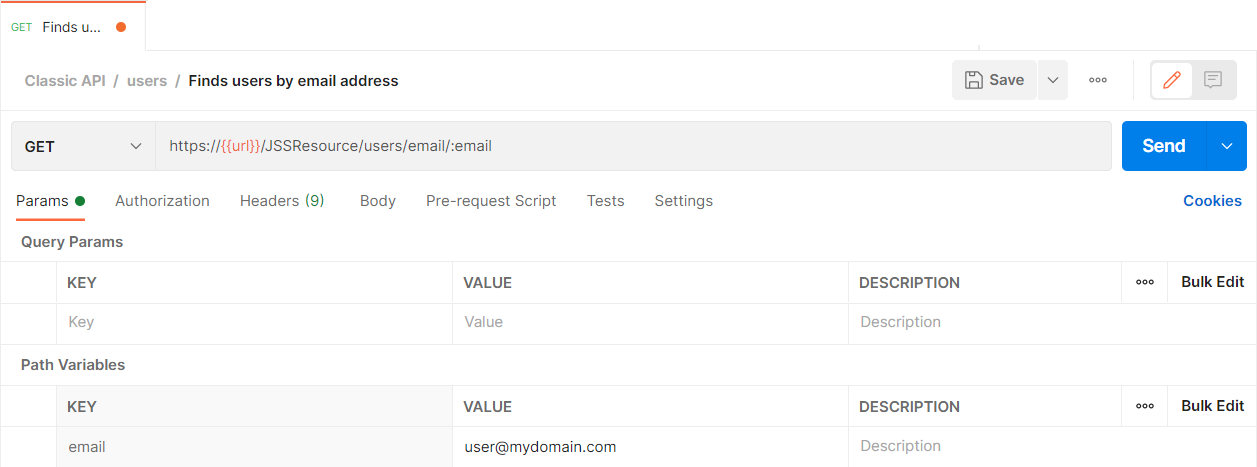
  • Notice how for the URL, the variable that we defined earlier is used. This makes Postman very easy to use and great for team work / sharing without having to input the same details in every API call/function.
  • Click on the ‘Send’ button. The output will be displayed in the console view below.
The output from the API call.
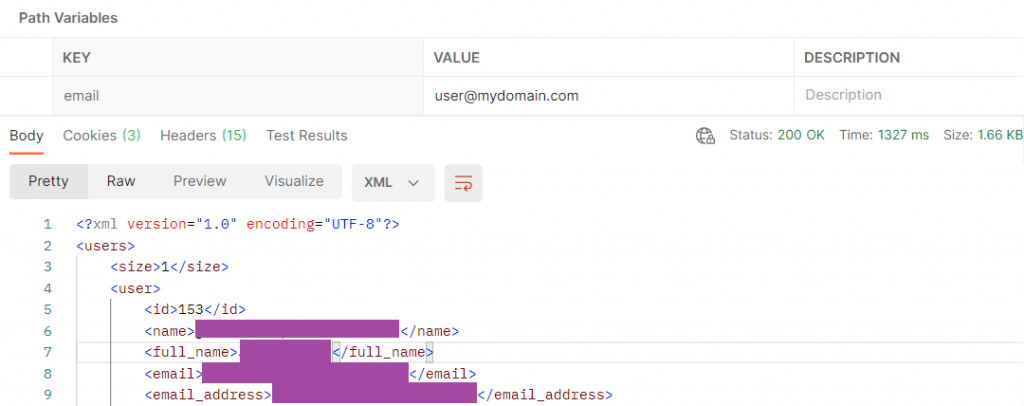
  • Note the following potential responses to an API call:
    • 200 – OK, the call was successful with some returned value
    • 201-202 – Created / Accepted
    • 400 – Bad Request – something is wrong with how you defined the request
    • 401 – Not Authorized – the credentials you supllied do not have the required rights
    • 403 – Forbidden – invalid credentials supplied
    • 404 – Not found – what you asked for cannot be found
    • 500 – Internal server error
    • 502 – Bad Gateway – the API server is not reachable or does not provide the required functionality. Check what hostname you are using
    • 503 – Service Unavailable – service is not available to you. Potentially, you got error 401/403 too many times and got temporarily banned

Now since we were able to send the request from Postman, let’s now try to do the same and more from Integromat!

Sources

  • JamF Pro’s official API guide
  • TalkingMoose’s script for setting computer pre-stage scope
  • GeekyGordo’s (Steve’s) article on Using Postman for JamPro API Testing
  • MyIntervals’ API error codes

Design a Gravity Form with a simple approval model
Create JamF Pro scripts, static groups and policies + a system account for API access
Back to: Create an automated Gravity workflow that will allow users to request admin rights for their Macs in JamF Pro using Integromat and JamF API.

Leave a Comment Cancel Reply

Save my name, email, and website in this browser for the next time I comment.

This site uses Akismet to reduce spam. Learn how your comment data is processed.

0 comment 0 FacebookWhatsappEmail

Create an automated Gravity workflow that will allow users to request admin rights for their Macs in JamF Pro using Integromat and JamF API.

  • Previous
  • Next
Collapse
Expand
  • What are we trying to do, why and how will we get there?
  • Pre-requisities - what software licenses will you need
  • Design a Gravity Form with a simple approval model
  • Access JamF Pro via Classic API - test connection with Postman
  • Create JamF Pro scripts, static groups and policies + a system account for API access
  • Use Integromat to get computer IDs from user email in JamF Pro

Search for articles

Other Tips

  • How to mount an NFS share (such as from FreeNAS) from an Android box
  • How to download a Windows 10 ISO on a Windows device – easy work-around

Other Tutorials

  • Build Your Own Router - Proxmox, OPNSense, OpenVPN server and a VPN client all in one!
    12 Steps
  • Dynamically Populate Gravity Forms from Google Sheets (GSheets APIv4)
    6 Steps

Recent Comments

  • Jan Bachelor on Use Integromat to get computer IDs from user email in JamF ProHi Robert, the static groups were created in the p…
  • Robert Petitto on Use Integromat to get computer IDs from user email in JamF ProCan you share how you'd use Make (integromat) to a…
  • Martin on Part 1 – What do we want to do + Required technology (bank feed)This tutorial deserves more credit, I've not seen…
  • Jan Bachelor on WAN / LAN Set Up (Before OPNSense Installation)Hi Ed, I have not tested it with PCI passthrough y…
  • Ed on OPNSense VM Set UpIn step 4 firewall you turned off firewall, should…

Tags

chrome iso windows

Categories

  • Android
  • FreeNAS
  • Linux
  • Windows

Recent Posts

  • How to mount an NFS share (such as from FreeNAS) from an Android box

  • How to download a Windows 10 ISO on a Windows device – easy work-around

Facebook Twitter Instagram Pinterest Linkedin Youtube

@2019 - All Right Reserved. Designed and Developed by PenciDesign

Bachelor Tech
  • Home
  • Tutorials
  • Portfolio
  • About Jan
  • Contact Jan