Part 3 - Migrate your data, then back up and secure the deployment
Go to previous section Download Markdown
July 25, 2025
Table of Contents
8. Bonus: Customize the 403 Forbidden page on Nginx
While you might have a custom page on your reverse proxy side for when your nodes are down, you may not have one for nginx. Let’s create it.
- Create a custom snippet configuration file that we will then include with our nginx config:
sudo nano /etc/nginx/snippets/custom-error-403.conf

        error_page 403 /custom-403.html;
        location = /custom-403.html {
                allow all;
                root /var/www/html/;
                internal;
                sub_filter 'SERVER_ID' $hostname;  # Replace placeholder with hostname
                sub_filter_once on;
}- In the custom 403 error file, we point to the
/var/www/htmlfolder, which is typical for Ubuntu and Debian installations. Some other flavors may use/usr/share/nginx/html. The choice is yours :) - Then let’s create the actual file:
sudo nano /var/www/html/custom-403.html- The template I downloaded from this source - kudos to dr5hn.
<!DOCTYPE html>
<html lang="en">

<head>
    <meta charset="UTF-8">
    <meta name="viewport" content="width=device-width, initial-scale=1.0">
    <title>403 Forbidden</title>
    <style>
        @import url("https://fonts.googleapis.com/css?family=Press+Start+2P");

        html,
        body {
            width: 100%;
            height: 100%;
            margin: 0;
        }

        * {
            font-family: 'Press Start 2P', cursive;
            box-sizing: border-box;
        }

        #app {
            padding: 1rem;
            background: black;
            display: flex;
            height: 100%;
            justify-content: center;
            align-items: center;
            color: #54FE55;
            text-shadow: 0px 0px 10px;
            font-size: 6rem;
            flex-direction: column;
        }
        #app .txt {
            font-size: 1.8rem;
            text-align: center; /* This centers the text content */
            /* Removed justify-content and align-items as they don't apply here */
        }
        @keyframes blink {
            0% {
                opacity: 0;
            }

            49% {
                opacity: 0;
            }

            50% {
                opacity: 1;
            }

            100% {
                opacity: 1;
            }
        }

        .blink {
            animation-name: blink;
            animation-duration: 1s;
            animation-iteration-count: infinite;
        }
    </style>
</head>

<body>
    <div id="app">
        <div>403</div>
        <div class="txt"> Blocked by fail2ban (SERVER_ID)<span class="blink">_</span> </div>
    </div>
</body>

</html>- Ensure that the html file is accessible to the user that executes nginx - in my case, this was
www-data:
sudo chown www-data:www-data /var/www/html/custom-403.html- Now you can edit any of the sites where you would like to apply this config (such as in
/etc/nginx/conf.d/vaultwarden.conf) and add a snippet in there:
sudo nano /etc/nginx/conf.d/vaultwarden.conf

# Find the server directive and add the following:
include /etc/nginx/snippets/custom-error-403.conf;- For completeness, here is the full Nginx Vaultwarden config file:
server {
    # We listen on 80 because HAProxy handles the SSL/HTTPS before it gets here.
    listen 8081;

    # Replace with your actual FQDN
    server_name vault.yourdomain.tld;

    # Handled below by the whitelisting script already - do not duplicate!
    # Replace OPNSense's IP with the actual one to block the right users with fail2ban:
    # set_real_ip_from 192.168.0.0/16; real_ip_header X-Forwarded-For; real_ip_recursive on;

    # Whitelist Cloudflare proxies & internal subnet:
    include /etc/nginx/snippets/trusted-proxies.conf;

    # Find the server directive and add the following:
    include /etc/nginx/snippets/custom-error-403.conf;

    # Block Banned IPs from fail2ban
    include /etc/nginx/blocklist.conf;

    # Allow large attachments (optional, but good for saving PDFs/Images in vault)
    client_max_body_size 128M;

    location / {
        proxy_pass http://127.0.0.1:8000;

        # WebSocket support (used by /notifications/hub)
        proxy_http_version 1.1;
        proxy_set_header Upgrade $http_upgrade;
        proxy_set_header Connection "upgrade";

        # Pass headers so Vaultwarden knows the real IP of the user, not just "127.0.0.1"
        proxy_set_header Host $host;
        proxy_set_header X-Real-IP $remote_addr;
        proxy_set_header X-Forwarded-For $proxy_add_x_forwarded_for;
        proxy_set_header X-Forwarded-Proto $scheme;
    }
}
- Then remember to reload the nginx service
sudo nginx -t
sudo systemctl reload nginx- Run a test. In my case (zoomed in a bit), it looks like this - while indicating which web server blocked it. For production use, you may wish to modify it.
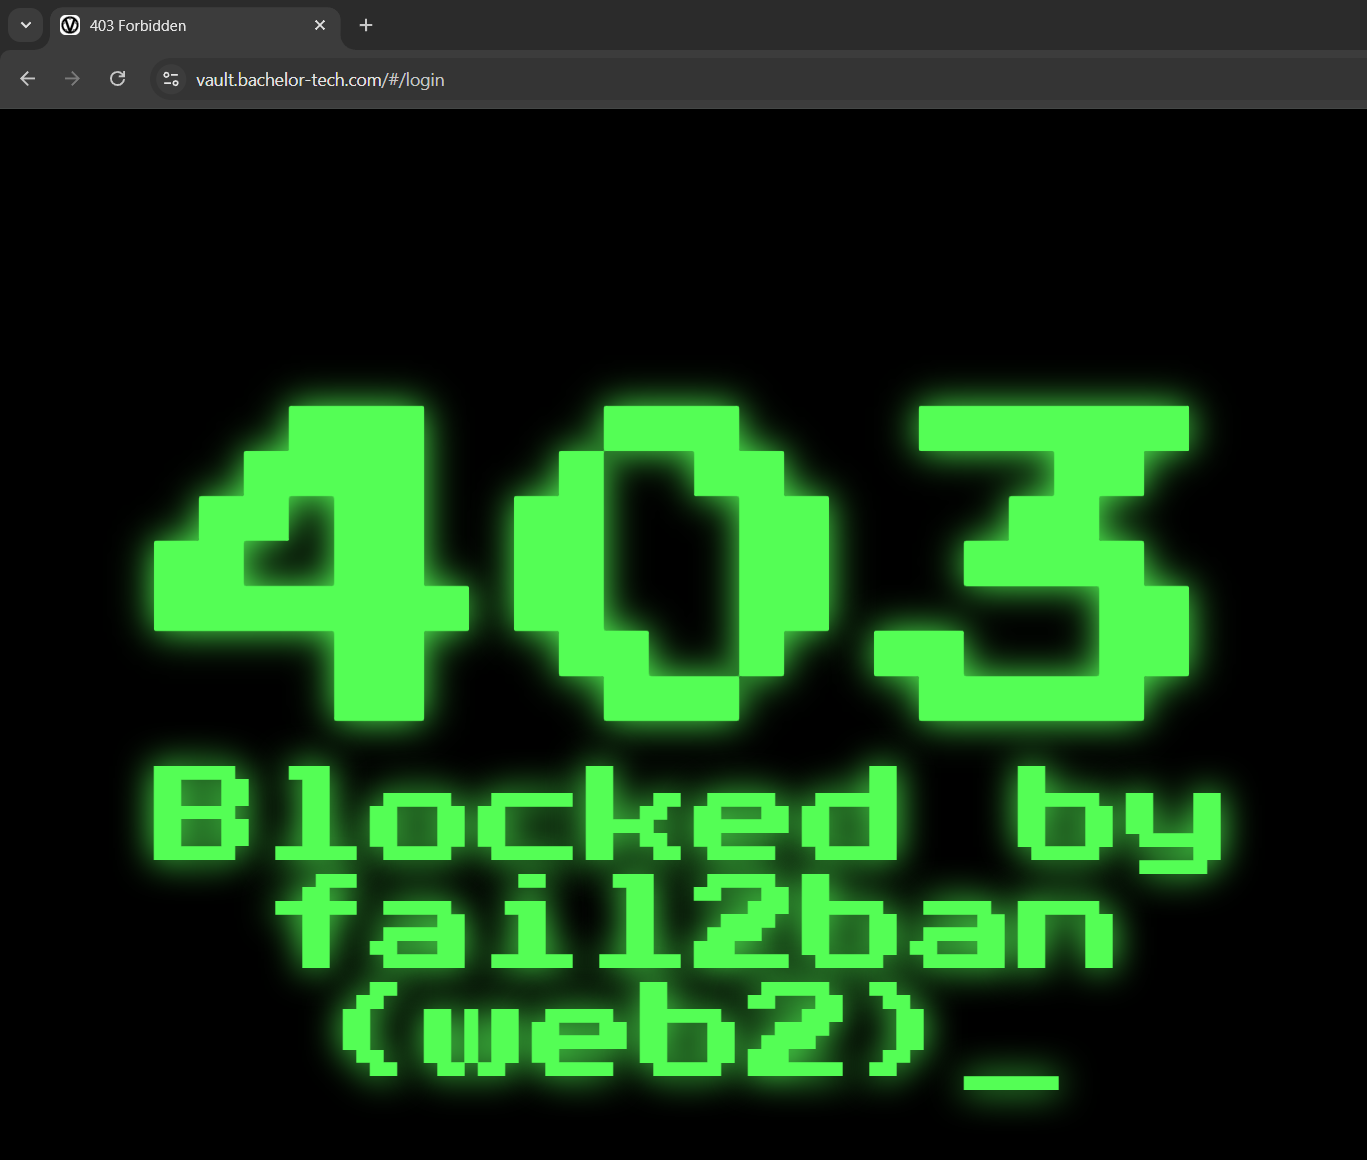
As mentioned before, if you have more nginx servers that you spread the load amongst, you would need to apply these steps on each of them.
9. Migrate your data from Bitwarden to Vaultwarden
Congratulations, the hardest part is done! Your infrastructure is in place including detailed monitoring on a granular level. Let’s migrate your existing data from Bitwarden. How can you move them over?
Migrating your Bitwarden data
Each user (you, your spouse, kids, etc.) imports their own private items.
- Export: Log in to your existing Bitwarden Web Vault.
- Go to Tools > Export Vault.
- Select format .json (Encrypted) if you know how to decrypt it, or .json (Plaintext). Warning: Plaintext is readable, handle with care. You can import an encrypted file just fine.

- Import: Log in to your new Vaultwarden instance.
- Create your user account (ensure
SIGNUPS_ALLOWED=truein thedocker-compose.ymlfile at least at the beginning for your own account, the others you can invite). - Go to Tools > Import Data.
- Select Bitwarden (json).
- Paste the content or upload the file. If you are using the recommended encrypted .json file, you will be prompted for a password.
- Create your user account (ensure
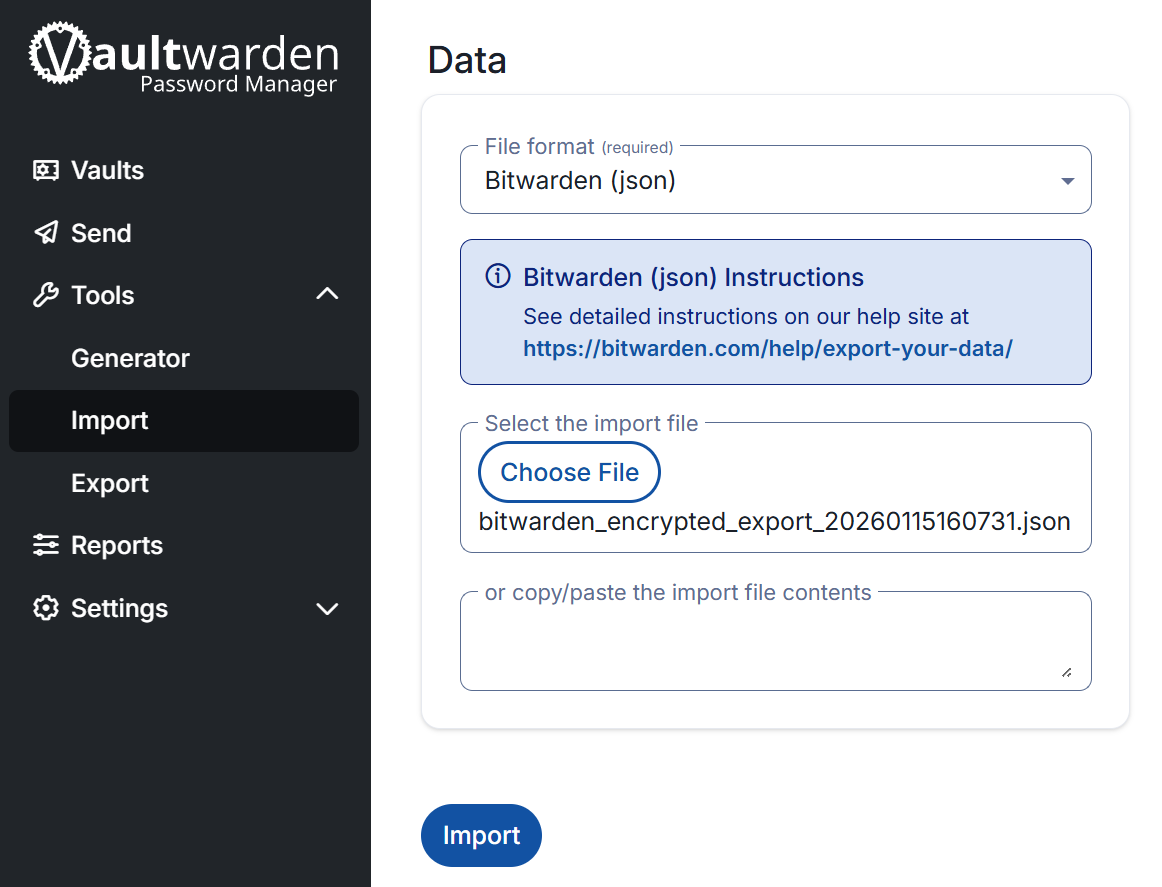
- Give it some time without refreshing the page for the credentials to import.
- You will then be greeted with a confirmation that the import has finished.
💡 Note
Moving an Organization (or a Family org) is done in the same way as the personal vault, you just need to export them and import them separately. Collections are re-created automatically during the import, you do not need to create them before the import.
Handling special items in Vaultwarden
- SSH Keys are stored as standard "Items" in the database (similar to Logins or Cards). They will be included in the JSON export and should appear in Vaultwarden automatically.
- Attachments - standard JSON exports do not contain file attachments (images, PDFs, keys attached as files). You must move these manually. While a
.zipexport that includes attachments is available inBitwarden, importing this into a self-hosted Organization often fails or isn't fully supported by the importer yet. Manual is the safest bet for integrity. - Sends (temporary links) - these cannot be exported. If you have active Sends, you will need to manually recreate them in the new instance.
Log into your Vaultwarden using Bitwarden browser plugin
- If, like many other users, you use the browser plugin for Bitwarden, you can also use it for Vaultwarden.
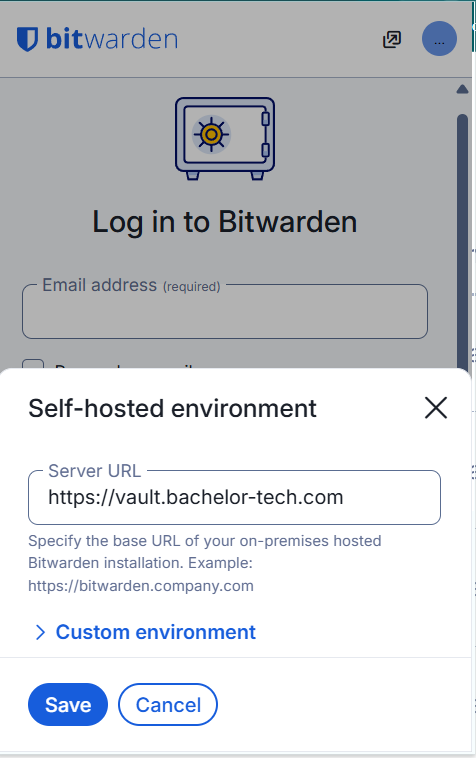
- Simply log out your Bitwarden account and, as shown below, click on the ‘Accessing’ option and choose ‘self-hosted’.

- Enter the URL of your instance.
💡 Note
Once your initial accounts are set up and no more sign ups are required, remember to open each
docker-compose.ymlfile on each web server and ensure thatSIGNUPS_ALLOWEDis set back tofalse. This is especially sensitive if your Vaultwarden instance is public-facing, as otherwise, anyone could create accounts and use your service, including bots.
Set up user/org policies
Before inviting users, it is vital to set some ‘ground’ rules for authentication and other security policies.
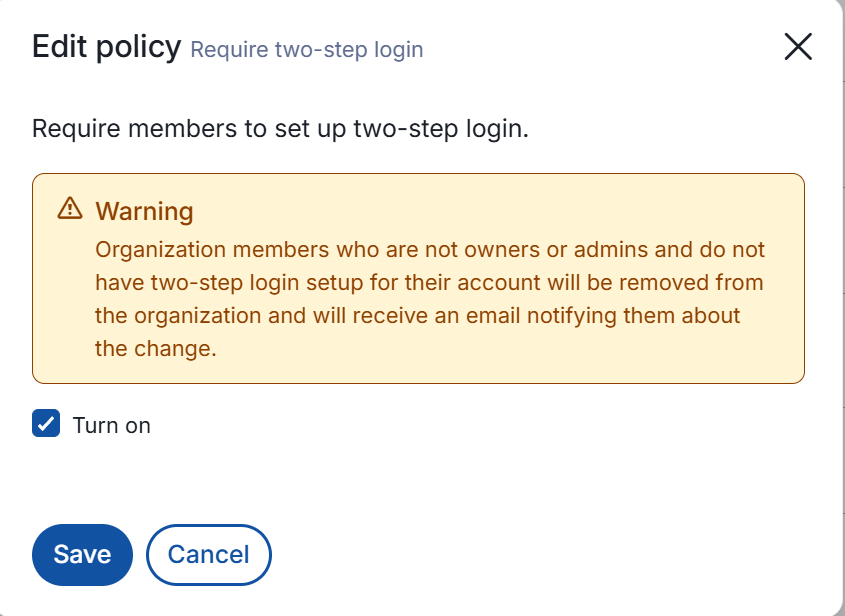
- Go to Settings → Policies → Require two-step login. Turn it on.
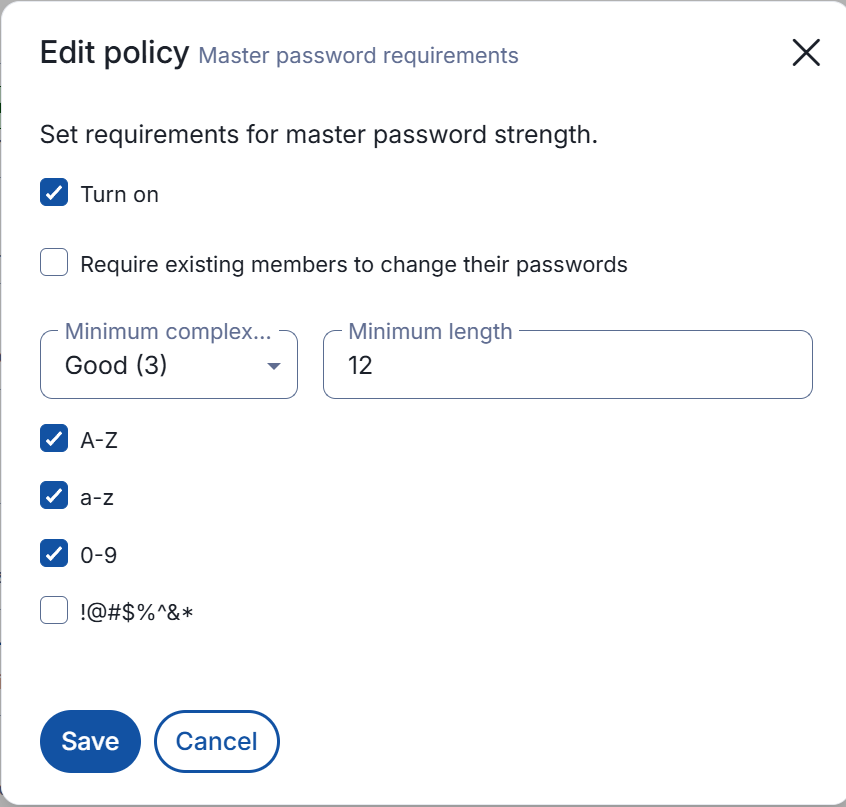
- Similarly, set up Master password requirements. Their length matters way more than complexity. Minimum recommended is 12 characters (marked as ‘Good (3)’ in Vaultwarden).
- Based on your preferences, you can enforce additional policies.
Invite other Vaultwarden members
Since this is a new server, your family members technically need "new" accounts.
- Have family members sign up on your new Vaultwarden URL.
- Go to your Organization > Members > Invite Member.
- Type their email (must match what they signed up with). Verify that they received an email based on the SMTP settings you placed in your
docker-compose.ymlfile previously. - Once they accept the invite, go back to Members and ‘Confirm’ them in the Members tab.
- Assign them to the correct Collections (e.g. children manage only their own collection).
Feel free to play with additional settings in Vaultwarden web UI. Are there additional considerations to take into account? How about backup and restoration? Or how can you go about updating your Vaultwarden instance? We will review these in our last step.
10. Backups, Restoration & Additional Security Considerations
In this article, I did not cover how to best harden your web and DB servers. It is assumed that it is already done.
Backup & Recovery
While this set up is fully HA in terms of the web and DB servers being available on two sites (with a Galera witness on a VPS outside), HA does not equal backups. In the event of a breach (like ransomware) or a cascading service failure, you will need a form of archived backups, ideally going back a few months, so that you can determine the nearest and still safest version of your data.
- The recommended approach is to follow the 3-2-1 principle, i.e. by having 3 total copies of your data (the original plus two backups), storing them on 2 different media types (e.g. SSDs and cloud-based), and keeping at least 1 copy in an off-site location to protect against data loss from hardware failure, cyberattacks, or natural disasters.
- In addition, it is highly advisable to have a copy stored not just off-site but also off-line from secure threats. Because consider what happens if you lose all your passwords and stored SSH keys! Proper care needs to be given, even if it is not done as often. In a homelab environment, an example could be copying an encrypted version of the exported Vaultwarden data onto a memory stick that is stored in your parents’ house twice a year.
- Components to back up:
| Component | Location | Priority | Notes |
|---|---|---|---|
| Vaultwarden data directory | /opt/vaultwarden/vw-data/ |
Critical | Contains RSA keys, attachments, icons, config |
| MariaDB/Galera database | Vaultwarden database | Critical | Contains all vault entries, users, organizations |
| Docker Compose file | /opt/vaultwarden/docker-compose.yml |
High | Contains your environment configuration |
| Nginx virtual host | /etc/nginx/conf.d/vaultwarden.conf |
Medium | Can be recreated but saves time |
| SSL certificates | Managed by ACME/OPNSense | Low | Can be regenerated |
Check out my previous article on how to back up VMs and LXCs from Proxmox onto a GCP’s archive storage!
Recovery Situations
Below are three common scenarios that may occur:
-
Scenario A: Single Web Node Failure. If one web server fails but others are operational:
- Restore the VM from Proxmox backup (or rebuild from template)
- Syncthing will automatically sync
/opt/vaultwarden/vw-data/from healthy nodes - Verify RSA keys match:
md5sum /opt/vaultwarden/vw-data/rsa_key.*(compare across nodes) - Start the container:
cd /opt/vaultwarden && sudo docker compose up -d - Verify in HAProxy that the node rejoins the backend pool
-
Scenario B: Database Corruption or Loss
- Stop Vaultwarden containers on ALL web nodes to prevent writes:
cd /opt/vaultwarden && sudo docker compose down - On your preferred (primary) Galera node, restore the database:
gunzip < /var/backups/vaultwarden/vaultwarden_YYYY-MM-DD_HHMMSS.sql.gz | mysql -u root -p vaultwarden - Verify Galera sync status:
mysql -u root -p -e "SHOW STATUS LIKE 'wsrep_cluster_size';" - Restart Vaultwarden containers on all nodes
- Stop Vaultwarden containers on ALL web nodes to prevent writes:
-
Scenario C: Complete Site Loss
- If both sites are compromised (e.g., ransomware), do NOT connect backup media to infected systems.
- Rebuild infrastructure from clean Proxmox templates
- Restore database from off-site/offline backup
- Restore
/opt/vaultwarden/vw-data/from backup (this includes the RSA keys). - Update DNS if IP addresses changed - do not open a public DNS record but rather a local record (such as on OPNSense by utilizing the Unbound DNS service).
- Have all users verify their vaults and re-authenticate devices
Testing Your Backups
Backups are worthless if you cannot restore from them. Schedule quarterly restore tests:
# On a test VM (not production!), verify database backup integrity:*

gunzip -t /var/backups/vaultwarden/vaultwarden_latest.sql.gz && echo "Archive OK"

# Test actual restoration to a temporary database:*
mysql -u root -p -e "CREATE DATABASE vaultwarden_test;"
gunzip < /var/backups/vaultwarden/vaultwarden_latest.sql.gz | mysql -u root -p vaultwarden_test
mysql -u root -p -e "SELECT COUNT(*) FROM vaultwarden_test.users;"
mysql -u root -p -e "DROP DATABASE vaultwarden_test;"
Updating Vaultwarden
This part is simple, yet for completion, let’s cover it.
- It is always good to look into the release notes before updating in case some larger changes have been made that could break a dependency.
- Take a snapshot of your web node before you carry out any changes.
- Then proceed on each web node:
# Pull the latest image:
sudo docker pull vaultwarden/server

# Restart the docker container
cd /opt/vaultwarden
sudo docker compose down && sudo docker compose up --force-recreate
# Once it loads and you can see the new version has loaded, press 'd' to detach it
Securing other components of your stack
Yet if you are looking for some tips, look at my previous article on how to deploy a DB Galera cluster that touch on how you can use tools like ufw firewall, fail2ban for securing your SSH access.
Putting Vaultwarden behind a VPN
So what else could we consider? You could consider NOT having a resolvable public DNS name for your Vaultwarden instance and instead, have it available only internally on your LAN. Then, if you have a VPN client deployed (such as a WireGuard plugin in your OPNSense instance), you could make it available only via that VPN connection. Security by obscurity is still a thing!
On your phone and other mobile devices, you can then install the VPN client to reach your Vaultwarden server. Alternatively, if you do not often update your passwords, simply let it sync whenever you are on your LAN - when outside, your mobile device will work off its local cache, preserving access to all the passwords up to the time of your last sync.
What else could go wrong?
While this guide is already rather comprehensive, there are quite a few other things that could go wrong (mostly related to the infrastructure) that could affect your Vaultwarden’s uptime. Examples include:
- Galera cluster split-brain scenarios - What happens if sites lose connectivity while both are accepting writes?
- Certificate renewal failures - ACME/Let's Encrypt certificates expire; what if renewal fails?
- Syncthing out-of-sync states - How to identify and resolve when folders get stuck in ‘Syncing’ state
- HAProxy backend health check failures - How to diagnose when health checks fail but the service appears to be running
- WebSocket connection issues - Users report ‘offline’ status in apps despite the site being reachable
- Database migration version conflicts - What if nodes are running different Vaultwarden versions with different schema expectations?
Let me know in the comments below in case you have come across any or if you would like me to expand on how to recover from these before you encounter them yourself 😇
This concludes our guide. I hope you enjoyed it.
Enjoying this tutorial?
This site is a non-profit project. If it saved you some time, you can support it by getting Jan some coffee.
☕ Buy me a coffee
Comments