Part 2 - Sync, monitor and harden your Vaultwarden deployment
Go to previous section Download Markdown Go to next section
July 25, 2025
Table of Contents
4. Troubleshoot Vaultwarden Docker/Web UI service
Let’s try accessing the web UI. Try accessing the Vaultwarden interface on https://vault.yourdomain.com .
Troubleshooting web UI reachability
In case the web UI is not coming up, we need to determine where the traffic got stuck. Here are the layers:
DNS- e.g. CloudFlare - is your DNS record set up? Does it point to the correct IP address?OPNSense- do you have a firewall + NAT rule set up for forwarding traffic to a port that HAPRoxy is listening on?HAProxy- is your public (front-end) service on and listening on the desired port? Have you attached your SSL certificate for decrypting traffic? Is your back-end pool forwarding traffic to the right host? Is your ‘real’ host configure on the right port?Nginxon the VM - is nginx on and listening on the right port? Is the syntax of your virtual host for forwarding ok?Docker- is the docker instance up? What do the logs say?Galera DB Cluster- is it reachable for the web servers? Is the virtual IP operational? Is the DB up, esp. if you are reaching it on a virtual IP via OPNSense / pfSense?
Example issue no.1 - Web server not accepted by the DB server
The example below shows that the Docker instance is running but spent the last two hours in a crash loop due to incorrect DB details:

- You may notice the IP 192.168.8.1 that points to the OPNSense host from which it is forwarded. This is because the Galera cluster is reachable on a virtual IP (192.168.8.70) provided by OPNSense. Such behavior is normal and expected.
- The main issue that I simulated here was that the user was defined for the wrong subnet - after dropping the user and re-creating it with the correct GRANT privileges fixed the issue.
Example issue no.2 - No Docker container running
Let’s say you set up just one web server VM and were able to reach the web UI and then later, it stopped loading. You may wish you double check that the docker container is still up.
sudo docker container ps -a
- To fix it, go to the folder where your container is located and start it. Ensure that you set up Docker to start on boot.
cd /opt/vaultwarden
sudo docker compose up -d
sudo systemctl enable docker
Example issue no.3 - "401 Unauthorized" loops
If you log in successfully but are immediately logged out when refreshing or performing an action, your nodes likely have different signing keys.
- The Cause: Vaultwarden generates RSA key pair files in
/dataon first startup. Ifweb1generated its own keys andweb2generated different ones, a login token signed byweb1will be rejected byweb2. - The Fix: Ensure Syncthing is successfully syncing the
rsa_key.pem,rsa_key.pub.pem, andrsa_key.derfiles. You may need to manually copy the keys from the "primary" node to the others once to establish a baseline, then let Syncthing handle future updates.
First login
- Your first step in the Web UI would be to create your account.
- Since we set
SIGNUPS_ALLOWED=falsein the config, you will need to temporarily change that totrueindocker-compose.yml, rundocker compose up -dto apply, create your accounts, and then flip it back tofalseand restart again. This is intentional as a matter of exercising how you can easily tweak settings with Docker Compose, esp. when applying updates in the future.
5. Set up Syncthing for Vaultwarden data sync
To ensure that the uploaded data stay consistent across multiple web servers, we will employ Syncthing, which I already use on my web servers. If you would like some help with deploying it, check out my previous tutorial on How to Configure HA for Web Servers.
- The permissions depend on which user runs the Syncthing service. In my case, this is
www-data. We will need to ensure that this user has access to Docker for monitoring purposes:
# Stop the container briefly to ensure the folder is free:
cd /opt/vaultwarden
sudo docker compose down

# Grant the 'www-data' user full Read/Write access to the docker volume
# using ACLs (Access Control Lists). This persists even if Docker recreates files.
sudo setfacl -R -m u:www-data:rwx /opt/vaultwarden/vw-data
sudo setfacl -d -m u:www-data:rwx /opt/vaultwarden/vw-data

# Start the container again (in a detached mode to free up the shell):
sudo docker compose up -d- Assuming you have Syncthing already deployed, add a new folder on web1:
- General tab:
- Label: Vaultwarden (web1)
- Path:
/opt/vaultwarden/vw-data
- Sharing tab → if you already have your other Syncthing web servers defined, then tick the boxes.
- File versioning tab → It is recommended to set up ‘Trash can versioning’ for 30 days+.
- Skip to the Advanced tab → Check [x] Ignore Permissions (Docker manages the ownership, Syncthing just moves the data bits).
- Go back to the Ignore Patterns tab: (tick the box and once you complete the other tabs and go forward, copy paste this list):
- General tab:
icon_cache/
tmp/
temp/
*.sqlite3
*.sqlite3-wal
*.sqlite3-shm
*.log
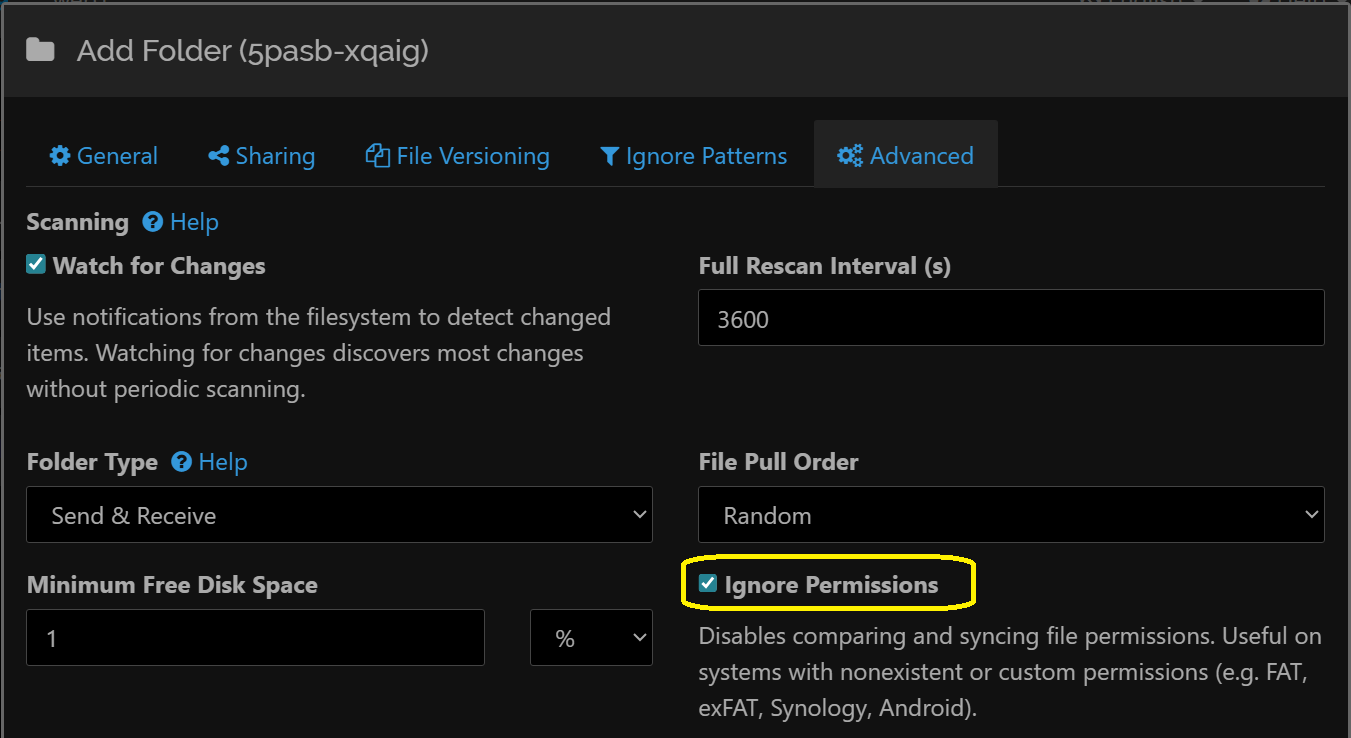

Troubleshooting Syncthing folder addition
- In case you add the sync job and immediately get a permission error like the one below, it means your permissions on the
/opt/vaultwardenfolder are not correct:
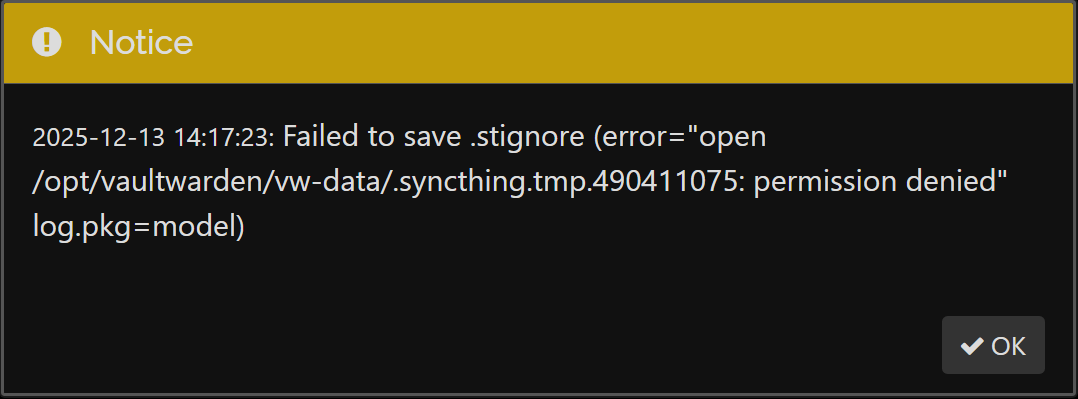
- While in my case, the user is www-data, in your case, it is likely different. How can you find out? Let’s take a look:
 # List all running processes, filter 'syncthing' and filter out the command itself:
sudo ps aux | grep syncthing | grep -v grep- Then adjust the ‘
sudo setfacl -R’ and‘sudo setfacl -d’ commands above accordingly. - For additional troubleshooting scenarios, you can check my previous guide for Syncthing that includes data loss situations and recovery options.
Add Syncthing on other web nodes
- SSH into your other web server nodes and set up the file permissions accordingly as we have done at the beginning of this Step.
- Open Syncthing on each of your other web nodes and accept the invitation:

- Set up the name, path, trash can, ignore permissions in the Advanced tab and then set up the file/folder patterns to be ignored, as we have done previously.
6. Set up Monitoring for Vaultwarden’s Docker Container + Website using UptimeKuma
There are three types of monitors that would be good to set up. If you only have one site or do not have your ‘witness’ site set up yet, then you can have all these checks running of just one UptimeKuma instance.
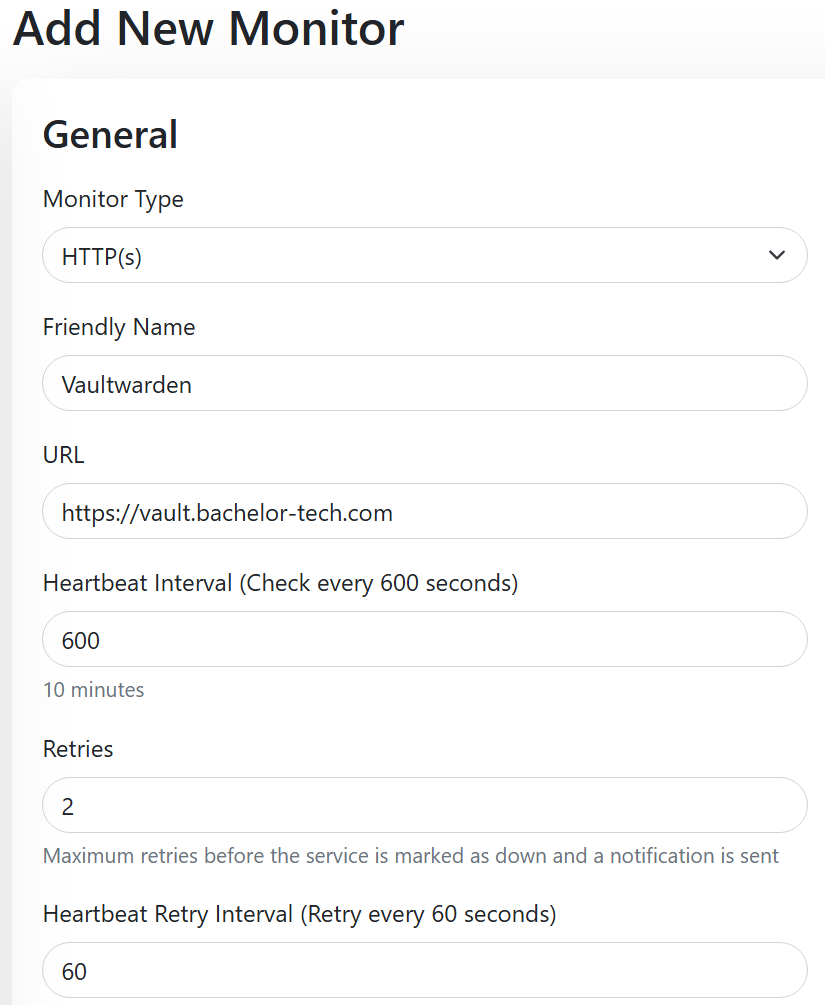
Monitor A. Site 3 - Website Uptime
On Site 3 (VPS - witness site), you can monitor the service as a whole (e.g. does the website load regardless of which site it is being loaded from?).
- Monitor Type:
HTTP(s) - Friendly name:
Vaultwarden or similar - URL: Your actual URL
- Heartbeat: 30-600 seconds (1 to 10 minutes)
- Retries: 1-3
- Heartbeat Retry: a small amount, such as 30-60 seconds
Monitor B. Site 1+2 Docker Container Monitor
For UptimeKuma to see the container, we will need to deploy a Socket Proxy container. The idea is to use the proxy as a ‘gatekeeper’ that provides read-only access to UptimeKuma on a specific port. We will need to apply this on each web server node.
- Create a new folder and a compose file:
# Create a directory for the proxy
sudo mkdir -p /opt/socket-proxy-container

# Go into that directory
cd /opt/socket-proxy-container

# Create the compose file
sudo nano docker-compose.yaml- Enter the following:
services:
  docker-socket-proxy:
    image: tecnativa/docker-socket-proxy
    container_name: docker-socket-proxy
    restart: unless-stopped
    # High privilege is required to access the raw docker socket
    privileged: true
    ports:
      - "2375:2375"
    volumes:
      # We give it access to the host's docker socket (read-only)
      - /var/run/docker.sock:/var/run/docker.sock:ro
    environment:
      # ENABLE specific read-only permissions
      - CONTAINERS=1 # Allows listing and checking container status
      - INFO=1       # Allows checking general docker info (optional)
      # BLOCK write permissions (security)
      - POST=0       # Blocks any commands that change state (restart/kill/create)
💡 Security Note: The socket proxy exposes read-only Docker API access on port 2375. In a homelab environment on a trusted LAN, this is generally acceptable. For stricter security, bind to a specific IP (
192.168.8.9:2375:2375) or implement firewall rules to allow only your UptimeKuma host on port2375. The most secure method would be to bind it tolocalhostonly and use SSH tunneling, instead.
- Then start the container:
cd /opt/socket-proxy-container
sudo docker compose up -d

# Check that it is running together with the Vaultwarden container:
sudo docker ps -a- On Site1/Site2 UptimeKuma, add a new monitor:
- Monitor Type:
Docker Container - Friendly name:
Web1 - Docker Monitor - Vaultwarden - Container name:
vaultwarden(as per how it’s shown when you rundocker container ps -aon your web server) - Docker host - add a new one:
- Friendly name:
Web1 Docker Host - Connection type:
TCP / HTTP - Docker Daemon:
tcp://192.168.8.9:2375(use your local IP with port 2375)
- Friendly name:
- Monitor Type:
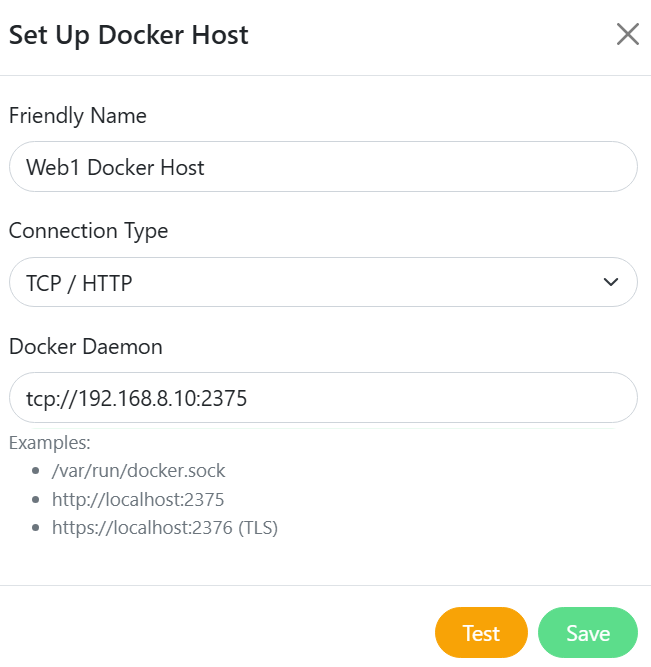
- The overall monitor for
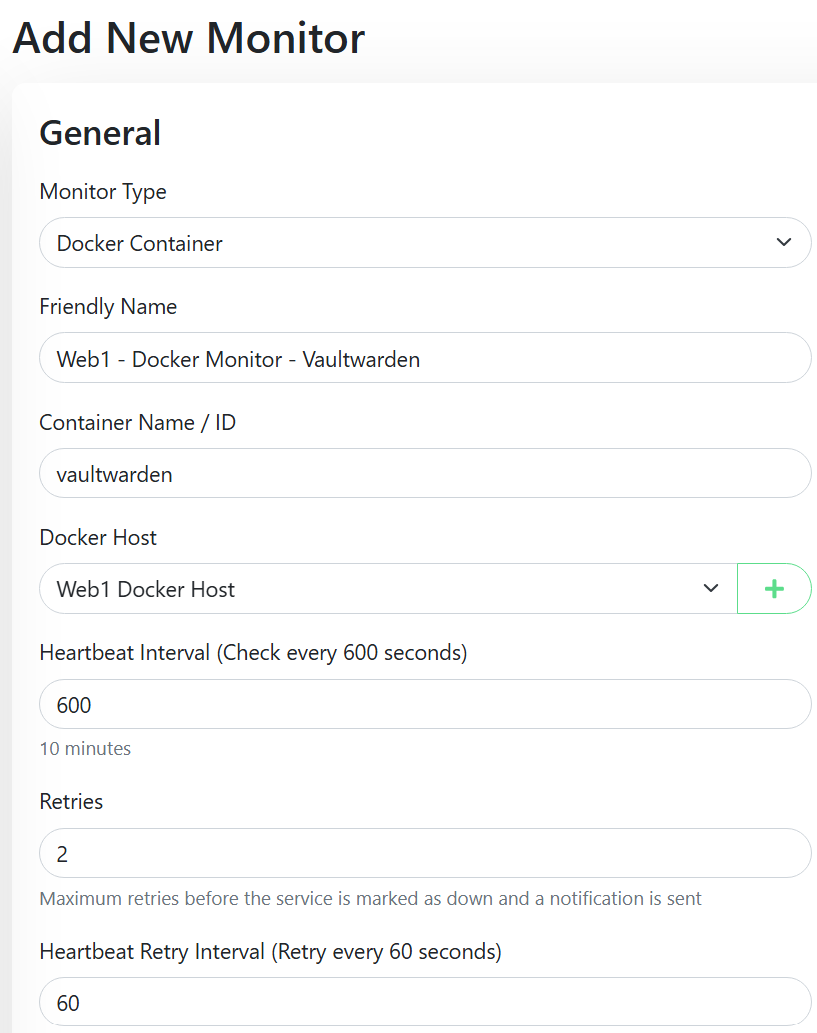
web1may look like this - remember to repeat this for each web server:
Monitor C. Site 1+2 Syncthing Monitor
The other thing that could stop working over time is Syncthing itself. We can leverage Syncthing’s API for that and push information regularly from each web server into UptimeKuma as a passive ‘push’ monitor.
- Since I have described this method already in my recent guide, please follow the steps from the Syncthing Web HA tutorial.
- You will get notified whenever ANY of the sync jobs are down or even paused, as per your config settings.
7. Harden Vaultwarden with Fail2ban
On the VM that runs docker with our Vaultwarden container, we should install fail2ban and secure the docker container. In case you do not have it set up already, you can also secure SSH and your other sites.
Install fail2ban
# 1. Install Fail2ban
sudo apt update
sudo apt install fail2ban -y

# 2. Create a local configuration file (never edit jail.conf directly)
sudo cp /etc/fail2ban/jail.conf /etc/fail2ban/jail.local
Protect SSH on a custom port
- In this case, SSH port is set to a custom port 2222 under
/etc/ssh/sshd_config.
sudo nano /etc/fail2ban/jail.local

# Un-commment these:
ignoreself = true

# Add your own IP range (oneself + LAN + docker subnet)
ignoreip = 127.0.0.1/8 ::1 192.168.0.0/16 172.20.0.0/16

# Comment out
# ignorecommand =

# Find an existing section called [sshd] and modify it as follows:

[sshd]
enabled = true
port    = 2222
mode    = aggressive
# The more modern method instead of reading text files
backend = systemd
maxretry = 3
bantime = 1h- If you have not started the fail2ban client yet, run
sudo fail2ban-client start. Otherwise runsudo fail2ban-client reloadfor the changes above to kick in.
Protect Vaultwarden’s docker container
- In your docker-compose.yml file, ensure that you have the following parameters set:
# Ensure these three are somewhere in your 'environment':
environment:
      - LOG_FILE=/data/vaultwarden.log
      - LOG_LEVEL=info
- EXTENDED_LOGGING=true- After changing the values below, run
docker compose up -dto apply changes. - Let’s create a config that instructs
fail2banon what a failed login to Vaultwarden looks like:
sudo nano /etc/fail2ban/filter.d/vaultwarden.conf

[Definition]
# Matches "Admin login attempt failed" and "Invalid password for user"
failregex = .*Username or password is incorrect.*IP: <HOST>
- We will need to define a deny action:
sudo nano /etc/fail2ban/action.d/nginx-deny.conf

[Definition]
actionstart =
actionstop =
actioncheck =
actionban = printf "deny <ip>;\n" >> /etc/nginx/blocklist.conf; systemctl reload nginx
actionunban = sed -i "/deny <ip>;/d" /etc/nginx/blocklist.conf; systemctl reload nginx- This path does not yet exist, let’s create it and set correct permissions for it:
sudo touch /etc/nginx/blocklist.conf
sudo chmod 664 /etc/nginx/blocklist.conf- Then we should configure nginx’s config to read from it:
sudo nano /etc/nginx/conf.d/vaultwarden.conf

# Block Banned IPs from fail2ban
include /etc/nginx/blocklist.conf;- Now we can finally add a new jail for Vaultwarden.
sudo nano /etc/fail2ban/jail.local

[vaultwarden]
enabled = true
# Read logs directly from Docker
backend = systemd
# Which container to watch
journalmatch = CONTAINER_NAME=vaultwarden
# The attacker's port, not the internal port
port    = 80,443,8081
filter  = vaultwarden
# The 'chain=DOCKER-USER' blocks the IP before Docker forwards it
action  = nginx-deny
maxretry = 3
bantime  = 300m # 5min
findtime = 300m # 5 min
-
Reload the fail2ban service -
sudo fail2ban-client reload. -
Then let’s run a real test: Attempt some failed login attempts from your phone while on mobile network. Attempt some bad logins and refresh the page. You should see your custom 403 page. Then check:
sudo fail2ban-client status vaultwarden. Then you can remove your banned IP by runningsudo fail2ban-client set vaultwarden unbanip 1.2.3.4on the affected web server.Troubleshooting fail2ban for Vaultwarden on Docker
-
Ensure that the log is seeing repeated failed login attempts:
sudo docker logs --tail 20 vaultwarden -
Compare the errors with the filter we created earlier - check
sudo nano /etc/fail2ban/filter.d/vaultwarden.conf.- In case you make modifications, restart the fail2ban service with
sudo fail2ban-client restart.
- In case you make modifications, restart the fail2ban service with
-
Run a dry-run using
sudo fail2ban-regex systemd-journal /etc/fail2ban/filter.d/vaultwarden.conf -
Is the count increasing but the connection with the device is not being blocked?
- Ensure that in your nginx config, you have this line included:
include /etc/nginx/blocklist.conf;, as otherwise, whatever is there to be blocked will be ignored. - Confirm that your nginx-deny config exists, such as by running
sudo nano /etc/fail2ban/action.d/nginx-deny.conf.
- Ensure that in your nginx config, you have this line included:
Ensure local + Cloudflare traffic does not get blocked
If you are using Cloudflare or another proxy-like traffic management that provides you with CDN and traffic filtering and an attacker tries to log into your instance of Vaultwarden, nginx will end up blocking the IP address of the proxy server from Cloudflare rather than their actual one. Such behavior is undesirable, as it would then block legitimate traffic coming from the proxy to your nginx server.
The solution is to whitelist the local and Cloudflare servers as shown on their website. Yet the list changes (not often but from time to time) and it would be tedious to keep it up to date manually. So let’s automate it!
- Create a folder and script:
sudo mkdir /opt/cloudflare-proxies
sudo nano /opt/cloudflare-proxies/update-cloudflare-ips.sh
#!/bin/bash
# Download Cloudflare IPs
echo "# Cloudflare IPs - Auto Updated" > /etc/nginx/snippets/trusted-proxies.conf
# Internal IPs - modify this to reflect your local subnet
echo "set_real_ip_from 192.168.0.0/16;" >> /etc/nginx/snippets/trusted-proxies.conf
# IPv4
for ip in $(curl -s https://www.cloudflare.com/ips-v4); do
echo "set_real_ip_from $ip;" >> /etc/nginx/snippets/trusted-proxies.conf
done
# IPv6
for ip in $(curl -s https://www.cloudflare.com/ips-v6); do
echo "set_real_ip_from $ip;" >> /etc/nginx/snippets/trusted-proxies.conf
done
# Headers
echo "real_ip_header X-Forwarded-For;" >> /etc/nginx/snippets/trusted-proxies.conf
echo "real_ip_recursive on;" >> /etc/nginx/snippets/trusted-proxies.conf
# Reload Nginx as part of the script
sudo systemctl reload nginx
- Run this script to verify it works as expected, then make it executable:
# Run it
sudo bash /opt/cloudflare-proxies/update-cloudflare-ips.sh

# You should see the IPs from the script in there
cat /etc/nginx/snippets/trusted-proxies.conf

# Make the script executable
sudo chmod +x /opt/cloudflare-proxies/update-cloudflare-ips.sh

# Add it to run weekly via a cron job
sudo crontab -e

# Add the following entry in there
0 4 * * 1 /bin/bash /opt/cloudflare-proxies/update-cloudflare-ips.sh
- Add it into your virtual host on nginx:
sudo nano /etc/nginx/conf.d/vaultwarden.conf
 # Add the text below under the server { directive:

# Whitelist Cloudflare proxies & internal subnet:
include /etc/nginx/snippets/trusted-proxies.conf;- Double check the syntax and reload nginx:
sudo nginx -t
sudo systemctl reload nginx
With syncing, monitoring and hardening in place, the last part covers migrating existing Bitwarden data in and locking down backups and restoration.
Enjoying this tutorial?
This site is a non-profit project. If it saved you some time, you can support it by getting Jan some coffee.
☕ Buy me a coffee
Comments