Part 1 - Choose Vaultwarden and set up the database, OPNSense and HAProxy
Download Markdown Go to next section
July 25, 2025
Table of Contents
Introduction
Running a mission-critical website on a single server creates a significant risk, as routine maintenance or unexpected hardware failures can take your service offline instantly. This tutorial guides you through transforming a standalone web server into a resilient High Availability (HA) cluster using accessible open-source tools.
We will utilize Proxmox to clone your existing environment and deploy OPNSense with HAProxy to intelligently distribute traffic between multiple nodes. To handle dynamic content, we solve the challenge of file synchronization by implementing Syncthing, a decentralized peer-to-peer tool that keeps folders like WordPress uploads identical across servers in real-time.
We will configure Syncthing on headless Linux instances, tunnel securely to its GUI for management, and set up automated health monitoring using UptimeKuma. By the end, you will have a robust architecture that can survive individual server reboots without downtime, offering a simpler alternative to complex enterprise-grade distributed file systems.
1. Vaultwarden or Bitwarden?
- While Bitwarden offers a robust, enterprise-ready self-hosted option, it is resource-intensive. The official Bitwarden server relies on a complex stack of MSSQL (Microsoft SQL Server) and multiple .NET containers, often requiring 2GB+ of RAM just to idle.
- Vaultwarden is a lightweight rewrite of the Bitwarden API in Rust. It is fully compatible with official Bitwarden apps (browser extensions, mobile, desktop) but runs on a fraction of the resources (often <100MB RAM).
- Bitwarden offers a free option for individuals. If you have a family or an organization and want to share a collection of passwords, you would need to go on the paid tier. The advantages include convenience (no maintenance on your part) and no missing features.
- The obvious pitfall with Vaultwarden is that if you deploy it yourself, you will also need to handle the maintenance. We counter that by using docker containers that can be updated very easily. What takes more effort is to ensure your web and database clusters are up to date and secure as well, which is beyond the scope of this tutorial. In addition, if Bitwarden introduces some flashy new features, you may need to wait till the Rust devs update them for Vaultwarden.
Pre-requisites
- A web server (or two) on site 1 + 2 running nginx on Debian 12 or newer. Their set up is beyond the scope of this article - you can refer to my previous article on How to configure High Availability for a Web Server using Syncthing and HAProxy (on OPNSense).
- A Galera cluster (MySQL) deployed in HA on your two sites, ideally with a Galera witness on site 3 (all connected via WireGuard). Again, the set up is beyond the scope of this article - you can complete them using previous tutorials titled Deploy MariaDB Galera Cluster on Proxmox and Set up a Galera Witness on Hetzner VPS using Terraform + Ansible (AWX)
- OPNSense (or pfsense or similar) with an HAProxy module to act as a reverse proxy + virtual IP interface for our DB cluster on site 1 and 2. Previously, this was completed in a tutorial called OPNSense in HA with CARP with dual WANs.
Topology
-
Site 1 (Main) - all connected to a UPS managed from an RPI
- OPNSense in HA (192.168.8.254) - CARP 0 - see this guide to set it up.
OPNSense1(192.168.8.1) - Proxmox host 1OPNSense2(192.168.8.2) - Proxmox host 2- Site-to-site VPN WireGuard) with the interface of 10.10.10.1/24
- Web servers in HA - reachable via a shared back-end pool in HAProxy within OPNSense
web1(192.168.8.9) - Proxmox host 1- Syncthing from web1 to web2 & web1 to web3 - to sync user data in near real-time
- Connected to a local Gitea server - to update app data on demand
web2(192.168.8.10) - Proxmox host 2- Syncthing from web2 to web1 & web2 to web3 - to sync user data in near real-time
- Connected to a local Gitea server - to update app data on demand
- Database Cluster - MariaDB Galera cluster - reachable on virtual IP 192.168.8.70 configured in OPNSense
galera1-2(192.168.8.71 + 72) - Proxmox host 1galera3-4(192.168.8.73 + 74) - Proxmox host 2galera-template- a pre-prepared LXC template ready for easy deployment in case a replacement is needed (can be automated with AWX for deployment)
Gitea LXC(192.168.8.21) - to sync app data and deployment scripts + config.xml for each OPNSense host.Uptimekuma1(192.168.8.60) - to monitor all Site 1 hosts’ uptime inc. services like SyncthingRPI(192.168.8.16)- Corosync for HA for the Proxmox cluster) - ensure a host is reachable if one is down
- Proxmox Backup Server with an added drive - for Site 1 + 2.
APCupsdwith scripts for smooth graceful shutdown of Proxmox hosts - see this tutorial for more information.- Can act as a local Galera witness before Site 3 is set up.
- OPNSense in HA (192.168.8.254) - CARP 0 - see this guide to set it up.
-
Site 2 (Online Backup)
OPNSense3(192.168.6.1) - Proxmox host 3- Site-to-site VPN (WireGuard) with the interface of 10.10.10.2/24
Web3(192.168.6.10) - Proxmox host 3- Syncthing from web3 to web1 & web3 to web2 - to sync user data in near real-time
- Connected to Site 1’s Gitea server - to update app data on demand
Galera4+5(192.168.6.75 + 76) - Proxmox host 3Uptimekuma2(192.168.6.60) - monitors Site 2 services inc. web2’s Syncthing jobs.
-
Site 3 (Witness)
- Galera witness VPS deployed automatically via AWX in Hetzner - see this tutorial on how to achieve that.
- Site-to-site VPN (WireGuard) with the interface of 10.10.10.3/24
Garb- daemon that does not hold data and provides HA if one site is down (quorum voting as +1)Uptimekuma3- monitors uptime for websites that are provided by either site (such as bachelor-tech.com)
- Galera witness VPS deployed automatically via AWX in Hetzner - see this tutorial on how to achieve that.
Software Versions at the time of write-up
For the purpose of reproducibility, as a side note, you can find the versions that I worked with:
- OPNSense:
- Core Version: 25.7.10 (commit: c2f076f30)
- os-haproxy plugin: 4.6_1
- os-acme plugin: 4.11
- os-ddclient plugin: 1.28
- os-git-backup: 1.1_1
- Vaultwarden Docker Image: 1.35.2
- Web servers
- OS: Debian 12 (Bookworm, kernel 6.1.0-26-amd64)
- nginx: 1.28.0
- Docker Engine (client + server): 29.1.3
- Syncthing: 2.0.12 (Hafnium Hornet)
- Fail2ban (server + client): 1.0.2
- Galera cluster:
- OS: Debian 13 (Trixie, kernel 6.17.2-2-pve)
- Maria DB Server: 11.8.3
- Maria DB Client: 15.2
- UptimeKuma: 2.0.0-beta.4
Gotchas with Vaultwarden & Syncthing
There are two specific limitations to be aware of during an Active-Active setup for Vaultwarden:
- Token Signing Keys: Users will get logged out if they hit
web1but their token was signed byweb2orweb3using a different key. You must ensure the RSA key files in the data directory are identical across all nodes.- We will handle that in this guide by using Syncthing to distribute the RSA key between the web nodes.
- WebSockets: Vaultwarden does not currently have a "message bus" (like Redis) to broadcast WebSocket events between nodes. If a user updates a password on
web1, a device connected toweb2orweb3won't get the live update immediately. It will sync the next time the user manually refreshes or performs an action. This is a minor inconvenience but acceptable for most. - Vaultwarden tables utilize Primary Keys, which is good (Galera requires them). However, ensure your Galera nodes are not running in
ENFORCINGmode forwsrep_drupal_282555_workaroundor strict checking that might blockINSERTstatements if they momentarily lack a PK. Most likely, this will not be an issue.
2. Create a Vaultwarden DB + Install Dependencies
Now since the topology and the specifics of Vaultwarden have been covered, let us move forward with the installation and setup. We will be setting it up on Debian 13 (Trixie) - other versions will likely work in a very similar fashion.
Create a DB on your cluster
- SSH into any of the Galera cluster node (as they will sync) and run the following:
- Replace the ‘
your_secure_password’ string with your own! It is recommended to avoid using special characters for compatibility - the length is what matters the most here! If you do use special chars, you will need to escape them properly later on in thedocker-compose.ymlfile for Vaultwarden. - If you are not sure about the subnet required for the user’s privileges, you can just use ‘
%’ instead of specifying the IP range.
- Replace the ‘
mysql -u root -p

CREATE DATABASE vaultwarden CHARACTER SET utf8mb4 COLLATE utf8mb4_unicode_ci;
CREATE USER 'vaultwarden'@'192.168.%' IDENTIFIED BY 'your_secure_password';
GRANT ALL PRIVILEGES ON vaultwarden.* TO 'vaultwarden'@'192.168.%';
FLUSH PRIVILEGES;
Install dependencies + Vaultwarden itself
- Take a snapshot of each web server before you start the process!
- Install the following on EACH web node you have:
# Update and install basic tools
sudo apt update && sudo apt install -y ca-certificates curl

# Add Docker's official GPG key
sudo install -m 0755 -d /etc/apt/keyrings
sudo curl -fsSL https://download.docker.com/linux/debian/gpg -o /etc/apt/keyrings/docker.asc
sudo chmod a+r /etc/apt/keyrings/docker.asc

# Add the repository
echo \
  "deb [arch=$(dpkg --print-architecture) signed-by=/etc/apt/keyrings/docker.asc] https://download.docker.com/linux/debian \
  $(. /etc/os-release && echo "$VERSION_CODENAME") stable" | \
  sudo tee /etc/apt/sources.list.d/docker.list > /dev/null

# Refresh apt & install Docker
sudo apt update
sudo apt install -y docker-ce docker-ce-cli containerd.io docker-buildx-plugin docker-compose-plugin

# Enable Docker Systemd service (so containers start on boot)
sudo systemctl enable --now docker
- Create a user, folder and a Docker Compose file:
# Create the directory
sudo mkdir -p /opt/vaultwarden

# Set permissions so your current user can edit files there
sudo chown $USER:$USER /opt/vaultwarden
cd /opt/vaultwarden

# Create the Compose file
nano /opt/vaultwarden/docker-compose.yml
- The
compose.ymlfile:- Note that in my setup, I have a virtual IP set up using OPNSense that I point the web application onto. If you do not have it set up yet, you can check out this part of the tutorial titled Virtual IP Set Up on OPNSense (you will then need a service such as HAProxy listening on that IP to receive and forward requests to your Galera cluster nodes).
services:
  vaultwarden:
    image: vaultwarden/server:latest
    container_name: vaultwarden
    restart: always
    ports:
      - "127.0.0.1:8000:80"
    environment:
      - DATABASE_URL=mysql://vaultwarden:[email protected]/vaultwarden
      - DOMAIN=https://vault.yourdomain.com
      - SIGNUPS_ALLOWED=false
      - INVITATIONS_ALLOWED=true
      - IP_HEADER=X-Real-IP
      - LOG_LEVEL=info
      - EXTENDED_LOGGING=true
      # --- SMTP Email Settings ---
      - SMTP_HOST=smtp.gmail.com  # Replace with your provider's host
      - [email protected]
      - SMTP_FROM_NAME=Vaultwarden
      - SMTP_SECURITY=starttls    # Options: starttls, force_tls, off
      - SMTP_PORT=587             # Usually 587 for starttls, 465 for force_tls
      - [email protected]
      - SMTP_PASSWORD=your_app_password
      - SMTP_AUTH_MECHANISM="Plain" # This is safe if used with TLS
    logging:
      driver: "journald"
      options:
        tag: "{{.Name}}"
    volumes:
      # This creates a 'vw-data' sub-folder as a form of persistent storage
- ./vw-data:/data- Run it:
cd /opt/vaultwarden

# Sudo is needed to pull the image
sudo docker compose up -d 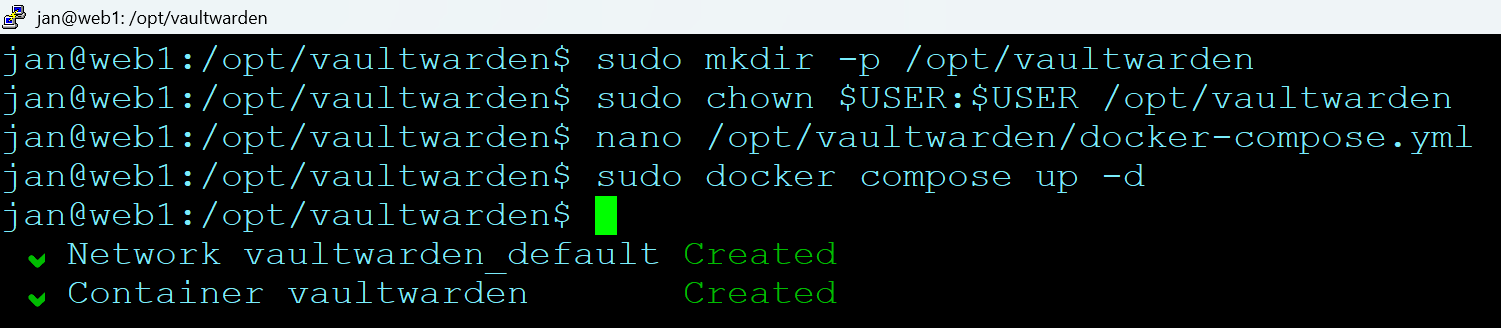
- You can check its status after creation by running
sudo docker container ps -a.
💡 Note
Once your
docker-compose.ymlfile is launched and you make changes to it, it is best to then re-create the container by runningsudo docker compose up -d --force-recreate
Configure Nginx with Vaultwarden
- Depending on how your nginx instance is already configured, your setup may look something like this:
- Ensure the path + port number match!
- SSL offloading is handled by HAProxy/OPNSense, so Nginx here listens on 8081. Ensure HAProxy passes the
X-Forwarded-Protoheader so Vaultwarden knows it's secure.
sudo nano /etc/nginx/conf.d/vaultwarden.conf

server {
    # We listen on 80 because HAProxy handles the SSL/HTTPS before it gets here.
    listen 8081;

    # Replace with your actual FQDN
    server_name vault.yourdomain.com;

        # Replace with OPNSense's actual IP to ensure fail2ban blocks the correct users:
    set_real_ip_from 192.168.0.0/16;
    real_ip_header X-Forwarded-For;
    real_ip_recursive on;

    # Allow large attachments (optional, but good for saving PDFs/Images in vault)
    client_max_body_size 128M;

    location / {
        proxy_pass http://127.0.0.1:8000;

        # WebSocket support (used by /notifications/hub)
        proxy_http_version 1.1;
        proxy_set_header Upgrade $http_upgrade;
        proxy_set_header Connection "upgrade";

        # Pass headers so Vaultwarden knows the real IP of the user, not just "127.0.0.1"
        proxy_set_header Host $host;
        proxy_set_header X-Real-IP $remote_addr;
        proxy_set_header X-Forwarded-For $proxy_add_x_forwarded_for;
        proxy_set_header X-Forwarded-Proto $scheme;
}- To clarify the ports used (these remain internal and do not need firewall rules):
- Port 8081: What nginx listens on to receive traffic from HAProxy
- Port 8000: The Vaultwarden application (web interface, API, and WebSockets)
💡 Note: In Vaultwarden versions prior to 1.29.0, WebSockets required a separate port (3012). Modern versions serve WebSockets from the main application port, simplifying the configuration.
- Check nginx config and reload it:
# Confirm there is no typo in the syntax before reloading it
sudo nginx -t

# Reload nginx for the changes to take an effect
sudo systemctl reload nginx- Remember to complete the above on all web server nodes, although you may wish to do the first one first and have HAProxy set up just with that one node until you got it working fully.
3. Configure OPNSense + HAProxy for Vaultwarden
- For true High Availability (ideally on each site or at least on the main site), you should run your OPNSense in a master-backup configuration running on separate hardware on the same site.
- You would need to open a port for HTTPS communication and since your OPNSense HA relies on having the web interface running on port 443, you will need to open another port on HAProxy to receive web traffic on (I use port 4443 that the ISP-provided router changes from 443 to 4443). See here for more details on which ports to open for web traffic to work on OPNSense, followed up by NAT rules.
- Create a DNS record for your
vault.yourdomain.tldrecord pointing to the public IP of your OPNSense - you can follow these steps to set up dynamic DNS with Cloudflare.- If you prefer a more secure set up, you do not actually need to expose a public DNS record, you can simply set one up on your network using tools such as Unbound DNS.
- Before setting up HAProxy, you should also set up an SSL certificate using the ACME plugin in OPNSense.
Add your ‘real’ hosts
In case you do not have it set up yet, apart from defining your web hosts (under the ‘Real Servers’ tab) with the local port (I’m using 8081), we should check the health of each web host.
- In OPNSense, go to Services → HAProxy → Settings. Then move to the other menu and click on Real Servers → Real Servers. Add a new one for each of your web servers:
- Name:
web1_nginx - Type:
static - IP: your actual IP
- Port: your chosen port configured on nginx, e.g.
8081 - No SSL config here!
- Name:

Set up a health monitor
We should also ensure that there is a health check in place for the web servers.
- Go to Rules & Checks → Health Monitors. Add a new monitor:
- Name:
web_server_cluster_check(or whatever you prefer) - Check type:
HTTP (default) - SSL preferences:
use server settings(default) - Check interval:
15-90s(you may get some false positives if too aggressive) - Port to check:
8081 - HTTP method:
HEAD - Request URI:
/ - HTTP version:
HTTP/1.1 - HTTP host:
yourdomain.tld
- Name:

Configure your back-end pool
You may already have a back-end pool configured for your existing web servers, yet we will need to create another pool with the same real hosts in it, since different parameters will need to be set up for Vaultwarden.
💡 Note
The challenge with the default session rate period is that it is typically about 10 seconds long as well as no pass-through option is defined, which would result in the client having to re-establish connection with the server (users would see having a ‘Connecting…’ spinning wheel appear regularly). While for example PHP-based applications receive a payload and close the connection after responding, for web sockets, we want the session to remain active.
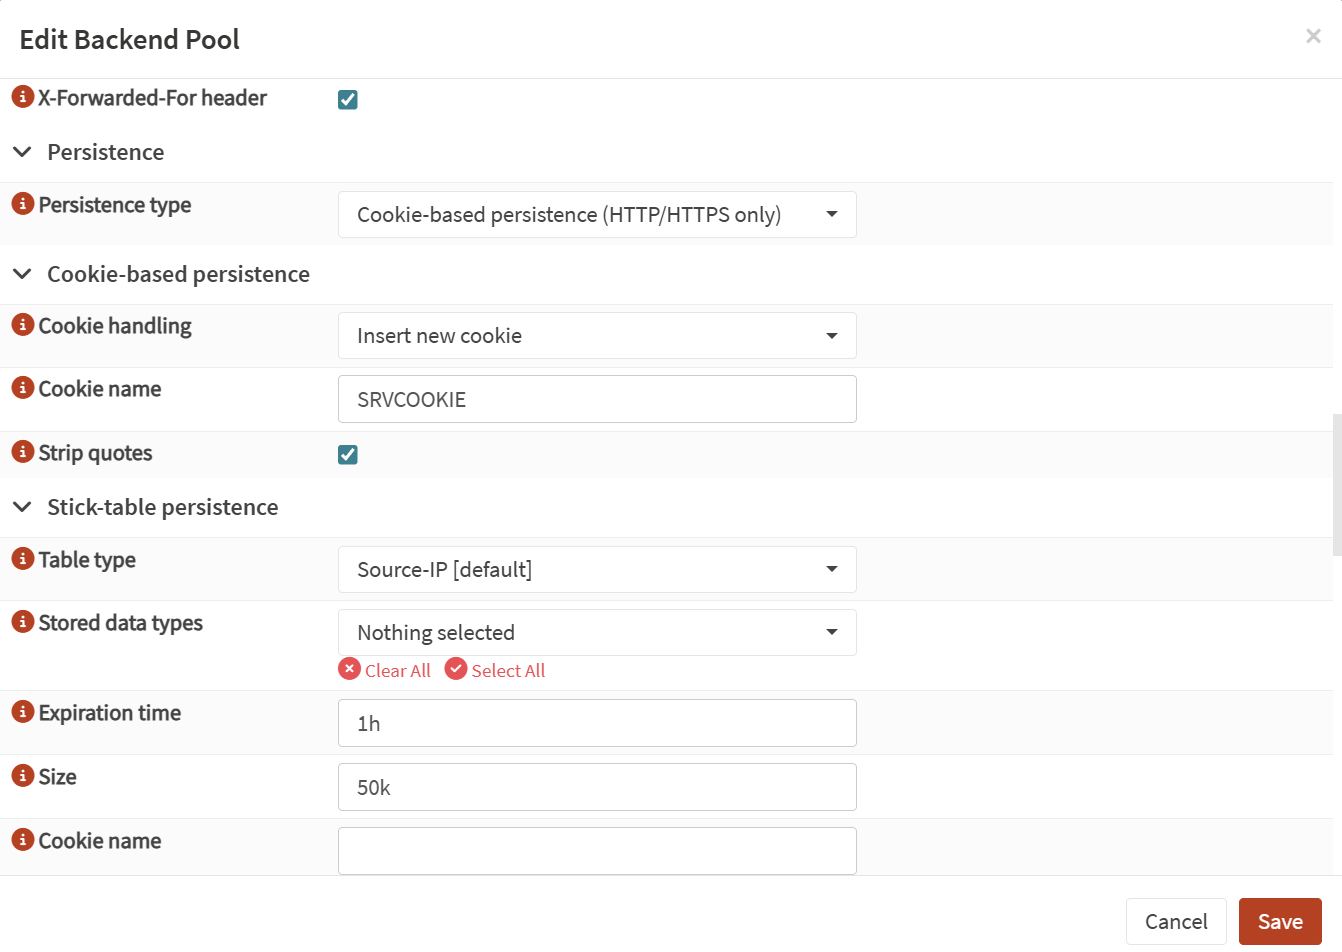
- Create a new back-end pool as follows (enable the advanced options):
- Name:
backend_vaultwarden_nginx - Mode:
HTTP (Layer 7) - Balancing Algorithm:
Round Robin - Random Draws:
2(entirely up to you) - Proxy Protocol: none
- Servers: add your ‘real’ servers here
- …
- Enable health checking:
Ticked - Health monitor:
web_server_cluster_check(previously defined in the health check section) - Proxy Protocol:
none - Servers: add your web servers
- …
- X-Forwarded-For header:
Ticked - Persistence Type:
Cookie-based persistence - Cookie Handling:
Insert new cookie - Cookie name:
SRVCOOKIE(or another name as you desire) - Strip Quotes:
Ticked(Default) - Expiration Time:
1h(match your tunnel timeout) - …
- Connection Timeout:
5s(fail-over fast if the server is not responding) - Check Timeout:
5s(fail fast if health check fails) - Server Timeout:
3600s(allows the server to keep the pipe open) - Retries:
3(default) - Option pass-through:
timeout tunnel 3600s(tells HAProxy that it is a tunnel) - You can leave the rest as default unless you have other specifics in your setup.
- Name:
Configure a condition and a rule on HAProxy to listen to
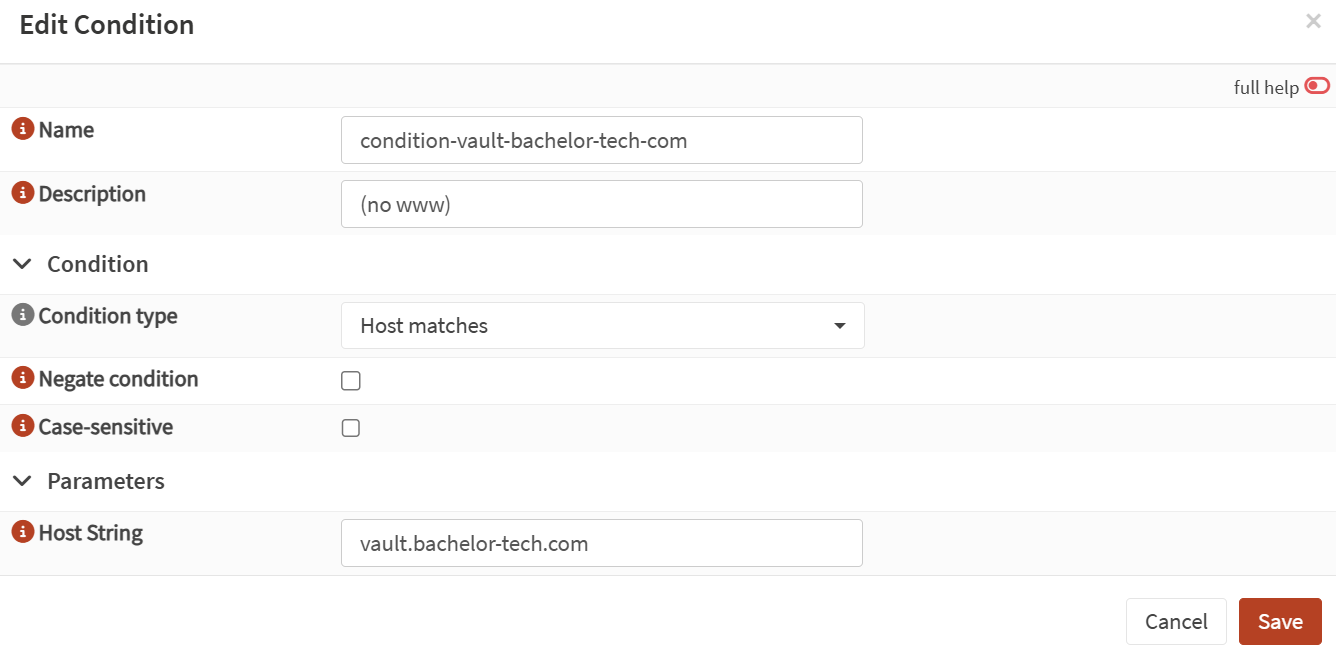
- While still under HAProxy’s settings, go to Rules & Checks → Conditions and add a new condition:
- Name:
condition-vault-your-domain-tld - Condition type:
Host matches - Host string:
vault.yourdomain.tld
- Name:
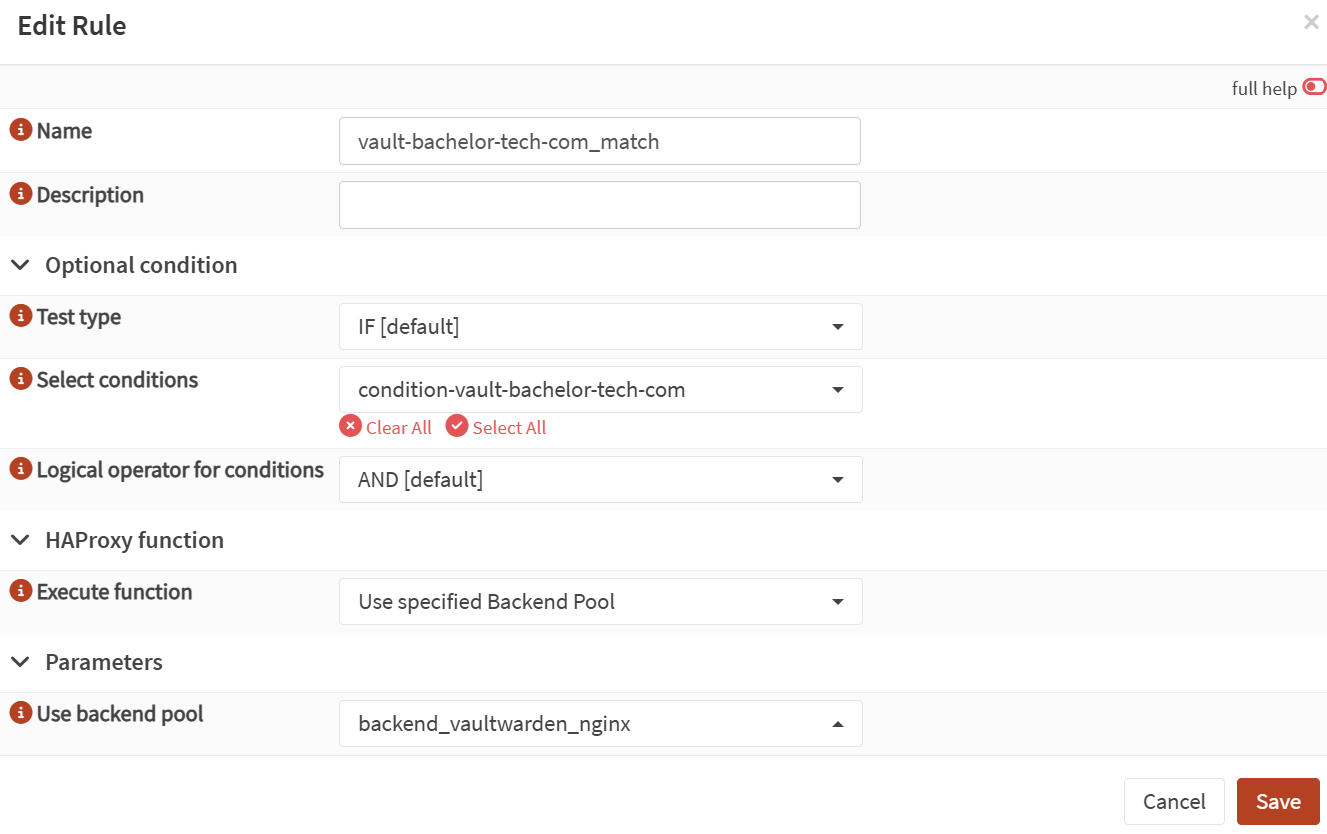
- And then still under Rules & Checks, go to Rules and add a new rule:
- Name: vault-your-domain-tld_match (do not use spaces)
- Test type:
IF - Select conditions:
condition-your-domain-tld(find your own) - Execute function: Use specified Backend Pool
- Use backend pool:
backend_vaultwarden_nginx(as defined previously)
Set up your public (front-end) service
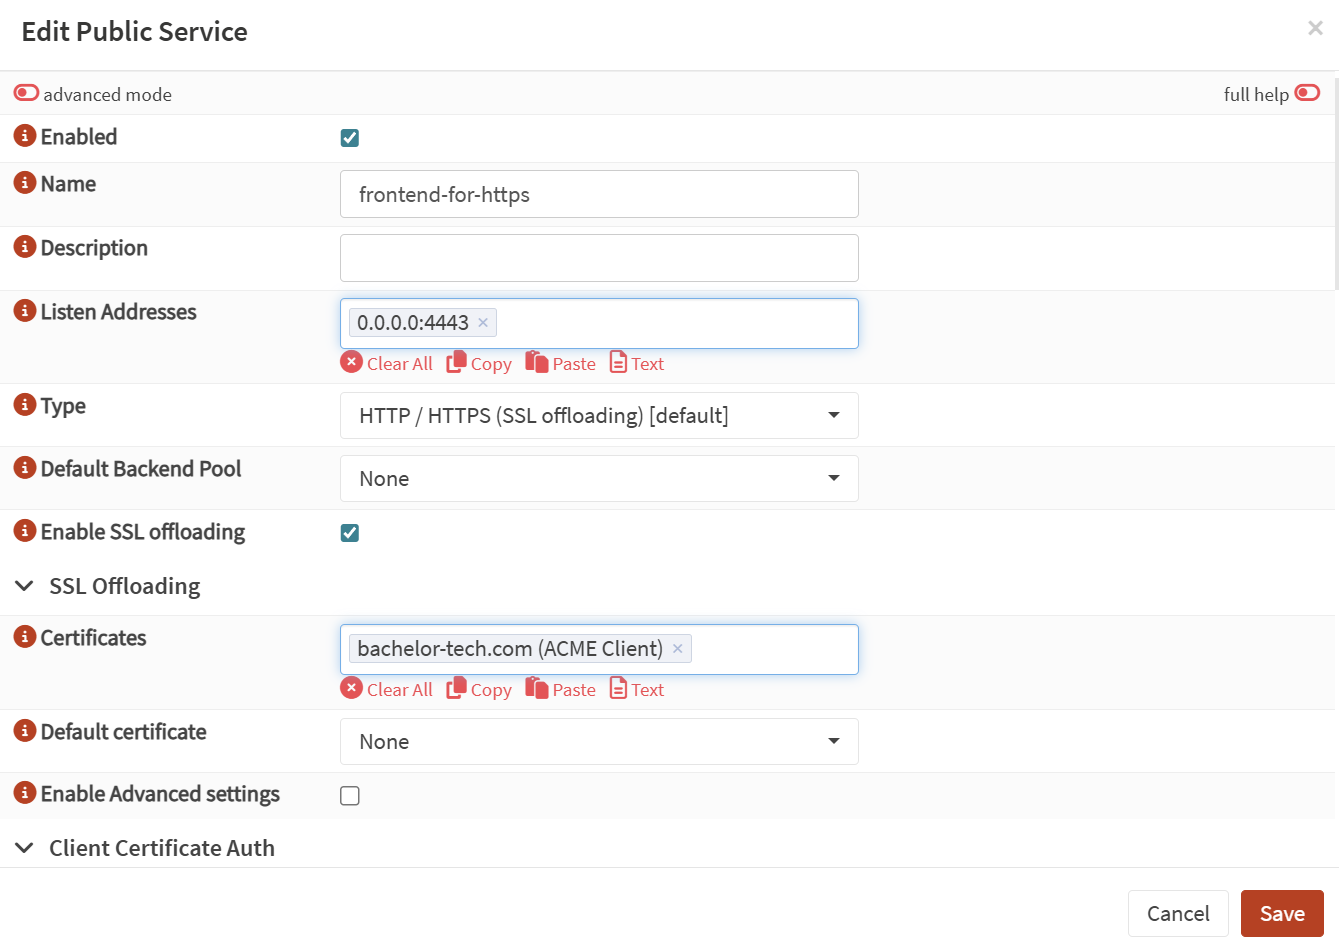
Go to Virtual Services → Public Services. If you already have one defined for HTTPS, then simply add the rule at the end, test & apply the syntax and you are done.
- If you have not set up HTTPS, then create a new one. The key here is to firstly have firewall rules set up to forward traffic to ‘This host’ on a port that HAProxy is listening to (must be different from the web interface that you use to access OPNSense!) and then in the ‘Public Service’ window, tick the ‘
SSL offloading’ box to ensure that traffic is decrypted on your LAN. You would need to use the ACME certificate created earlier.
💡 Note
Ensure that you follow these steps on all of your sites to have the same config and can thus expect consistent behavior.
With Vaultwarden reachable through HAProxy, the next part covers keeping its data in sync across sites and monitoring and hardening the deployment.
Enjoying this tutorial?
This site is a non-profit project. If it saved you some time, you can support it by getting Jan some coffee.
☕ Buy me a coffee
Comments