Part 1 - Set up automatic patching with Semaphore, Patchmon and n8n
Download Markdown Go to next section
September 12, 2026
Table of Contents
- Introduction
- Step 1: Install Semaphore on Proxmox with PostgreSQL
- Step 2 - First Login & Connection with Gitea
- Step 3 - Prepare your hosts - Ansible SSH key
- Step 4 - Prepare your Proxmox servers
- Step 5: Connect Semaphore to Proxmox with Dynamic Inventory
- Step 6: Run a simple Playbook from Semaphore
- Step 7 - Set up group_vars for more than one Proxmox node
- Step 8 - A gotcha about Semaphore’s Inventory
-
Step 9: Create a Proxmox Snapshot and a Patch job template (Debian patching)
- Template 1: Snapshot a Proxmox host (VMs + LXCs)
- Template 2a: APT Cache update template
- Template 2b: Security only patch template
- Template 2c: Reboot host if necessary
- Template 2d: Verify Proxmox tags
- Template 3: Patch Debian Hosts (general)
- Template 4a: Sury repo fix for web servers running PHP
- Template 4b: Patch nginx (web servers with PHP) on Debian
- Template 5: Patch Galera nodes (MariaDB on Debian)
- Transferring other templates
Introduction
Do you have a fleet of Proxmox VMs and LXCs and have to manually update each? With the rising threat of AI-driven vulnerability exploitation, it is all the harder these days to stay on top of patching. While recently in version 2 onwards, Patchmon implemented patching (which is great), even the most current version at the time of writing this article (2.0.2) does a very basic job with it.
For example, what if you want to take a snapshot before a patching job is done? Or perform checks before running updates (such as whether there is enough disk space available)? What if you would like to run analysis on the output of the patching and apply additional fixes if something gets stuck? How about verifying that services work as expected after the patching and restoring them if not? Would you like to get an automated summary of what was patched shipped to you via Discord/Telegram afterwards? These (and more) are but basic requirements that Patchmon in itself will not manage. That is why we can pair it up with n8n together with Semaphore UI equipped with an arsenal of pre-configured jobs that will handle it for us.
Some of the limitations of Patchmon have been highlighted more than six months before this tutorial was published by Stephane’s article called: “The Perfect Patch Management Duo: PatchMon + Ansible AWX” - worth a read! However, AWX has not received proper updates since Q4 2024 and the vision for it is to move to a paid closed system. For this reason, we will evaluate other options and set the jobs up in another automation platform.
Structure of this series
- Part 1 - Semaphore UI set up
- Docker + a local PostgreSQL DB
- Dynamic Proxmox integration
- Playbooks set up (migration from AWX for some)
- Test of templates, troubleshooting
- Part 2 - Patchmon set up
- Docker installation with persistent storage
- Automatic discovery of LXCs
- Use of Semaphore templates to deploy on VMs
- Part 3 - UptimeKuma set up
- Installation in LXC (or Docker)
- Monitors tagged by hostname
- Maintenance windows triggered via Ansible
- Part 4 - Patching workflow in n8n
- Set up using docker and persistent storage
- Import of an automated patching workflow
- Integration with Telegram/Discord for notifications
Series Explained
In Part 1 we will stand Semaphore up from scratch in a dedicated Debian 13 LXC within a Proxmox node, link it to a local PostgreSQL database and configure Semaphore from ground up (including setting up Proxmox tags, Ansible vaults, patching playbooks, etc.). We will pair it up with a dynamic Proxmox inventory called ip2tag.
In Part 2, we will deploy Patchmon and add our hosts to see which ones need updates. Later in Part 4, we will set up threshold that will shoot a webhook when either standard OS updates or security updates are ready, which will act as the trigger for the whole workflow.
In Part 3, we will stand up Uptimekuma in LXC (or Docker), set up monitors and tag them by their hostnames, so that we can match them for uptime maintenance to disable false alarms during updates and reboots. The idea here is to automatically disable alarms when snapshotting and patching is in progress.
In Part 4, we set up two n8n workflows: one sub-workflow that handles repetitive tasks like starting a playbook, fetching results from Semaphore, setting a maintenance window in Uptimekuma, etc. Then we will connect it to the main orchestration workflow that will handle the whole process.
The main workflow handles exceptions for hosts that are not to be patched, followed by an UptimeKuma maintenance request, then fires a snapshot job if the host is a Proxmox virtual. After that, the actual patching starts - a suitable playbook is chosen based on the nature of the host - generic Debian hosts, web servers running nginx, MySQL hosts (Galera nodes), etc. This can be customized as per your needs.
The jobs are polled regularly using the sub-workflow and the result is posted on Discord/Telegram. The admin gets notified also if a reboot is required before it takes place. Each patching playbook also triggers a re-check from Patchmon to verify that all updates have been applied.
Requirements - before starting
It is expected that you have at least the following when starting:
| Item | Purpose |
|---|---|
| Proxmox host (1 or more - can be in a cluster) | To patch VMs, LXC containers. |
| Gitea (or similar locally or cloud-hosted versioning system) | To store playbooks in |
| 2 GB of available RAM, 50 GB drive space (minimum) | Install all services either in one VM or as separate LXCs. |
The Fall of AWX - What other options are there?
In the past on my blog, I propagated the use of AWX. Yet there has not been an update / release since Q4 2024 and Red Hat now steers production users towards the (rather expensive) Ansible Automation Platform. I wanted something lighter, actively maintained and built to last.
What are the options? See a brief comparison evaluated during early July 2026:
| Criterion | Semaphore | Gitea Actions | Rundeck CE | AAP (dev sub) | AWX |
|---|---|---|---|---|---|
| Actively maintained / longevity | ✅ steady | ✅ (Gitea) | ✅ open-core | ✅ vendor | ❌ stalled since Q4 2024 |
| Free & self-hosted | ✅ | ✅ | ✅ (core) | ✅ (individuals) | ✅ |
| Lightweight | ✅ Go binary | ✅ runners | ⚠️ Java | ❌ heavy | ❌ k3s/6GB |
| Proxmox dynamic inventory + token | ✅ via a plugin file | ✅ you wire it | ⚠️ awkward | ✅ | ✅ |
| REST API to launch + read results | ✅ clean | ⚠️ workflow dispatch | ✅ | ✅ | ✅ |
| Scheduling (many jobs) | ✅ (UI a bit plain) | ✅ cron in YAML | ✅ best-in-class | ✅ | ✅ |
| GitOps | ✅ git templates | ✅✅ native | ⚠️ | ⚠️ | ⚠️ |
| RBAC/SAML | ⚠️ basic | ⚠️ repo-based | ✅ | ✅ | ✅ |
The choice was set on Semaphore UI: a single Go binary that happily runs on a 1 GB box, gives you a clean web UI, a proper REST API, built-in scheduling, and speaks plain Ansible (plus Terraform, OpenTofu, PowerShell and scripts, if you ever fancy it).
In this first part we will stand Semaphore up from scratch in a dedicated Debian 13 LXC on my Site 2 Proxmox node, backed by PostgreSQL, and log into the UI. We will pair it up with a dynamic Proxmox inventory and set up new jobs (or migrate existing playbooks if you have any). Let's dive in!
Step 1: Install Semaphore on Proxmox with PostgreSQL
What will we set up here:
- A clean, unprivileged Debian 13 LXC just for Semaphore (easy to snapshot and back up)
- PostgreSQL as the database backend (robust for scheduling and task history)
- Semaphore installed natively from the official .deb, running as a systemd service
- Access over the LAN at http://
:3000 with an option to set up HTTPS in the future.
Set up a Debian LXC in Proxmox
On your Proxmox host, create a fresh container. You can do this in the Proxmox web UI (Create CT) or from the shell. The key choices:
- Template: Debian 13 (Trixie)
- Type: unprivileged container (safer; fine for Semaphore)
- Resources: 2 vCPU, 2 GB RAM, 10 GB disk is plenty to start
- A hostname you will recognise, e.g. semaphore .
- Add a static IP mapping against the generated MAC address on your Proxmox node.
Start the container and open its console (or SSH in) as root.
apt update && apt -y full-upgrade- Add a user to use + sudoers
# Create a user
adduser <username>

# Add the user into the list of admins
usermod -aG sudo jan

# Switch into that user
su jan
Semaphore itself is just one binary, but it needs Ansible to run playbooks, Git to clone your repos, and a database. While we are here we will also add the Python bits that the Proxmox dynamic inventory will need in Part 2, so we do not have to come back.
apt -y install ansible git curl wget gnupg ca-certificates \
python3-pip python3-venv python3-apt sshpass postgresql

# Python libraries for the community.proxmox inventory plugin (used in Part 2)
apt -y install python3-proxmoxer python3-requestssshpassis only needed if any of your hosts authenticate with a password instead of an SSH key (harmless to have ready).- Confirm the essentials are present:
ansible --version
psql --version- One more thing - Debian packages are often behind a few versions and to make a future template that takes Proxmox snapshot work (using
proxmoxer), we better check that it is at its newest version (at least 2.3.0 is required):
sudo pip install --break-system-packages --upgrade 'proxmoxer>=2.3' requests
python3 -c "import proxmoxer; print(proxmoxer.__version__)"   # should be ≥ 2.3
Create the PostgreSQL database and user
Semaphore keeps your projects, encrypted credentials, schedules and task history in the database. Let's give it a dedicated database and user:
sudo -u postgres psql <<'SQL'

CREATE DATABASE semaphore;
CREATE USER semaphore WITH ENCRYPTED PASSWORD 'YourStrongPasswordHere';
ALTER DATABASE semaphore OWNER TO semaphore;
GRANT ALL PRIVILEGES ON DATABASE semaphore TO semaphore;
SQL- One gotcha worth knowing: PostgreSQL 15+ locks down the public schema by default, which can trip up Semaphore's first-run migrations. Making semaphore the database owner (as above) avoids it, but to be safe, grant schema rights explicitly too:
sudo -u postgres psql -d semaphore -c "GRANT ALL ON SCHEMA public TO semaphore;"Install Semaphore from the official .deb
Semaphore publishes .deb packages on GitHub. This snippet detects the latest version and your architecture automatically, so you are not chasing version numbers:
cd /tmp
VER=$(curl -sL https://api.github.com/repos/semaphoreui/semaphore/releases/latest \
| grep tag_name | head -1 | sed 's/.*"v\([^"]*\)".*/\1/')

ARCH=$(dpkg --print-architecture)
echo "Installing Semaphore v$VER ($ARCH)"

wget "https://github.com/semaphoreui/semaphore/releases/download/v${VER}/semaphore_${VER}_linux_${ARCH}.deb"
sudo dpkg -i "semaphore_${VER}_linux_${ARCH}.deb"
semaphore version
The binary lands in /usr/bin/semaphore.
Create a dedicated system user and directories
It is good practice not to run Semaphore as root. We give it its own system account and a home for its playbooks/working files:
sudo useradd --system --create-home --home-dir /opt/semaphore \
--shell /usr/sbin/nologin semaphore
sudo mkdir -p /opt/semaphore/config /opt/semaphore/playbooks
sudo chown -R semaphore:semaphore /opt/semaphore
Run the setup wizard
For a package install, Semaphore generates its config.json through an interactive wizard. Run it as the semaphore user so the file ownership is correct:
sudo -u semaphore bash -c 'cd /opt/semaphore/config && semaphore setup'Work through the prompts. The ones that matter:
- Database type: choose your preferred option, such as PostgreSQL (option 3)
- DB hostname: 127.0.0.1:5432 (default)
- DB user / password / name: semaphore / your password / semaphore
- Playbook path: /opt/semaphore/playbooks
- Public URL: leave blank for now (we are on plain HTTP by IP). We will set this up later.
- Enabled email alerts: no (we will set up an email client later)
- Username: enter a username
- Email: enter an email address
- Password: your password (to log into Semaphore UI).
When it finishes you will have /opt/semaphore/config/config.json.
Back this up now. That file contains access_key_encryption, the key that encrypts every credential in Semaphore's Key Store. Lose it and you lose access to all stored secrets. Copy it somewhere safe (and we will add it to our backup routine in Step 9).
Run Semaphore as a systemd service
Depending on the package version, the systemd unit may not be created for you. Create it explicitly so Semaphore starts on boot and restarts if it ever crashes:
cat >/etc/systemd/system/semaphore.service <<'EOF'

[Unit]
Description=Semaphore Ansible UI
Documentation=https://docs.semaphoreui.com
Wants=network-online.target
After=network-online.target postgresql.service

[Service]
Type=simple
ExecStart=/usr/bin/semaphore server --config /opt/semaphore/config/config.json
ExecReload=/bin/kill -HUP $MAINPID
SyslogIdentifier=semaphore
Restart=always
User=semaphore

[Install]
WantedBy=multi-user.target
EOF- Then reload systemd and get it up and running:
systemctl daemon-reload
systemctl enable --now semaphore
systemctl status semaphore --no-pager
You should see active (running). If not, journalctl -u semaphore -e will tell you why - nine times out of ten it is the database password or the PG public schema grant from Step 3.
Step 2 - First Login & Connection with Gitea
Open a browser on your LAN to reach the host’s IP on port 3000. Sign in with the admin user you created:
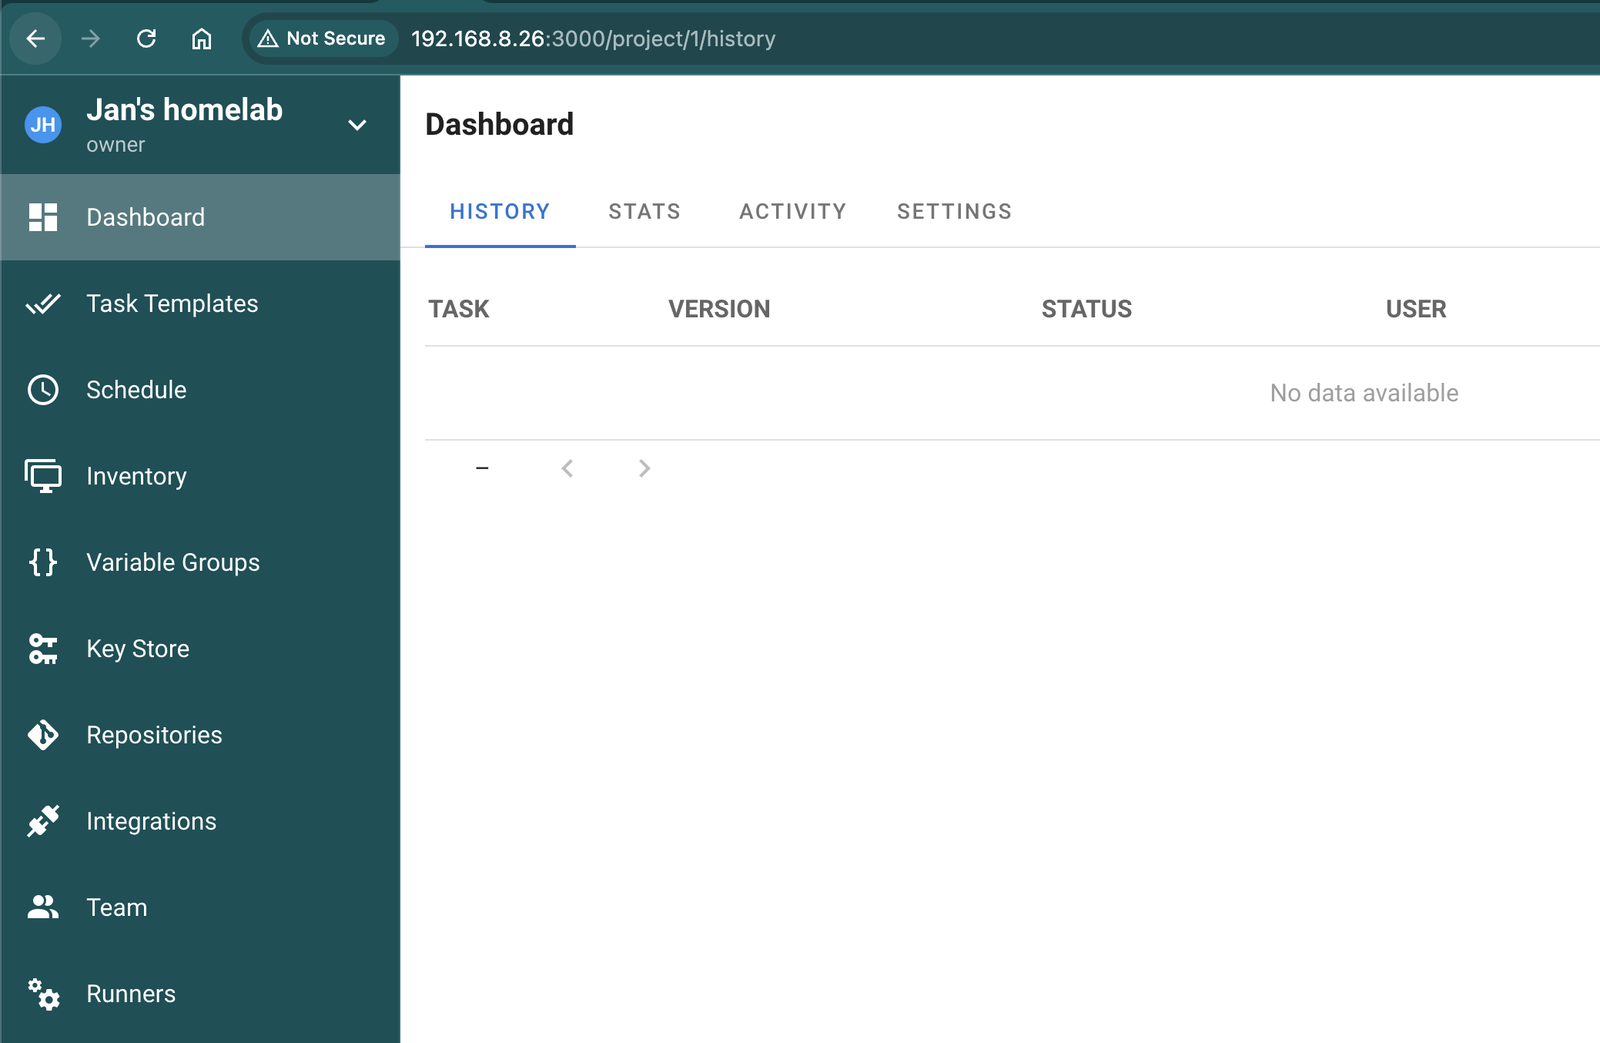
A whirlwind tour of the concepts you will use:
- Project: the top-level container for everything below. Create one, e.g. Homelab.
- Key Store: your SSH keys, passwords and secrets
- Repositories: a Git repo holding your playbooks. This is the GitOps heart of the setup: your automation lives in Gitea, Semaphore just runs it.
- Inventory: static, or a file-based dynamic inventory (this is where the Proxmox plugin helps us).
- Task Templates: a saved "run this playbook against that inventory with these credentials." Templates are what you launch, schedule, or trigger via the REST API.
The plan:
- Step 2a: Get the repo ready (a
collections/requirements.ymland anansible.cfgso the Proxmox plugin loads cleanly). - Step 2b: Connect Gitea to Semaphore with a read-only SSH deploy key.
- Step 3: Set up a different SSH key called
ansiblethat can reach all hosts inc. each individual Proxmox host. Add it to Semaphore. - Step 4: Install an ip2tag plugin on each Proxmox host and create Proxmox API tokens.
- Step 5: Build the dynamic inventory for each Proxmox host/cluster in the
inventory/site_namefolders. - Step 6: Run a read-only playbook and read the output. Troubleshooting steps for errors.
- Step 7: More advanced playbooks to run against your fleet.
Prepare a Git repo
Create a new repository for running Semaphore playbooks.
For those who ran AWX previously and would like to use the same repo with the same Ansible playbooks: please do not, as the syntax for some Ansible playbooks is different. For example, to store credentials for reaching Proxmox host(s), we will be using Ansible Vault and will modify the playbooks, accordingly.
Configure Semaphore with Proxmoxer
Your playbooks already live in Gitea (or a similar app). We just need to add two small files into your existing Gitea repo so Semaphore can resolve the Proxmox plugin without surprises.
a) Tell Semaphore which collections to install. Semaphore automatically runs ansible-galaxy against a requirements.yml in your repo. Create a file under the root folder of your repo under collections/requirements.yml:
- The Python side (
proxmoxerandrequests) we already installed into the LXC in the previous Step, so the plugin has what it needs.
b) Add an ansible.cfg file at the repo root so the inventory plugin is enabled and first-contact host-key prompts don't stall an unattended run:
[defaults]
host_key_checking = False
interpreter_python = auto_silent
collections_path = ./collections

[inventory]
enable_plugins = community.proxmox.proxmox, auto, host_list, yaml, ini
One naming detail that matters: the Proxmox inventory plugin only auto-loads from files ending with proxmox.yml / proxmox.yaml , so ensure that yours does, too (such as biohazard-proxmox.yml).
c) Add a deliberately harmless check playbook for our first run (ansible.builtin.ping makes no changes, it just confirms Python + SSH work end to end). Create a file under helpers/ping.yml:
- Commit and push all three into your Gitea repository which Semaphore cannot reach at this point - let’s address that next.
Connect Gitea with a read-only SSH deploy key
A deploy key is a per-repository SSH key, which is ideal here because it's read-only and scoped to just this repo, so Semaphore can pull but never push or touch anything else.
Generate a dedicated keypair (no passphrase, so the service can use it unattended). You can do this right on the Semaphore LXC:
ssh-keygen -t ed25519 -C "semaphore-deploy" -f ~/semaphore_gitea_deploy -N ""
cat ~/semaphore_gitea_deploy.pub      # the PUBLIC key → goes into Gitea
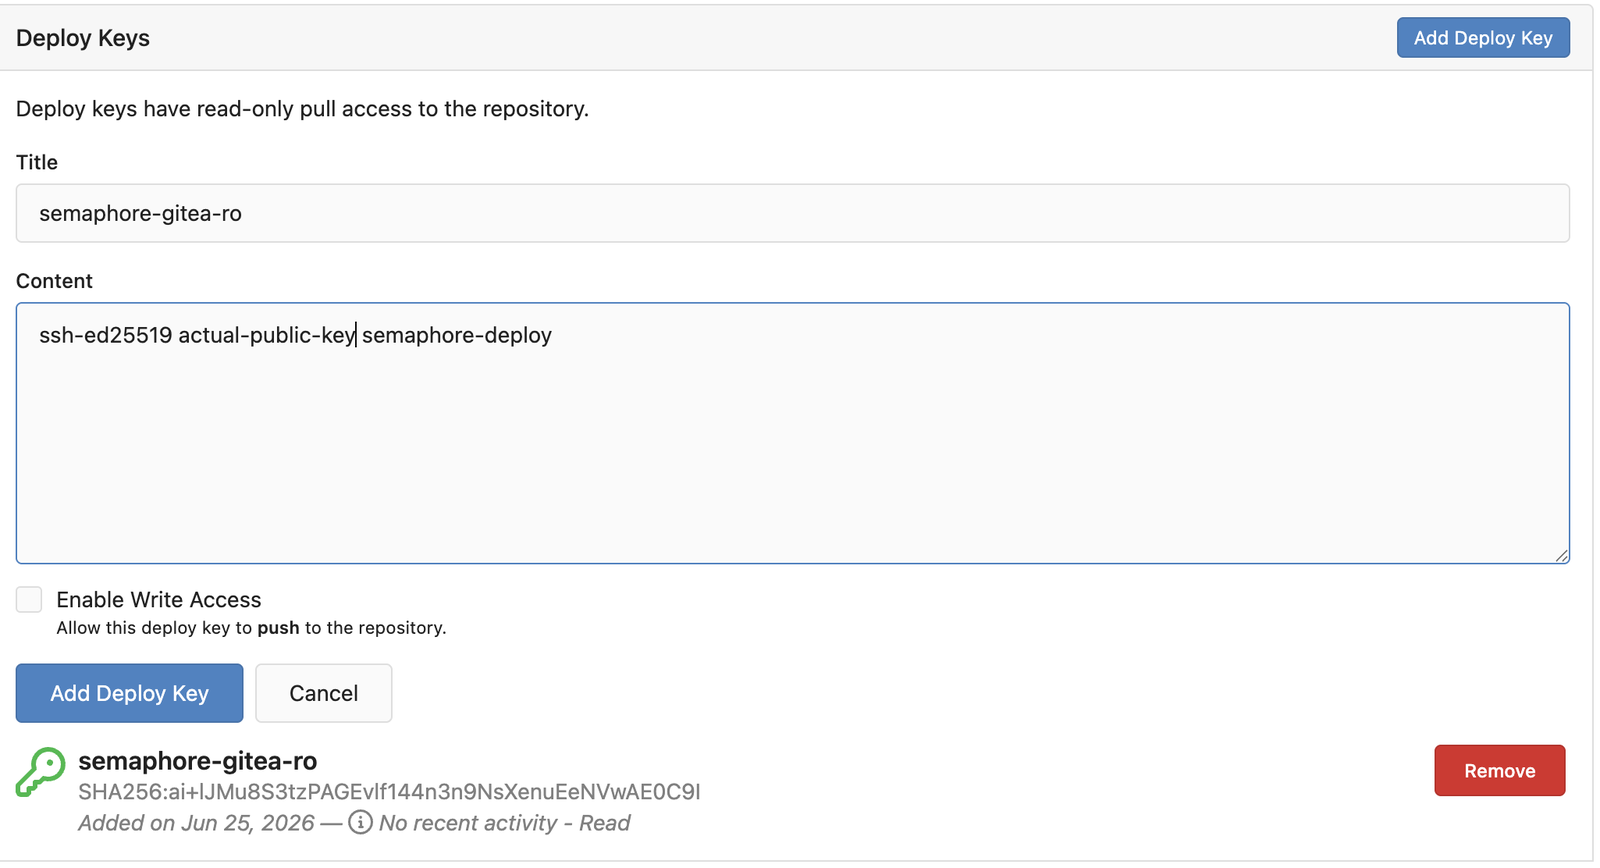
cat ~/semaphore_gitea_deploy # the PRIVATE key → goes into Semaphore- Add the public key to Gitea: open the repo → Settings → Deploy Keys → Add Deploy Key. Paste the .pub contents, give it a name like semaphore-ro, and leave "Enable Write Access" unchecked.
- Add the private key to Semaphore: Key Store → New Key, Type SSH Key, name it gitea-deploy, paste the private key. (Leave passphrase empty.)

- In order to prevent a situation when during the first connection, SSH asks for the server’s fingerprint, we can pre-seed the host key into the
semaphoreuser'sknown_hosts:
sudo -u semaphore mkdir -p /opt/semaphore/.ssh && sudo chmod 700 /opt/semaphore/.ssh
ssh-keyscan -H git.bachelor-tech.com | sudo -u semaphore tee -a /opt/semaphore/.ssh/known_hosts
sudo chown -R semaphore:semaphore /opt/semaphore/.ssh- Once it's safely in both places, delete the local copies from the LXC so the private key isn't lying around:
shred -u ~/semaphore_gitea_deploy ~/semaphore_gitea_deploy.pubAdd the repository into Semaphore
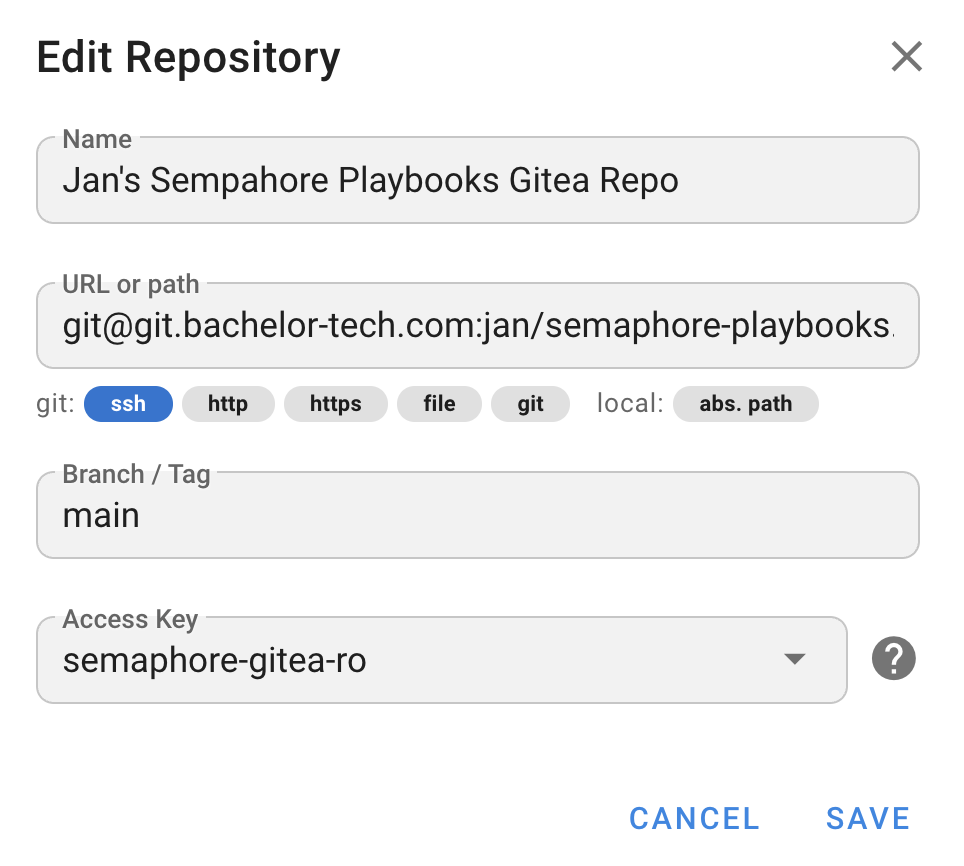
If you haven't already, create a Project (e.g. Homelab), everything below lives inside it. Go to Repositories → New Repository:
- Name:
semaphore-playbooks - URL: the SSH clone URL, e.g. [email protected]:jan/semaphore-playbooks.git
- Branch: main
- Access Key:
gitea-deploy(the key from Step 2)
Save. Semaphore will validate it can reach the repo.
Step 3 - Prepare your hosts - Ansible SSH key
At this point, we have Semaphore connected with Gitea with a requirements set with Proxmoxer in place, but we have no hosts to run the harmless ‘ping’ playbook against.
This is the most boring but necessary part - to ensure Ansible can reach each host, set up a single password-less key that you distribute to each host.
- On our VM, create a temporary key:
# 1. Create the key. Use -N "" for no passphrase
ssh-keygen -t ed25519 -f $HOME/.ssh/ansible_key -N ""

# 2. Display the PUBLIC key. Copy this entire line to your clipboard.
cat $HOME/.ssh/ansible_key.pub- This is the manual, lengthy part if you have a lot of VMs and containers – run this on each to get the key over.
# 1. Create the 'ansible' user with no password.
# -m creates the /home/ansible directory.
# -s /bin/bash sets their shell.
sudo useradd -m -s /bin/bash ansible

# Lock the user - disable password-based login
sudo passwd -l ansible

# 2. Give the user passwordless sudo
sudo visudo

# Add this line at the very end of the file. Save and exit.
ansible ALL=(ALL) NOPASSWD: ALL

# 3. Create the .ssh directory and file as the 'ansible' user
sudo -u ansible mkdir /home/ansible/.ssh
sudo -u ansible chmod 700 /home/ansible/.ssh
sudo -u ansible touch /home/ansible/.ssh/authorized_keys
sudo -u ansible chmod 600 /home/ansible/.ssh/authorized_keys

# 4. Open the file and paste your key
sudo -u ansible nano /home/ansible/.ssh/authorized_keys
ssh-ed25519 your-public-key

# Paste the key from the clipboard. Save & exit.- Rinse and repeat (including on all of your individual Proxmox hosts, cluster or not) until you reach all your hosts that you want to manage! Got a non-Linux OS? See below.
Troubleshooting different OS/situations
- In case the
sudo visudocommand does not work on Linux:
sudo apt install sudo -y # Debian/UbuntuFor hosts that are not Linux-based, such as FreeBSD (on OPNSense, select option 8 to get to Shell first):
pkg install sudo

adduser
- Username: ansible
- Full name: Ansible Service User
- Uid (Leave empty for default): (Press Enter)
- Login group [ansible]: **wheel**
- Invite ansible into other groups? []: (Press Enter)
- Login class [default]: (Press Enter)
- Shell [sh]: (Press Enter)
- Home directory [/home/ansible]: (Press Enter)
- Home directory permissions (Leave empty **for** default): (Press Enter)
- Use password-based authentication? [yes]: **no** (This will disable password login)
- Lock out the account after creation? [no]: (Press Enter)
- OK? [yes/no]: yes
- Add another user? (yes/no) [no]: no

visudo

# Here add the row. Most likely, you will be using 'vi' - press 'a' for insert mode
# Find the row, insert the text:

ansible ALL=(ALL) NOPASSWD: ALL

# Then press Escape, followed by typing :wq
# followed by enter. To exit without saving, type :q!
# Set up folder/file permissions

mkdir /home/ansible/.ssh
chmod 700 /home/ansible/.ssh
touch /home/ansible/.ssh/authorized_keys
chmod 600 /home/ansible/.ssh/authorized_keys
chown -R ansible:wheel /home/ansible/.ssh

ee /home/ansible/.ssh/authorized_keys # or use vi
# Paste the public part of the key, save and exit.
Add the Ansible SSH key for logging into hosts into Semaphore
This is a different key from the Gitea one, it is the private key for the ansible user that your hosts already trust that we set up earlier. Import it into Key Store → New Key, Type SSH Key, name it something like ansible_all_hosts, and paste the private key (plus passphrase if it has one).

Step 4 - Prepare your Proxmox servers
So far we have Semaphore installed and running as a service, connected to our Gitea repo for playbooks, and a password-less ansible SSH key trusted on every host we want to manage. What is still missing is the Proxmox side of things: Semaphore needs a way to discover each guest's current IP address, and it needs API credentials so it can eventually take snapshots and query VM/LXC state directly through the Proxmox API rather than only over SSH. This step covers both: installing the ip2tag helper on each Proxmox host so IPs show up as tags we can inventory, and creating the Proxmox API tokens that Semaphore will use.
Install ip2tag on all Proxmox hosts + tag them
In order to get up-to-date IP addresses for each host in the Semaphore inventory, we will need to use a nifty little app that shares the IP address as a tag, which we will then import into Semaphore as a group.
- To install it or update it, run this on every Proxmox host (not just a cluster):
INSTALL_SOURCE=github bash -c "$(curl -sSL https://github.com/MorsStefan/proxmox-ip2tag/releases/latest/download/prox-ip2tag_install.sh)"- Configure the ip2tag helper app to display only the desired subnet. For example, if your hosts are on
192.168.5.0/24,then you would configure it as follows:
nano /usr/local/etc/prox-ip2tag.conf

GNU nano 8.4                                       /usr/local/etc/prox-ip2tag.conf
#!/bin/bash

# Defines which guest types to process: 1 = LXCs, 2 = VMs, 3 = both.
GUEST_TYPE=3

# IP addresses and network ranges in CIDR format in which IP must be located
# in order to be automatically added or removed as IP tag.

# Well known private networks: 10.0.0.0/24 192.168.0.0/24
# Use 0.0.0.0/0 to search for every possible IP'a
NETWORK_RANGES=(
    192.168.5.0/24
)

# Do not auto add or remove these IP tags for VMs and LXCs, do not change their color.
# Accepts both: single addresses and network ranges in CIDR format
NETWORK_RANGES_IGNORED=(
    127.0.0.1
)- Review the rest of the config file, as needed. Once you are done, ensure that the service on each Proxmox host is restarted and comes up
systemctl restart prox-ip2tag.service
systemctl status prox-ip2tag.service- Open the web UI of any of your Proxmox hosts and check that each host has a tag that is the main IP address that you want it to be inventoried as.
- Add additional tags for each host to create groups. For example:
- Web servers running nginx on Debian with a default SSH port of 2222 on site 1:
web,nginx,debian,22,site_1. - A MariaDB cluster A node running on Debian with a default SSH port of 2222 on site no.1:
database,galera,debian,cluster_a,2222,site_1
- Web servers running nginx on Debian with a default SSH port of 2222 on site 1:
- You might ask why so many tags? Here are some example use cases:
- An important MariaDB update would affect both individual hosts or a Galera cluster, so it could be applied to both.
- A post-update check of a Galera cluster would look different from a standalone MySQL/MariaDB update - we would want to ensure that the node rejoined its cluster.
- You may have web servers running
nginxbut also web servers runningapache2or another service. - OS-level updates would be configured differently - commands differ between Debian/Ubuntu and FreeBSD, for example.
- Distinguishing between sites may be important if you want to be applying updates only to one site at a time to ensure fail-over.

Set up Proxmox API tokens
Whether you run a cluster or an individual host, an API key in Proxmox is created on the ‘Datacenter’ level. So for a cluster, you create one key in that section and it applies to all your hosts in that cluster. Standalone hosts have one API key each.
- In your Proxmox UI, go to Datacenter -> Permissions -> Users. Create a new user such as:
- User name:
ansible(this will becomeansible@pam). - Fill in the First name and Last name.
- Leave a comment (optional), such as ‘Used by Semaphore UI’.
- User name:
- This is the user under which we will want to create the API token. Still under Permissions, go to API Tokens → Add.
- User: Select the
ansible@pamuser from the drop-down. - Token ID:
semaphore_token - Privilege separation: Do NOT tick it. This means that the API key will be treated with the same permissions as we grant to this system user.
- User: Select the

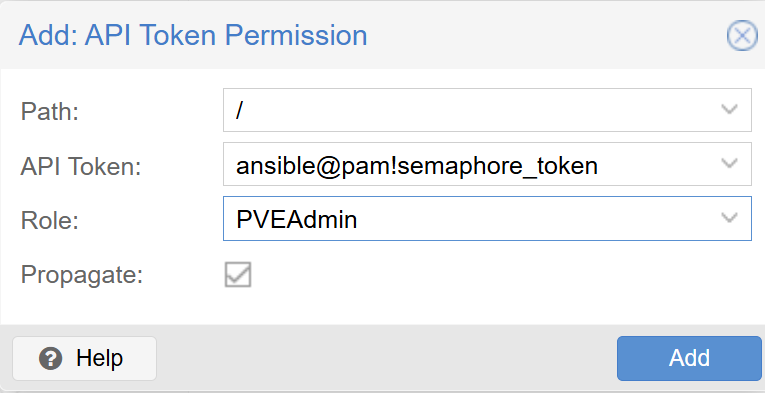
- Now let’s give the user + token some permissions to be allowed to manage VMs and LXCs on each Proxmox DataCenter. Go to one level above to Permissions. Click on the Add button, select API Token → API Token Permission.
- Path: /
- API token:
ansible@pam!semaphore_token - Role:
PVEAdmin - Propagate: yes, tick the box
- Copy the Token ID and the Secret aside for later (I recommend using a password vault such as
Bitwardenor the self-hosted variant calledVaultwarden).
Rinse and repeat for each Proxmox cluster/host.
Step 5: Connect Semaphore to Proxmox with Dynamic Inventory
Now since we have Semaphore configured to reach our repo in Gitea AND we can reach each Proxmox host (with its tags being set up earlier that can pass over as groups), we can eventually get the inventory imported into Semaphore - how exciting!
If you just have one Proxmox cluster or host, you could store the token_id and token_secret as an environment secret. However, the moment you have more than one Proxmox host/cluster (which is likely most home labbers), this approach would not work, as the dynamic inventory plugin accepts only one variable called PROXMOX_TOKEN_SECRET (only one such variable can be supplied during a task run).
Technically, you could have templates that do the same job just calling different sites as needed. This could work, unless you have automation in place that calls a particular host without knowing its location. For example, I have a template called galera-rejoin , when Uptimekuma triggers an n8n workflow that triggers a playbook that helps an orphaned MariaDB node to rejoin its cluster. In such a case, there is no easy way to know which site (or Proxmox cluster) is the particular Galera instance on. But do not worry, there is a workaround in place that works well.
Multi Proxmox host inventory set up (Unified Inventory)
The answer to the challenge is to utilize Ansible Vaults. This might be a new topic for you. Although it is out of the scope of a Semaphore set up tutorial, since it is crucial for the dynamic inventory to work, I will expand on it below and we will set it up together.
Part 1 - Bind the secret to the inventory instead of the environment, using Ansible Vault per-site tokens:
- New key store entry: In Semaphore, go to Key Store → New key.
- Provide a key name such as ‘
Proxmox tokens’ . - Type:
Login with password. Create some password that will be used later. This is how Semaphore will authenticate against Ansible Vault to retrieve it during a playbook’s runtime.
- Provide a key name such as ‘
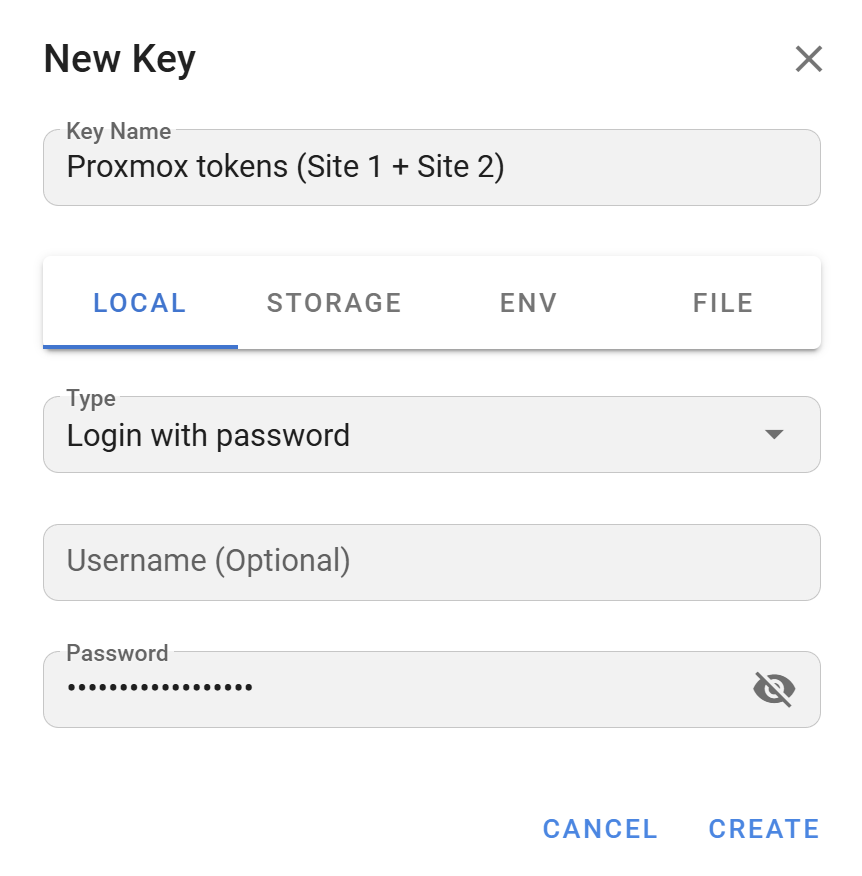
- Generate a token_secret: SSH into your Semaphore host and run the following:
# The 'actual-secret' is the Proxmox token's secret. Keep the 'token_secret' as-is:
ansible-vault encrypt_string 'actual_secret' --name 'token_secret'
- Save the vault password safely for future encryptions.
- Note:
ansible-vault encrypt_stringdoes not generate a hash. It generates encrypted text (a ciphertext) using AES-256 symmetric encryption, meaning the original string can be completely decrypted back to its plaintext form if you have the correct password (which we created just above). Save it somewhere in your password manager, such as in Bitwarden/1Password. - Edit each site’s (or Proxmox node/cluster’s) dynamic inventory .yml file.
- To explain what the terms mean:
| Item Type | What it is | Where it lives |
|---|---|---|
| Key Store entry | Holds the vault password (not the Proxmox token) | Semaphore (UI) |
| Proxmox token secret | The real credential to Proxmox (e.g. ecf6ce36-d22f-…) |
Encrypted into the inventory file |
| Vault password | A passphrase you invent that locks/unlocks the above | Semaphore (Key Store) |
- Do this for EACH Proxmox host or cluster that you want to be able to reach. In my case, I have one cluster (one key) and one standalone host.
Part 2 - Create a single inventory path for more inventories (dynamic and static):
-
In your Gitea repo, put all inventory files under a folder such as
inventory/and point to that one. In other words, the tree structure in your Gitea repo would look like something like this:jan@semaphore:~/semaphore-playbooks/inventory$ tree . |-- site1 | |-- site1-dynamic-proxmox.yml | `-- site1-static-proxmox.yml `-- site2 |-- site2-dynamic-proxmox.yml `-- site2-static-proxmox.yml -
The content of each dynamic inventory file can look like this - this is the content of the
/semaphore-playbooks/inventory/site1/dynamic-proxmox.ymlfile.
---
# Site 1 cluster dynamic inventory file
# Below are details about our Proxmox cluster or instance + how to reach it + groups logic:
url: https://1.2.3.4:8006
validate_certs: false
user: ansible@pam
token_id: semaphore_token
# The secret below is fetched from Ansible vault saved on the Semaphore instance.
token_secret: !vault |
          $ANSIBLE_VAULT;1.1;AES256
          39313735393833393361316_REDACTED

# Specify which tool (plugin) we will need:
plugin: community.proxmox.proxmox
want_facts: true
qemu_extended_statuses: true

# Group the fetched hosts based on their tags in Proxmox to these categories.
# Modify the it as per your needs. In this case, the 'web' tag is translated
# into a group called webservers.

groups:
  webservers: "'web' in (proxmox_tags_parsed|list)"
  mailservers: "'mail' in (proxmox_tags_parsed|list)"
  databases: "'database' in (proxmox_tags_parsed|list)"
  gaming: "'gaming' in (proxmox_tags_parsed|list)"
  network: "'network' in (proxmox_tags_parsed|list)"
  productivity: "'productivity' in (proxmox_tags_parsed|list)"
  cctv: "'cctv' in (proxmox_tags_parsed|list)"
  monitoring: "'monitoring' in (proxmox_tags_parsed|list)"
  debian_hosts: "'debian' in (proxmox_tags_parsed|list)"
  opnsense_hosts: "'opnsense' in (proxmox_tags_parsed|list)"
  ubuntu_hosts: "'ubuntu' in (proxmox_tags_parsed|list)"
  nginx: "'nginx' in (proxmox_tags_parsed|list)"
  nodejs: "'nodejs' in (proxmox_tags_parsed|list)"
  windows: "'windows' in (proxmox_tags_parsed|list)"
  galera: "'galera' in (proxmox_tags_parsed|list)"
  site1: "'site1' in (proxmox_tags_parsed|list)"
  site2: "'site2' in (proxmox_tags_parsed|list)"
  site3: "'site3' in (proxmox_tags_parsed|list)"
  site4: "'site4' in (proxmox_tags_parsed|list)"
  docker_host: "'docker' in (proxmox_tags_parsed|list)"
  cluster_a: "'cluster_a' in (proxmox_tags_parsed|list)"
  cluster_b: "'cluster_b' in (proxmox_tags_parsed|list)"
  cluster_c: "'cluster_c' in (proxmox_tags_parsed|list)"
  # Applies to all Proxmox VMs and LXCs for snapshots to distinguish them from bare-metal hosts
  all_proxmox_guests: "proxmox_vmid is defined"

# Skip the host if it does not have an VM ID (works for LXCs as well) OR if it is shut down
# Modify as you need - such as if you want to fetch hosts that are shut down.
filters:
  - proxmox_vmid is defined
  - proxmox_status != "stopped"

# Additional settings - tag for virtuals that use port 2222 for SSH + fetch network details +
# modify the default description field in the 'Hosts' tab
compose:
  ansible_port: "2222 if '2222' in (proxmox_tags_parsed|list) else 22"
  ansible_user: "'ansible'"
  ansible_host: "(proxmox_name + '.your.doman.tld') if proxmox_vmtype == 'qemu' else (proxmox_hostname + '.your.doman.tld')"
ansible_ip: "(proxmox_tags_parsed | list | first)"- If you also have some static inventory like standalone hosts (such as an RPI used for HomeAutomation), you can add additional files - in the case below, I have added the actual Proxmox servers + a dedicated PBS server (the IP addresses are only examples):
---
all:
  children:
    # Define a group for your hypervisors + additional non-Proxmox hosts
    proxmox_nodes:
      hosts:
        proxmox1:
          ansible_host: "proxmox1.mydomain.tld"
          ansible_port: "2222"
          ansible_ip: "192.168.5.3"
          ansible_user: "ansible"
          ansible_python_interpreter: /usr/bin/python3

        proxmox2:
          ansible_host: "proxmox2.mydomain.tld"
          ansible_port: "2222"
          ansible_ip: "192.168.5.4"
          ansible_user: "ansible"
          ansible_python_interpreter: /usr/bin/python3

        pbs:
          ansible_host: "pbs.mydomain.tld"
          ansible_port: "22"
          ansible_ip: "192.168.5.16"
          ansible_user: "ansible"
          ansible_python_interpreter: /usr/bin/python3

    # Map them to the Debian group
    debian_hosts:
      hosts:
        proxmox1:
        proxmox2:
        pbs:

    # Map them to the site group
    site1:
      hosts:
        proxmox1:
        proxmox2:
pbs:- Then create a new Inventory in Semaphore UI (Type: File). This will point Semaphore to the folder in Gitea that contains all of your inventory files (static + dynamic):

Step 6: Run a simple Playbook from Semaphore
Exciting times - now we have all the required pieces:
- Semaphore can pull playbooks and config files from Gitea.
- Semaphore can reach all hosts in your fleet.
- Proxmox has tags prepared that include the IP address of each host to populate the inventory’s
ansible_ipfallback variable (in case the hostname does not resolve). - Gitea contains inventory files that provide (a) necessary Proxmox API key details with the help of Ansible Vault + (b) inventory details for each Proxmox host/cluster and other hosts you have in your fleet.
All we need to do now is to test that we can reach the hosts! Go to Task Templates → New Template → New Ansible Playbook:
- Name: Check inventory (read-only)
- Path to playbook file:
checks/ping.yml(relative path within the repository) - Inventory:
- Repository:
- App / Type: Ansible Playbook

Save and hit run. Watch the live task log. A healthy run will:
- Clone the repo and install the
community.proxmoxcollection. - Query the Proxmox API and expand the inventory (you'll see your tag-based groups appear).
- SSH into the target host and return ping: pong plus the debug line.
💡 Note
Note that hosts that fail to ping will still be reported as success - you will see them at the end as ‘ignored=2’. In my case, I manage OPNSense hosts manually and so I do not have the SSH key installed on them, so while Semaphore can see them due to the dynamic inventory plugin, it cannot reach them.

Troubleshooting: Potential gotchas that you may encounter
- Parsing key failure: When you run the job for the first time, you might hit ‘Failed to run task: parsing private key: ssh: no key found’. The key in the Key Store was likely pasted without the
-----BEGIN/END OPENSSH PRIVATE KEY-----lines . Edit it and re-paste the full private key including those header/footer lines and a trailing newline. - Parsing your .yml file:
[ERROR]: Failed to parse the requirements.yml at '/opt/semaphore/playbooks/project_1/repository_1_template_1/collections/requirements.yml'. Check the syntax of your .yml file, including that it starts with three dashes and correct spacing. - DNS resolution. If your inventory goes between more sites and VPN tunnels are providing the connection, you will need to ensure that DNS resolution works across. If the run fails with ‘Could not resolve hostname’, either add a conditional forwarder on the Site 2 resolver for that zone, or fall back to IPs by adding ansible_host: "
{{ proxmox_ip | default(ansible_ip) }}" logic. - Password authentication failed error. This would be the
PROXMOX_TOKEN_SECRETvalue in the Proxmox site environment. - Authentication error: You hit a 404 error such as:
Failed to parse inventory with 'ansible_collections.community.proxmox.plugins.inventory.proxmox' plugin: 401 Client Error: Authentication failed!. This means that your Proxmox token is incorrect.
Step 7 - Set up group_vars for more than one Proxmox node
It would be good to distinguish here between the static/dynamic inventory and group vars (variables).
A dynamic inventory file (such as site1-dynamic-proxmox.yml) is config for the inventory plugin itself. Semaphore hands this file to community.proxmox.proxmox before anything else runs, so it can call the Proxmox API, discover which VMs/LXCs exist, sort them into groups by tag, and set the connection vars (ansible_host, ansible_port, ansible_user) needed to SSH into each guest. Its url/token_id/token_secret are plugin parameters, they exist only to let Ansible build the inventory. They are not exposed to your playbooks as variables afterwards.
On the other hand, a group_vars file (inventory/group_vars/somefile.yml) is regular Ansible variable data, auto-loaded for any host in the site group (the group your dynamic inventory created from the site tag, such as site1). They're consumed by your playbook tasks, at run time, whenever a task needs to talk to the Proxmox API directly rather than SSH into the guest.
You could just have vars:in each of your playbook to provide instructions on how to reach each Proxmox host. This would, however, be tiring with duplicate information - not the best practice for more than one playbook/one Proxmox host/cluster.
In your repo, create a folder called ‘group_vars’ under the ‘inventory’ folder name that starts with the same name as your site. In my case, I have a cluster per site, so it looks like this:
jan@semaphore:~/semaphore-playbooks/inventory$ tree
.
|-- group_vars
|   |-- site2.yml
|   `-- site1.yml
|-- site1
|   |-- site1-dynamic-proxmox.yml
|   `-- site1-static-proxmox.yml
`-- site2
    |-- site2-dynamic-proxmox.yml
`-- site2-static-proxmox.yml- Your structure may look very different. For example, you may have only one site with 4 Proxmox nodes that are in a cluster of two.
- Since the tokens can be shared per cluster, you would need two keys and instead of calling them sites, you would call the folders as cluster1 , cluster2, etc.
- What you need to ensure is that the group exists in your inventory. In our example, we create groups from tags fetched by the plugin, Proxmoxer. So if you call it
cluster1, you will need a group called with that name as well. - If you have such groups created, you can use an alternative structure such as below:
# Alternative structure (1 site, 2 clusters)
jan@semaphore:~/inventory$ tree
.
|-- cluster1
|   `-- cluster1-proxmox.yml
|-- cluster2
|   `-- cluster2-proxmox.yml
`-- group_vars
    |-- cluster1.yml
`-- cluster2.yml- So in each file under
/inventory/group_vars, populate it as follows:
---
# Site 1 variables
proxmox_api_host: "1.2.3.4"
proxmox_api_port: 8006
proxmox_api_user: "ansible@pam"
proxmox_api_token_id: "semaphore_token"
proxmox_validate_certs: false
proxmox_api_secret: !vault |
          $ANSIBLE_VAULT;1.1;AES256
393137...long numeric string...- Similarly, create files for other Proxmox nodes/clusters or sites.
💡 Note
If you have some parameters that apply to all group_vars, you can set up a file called
all.ymland place it there for cluster-wide defaults.
Step 8 - A gotcha about Semaphore’s Inventory
You will notice that your hosts are not visible in Semaphore anywhere like with AWX. Semaphore renders the inventory at EVERY template run. This is by design.
Accessing your inventory
What if you want to see what is in your inventory before you execute a task? Such as to confirm that the group membership is correct. For this reason, there is a purpose-built tool called ansible-inventory. It is already installed, we just need to save the ansible SSH key to Semaphore’s shell and add the community.proxmox / community.generala collections so that our shell’s Ansible can talk to Proxmox (basically similar to what we already configured before for Semaphore UI’s app in Gitea).
- Firstly, the Semaphore host would need to be provided with the private part of the key to reach other hosts. While you may have already uploaded it to Semaphore, the shell does not have access to it. Log into your Semaphore instance as a standard user who installed the packages before and enter:
# Upload the private part of your ansible key
nano /home/jan/.ssh/ansible_key

# Change the permissions to the owner only
chmod 600 /home/jan/.ssh/ansible_key- Then install the collections and git clone your repo to query against it:
# Install the collection for your user
ansible-galaxy collection install community.proxmox community.general

# Get a copy of the repo to run against (if you don't have one locally)
git clone https://git.your-server.tld/path/to/ansible-playbooks-repo ~/semaphore-playbooks
# git clone https://git.bachelor-tech.com/jan/ansible-playbooks ~/ansible-playbooks

cd ~/semaphore-playbooks

# Run the command with @ (all) or specific ones, such as @nginx
ansible-inventory -i inventory --graph --ask-vault-pass | grep -A20 '@'
- You will be prompted for a Vault password (if you used Ansible Vault for more than one Proxmox node/cluster). The result should look as follows:
jan@semaphore:~/semaphore-playbooks$ ansible-inventory -i inventory --graph --ask-vault-pass | grep -A20 '@'
Vault password:
@all:
  |--@ungrouped:
  |--@proxmox_nodes:
  |  |--proxmox2
  |  |--proxmox1
  |  |--proxmox3
  |--@debian_hosts:
  |  |--galera-A3
  |  |--gitea-turnkey
  |  |--uptimekuma
  |  |--galera-A4
  |  |--semaphore
  |  |--mail1
  |  |--awx-ansible
  |  |--web1
  |  |--honza-web1
  |  |--proxmox1
  |  |--proxmox2
  |  |--pbs
  |  |--galera-A5
  |  |--galera-A6
  |  |--uptimekuma2
  |  |--docker-metrics
  |  |--web3
  |  |--proxmox3
  |--@gaming:
  |  |--win-minecraft
  |  |--ubu-minecraft1
  ...
💡 Note
If you run a command from the shell later on, always do a 'git pull' to download updates from Gitea.
Step 9: Create a Proxmox Snapshot and a Patch job template (Debian patching)
The pre-requisite is that your Proxmox hosts already have a password-less SSH key that has sudo privileges. This is because certain activities require sudo privileges and the patching playbook uses a become: true flag to be executed with root privileges.
Template 1: Snapshot a Proxmox host (VMs + LXCs)
Create a new file in your Gitea repository under helpers/proxmox_snapshot_host.yml :
💡 Note
If you have more admins that run jobs, you can grab other handy fields the same way, such as
semaphore_vars.task_details.usernameto indicate who launched it. See more here.
- Create a new Task Template in Semaphore:
- Name: Snapshot Proxmox Host
- Path:
helpers/proxmox_snapshot_host.yml(your case will likely vary) - Inventory:
ALL Sites & Clusters - Repository:
Jan's Semaphore Playbooks Gitea Repo - Limit: select just one VM/LXC, such as
uptimekuma - Vaults: add your vault details

- Run the job! You can see that a snapshot was taken in Proxmox web UI:
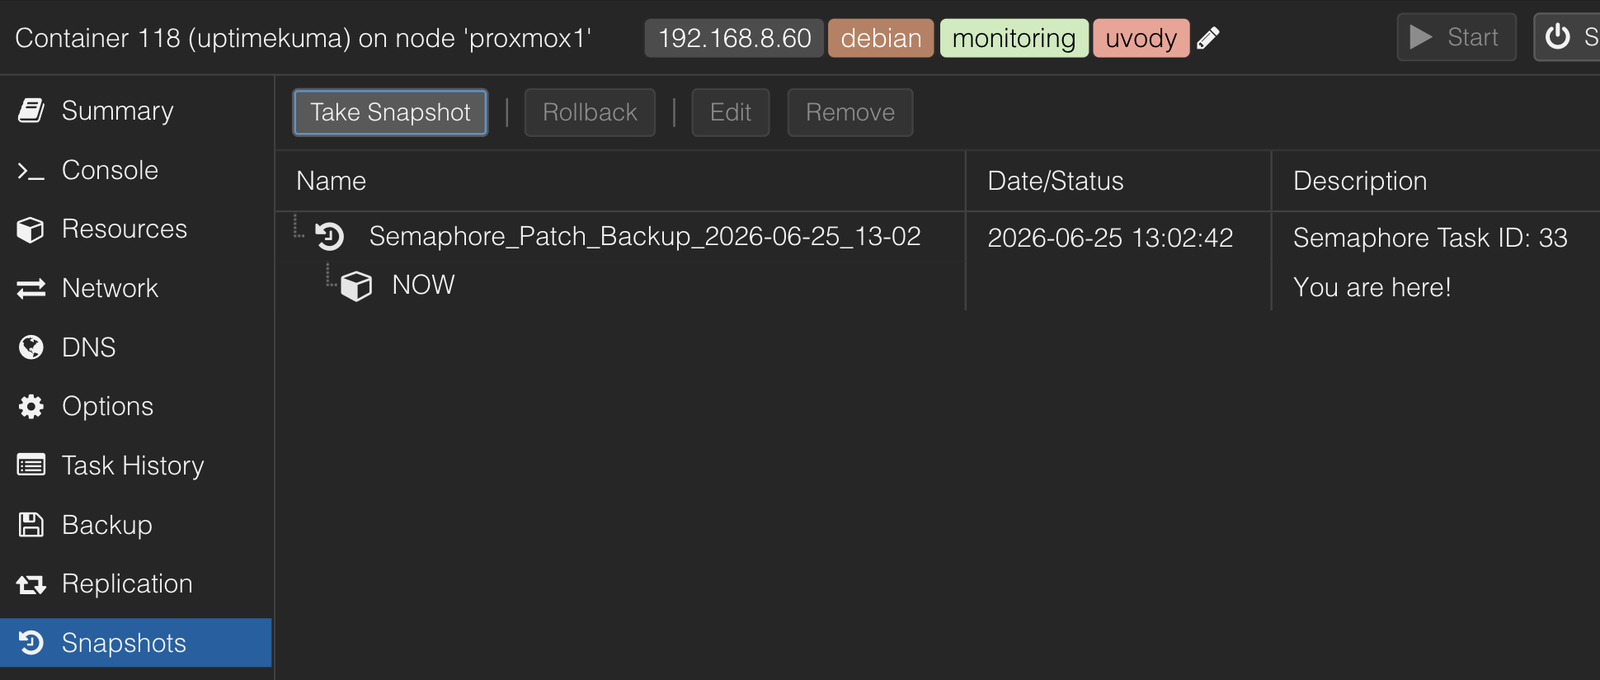
- Try running it against hosts on different Proxmox hosts/clusters to verify you can reach them all.
Template 2a: APT Cache update template
In your repository, create a new file called apt_cache_update_tasks.yml that will be used by other templates for updating the apt repo and cache.
Template 2b: Security only patch template
Create another template to be used for hosts where only security updates will be applied.
Template 2c: Reboot host if necessary
If a reboot is triggered, it waits for up to 5 minutes and then still waits 30 seconds for post-reboot tasks to complete and runs a test command (whoami) to confirm connectivity.
Template 2d: Verify Proxmox tags
Forces a fresh PatchMon report, works out what is still pending (scoped to what the run was actually responsible for), and reflects that back to Proxmox as a tag-based alert cooldown.
Template 3: Patch Debian Hosts (general)
Now we will leverage the other 4 templates and load them in this general Debian patching template. What does it does it do?
- Updates the apt repo and cache
- Upgrades all packages
- Confirms whether a reboot is necessary (such as for Kernel updates or when the uptime is more than 90 days).
- Verifies patch results with PatchMon and removes the Proxmox tag (if a Proxmox host).
- Create a new Task Template in Semaphore UI:
- Name:
Patch Debian Hosts - Path to file:
patch_debian_single_hosts.yml(specify folder before if not in the root folder of your repo) - Repo: your existing repo
- Limit: set to just one host for a test OR tick the Limit box and specify it later
- Vaults: supply a Vault that contains all your Proxmox nodes/clusters.
- Name:

- Here is the log from the job -
cacheanddistupgrades were executed, no reboot was required:

Template 4a: Sury repo fix for web servers running PHP
If you run nginx servers with PHP, you may need to deal with an occasional update of the Sury apt repository. For this reason, such hosts have an extra playbook/task that addresses it.
Template 4b: Patch nginx (web servers with PHP) on Debian
And here is the main playbook that is called for Debian hosts running nginx. There is a post-update task that listens on http://localhost:8081 to ensure that the host is back up. Please ensure that you modify the port number based on your use case.
Template 5: Patch Galera nodes (MariaDB on Debian)
In case you have more MariaDB instances joined in a Galera cluster, you may wish to not only patch the OS but also ensure that the node rejoins the cluster successfully afterwards. You can use this one:
- The
serial: 1parameter ensures that only one host is processed at a time. Become: trueis required to get sudo privileges- As opposed to the generic Debian template, there are two additions - wait for port 3306 to be operational + confirm that the node re-joined the cluster.
- In case you just want to patch a single MariaDB instance, simply remove the last two tasks (Show cluster size for visibility + Report node health).
- If it goes through successfully, the result is a nice clear message that the job has completed:

Transferring other templates
Overall, I have transferred most of the templates created for AWX and it was straightforward. If you see a playbook that you are interested but cannot find it on my Github account (since I have plenty more on my private Gitea server), please let me know and I will share it with you.

Feel free to do more testing, esp. if you have different Proxmox nodes.
- With the two jobs running smoothly, we can proceed into the next part of setting up Patchmon.
- The desired workflow:
- We utilize Patchmon to monitor updates for our hosts.
- Instead of letting Patchmon do the patching (its functionality does not provide proper logs and adjustments to the type of services each host runs), we will handle it via n8n, leveraging the snapshot job first and our different templates with extended logging capabilities using Semaphore.
- We run the results through AI (self-hosted or external) and populate our Discord/Telegram/Signal channel if issues arise.
- Additional remediation jobs could be planned in case the snapshotting or patching does not work.
- Patchmon can then independently verify that the patching took place successfully.
Enjoying this tutorial?
This site is a non-profit project. If it saved you some time, you can support it by getting Jan some coffee.
☕ Buy me a coffee
Comments