Bachelor Tech
  • Home
  • Tutorials
  • Tips
  • Portfolio
  • About Jan
  • Contact Jan

Testing your outgoing email ranking

by Jan Bachelor October 31, 2024
  • You can use mail-tester.com for up to three tests in 24 hours.
  • Once you reach the website, you will be asked to send an email to a unique email address / hostname.
  • Save the email address and create a new email, for example via Roundcube
Mail-Tester – Send Out An Email
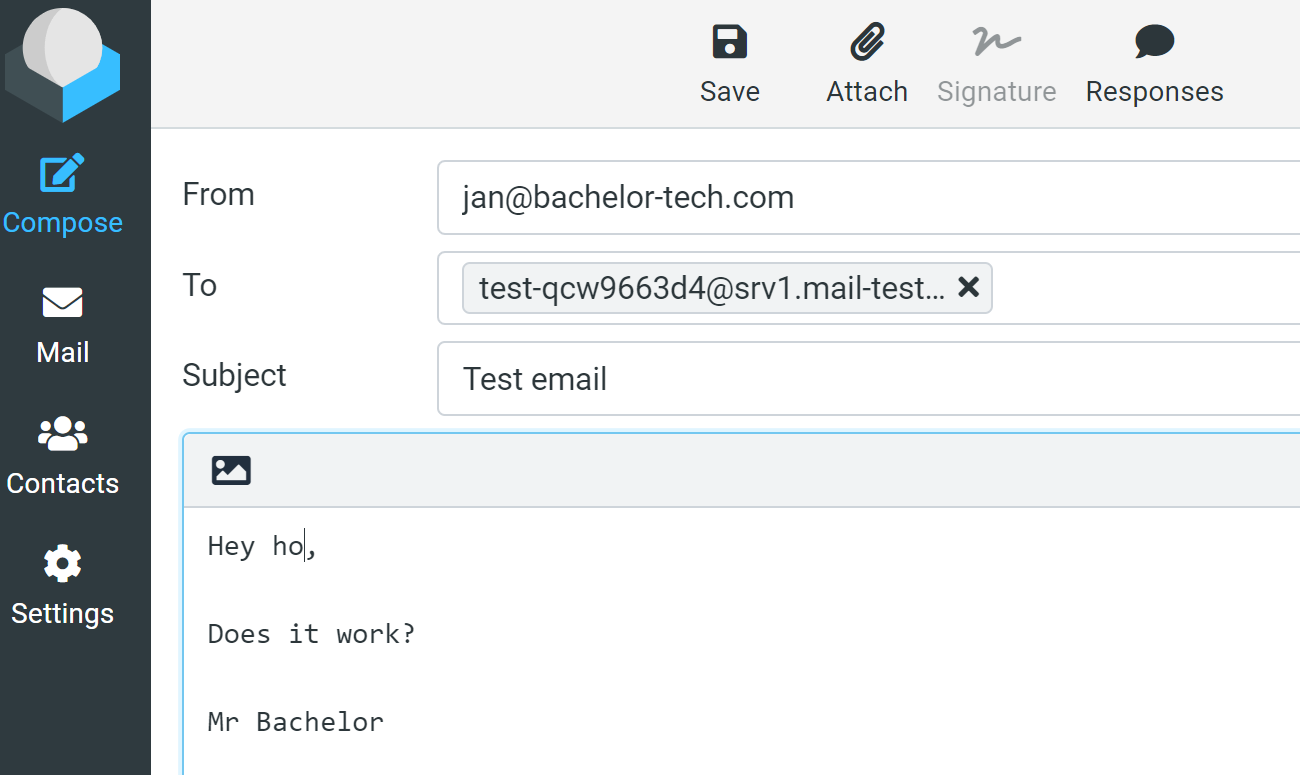
  • Then click on the ‘Then check your score button’ to see what you get:
Mail Test – Check Your Rating
  • Hopefully the boat has successfully travelled to new lands and the score is close to 10. With the free version of Brevo, an invisible tracking pixel is inserted by the relay and for some reason, it does not contain an alt tag, which lowers the score:
Mailer Test – Details On Brevo’s Rating
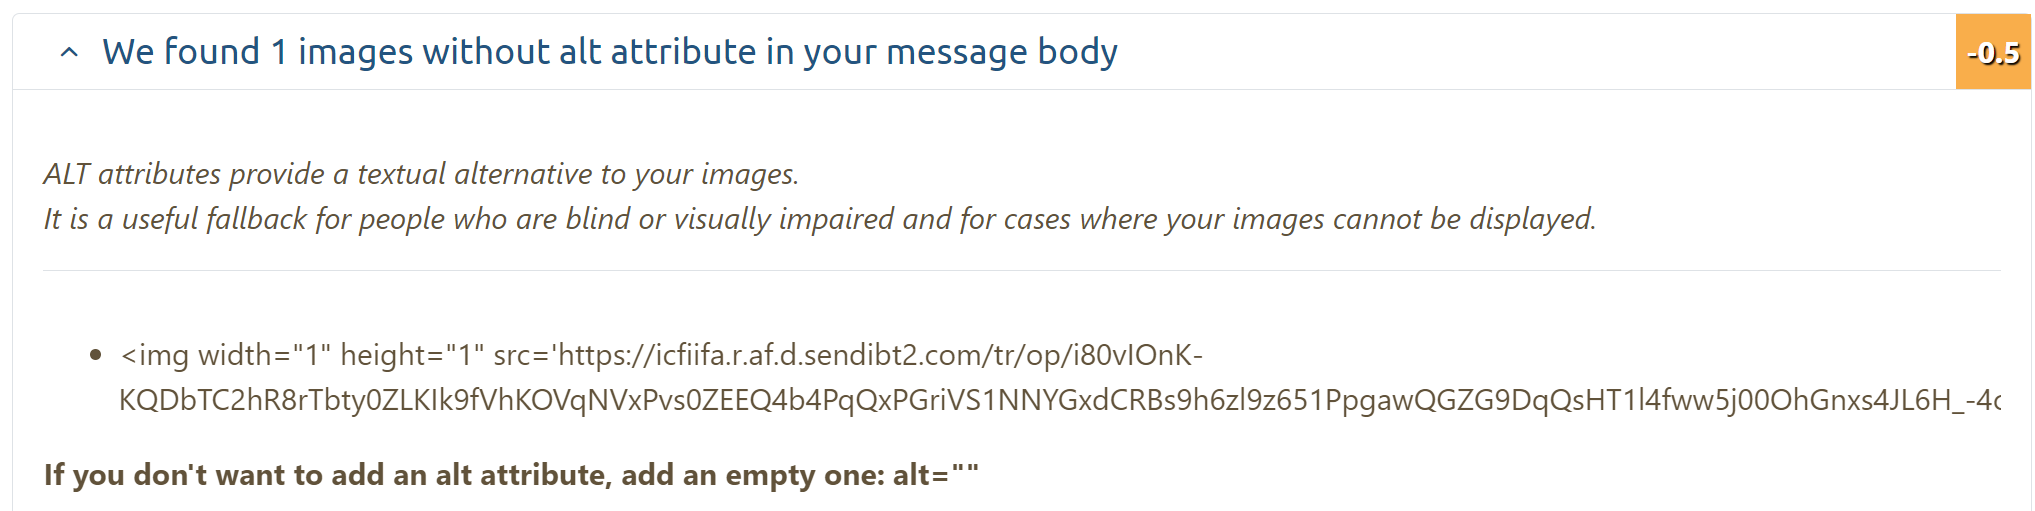
  • The issue of the tracker is discussed a lot on their forum since late 2023. It seems to be present even when anonymous tracking is disabled:
Brevo – Toggle Anonymous Tracking
  • While in my tests, emails to all major providers inc. Google and O365 were delivered fine, if you encounter issues, reach out to Brevo’s support to manually remove the tracking from all transactional emails.
  • An alternative is to sign up for another provider. For instance, Mailer Lite providers 3,000 emails per month for free, which may be enough for some (and it is a decent service).

So with emails working in and out, how about we try connecting to our mail server via IMAP using an email client?

SMTP Relay With Brevo
Connect Your Device To The Mail Server Via Email Client
Go back to course overview: Install iRedMail Mail Server As Proxmox VM With OPNSense As Firewall

Leave a Comment Cancel Reply

Save my name, email, and website in this browser for the next time I comment.

This site uses Akismet to reduce spam. Learn how your comment data is processed.

0 FacebookWhatsappThreadsBlueskyEmail

Course Steps

  1. Starting Point and Considerations
  2. Pointing Your MX Records (DNS)
  3. Generic VM Installation (Proxmox)
  4. Firewall - static DHCP assignment (OPNsense)
  5. Firewall - Ports to open on your firewall (OPNSense)
  6. Fiirewall- Set Up NAT Rules (OPNSense)
  7. Dynamic DNS for our ‘mail’ DNS record (CloudFlare with OPNSense)
  8. Get SSL Certificate on OPNSense for Web Services (CloudFlare)
  9. HAProxy Set Up - SSL termination (OPNSense)
  10. Services To Be Installed On Our Mail Server (OPTIONAL)
  11. iRedMail installation (Debian)
  12. Nginx Configuration (Debian)
  13. Access iRedAdmin
  14. Configure Roundcube
  15. CertBot Certificate Creation
  16. Apply Certificates - Nginx
  17. A Theory Crash Course On Postfix (OPTIONAL)
  18. Securing Your Mail Server (Postfix)
  19. SMTP Relay With Brevo
  20. Testing your outgoing email ranking
  21. Connect Your Device To The Mail Server Via Email Client
Previous Next

Recent Comments

  • Jan Bachelor on Dynamic DNS Set Up with DuckDNS on OPNSenseHi Jake, that's awesome, congratulations on getting…
  • Jake on Dynamic DNS Set Up with DuckDNS on OPNSensefollowed guide above to the T and all is working. i…
  • Fastbrain on Dynamic DNS Set Up with DuckDNS on OPNSenseThanks for the guide. For some reason, after follow…

Other courses

Turn your Raspberry Pi into a Proxmox Backup...

July 13, 2025

OPNSense in HA with CARP with dual WANs

June 30, 2025

Never again forget about important dates with MIND!

June 30, 2025

Install iRedMail Mail Server As Proxmox VM With...

October 31, 2024

Remote Bucket Storage for Proxmox VM Backups

August 16, 2024

Recent Posts

  • How to get LXC containers for Proxmox outside of ready-made templates

  • How to join two Proxmox nodes into a cluster (PVE 8.x)

  • How to Rename a Proxmox Node

Facebook Twitter Instagram Pinterest Linkedin Youtube

All Rights Reserved. The theme was customized from Soledad, see PenciDesign

Bachelor Tech
  • Home
  • Tutorials
  • Tips
  • Portfolio
  • About Jan
  • Contact Jan