Bachelor Tech
  • Home
  • Tutorials
  • Portfolio
  • About Jan
  • Contact Jan

iRedMail installation (Debian)

by Jan Bachelor October 31, 2024

Let’s SSH into the Mail Server VM and do some work there to get iRedMail (and the related services mentioned in the previous step) installed.

  • Update + set up the desired hostname
sudo apt update && sudo apt upgrade
sudo hostnamectl set-hostname mail.your-domain.com

# Modify the hosts file like this:
sudo nano /etc/hosts
127.0.0.1       mail.your-domain.com localhost

# Check that it is correct:
hostname -f
  • Install iRedMail and related tools (check the latest version here)
# Download the package
https://github.com/iredmail/iRedMail/archive/refs/tags/1.7.1.tar.gz

# Unpack it and go in
tar xvf 1.7.1.tar.gz
cd iRedMail-1.7.1

# Make the bash file executable and run it (it will download more packages):
chmod +x iRedMail.sh
sudo bash iRedMail.sh
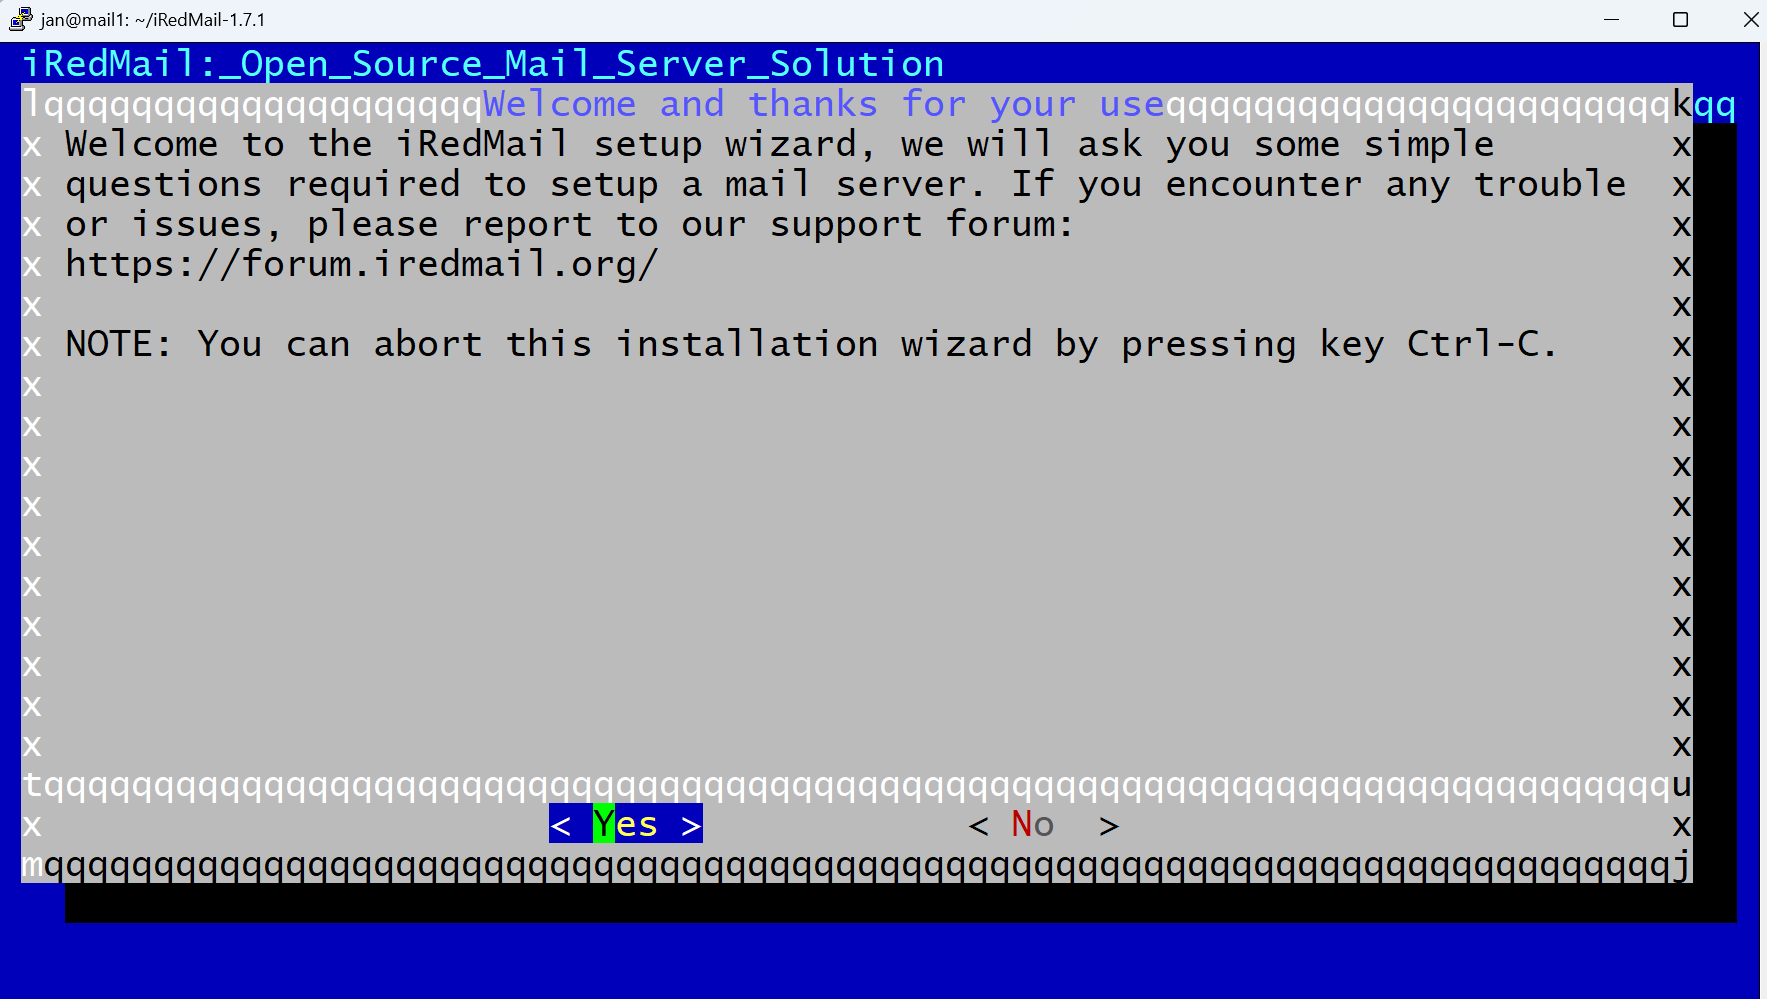
  • A wizard will be launched, eventually. Click on “Yes’ to proceed.
iRedMail – proceed with installation
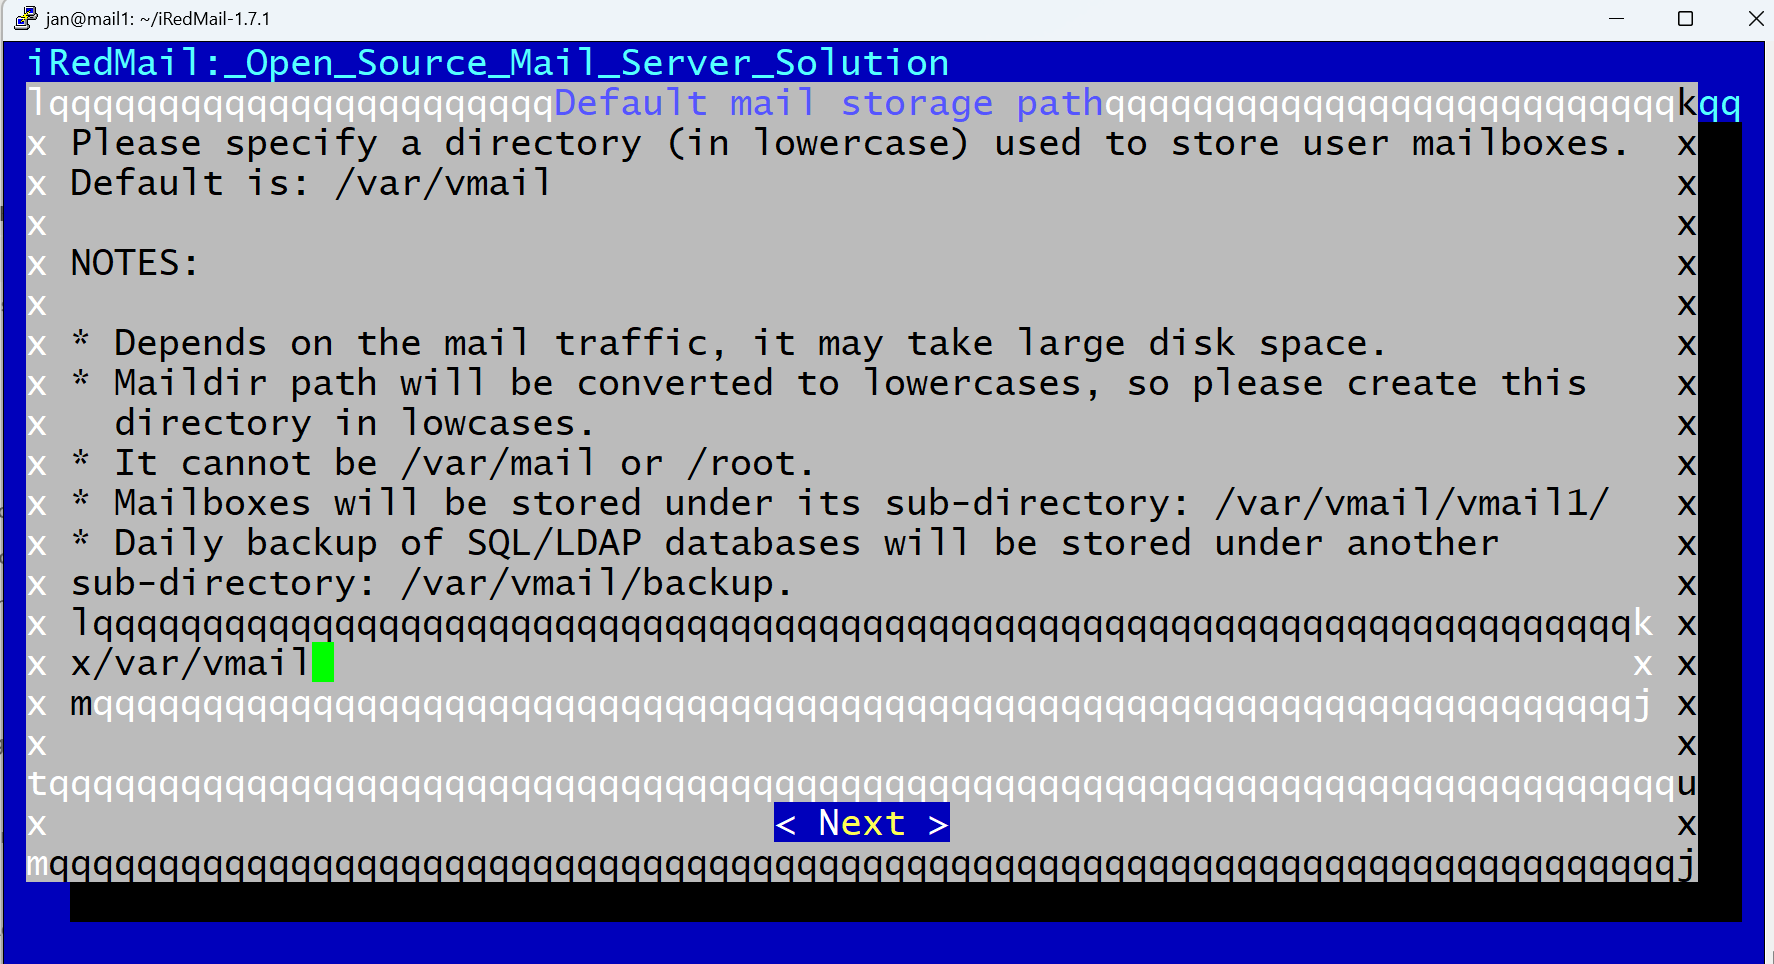
  • Next, you will be asked for where to store email boxes – the default location is /var/vmail (as /var/mail cannot be used) – you can confirm the default, unless preferred otherwise.
iRedMail – location to store mailboxes
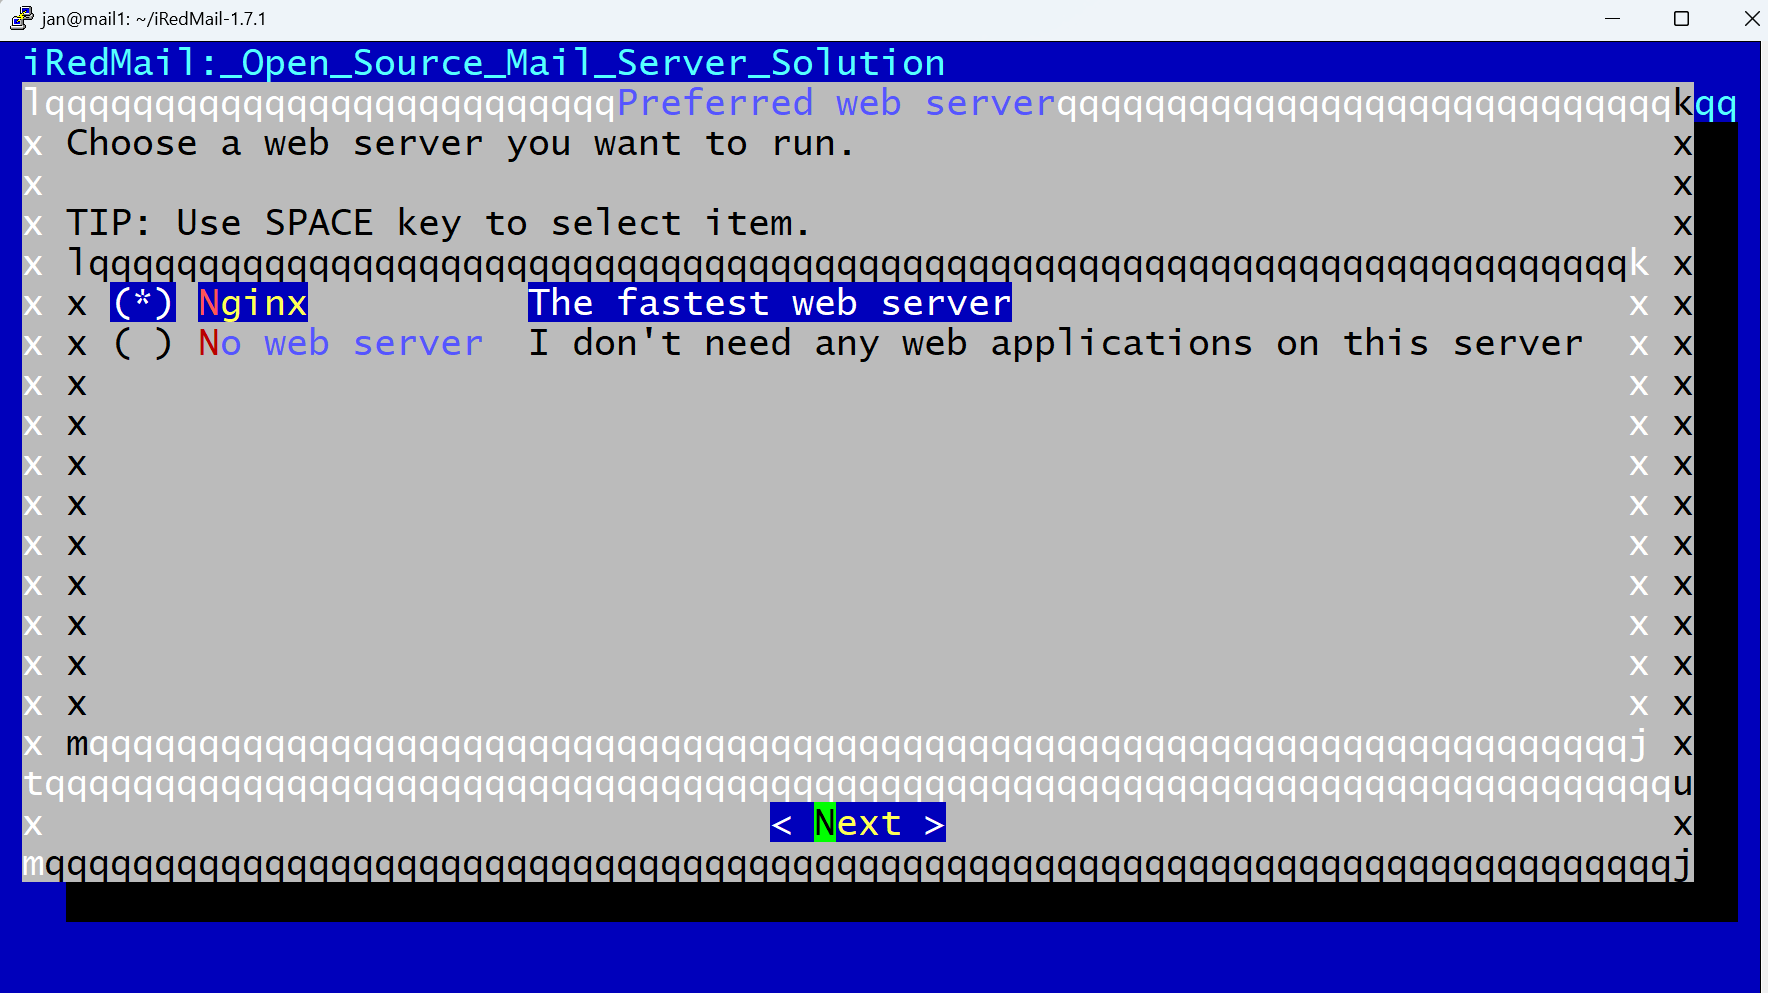
  • Web server step – Nginx is the default (in the past, it was Apache) – this allows you to set up mailboxes as admin and will be used for RoundCube webmail, so it is definitely recommended.
iRedMail – Web Server – Nginx
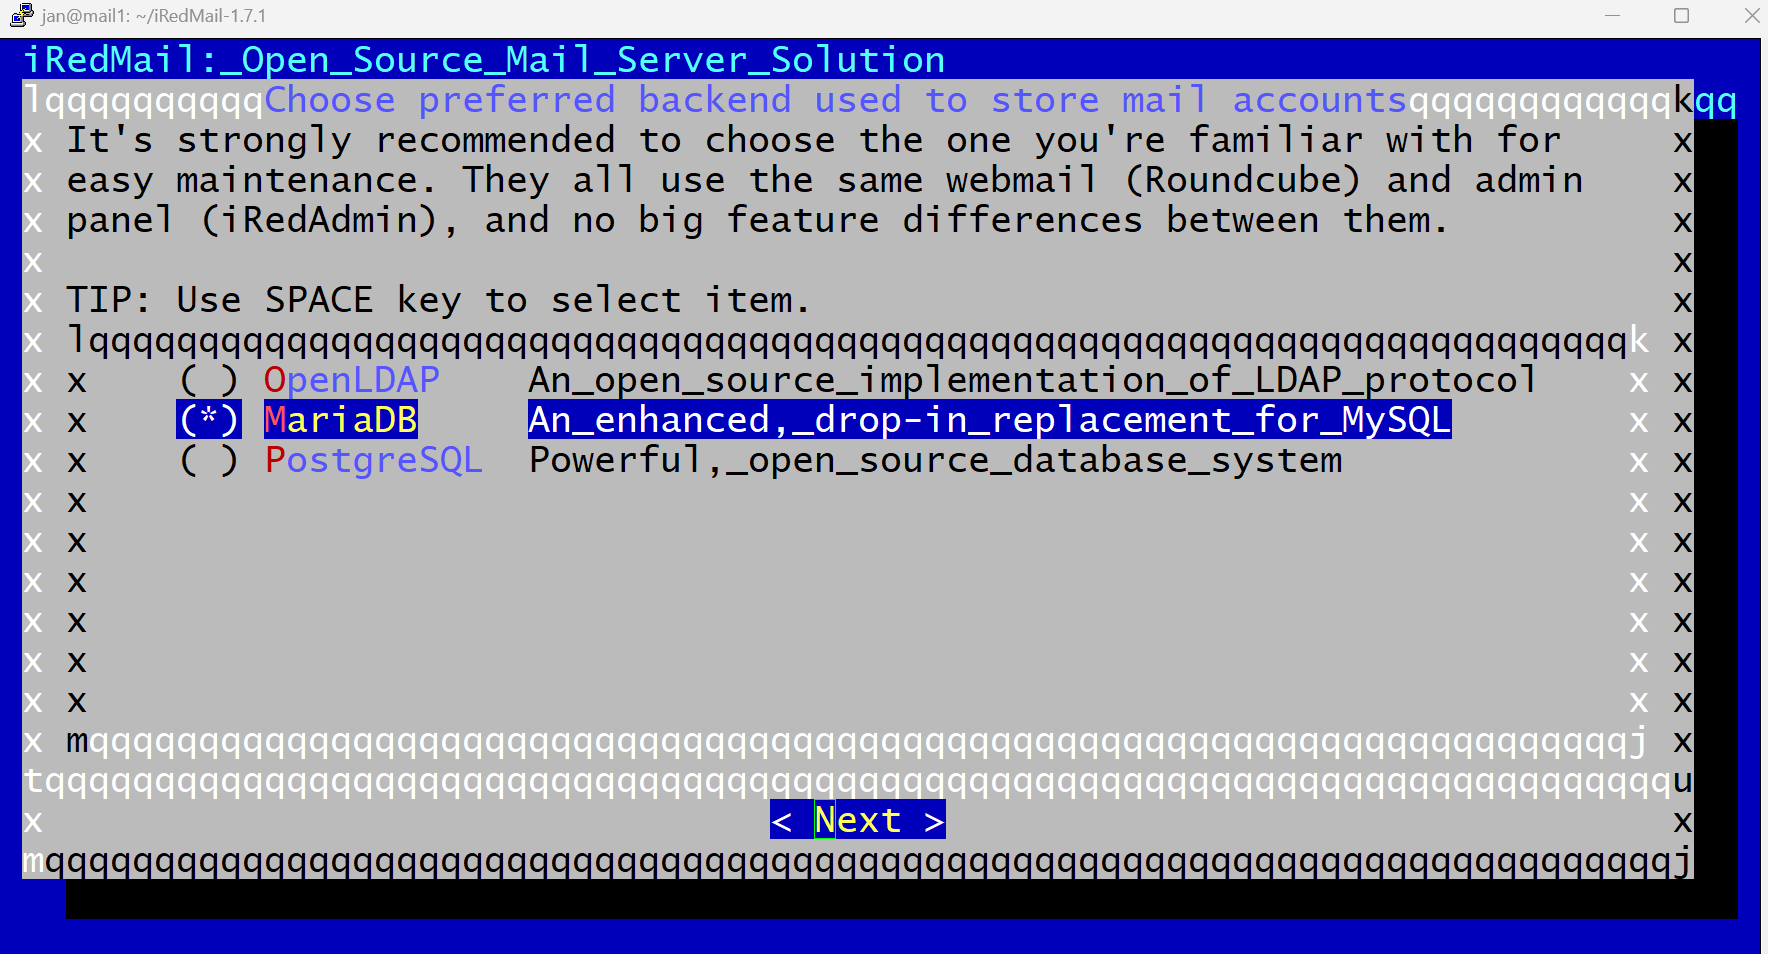
  • Database menu – for our use, MariaDB is more than enough.
iRedMail – Database Engine Options
  • Database root password – be careful to type it correctly, as you do not get to see what you are typing and there is no re-type confirmation.
iRedMail – Database Password prompt
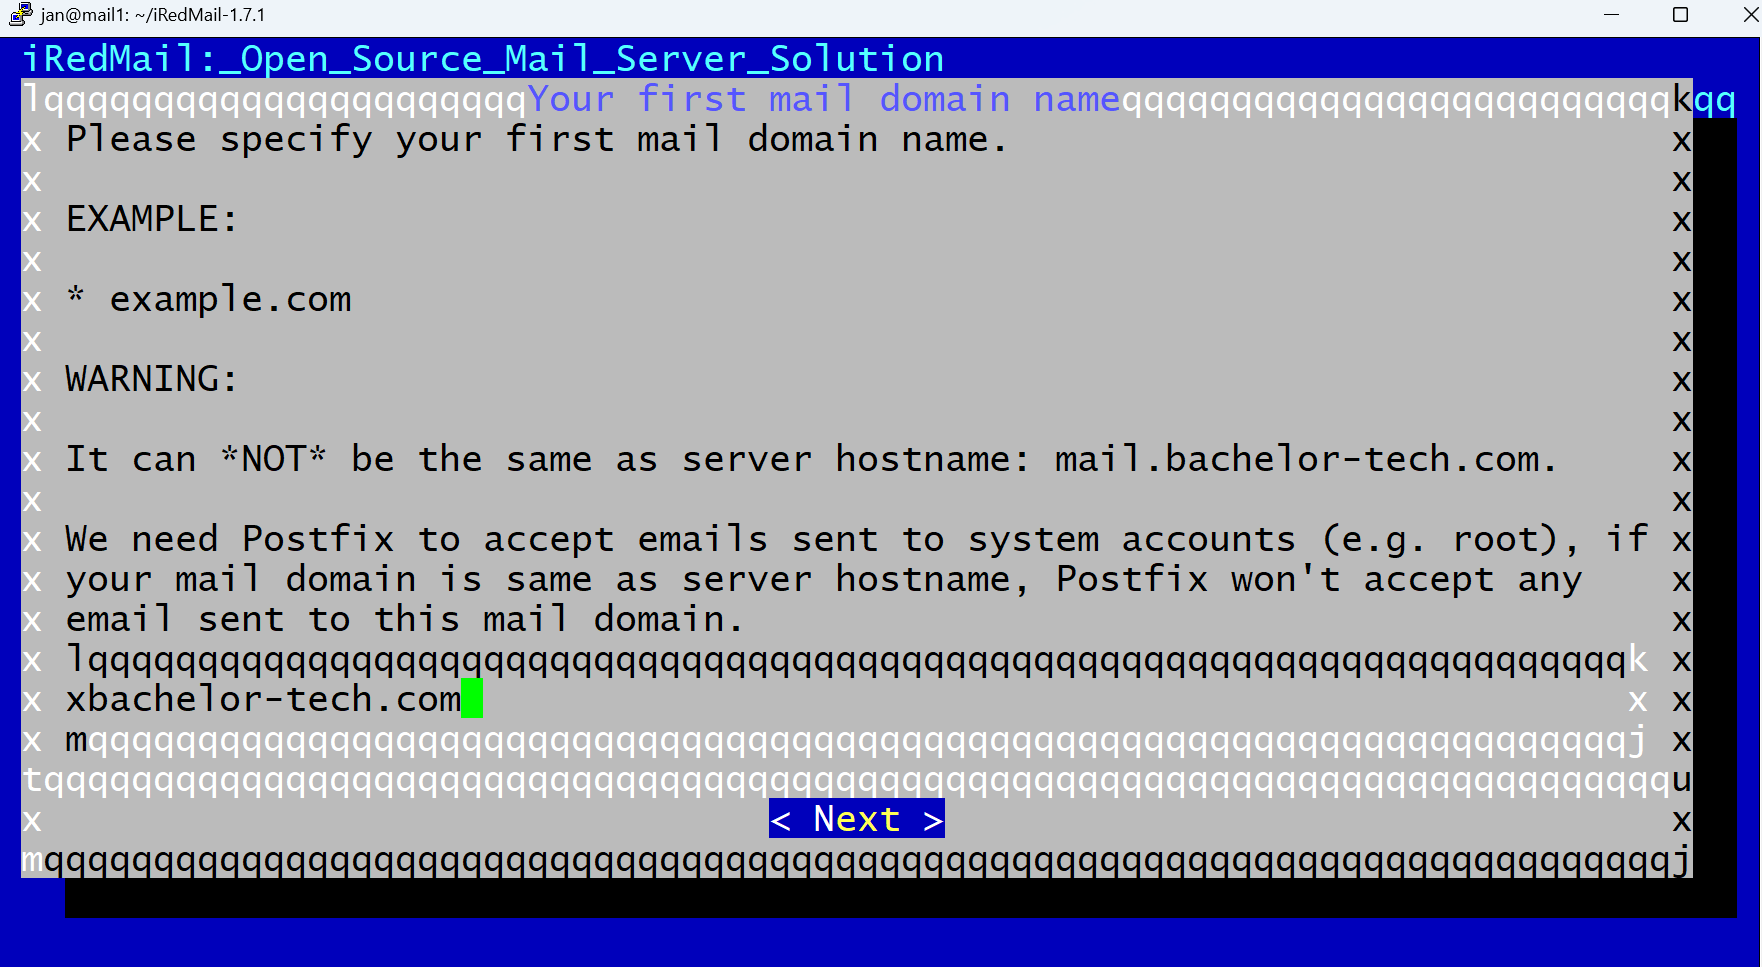
  • First domain name – what is the first (and could be the only) domain that you will want to be receiving emails on? This can be different from the hostname’s domain.
iRedMail – Provide Domain Name for Mail
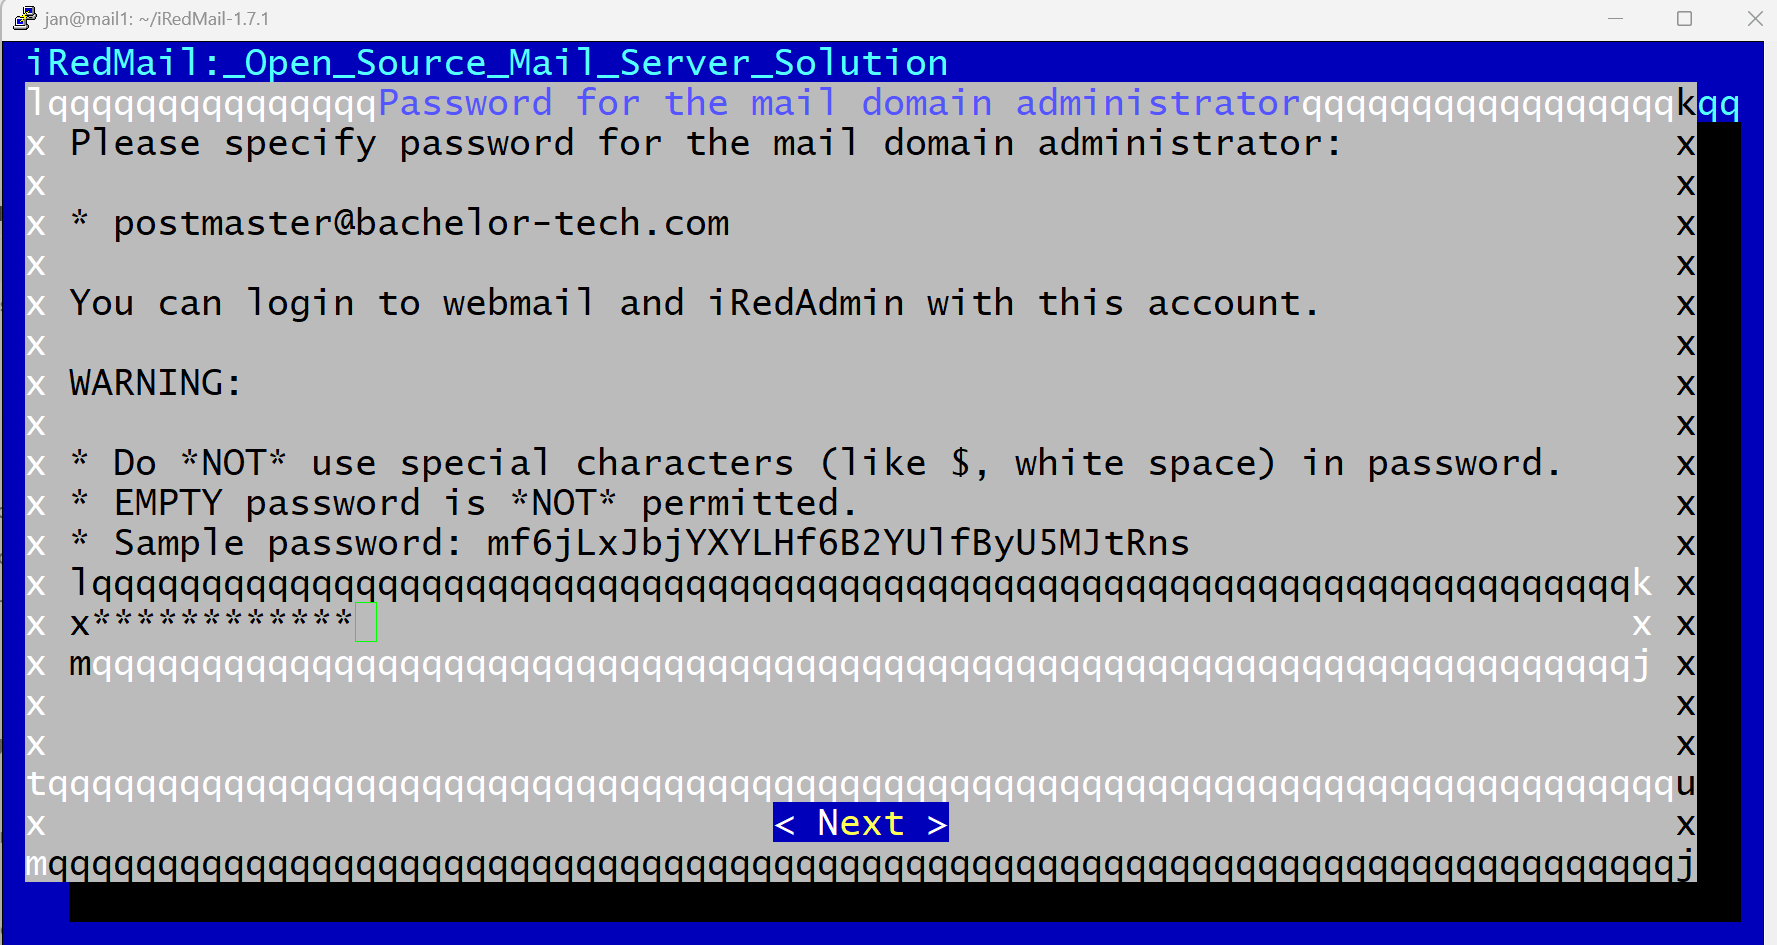
  • Postmaster’s email admin password – again, keep track of what you enter. It should be different from the DB root password.
iRedMail – Postmaster Admin Password Prompt
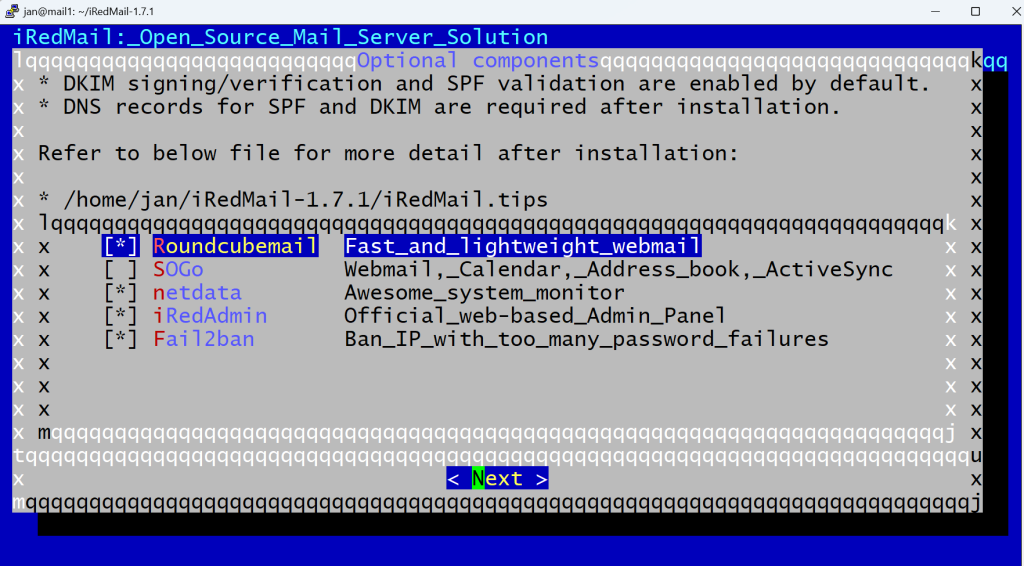
  • Additional components – Roundcube replaces SoGo in terms of webmail capabilities (SoGo still runs on Apache). Others are good to install.
iRedMail – Additional Components – RoundCube + NetData + Fail2Ban
  • At the end of the wizard, confirm ‘y’ to proceed with the installation.
  • Once configured, you will be asked to confirm your SSH port for the firewall to ensure that you do not get locked out and then to restart the firewall:
iRedMail – Enable Port For SSH
  • Before restarting, take a look at the tips file to confirm that you have got the passwords typed correctly and know the interfaces:
sudo nano iRedMail.tips
  • Reboot your VM.

By this point, you have a basic installation of iRedMail completed. However, the services will not yet be reachable, we still have some configuration to do for each.

Services To Be Installed On Our Mail Server (OPTIONAL)
Nginx Configuration (Debian)
Go back to course overview: Install iRedMail Mail Server As Proxmox VM With OPNSense As Firewall

Leave a Comment Cancel Reply

Save my name, email, and website in this browser for the next time I comment.

This site uses Akismet to reduce spam. Learn how your comment data is processed.

0 FacebookWhatsappEmail

Course Steps

  1. Starting Point and Considerations
  2. Pointing Your MX Records (DNS)
  3. Generic VM Installation (Proxmox)
  4. Firewall - static DHCP assignment (OPNsense)
  5. Firewall - Ports to open on your firewall (OPNSense)
  6. Fiirewall- Set Up NAT Rules (OPNSense)
  7. Dynamic DNS for our ‘mail’ DNS record (CloudFlare with OPNSense)
  8. Get SSL Certificate on OPNSense for Web Services (CloudFlare)
  9. HAProxy Set Up - SSL termination (OPNSense)
  10. Services To Be Installed On Our Mail Server (OPTIONAL)
  11. iRedMail installation (Debian)
  12. Nginx Configuration (Debian)
  13. Access iRedAdmin
  14. Configure Roundcube
  15. CertBot Certificate Creation
  16. Apply Certificates - Nginx
  17. A Theory Crash Course On Postfix (OPTIONAL)
  18. Securing Your Mail Server (Postfix)
  19. SMTP Relay With Brevo
  20. Testing your outgoing email ranking
  21. Connect Your Device To The Mail Server Via Email Client
Previous Next

Recent Comments

  • Jan Bachelor on Dynamic DNS Set Up with DuckDNS on OPNSenseHi Jake, that's awesome, congratulations on getting…
  • Jake on Dynamic DNS Set Up with DuckDNS on OPNSensefollowed guide above to the T and all is working. i…
  • Fastbrain on Dynamic DNS Set Up with DuckDNS on OPNSenseThanks for the guide. For some reason, after follow…

Other courses

Install iRedMail Mail Server As Proxmox VM With...

October 31, 2024

Remote Bucket Storage for Proxmox VM Backups

August 16, 2024

Concur Alternative: Import Employees’ Credit Card Expenses to...

January 19, 2024

Create an automated Gravity workflow that will allow...

January 19, 2024

Dynamically Populate Gravity Forms from Google Sheets (GSheets...

March 16, 2021
Bachelor Tech
  • Home
  • Tutorials
  • Portfolio
  • About Jan
  • Contact Jan

Recent Posts

  • How to join two Proxmox nodes into a cluster (PVE 8.x)

  • How to Rename a Proxmox Node

  • How to mount an NFS share on an Android box

Facebook Twitter Instagram Pinterest Linkedin Youtube

All Rights Reserved. The theme was customized from Soledad, see PenciDesign