Part 2 - Prepare AWX and build the provisioning and configuration templates
Go to previous section Download Markdown Go to next section
December 17, 2025
Table of Contents
- 3. Prepare your AWX environment
- 4. Create a provisioning job in AWX [Template 1]
-
5. Create a Configuration job template in AWX [Template 2]
- Prepare WireGuard configuration template
- WireGuard configuration file:
- Garb configuration for the Galera arbitrator:
- Generate a Site 3 public/private keys
- Firewall rules on Site 1 + Site 2
- Create a new job template in AWX for Configuring the VPS
- Troubleshooting the 2nd template
- Verify that Galera comms is established
3. Prepare your AWX environment
In order to be able to execute these templates saved in Gitea, we will need to prepare the environment in AWX.
Create an API token to provision Hetzner-based resources using Terraform
- Create an account with Hetzner and activate 2FA.
- Create a token:
- Go to the Hetzner Cloud Console.
- Select your project (and note the ID from the browser URL, you will need it later).
- On the left, click Security.
- Select the API Tokens tab.
- Click Generate API Token.
- Give it a name (e.g.,
terraform-provisioner) and set its permissions to Read & Write. - Click Generate API Token.
- Copy the token. You will not see it again.
Automate adding your Hetzner VPS into AWX inventory after creation
-
Once the VPS is set up in Hetzner, the
outputs.tfwill help us to get the public ipv4 or ipv6 address of the host and we will be able to add the host into our inventory to manage it later. -
Create an AWX API Token:
- In AWX UI, go to your User Profile (bottom left).
- Click on the Tokens tab.
- Click Add and create a new Personal Access Token.
- Give it a Scope of Write.
- Copy the token immediately! You will not see it again.
-
Now, let's store this token securely. Create the credential
- Go to Administration -> Credential Types.
- Click Add and create a new Credential Type.
- Name:
AWX Controller Token - Input & Injector Configuration - copy paste it as below:
# Input configuration
fields:
  - id: AWX_TOKEN
    label: AWX Token
    type: string
    secret: true

# Injector Configuration:
env:
  AWX_TOKEN: '{{ AWX_TOKEN }}'
- With the credential type created, go to Resources -> Credentials. Add a new credential:
- Name:
AWX API Token - Credential Type:
AWX Controller Token - AWX Token: Paste your new token here.
- Save it.
- Name:
Create your Hetzner token + virtual local host to run jobs from
- Create the Hetzner Credential. Go to Administration -> Credential Types and create the
Hetzner Cloud Tokentype:
# Input Configuration
fields:
  - id: HCLOUD_TOKEN
    label: Hetzner API Token
    type: string
    secret: true

# Injector Configuration
env:
  HCLOUD_TOKEN: '{{ HCLOUD_TOKEN }}'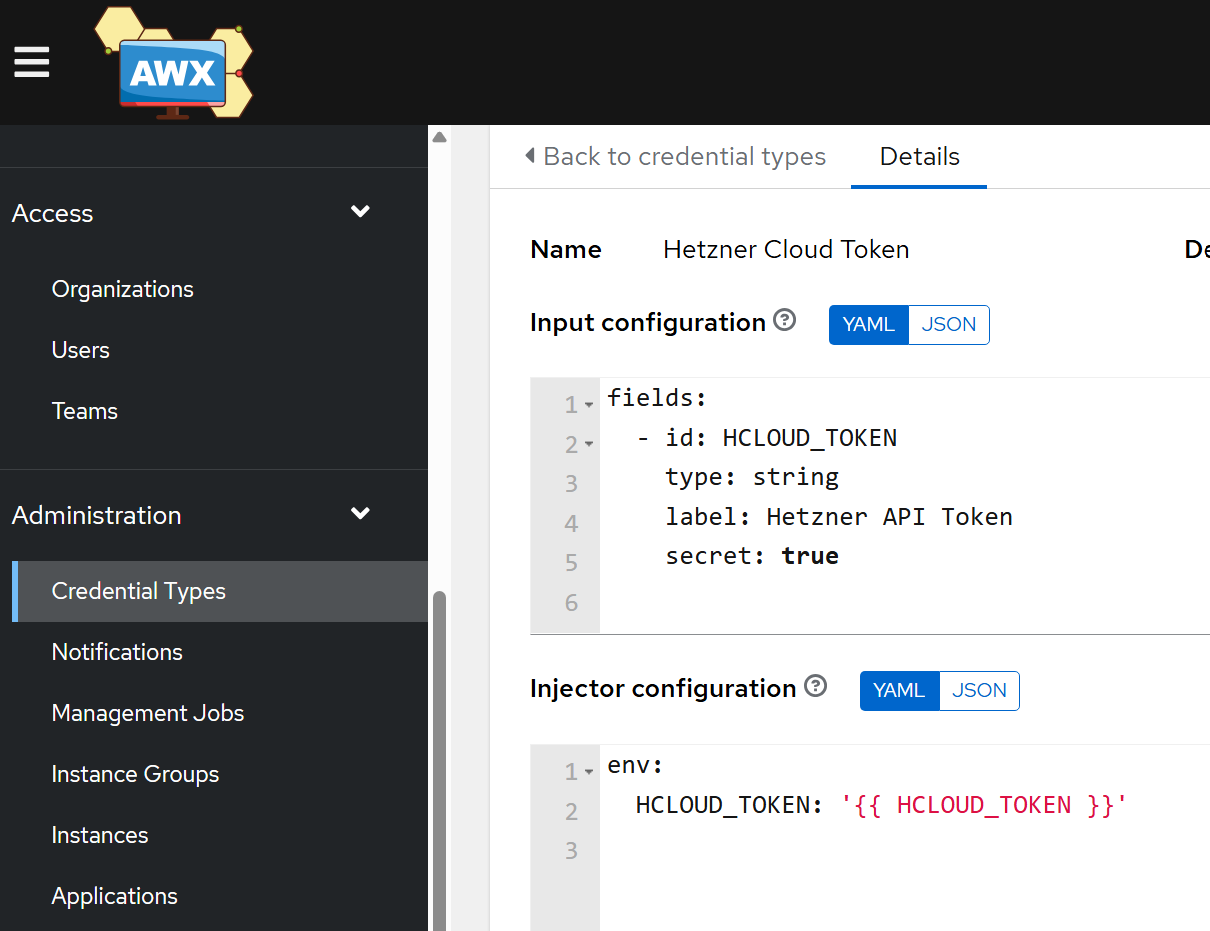
-
Then go to Resources -> Credentials and create a new credential using this type. Paste in your Hetzner API token.
-
In AWX UI, go to Resources → Inventory and select ‘Add inventory’ from the dropdown.
- Name:
Hetzner - Save it and move to the Hosts tab. Add a new host.
- Name:
localhost - Variables: copy paste the row below:
- Name:
---
ansible_connection: local
Credentials for updating DNS records in CloudFlare for Hetzner-created VPS
In order to set up the Site to Site VPN with Site 1 and Site 2 later on, providing the fact that the IP address issued by Hetzner may change during (re-)provisioning of the VPS, we should maintain a DNS record that Site 1 and Site 2 use to connect to Site 3’s endpoint and update it dynamically upon the VPS creation. Unless you have a CloudFlare token already set up, follow these steps to create it.
Create a CloudFlare token
- In your CloudFlare dashboard, go to My Profile -> API Tokens.
- Click Create Token.
- Use the "Edit zone DNS" template.
- Set the permissions as follows:
- Permissions:
Zone-DNS-Edit - Zone Resources:
Include-Specific zone-bachelor-tech.com
- Permissions:
- Create the token and copy it, as you will not see it again.
Create a New AWX Credential Type
- Go to Administration -> Credential Types and click Add.
- Name:
CloudFlare API Token - Add in the following input & injector configuration:
# Input configuration:
fields:
  - id: cloudflare_api_token
    label: CloudFlare API Token
    type: string
    secret: true

# Injector configuration:
extra_vars:
  cloudflare_api_token: '{{ cloudflare_api_token }}'
Create the New Credential for CloudFlare
- Go to Resources -> Credentials and click Add.
- Name:
CloudFlare (bachelor-tech.com) - Credential Type: Select your new
CloudFlare API Token. - CloudFlare API Token: Paste your new token.
4. Create a provisioning job in AWX [Template 1]
In case you have created the YAML and Terraform files in a new repo, you will need to ensure that they are pulled into AWX. If you are working on an existing repo, then just run a sync job.
Add Your Gitea Project (if not done already):
- Go to Resources -> Projects.
- Click Add.
- Name:
Gitea - Infrastructure - Source Control Type:
Git - Source Control URL: Your Gitea repo URL.
- Add your Gitea credential (you can create it in Gitea as read only - see my previous guide)
- Click Save and let it sync.
Create the Job Template (after a sync from Gitea):
- Go to Resources -> Job Templates.
- Click Add -> Add Job Template.
- Name:
H1. Provision Galera Witness - Hetzner - Job Type:
Run - Click on the Credentials tab. Add the
AWX API Tokencredential and theHetzner API Tokencredential and theCloudFlare API token(so 3 in total!). - Project: Select your
Gitea - Infrastructureproject. - Playbook:
provision-witness.yml(This should pop up from your Gitea project). - Execution Environment: Select your existing environment (see here for a step-by-step guide on how to create one - you will need modules like
community.generalfor Terraform to work). - Inventory: Select the
localhostitem we created earlier. - Click Save and Launch it.

- It’s such a nice feeling to see the automation works for you!

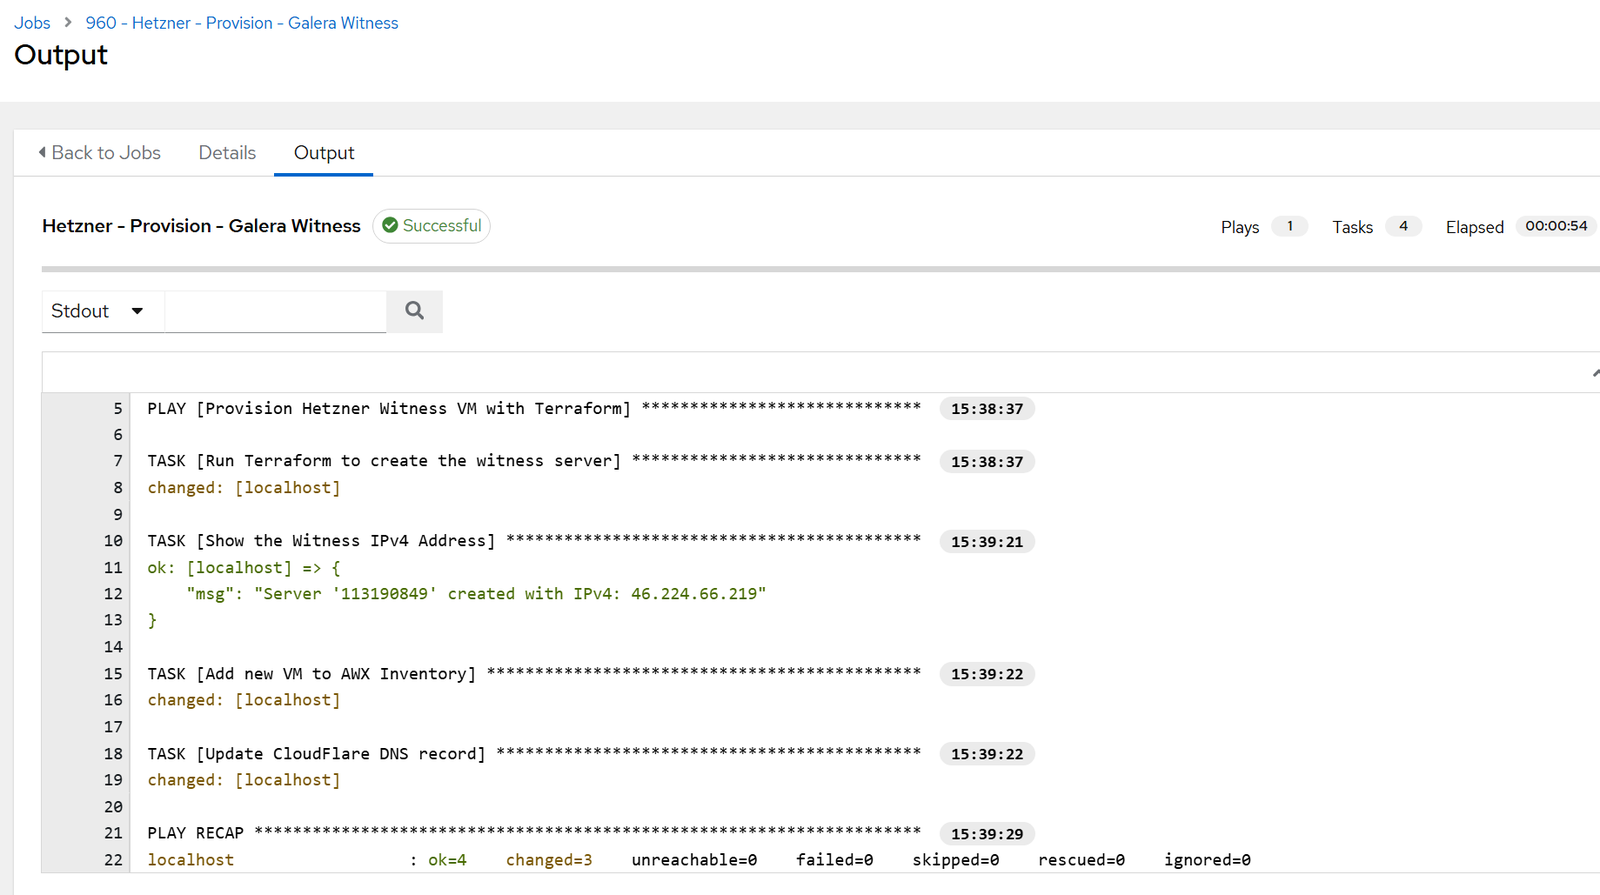
- The output from the template log running - what we see in there:
- The IP address was provided.
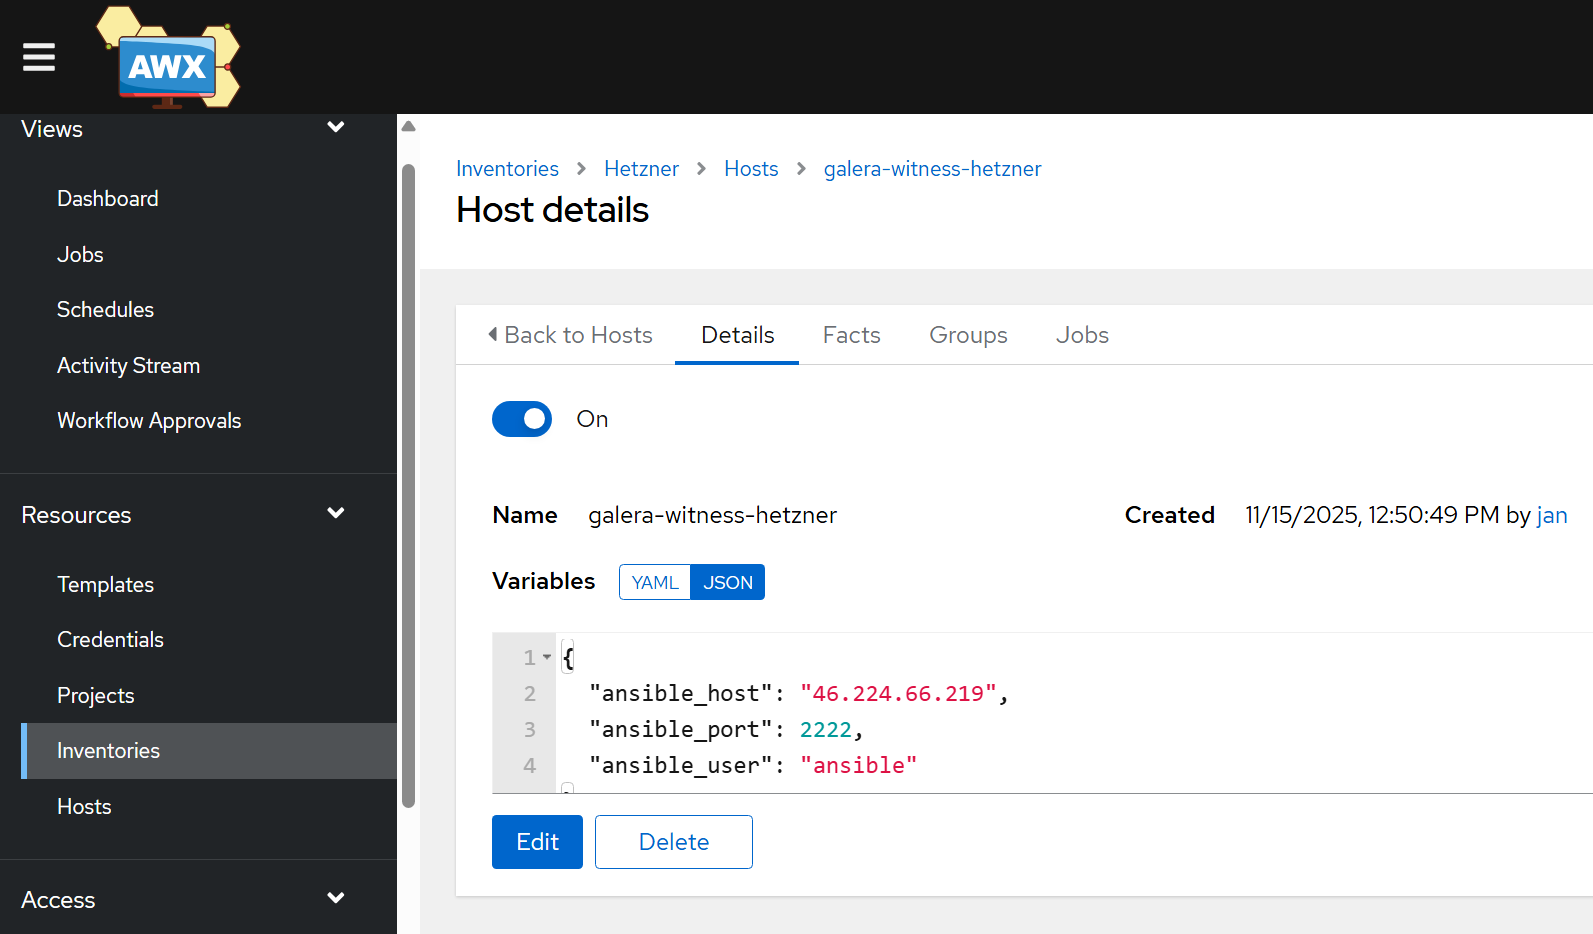
- The VPS was added into inventory.
- Now, check the inventory in AWX!
Troubleshooting the 1st template
Lots of things can go wrong, starting from little YAML-related syntax mistakes to certain commands not working on your distro or version of choice.
-
Potential issues before the VPS is created:
- Missing
community.generalin your EE → cannot call Terraform - Missing
hetzner.hcloudin your EE → cannot interface with Hetzner - Missing
ansible_connection: localin your localhost host results in errors related to the inability to match a host - Your cloud-config file (
provision-witness-hetzner.yml) does not start with the#cloud-configline on the first line, making it non-recognizable when executed on the VPS. - Cloud init script issues → one part completes and the rest does not - check the logs above in detail.
- Firewall rules in Hetzner do not get created → check the syntax against the official TF Hetzner documentation in case there have been changes.
- Re-running the template fails - have you manually removed both the VPS and the firewall rules in Hetzner?
- Or the other way - if you get
Error: name is already used (uniqueness_error, 97cc8f7bf626fbe0084738ed7d6b0cdd) with hcloud_firewall.witness_fw, it means that you are running the job again, removed the VPS but forgot to remove the firewall rule in Hetzner. - During re-creation of the VPS, you forgot to remove the firewall rules, making the job fail.
- Unable to find your host or script - ensure that you have synced your project playbook (synced from Gitea).
- MariaDB repo issues - check the newest version for your distro on MariaDB’s mirror.
- Firewall-related errors - such as when you enter a hostname and only IP addresses are accepted.
- Missing
-
Some challenges you may run after the VPS creation:
- Whatever error you may experience once the VPS is created, you can find it in one of the two log files called
cloud-init.logandcloud-init-output.log. Let me know in the comments below if you get stuck or would like to understand what the errors in the logs mean (unless you prefer to use AI to interpret for you!). - To get to those logs, open your respective project in Hetzner and go to the details about your server.
- Go to the Rescue tab and scroll down to click on the ‘Reset Root Password’ button.
- A new root password is generated, save it.
- Use the console button in the top right area to console it. Enter
rootfor the username and manually type in the generated password. You will get into the VPS. Check the following logs:
- Whatever error you may experience once the VPS is created, you can find it in one of the two log files called
# The output from cloud-init (the initial commands)
sudo nano /var/log/cloud-init.log

# The output of the RUN commands
sudo nano /var/log/cloud-init-output.log
5. Create a Configuration job template in AWX [Template 2]
We now have our VPS in our inventory and can reach its public IP address via SSH to run additional jobs. What we want is to automate the set up of a Site 2 Site VPN with the other two sites + to configure garbd, so that our VPS can start acting as a witness.
Prepare WireGuard configuration template
- Create the second template to configure the VPS in Hetzner:
- Pre-flight Checks: Waits for the SSH port (2222) to become available and ensures
cloud-inithas finished installing all base packages. - VPN Configuration: Generates the WireGuard configuration file (
wg0.conf) using Jinja2 templates and secrets from AWX, then enables the service. - Galera Arbitrator: Deploys the
garbconfiguration, sets up log rotation for the arbitrator logs, and starts the service to join the cluster.
- Pre-flight Checks: Waits for the SSH port (2222) to become available and ensures
**# 2-configure-witness.yml**

---

- name: 1. Verify Witness is Ready
  hosts: galera-witness-hetzner
  gather_facts: no # Don't try to gather facts until we know it's online

  pre_tasks:
    - name: Wait for SSH port (2222) to be available
      ansible.builtin.wait_for:
        host: "{{ ansible_host | default(inventory_hostname) }}"
        port: "{{ ansible_port | default(2222) }}"
        state: started
        delay: 5      # Wait 5s before first check
        timeout: 300  # Wait up to 5 minutes
      delegate_to: localhost # Run this check from the AWX container
      become: false # No need for sudo

    - name: Wait for cloud-init to finish
      ansible.builtin.command:
        cmd: cloud-init status --wait
      changed_when: false
      become: true # This must run with sudo

- name: 2. Configure WireGuard on Witness
  hosts: galera-witness-hetzner
  become: true

  tasks:
    - name: Ensure /etc/wireguard directory exists
      ansible.builtin.file:
        path: /etc/wireguard
        state: directory
        owner: root
        group: root
        mode: '0700' # drwx------

    - name: Create WireGuard wg0.conf
      ansible.builtin.template:
        src: wg0.conf.j2
        dest: /etc/wireguard/wg0.conf
        owner: root
        group: root
        mode: '0600'
      notify: Restart wireguard

    - name: Ensure WireGuard starts on boot
      ansible.builtin.systemd_service:
        name: wg-quick@wg0
        enabled: yes
        state: started

  handlers:
    - name: Restart wireguard
      ansible.builtin.systemd_service:
        name: wg-quick@wg0
        state: restarted

- name: 3. Configure Galera Arbitrator (garbd)
  hosts: galera-witness-hetzner
  become: true

  tasks:
    - name: Create and set permissions for garbd.log
      ansible.builtin.file:
        path: /var/log/garbd.log
        state: touch
        owner: nobody
        group: nogroup
        mode: '0644'

    - name: Create garb configuration
      ansible.builtin.template:
        src: garb.default.j2
        dest: /etc/default/garb
        owner: root
        group: root
        mode: '0644'
      notify: Restart garb

    - name: Add logrotate configuration for garb
      ansible.builtin.copy:
        dest: /etc/logrotate.d/garb
        content: |
          /var/log/garbd.log
          {
              daily
              rotate 7
              compress
              delaycompress
              missingok
              notifempty
              create 0644 nobody nogroup
          }
        owner: root
        group: root
        mode: '0644'

    - name: Ensure garbd starts on boot
      ansible.builtin.systemd_service:
        name: garb  # The service name is called garb, not garbd
        enabled: yes
        state: started

  handlers:
    - name: Restart garb
      ansible.builtin.systemd_service:
        name: garb
        state: restarted
WireGuard configuration file:
- Interface Definition: Configures the local WireGuard interface with the private key injected securely from AWX credentials.
- Peer Setup: Defines the connection details (Endpoint, Public Key, AllowedIPs) for Site 1 and Site 2, establishing the mesh VPN topology.
**# wg0.conf.j2**

[Interface]
# This is the witness node's configuration
Address = {{ witness_wg_ip | default('10.10.10.3/24') }}
ListenPort = 51821
PrivateKey = {{ witness_wg_private_key }}

# --- Peer 1: Site 1 - U vody (OPNSense) ---
[Peer]
PublicKey = {{ site1_wg_public_key }}
Endpoint = {{ site1_wg_endpoint | default('uvody.bachelor-tech.com:51821') }}
AllowedIPs = 192.168.8.0/24, 10.10.10.1/32

# --- Peer 2: Site 2 - Tusarka (OPNSense) ---
[Peer]
PublicKey = {{ site2_wg_public_key }}
Endpoint = {{ site2_wg_endpoint | default('tusarka.bachelor-tech.com:51821') }}
AllowedIPs = 192.168.6.0/24, 10.10.10.2/32
Garb configuration for the Galera arbitrator:
- Cluster Config: Defines the Galera cluster address string (
GALERA_NODES), listing all other nodes in the cluster so the arbitrator knows who to connect to. - Arbitrator Mode: Sets specific options (like
gmcast.segment) to ensure the witness participates in voting and is treated as a separate segment for latency reasons.
**# garb.default.j2**

# Configuration for Galera Arbitrator
# This file is sourced by /usr/bin/garb-systemd

# Cluster name from your 60-galera.cnf
GALERA_GROUP="clusterA"

# List of ALL *DATA NODES* (Sites 1 & 2)
GALERA_NODES="192.168.8.71:4567,192.168.8.72:4567,192.168.8.73:4567,192.168.8.74:4567,192.168.6.75:4567,192.168.6.76:4567"

# Set the segment for this witness node
GALERA_OPTIONS="gmcast.segment=3"

# Log file location
LOG_FILE="/var/log/garbd.log"
Generate a Site 3 public/private keys
- This only needs to be done once when you create it for the first time.
- On any Linux machine that has WireGuard installed, run the following. This will provide two files,
witness_private.keyandwitness_public.key. We will store the private key in its own credential type.
wg genkey | tee witness_private.key | wg pubkey > witness_public.key- As for the public key, you can add it into your Site 1 and Site 2’s WG configuration. In my case, I have OPNSense running with WireGuard, so I would add it as a peer in there (for each Site 1 and Site 2’s OPNSense):
- Enabled: tick
- Name:
Hetzner_Witness_peer - Public key: paste in your key
- Pre-shared key: leave blank
- Allowed IPs:
10.10.10.3/32(just the interface) - Endpoint address: either the public IP or a hostname that is kept up to date with a dynamic DNS client.
- Endpoint port:
51821 - Instances: your local WG S2S instance

- Create a Custom Credential Type
- In AWX, go to Administration -> Credential Types. Add a new one.
- Name:
WireGuard Private Key - Add the Input and Injector Configuration:
# Input Configuration
fields:
  - id: private_key
    label: WireGuard Private Key
    type: string
    secret: true

# Injector Configuration
extra_vars:
  witness_wg_private_key: '{{ private_key }}'

- Now go to Resources -> Credentials. Add a new one
- Name:
Witness WG Private Key - Credential Type: Select your new
WireGuard Private Keytype. - WireGuard Private Key: Paste in the contents of your
witness_private.keyfile.
Firewall rules on Site 1 + Site 2
In order for the Galera Arbitrator communication to occur from Site 3 with Site 1+2, we need to open a port on the VPN tunnel to pass traffic on TCP and UDP port 4567. Here is an example with OPNSense that is located on Site 1 and Site 2. You will need to apply this rule on each.
- On OPNSense, go to Firewall → Rules → WireGuard S2S interface (whatever you have called it). Add a new rule:
- Action:
Pass - Interface:
WG S2S VPN - Direction:
in - TCP/IP:
IPv4 - Protocol:
TCP/UDP - Source:
10.10.10.3/32(Site 3 VPN) - Destination:
LAN net - Port: other -
4567to4567(this is the port that garb uses, unlike SQL) - Log: tick
Log packets that are handled by this rule - Description:
Allow Galera Witness In
- Action:

- Save and apply the rule.
- Then if you have
ufw(or another local firewall service likeiptables) running on each of your galera nodes, you will need to open ports for the communication with the Arbitrator over the S2S VPN to work on port 4567 TCP+UDP:- If using
ufw, SSH into each Galera node (Site 1 + Site 2) and run the following using the IP of the tunnel of Site 3:
- If using
sudo ufw allow from 10.10.10.0/24 to any port 4567 proto tcp
sudo ufw allow from 10.10.10.0/24 to any port 4567 proto udp
Create a new job template in AWX for Configuring the VPS
- Name:
H2 - Configure Galera Witness - Inventory:
Hetzner - Project: Gitea’s or your preferred source version control system
- Limit: Add your witness VPS, such as
galera-witness-hetzner - Execution environment: same as for your first template
- Playbook:
2-configure-witness.yml- if you do not see it, sync your playbook from the Project section first to fetch it from Gitea. - Credentials:
ansible- the SSH key we use to log into VMs andSite 3 WG private key - Add these extra variables:
---
# These are all public and safe to store as plain text
site1_wg_public_key: "PASTE_SITE1_PUBLIC_KEY_HERE"
site1_wg_endpoint: "site1:51821"
site2_wg_public_key: "PASTE_SITE2_PUBLIC_KEY_HERE"
site2_wg_endpoint: "site2:51821"
witness_wg_ip: "10.10.10.3/24"- Tick the box for Privilege Escalation

- Give it a test and run it!
Troubleshooting the 2nd template
- Remember that if you choose to run the 1st template from start, you will need to remove both the VPS and the firewall rules in Hetzner before re-running it.
- If you experience errors during the first part of the playbook run, ensure that the variable names in Gitea match the ones in the template variables.
- In case you get stuck, post the relevant parts of the output log in the comments below and we can troubleshoot it together.
- While the 2nd template is probably the simplest from the three, the most likely hiccup you may experience is with the site-to-site VPN communication and firewall ports. Let’s confirm that it works.
Verify that Galera comms is established
- Once communication is established with the Site 3 Arbitrator, you can run this command from any Galera node (not the Arbitrator) to reveal the cluster size - the number should be increased by one:
mysql -u root -p

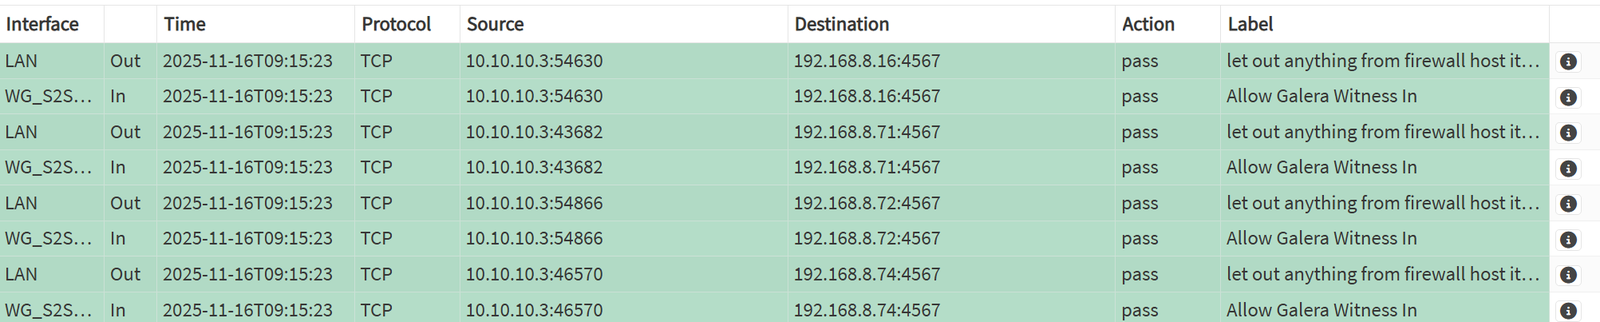
SHOW STATUS LIKE 'wsrep_cluster_size';- Observe the traffic under Firewall → Log Files → Live view on port 4567, you can observe the traffic coming in and out once the
garb(orgarbd) service is up on Site 3.
With both templates working end to end, the last part adds a restoration job and joins everything into one workflow you can trigger with a single click.
Enjoying this tutorial?
This site is a non-profit project. If it saved you some time, you can support it by getting Jan some coffee.
☕ Buy me a coffee
Comments