Part 1 - Plan the setup and write the Terraform and Ansible scripts
Download Markdown Go to next section
December 17, 2025
Table of Contents
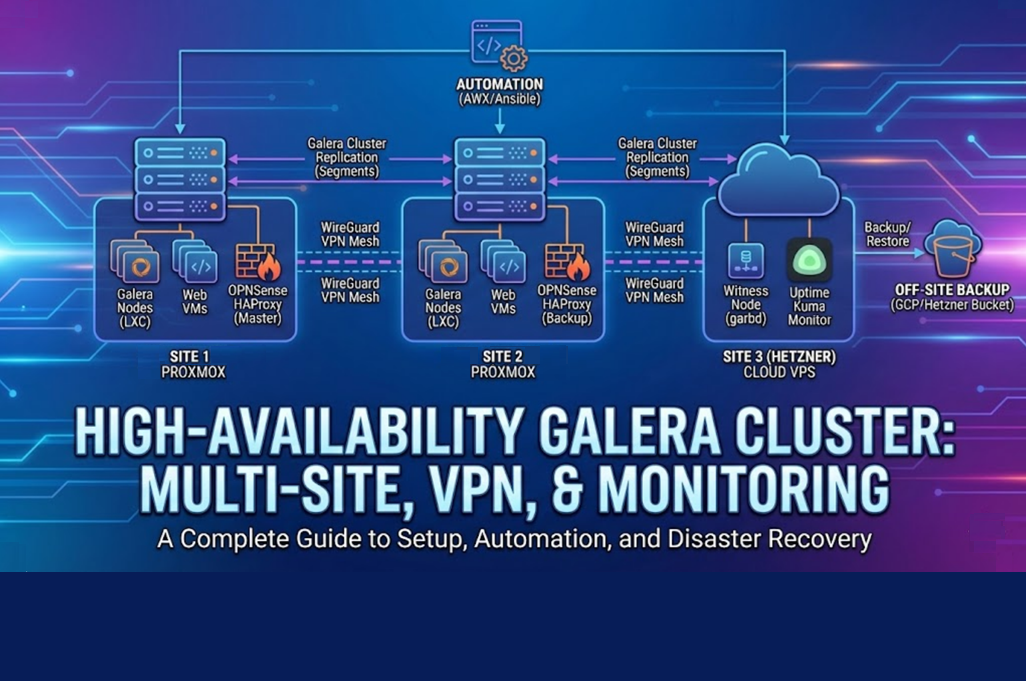
In this tutorial, we will automate deployment of a VPS on Hetzner (a renowned EU cloud-based provider) using Terraform and configure it using Ansible - all triggered from AWX. This is a definitive guide for anyone running Galera on hybrid cloud infrastructure!
1. What are we trying to achieve here?
AWX will run the following three templates as part of one workflow:
With a click of a button, you will be able to spin up a fully configured VPS for < 4 EUR a month in an environment of a trusted European-based cloud provider and be able to re-create it whenever or wherever needed 🙂

Use case - what is this setup for?
- You have Site 1 and Site 2 already configured using a MariaDB Galera Cluster and web servers.
- Site 1 and Site 2 are connected using a Site-to-site VPN tunnel (WireGuard), each with equal weight in terms of Galera weighting.
- Site 3 will therefore act as a ‘witness’ in between the two sites - if one goes down, the DB cluster will remain operational.
Proposed architecture:
- 1st Site/Segment 1 (Uvody) - main site:
- Proxmox host 1 - 192.168.8.3/24
- Galera-A1 LXC - Weight - 1 - 192.168.8.71/24
- Galera-A2 LXC - Weight - 1 - 192.168.8.72/24
- Web1 VM - 192.168.8.9/24
- OPNSense 1 VM (CARP - master, HAProxy, S2S VPN) - 192.168.8.1/24 (LAN CARP = 192.168.8.254/24), S2S VPN on 10.10.10.1/24
- AWX-Ansible VM (K3s) - 192.168.8.25/24
- Uptime Kuma LXC - 192.168.8.60/24
- Proxmox host 2 - 192.168.8.4/24
- Gitea LXC - 192.168.8.20/24
- Galera-A3 LXC - Weight - 1 (Proxmox host 2) - 192.168.8.73/24
- Galera-A4 LXC - Weight - 1 (Proxmox host 2) - 192.168.8.74/24
- Galera-template LXC (offline) - ID 150 - backed up to PBS
- Web2 VM - 192.168.8.10/24
- OPNSense 2 VM (CARP - backup, HAProxy, S2S VPN) - 192.168.8.2/24
- Proxmox Backups Server (PBS, runs on RPI 4) - 192.168.8.17/24
- Proxmox host 1 - 192.168.8.3/24
- 2nd Site/Segment 2 (Tusarka) - fallback site:
- Proxmox host 3 - 192.168.6.4/24
- Galera-A5 - Weight 2 (Proxmox host 3) - 192.168.6.75/24
- Galera-A6 - Weight 2 (Proxmox host 3) - 192.168.6.76/24
- Web3 VM - 192.168.6.11/24
- OPNSense 3 (HAProxy, S2S VPN) - 192.168.6.1/24, S2S VPN on 10.10.10.2/24
- Proxmox host 3 - 192.168.6.4/24
- 3rd Site/Segment 3 (Hetzner VPS) - services running on the VPS:
- WireGuard S2S VPN - S2S VPN on 10.10.10.3/24
- Galera witness - Weight - 1 (S2S VPN)
- Uptime Kuma - monitor websites, VPN tunnel + Galera via push scripts
For an easier visualization, here is a flowchart diagram:
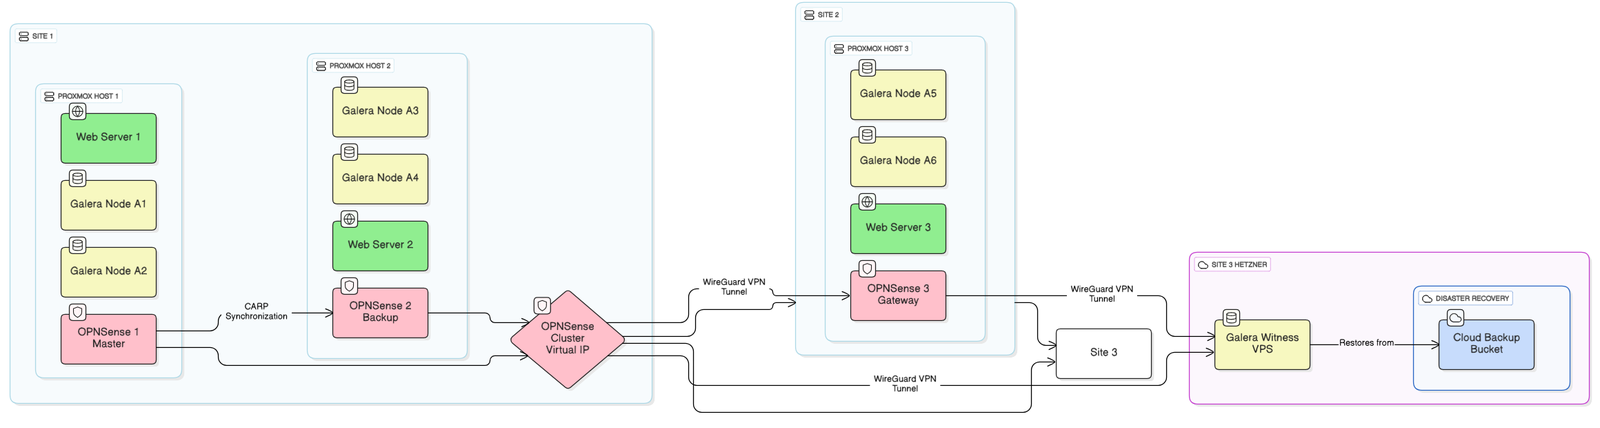
Existing setup this tutorial assumes (Site 1 + Site 2)
- Site 1 and 2 are already assumed to be set up from before and are not covered by this tutorial.
- Galera weight by Segment: 4+4+1=9 - required min. quorum: 5 (1 full site + witness)
- Outage happens only if both Site 1 AND Site 2 are down. Alternatively, if the witness node is down and Site 1 OR Site 2 goes down.
- Web VMs sync web data via Gitea (a separate LXC) and user data using syncthing
- CloudFlare load balancing prioritizes Site 1 and fallbacks to Site 2 during an outage
- OPNSense on each site provides sticky binding to a web VM host with an inserted cookie
- UptimeKuma LXC is located in each site to monitor local services (web1, web2, galera cluster health, VPN tunnel, etc.).
- It is also installed on the witness node to monitor the S2S VPN tunnel + overall web services (e.g. ‘does the website load?’).
- The bucket serves as a backup location for catastrophic situations since Site 1 and Site 2 are physically only 1 mile away from each other.
Galera set up on Site 1 & 2 - weights & segments
While the Site 1 & 2 configuration is out of the scope of this tutorial, we have already explored which firewall ports will need to be opened and how to troubleshoot them (at least on OPNSense).
-
In case you have been running your Galera cluster on just one site for now, you may have noticed that the config file for the Arbitrator contains a term ‘segment’. What is it?
- Galera segments allow you to group nodes based on their physical location (e.g., Site 1, Site 2, Cloud). By assigning these segments, you enable Optimized WAN Replication: instead of the primary node sending individual data packets to every remote node over your VPN tunnel (which consumes massive bandwidth), it sends a single copy to one node in the remote segment, which then acts as a relay to distribute the data locally to its neighbors. This drastically reduces traffic across your site-to-site links and prevents database replication from choking your network.
-
In its default setting, each node carries one weight. In the proposed architecture section earlier, you may have noticed that Site 2 has only 2x Galera nodes, whereas Site 1 has 4x nodes. So how can you influence weighting on the galera nodes?
-
An example for Site 2’s Galera node config where we need to set:
segment: 2weightfor each node: 2
sudo nano /etc/mysql/mariadb.conf.d/60-galera.cnf

[galera]
# ... your other settings ...

# Site 2 Specifics: Segment 2, Weight 2
wsrep_provider_options="gcache.size=512M;gcs.fc_limit=128;gcs.fc_factor=0.8;**gmcast.segment=2;pc.weight=2**"

# Full Cluster List
wsrep_cluster_address="gcomm://192.168.**8**.71,192.168.**8**.72,192.168.**8**.73,192.168.**8**.74,192.168.**6**.75,192.168.**6**.76"

# Node Specifics (Example for A5)
wsrep_node_address = "192.168.6.75"
wsrep_node_name = "galera-a5"
wsrep_sst_receive_address = "192.168.6.75"
- Similarly, on Site 1, ensure you use:
- weight: 1 (since we have 4 nodes)
- segment: 1 (as our first site)
[galera]
# ... your other config ...
wsrep_provider_options="gcache.size=512M;gcs.fc_limit=128;gcs.fc_factor=0.8;gmcast.**segment=1;pc.weight=1**"- Once set up, SSH into any Galera node in your cluster and compare the values:
mysql -u root -p

# With 4+4+1 design, you should see 9
SHOW STATUS LIKE 'wsrep_cluster_weight';

# With 4 nodes + 2 nodes + 1 witness, you should see 7
SHOW STATUS LIKE 'wsrep_cluster_size';
Other Infrastructure Pre-requisites:
- These you can have running on either of your Sites as VMs or containers.
- A Gitea server (or some other source version control service hosted locally or externally).
- AWX (or plain Ansible if you are comfortable running playbooks manually). What will you need for the execution environment (keep in mind that this means both the modules in
requirements.ymlas well as related dependencies inrequirements.txt- check out this part of my previous guide).hetzner.hcloud- to provision the VPS and firewall rules on Hetznercommunity.general- for CloudFlare DNS record changes, Terraformansible.netcommon- sudo elevation on the VPSawx.awx- to add the VPS into our AWX inventorygoogle.cloud- to interface with a GCP bucketcommunity.docker- to work with a Docker container for UptimeKuma
- An account in Hetzner - we will be deploying a VM for 5 EUR a month
- Reverse proxy and load balancer on Site 1 + 2 (I use OPNSense in this tutorial)
- WireGuard Site-to-Site VPN set up on Site 1 + 2 already
- CloudFlare account - to automate managing DNS records for Site 3 as the public IP of the instance may change during re-provisioning.
- For the third template, I will have a
kuma.db(backup) of Uptime Kuma to restore from a GCP bucket.
2. Create the initial Terraform + Ansible scripts
Firstly, we will create our scripts and based on that, we will create the credential types and add the credentials in. This will hopefully help shed some light on what we are doing and why.
- Scripts required to provision the VPS:
main.tf: This file is the main set of instructions. It defines the provider, finds the right OS image, and creates the server with your exact specifications. See Terraform manual.1a-provision-witness-terraform.yml- use Terraform to provision the VPS in Hetzner (before cloud-init below is used).1b-provision-witness-hetzner.yml- the cloud-init script that will install and configure services on the VPS. See Hetzner’s manual.outputs.tf: This file tells Terraform what information to print out when it's done. This is critical for AWX integration.
First script - main.tf:
- Provider Setup: Configures the
hcloud(Hetzner Cloud) provider to manage resources. - Image Selection: Automatically finds the latest available image for Debian 13 (Trixie) on x86 architecture.
- Server Creation: Provisions a
CX23VPS (2 vCPU, 4GB RAM) in the Falkenstein data center (fsn1). - Cloud-Init Injection: Injects the
1b-provision-witness-hetzner.ymluser data to handle OS-level setup immediately upon boot. - Firewall Management: Creates and attaches a robust Hetzner Cloud Firewall (
witness_fw) that strictly limits ingress traffic to SSH, WireGuard, and Uptime Kuma ports (this is external toufwthat also gets installed on the VPS later using the 1b template).
**#** **main.tf
**
# This tells Terraform we are using the Hetzner Cloud provider
terraform {
  required_providers {
    hcloud = {
      source  = "hetznercloud/hcloud"
      version = "~> 1" # Use the latest 1.x version
    }
  }
}

# The provider will automatically use the HCLOUD_TOKEN environment variable
provider "hcloud" {}

# ----------------------------
# --- DEFINE VM PROPERTIES ---
# ----------------------------

# This data block finds the latest "debian-13" image ID
data "hcloud_image" "debian_image" {
  name        = "debian-13"
  with_architecture = "x86"
}

# This data block finds your SSH key to add to the server.
data "hcloud_ssh_key" "jan_key" {
  name = "Jan's key 2025-06"
}
data "hcloud_ssh_key" "ansible_key" {
  name = "Ansible"
}

# This is the main resource block that creates the VM
resource "hcloud_server" "witness_vm" {
  name        = "galera-witness"
  server_type = "cx23"                # 2 vCPU, 4GB RAM, 40GB SSD
  image       = data.hcloud_image.debian_image.id
  location    = "fsn1"                # Falkenstein (eu-central)

  # Enable/disable ipv4 and ipv6
  public_net {
    ipv4_enabled = true
    ipv6_enabled = false
  }

  # Add your SSH key for initial access (before cloud-init runs)
  ssh_keys = [
    data.hcloud_ssh_key.jan_key.id,
    data.hcloud_ssh_key.ansible_key.id
  ]

  # This reads the cloud-init for Hetzner and passes it to the server
  user_data = file("1b-provision-witness-hetzner.yml")

  labels = {
    "service" = "galera"
    "role"    = "witness"
  }
}

# -------------------------------------------------
# --- DEFINE THE HETZNER FIREWALL AND ITS RULES ---
# -------------------------------------------------
resource "hcloud_firewall" "witness_fw" {
  name = "galera-witness-fw"

  # Rule 1: Allow SSH (on your new port) from anywhere
  rule {
    direction = "in"
    protocol  = "tcp"
    port      = "2222"
    source_ips = [
      "0.0.0.0/0",
      "::/0"
    ]
  }

  # Allow WireGuard (UDP) from Site 1 and Site 2
  rule {
    direction = "in"
    protocol  = "udp"
    port      = "51821"
    source_ips = [
      "0.0.0.0/0",
      "::/0"
    ]
  }

  # Rule 3: Allow Galera (TCP/UDP) from  VPN subnets
  rule {
    direction = "in"
    protocol  = "tcp"
    port      = "4567"
    source_ips = [
      "192.168.0.0/16",
      "10.10.10.0/24"
    ]
  }
  rule {
    direction = "in"
    protocol  = "udp"
    port      = "4567"
    source_ips = [
      "192.168.0.0/16",
      "10.10.10.0/24"
    ]
  }

  # Rule 4: Allow ICMP (Ping)
  rule {
    direction = "in"
    protocol  = "icmp"
    source_ips = [
      "0.0.0.0/0",
      "::/0"
    ]
  }

  # Rule 5: Allow Uptime Kuma (TCP) from anywhere
  # Later, this can be restricted to the Site 1 + 2 and other WG Roadwarrior IP addresses
  rule {
    direction = "in"
    protocol  = "tcp"
    port      = "3001"
    source_ips = [
      "0.0.0.0/0",
      "::/0"
    ]
  }
}

# -----------------------------------------
# --- ATTACH THE FIREWALL TO THE SERVER ---
# -----------------------------------------
resource "hcloud_firewall_attachment" "fw_attachment" {
  firewall_id = hcloud_firewall.witness_fw.id
  server_ids  = [hcloud_server.witness_vm.id]
}
Terraform provisioning script:
- Terraform Execution: Runs
terraform applyto provision the actual infrastructure on Hetzner. - Dynamic Inventory: Captures the newly created server's public IP address from Terraform's output.
- AWX Integration: Automatically adds the new host to the AWX
Hetznerinventory, allowing subsequent job templates to target it immediately without manual intervention. - DNS Automation: Updates a CloudFlare DNS A-record (
hetzner-witness.bachelor-tech.com) to point to the new IP, ensuring VPN endpoints remain valid even if the IP changes.
# 1a-provision-witness-terraform.yml

---
- name: Provision Hetzner Witness VM with Terraform
  hosts: localhost
  connection: local
  gather_facts: no

  tasks:
    - name: Run Terraform to create the witness server
      community.general.terraform:
        project_path: "{{ playbook_dir }}"
        state: present              # This means "run terraform apply"
        force_init: true            # This runs "terraform init" first

      # This is how the playbook gets the Hetzner token
      # from the AWX credential (see step 4)
      environment:
        HCLOUD_TOKEN: "{{ lookup('env', 'HCLOUD_TOKEN') }}"

      # This registers the output of the 'terraform apply' command
      register: tf_output

    - name: Show the Witness IPv4 Address
      ansible.builtin.debug:
        msg: "Server '{{ tf_output.outputs.witness_id.value }}' created with IPv4: {{ tf_output.outputs.witness_ipv4.value }}"

    - name: Add new VM to AWX Inventory
      awx.awx.host:
        name: "galera-witness-hetzner"
        inventory: "Hetzner"  # Or whatever your inventory is called
        variables:
          ansible_host: "{{ tf_output.outputs.witness_ipv4.value }}"
          ansible_port: 2222
          ansible_user: ansible
        state: present

      environment:
        # Token for AWX API - adjust your hostname, as required
        CONTROLLER_HOST: "{{ lookup('env', 'TOWER_HOST') | default('https://awx.bachelor-tech.com', true) }}"
        CONTROLLER_OAUTH_TOKEN: "{{ lookup('env', 'AWX_TOKEN') }}"
        CONTROLLER_VERIFY_SSL: false # Set to true if you have valid SSL

    - name: Update CloudFlare DNS record
      community.general.cloudflare_dns:
         zone: "bachelor-tech.com"
         record: "hetzner-witness"
         type: "A"  # A record is for IPv4
         value: "{{ tf_output.outputs.witness_ipv4.value }}"
         api_token: "{{ cloudflare_api_token }}"

      no_log: true # Hides the token from the log output
Cloud-config file:
- Adds two users (ansible user for management via
S2S VPNwith AWX from Site 1) - Custom SSH port (with no password auth) + installs packages apart from the one used for Galera
- Installs Docker + configures
ufwfirewall rules - The cloud-config file (the file MUST start with the
#cloud-configline or else it will not be recognized and the following will not be applied):
**# 1b-provision-witness-hetzner.yml**

#cloud-config

# Add users
users:
  - name: jan
    groups: users, admin
    sudo: ALL=(ALL) NOPASSWD:ALL
    shell: /bin/bash
    ssh_authorized_keys:
      - ecdsa-sha2-nistp256 AAAAE2VjZHNhLXNoYTItbmlzdHAyNTYAAAAIbmlzdHAyNTYAAABBBPS+K109p5/R9YjsGrzW5smURig7pOF+ex3BoBW5a9ZISUQW7A9vdOavwHbGZC5oCM7DyexZwQhr1BVdlLFW4X8= ecdsa-key-20250630
  - name: ansible
    groups: users, admin
    sudo: ALL=(ALL) NOPASSWD:ALL
    shell: /bin/bash
    ssh_authorized_keys:
      - ssh-ed25519 AAAAC3NzaC1lZDI1NTE5AAAAICYSPfWeFXXskRcuSCa8valFv0rCZY8RizM+68MYMa9c

# Install the pre-requisites for adding the repo
package_update: true
packages:
  - curl
  - gpg
  # Required for Docker:
  - ca-certificates
  - gnupg
  - python3-pip
  - mariadb-client # To check for Galera cluster size
package_upgrade: true

# Write into the SSH config file
write_files:
  - path: /etc/ssh/sshd_config.d/ssh-hardening.conf
    content: |
      PermitRootLogin no
      PasswordAuthentication no
      Port 2222
      KbdInteractiveAuthentication no
      ChallengeResponseAuthentication no
      MaxAuthTries 2
      AllowTcpForwarding no
      X11Forwarding no
      AllowAgentForwarding no
      AuthorizedKeysFile .ssh/authorized_keys
      AllowUsers jan ansible

# Run setup commands
runcmd:
  # Apply the new SSH port
  - systemctl restart sshd

  # Manually add the MariaDB repo (from which we will fetch the arbitrator package)
  - curl -o /etc/apt/keyrings/mariadb-keyring.pgp https://mariadb.org/mariadb_release_signing_key.pgp
  # Fetch MariaDB 11.8.5 compatible with Trixie
  - echo "deb [signed-by=/etc/apt/keyrings/mariadb-keyring.pgp] https://deb.mariadb.org/11.8.5/debian trixie main" > /etc/apt/sources.list.d/mariadb.list
  # Update and install the packages
  - apt-get update
  - apt-get install -y fail2ban ufw mc wireguard wireguard-tools rsync galera-arbitrator-4

  # Configure them
  - printf "[sshd]\nenabled = true\nport = ssh, 2222\nbanaction = iptables-multiport" > /etc/fail2ban/jail.local
  - systemctl enable fail2ban
  - systemctl start fail2ban

  # --- Install Docker ---
  - install -m 0755 -d /etc/apt/keyrings
  - curl -fsSL https://download.docker.com/linux/debian/gpg -o /etc/apt/keyrings/docker.gpg
  - chmod a+r /etc/apt/keyrings/docker.gpg
  - echo "deb [arch=$(dpkg --print-architecture) signed-by=/etc/apt/keyrings/docker.gpg] https://download.docker.com/linux/debian trixie stable" > /etc/apt/sources.list.d/docker.list
  - apt-get update
  - apt-get install -y python3-docker docker-ce docker-ce-cli containerd.io docker-buildx-plugin docker-compose-plugin
  # Add ansible user to docker group
  - usermod -aG docker ansible
  - systemctl enable docker
  - systemctl start docker

  # Configure UFW
  - ufw allow 2222/tcp # SSH
  - ufw allow 51821/udp # Site-to-site VPN listening port
  - ufw allow 3001/tcp # UptimeKuma's web interface
  - ufw allow from 192.168.0.0/16 to any port 4567 # Allows the remote LAN to reach the Arbitrator
  - ufw allow from 10.10.10.0/24 to any port 4567 # Site-to-site VPN for Galera Arbitrator

  # Enable UFW
  - ufw --force enable
The Outputs file:
- Exposes Data: Defines exactly which data points (IP addresses, Server ID) Terraform should return to Ansible after the provisioning completes.
- Integration Key: This allows the Ansible playbook to read
tf_output.outputs.witness_ipv4.valueand use it to update DNS and Inventory. The ipv6 address is provided as an optional extra for those who would prefer to use that, instead (in which case, modify the1ascript as well).
# outputs.tf

output "witness_ipv4" {
  description = "The public IPv4 address of the witness server."
  value       = hcloud_server.witness_vm.ipv4_address
}

output "witness_ipv6" {
  description = "The public IPv6 address of the witness server."
  value       = hcloud_server.witness_vm.ipv6_address
}

output "witness_id" {
  description = "The ID of the witness server."
  value       = hcloud_server.witness_vm.id
}
With the VPS provisioned and the Galera arbitrator configured, the next part wires this into AWX itself, starting with the provisioning and configuration job templates.
Enjoying this tutorial?
This site is a non-profit project. If it saved you some time, you can support it by getting Jan some coffee.
☕ Buy me a coffee
Comments