Part 1 - Prepare networking, firewall, DNS and SSL termination
Download Markdown Go to next section
August 15, 2025
Table of Contents
- Sources:
- Introduction:
- Desired State
- Expected Gear / Skills
- What you do NOT need
- Pointing your MX records (DNS):
- Generic Proxmox VM Installation:
- Firewall - static DHCP assignment
- Firewall - Ports to open on your firewall (OPNSense):
- Dynamic DNS for our ‘mail’ DNS record on CloudFlare with OPNSense
- SSL termination for web services
- HAProxy on OPNSense - SSL Termination:
- Services To Be Installed On Our Mail Server (OPTIONAL READ):
- VM preparation on Proxmox - QEMU agent:
Sources:
- Older LinuxBabe guide for iRedMail installation guide
- iRedMail website
- Postfix SMTP Relay on Debian with Brevo (from 2021)
Introduction:
Would you like to have your own mail server that serves emails for multiple domains? Are you struggling with MX Blacklists and would like to have your emails in your possession but still send emails out without them reaching spam boxes? Then let’s set up iRedMail with SMTP relay using Brevo (or another provider). With Brevo, you can send up to 300 emails daily for free, which is enough for most people who do not run a business. Let’s dive into the plethora of open source options that can take us there!
Desired State
- We want to have a running mail server that is integrated with an OPNSense firewall and terminates SSL for web services (RoundCube / iRedmail Admin) on the firewall using HAProxy.
- Able to reach the mailboxes from anywhere via IMAP.
- Send emails via a free SMTP relay to avoid getting on spam lists.

Expected Gear / Skills
- Proxmox (or you can run iRedMail on another Hypervisor or bare-bone)
- OPNSense (whether virtualized or bare-bone does not matter for this set up) - the steps will work similarly with Pfsense as well.
- At least 3 GB RAM available for iRedMail and all the software that it comes with
- HAProxy (in this guide, we will use HAProxy as a plugin of OPNSense).
- A free CloudFlare account with your domain name servers using CloudFlare.
- Basic Linux skills (Debian) are recommended (all required steps are covered with screenshots)
- Possibility to open ports 25 (SMTP in), 465/587 (SMTPS out), 993 (IMAP), 80/443 (HTTP/HTTPS) on your firewall. If you are using a hosted VPS, check with the provider that port 25 can be opened to avoid disappointment.
- About 3 hours of your time to go through the entire guide (if things go according to plan)
What you do NOT need
- Static IP by your ISP or VPS hosting provider
- Database skills (we will be using MariaDB SQL)
- Previous experience of working with Postfix, Dovecot, iRedMail Admin, Nginx, HAProxy.
Pointing your MX records (DNS):
- In this case, I have the domain I want to use to receive email on CloudFlare. So I create two records:
- An MX record that points to mail.bachelor-tech.com with a priority of 10 (the number does not matter, since we will have only one mail server).
- An A that expands on where does the ‘mail’ record point to, which should be the public IP address.

- Note that the MX record should not be shielded by CloudFlare’s proxy service, as the other mail servers need to be able to resolve the public IP of the mail server to be able to reach it.
Generic Proxmox VM Installation:
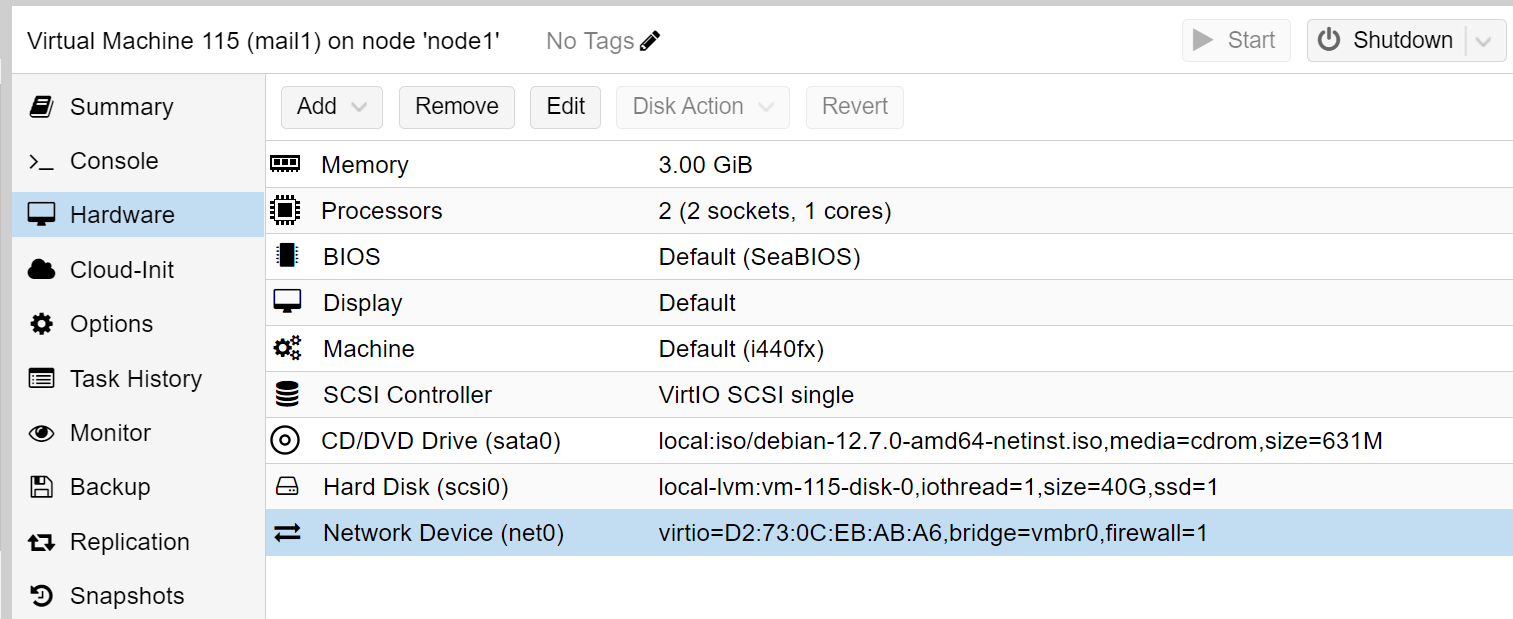
- On Proxmox, create a new VM. Have a standard net-iso for Debian 12.x or newer ready.
- The VM should have at least 3 GB of RAM as the number of services installed is a lot. Recommended at least 2x CPU and at least 40 GB of space (if not more).
- Once the VM is set up, note that the MAC address of the network card, so that we can add it into static DHCP on OPNSense (or your existing firewall).
Firewall - static DHCP assignment
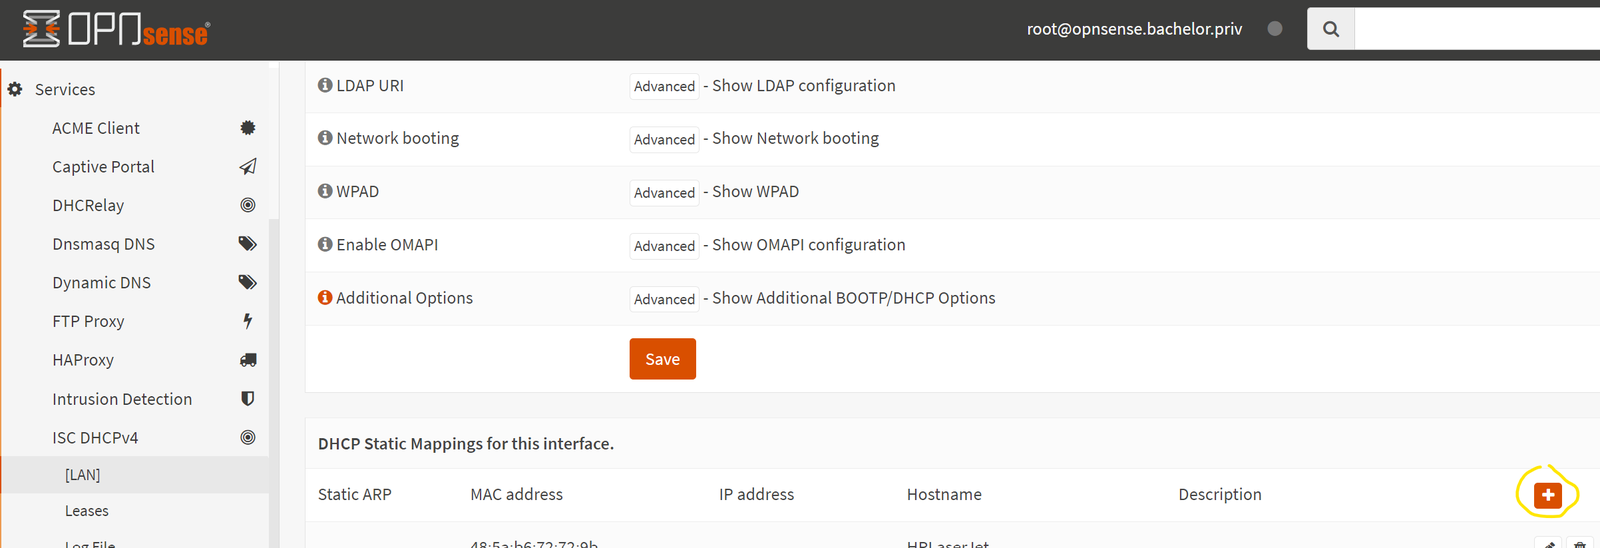
- On OPNSense, go to Services → ISC DHCPv4 → [LAN] (or whatever the interface is called for your local network).
- Scroll down and click on the + sign to add a new host.
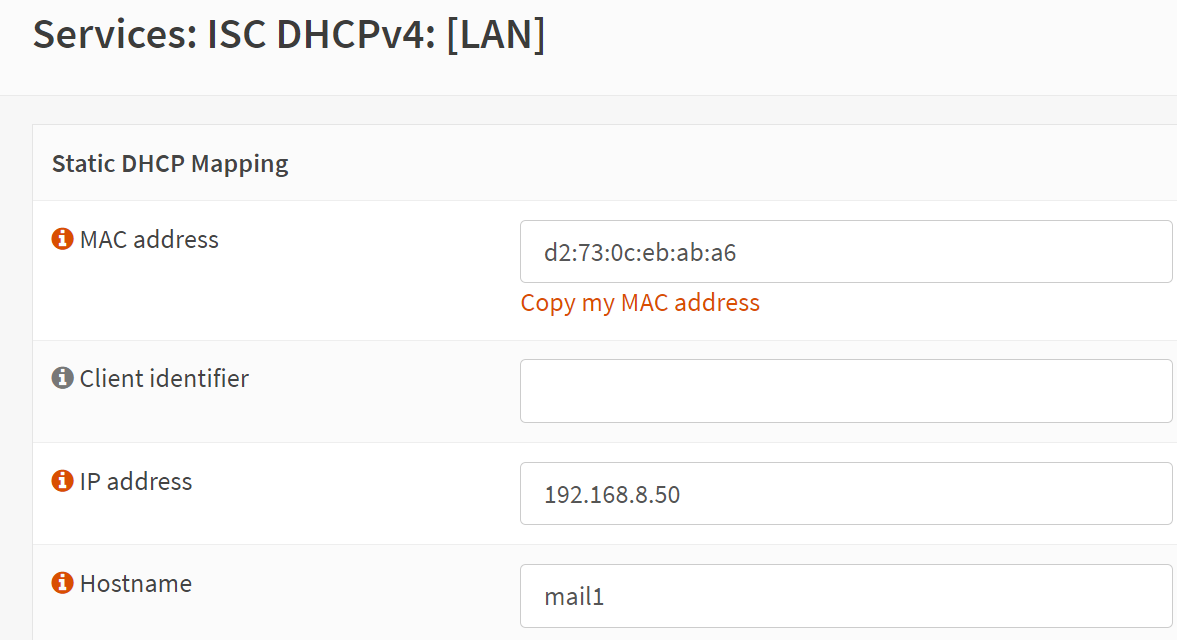
- Add the MAC address and IP address for your host, save it and apply the configuration.
Firewall - Ports to open on your firewall (OPNSense):
- On OPNSense, go to Firewall → Rules → WAN 1 (or whatever the name of your inteface is).
- Here is a list of ports used by iRedMail services - not all of them need to be opened.
- Port 80 and 443 for HAProxy (unless you have it set up already)
- Port 25: required for mail server exchange.
- Port 993 for IMAP over SSL
- We will not need to open ports for SMTP since we will be using the relay by default. This is safer in case the public IP changes to ensure that communication can be sent out.
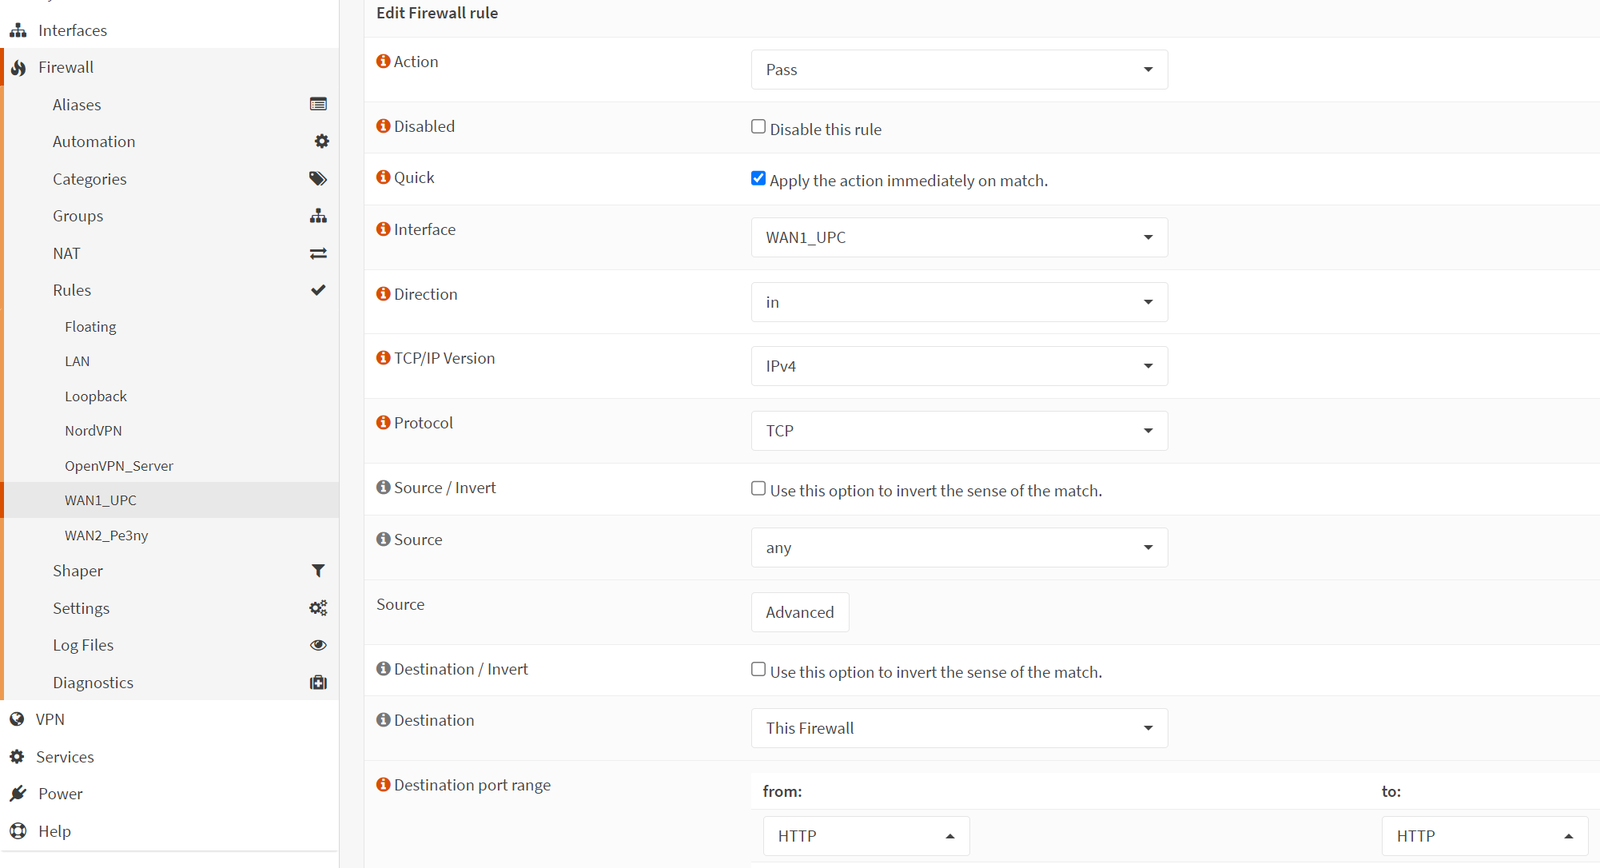
- Firewall rules - go to Firewall → Rules → WAN 1 (or just WAN) and click on the + sign to make sure you have the following set up
- Rule 1: Port 80
- Action: Pass
- Interface: WAN
- Direction: in
- TCP/IP: IPv4
- Protocol: TCP
- Destination: This Firewall
- Destination port range: from HTTP to HTTP
- Rule 2: Port 443
- Same as above with the difference of the port range starting from HTTPS to HTTPS (or choose ‘other’ and manually type 443 in both boxes).
- Rule 3: Port 25
- Destination here is not ‘This firewall’ but ‘LAN net’ since we will be forwarding it as a NAT rule to our mail server later.
- Port range starting from SMTP to SMTP (or choose ‘other’ and manually type 25 in box boxes).

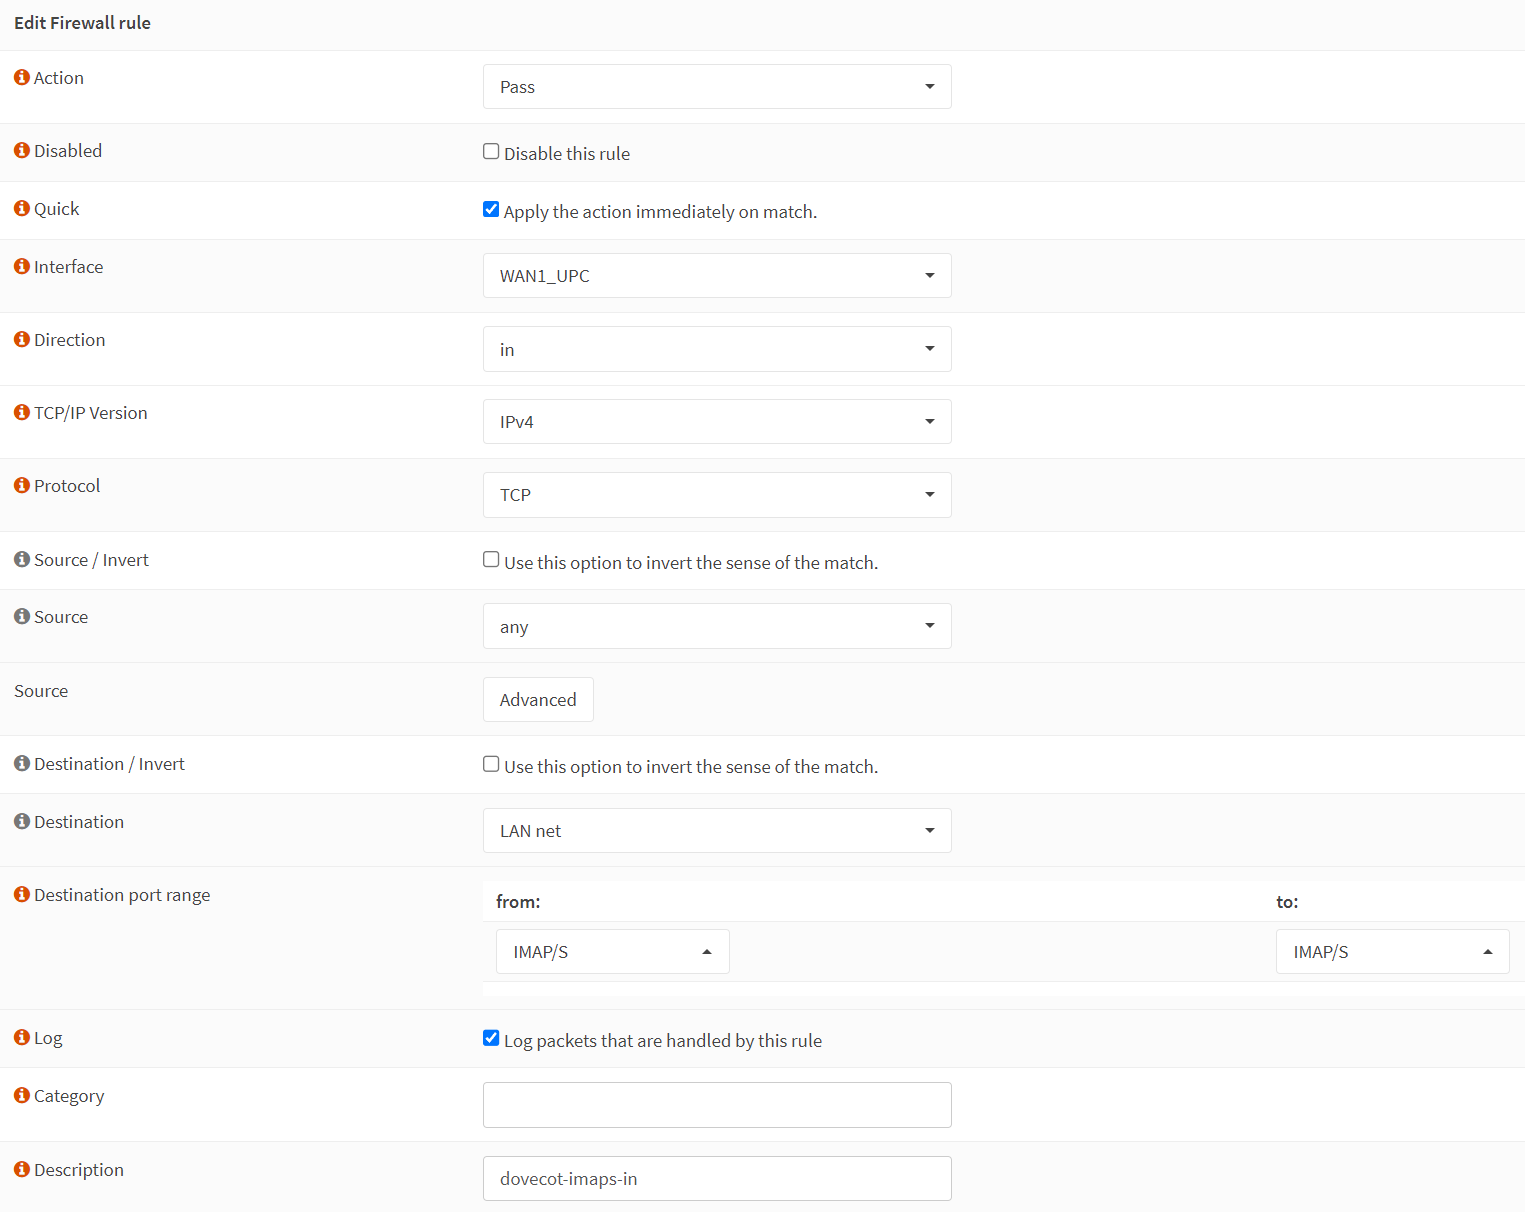
- Rule 4: Port 993 (IMAPS)
- As before, the Destination is not ‘This firewall’ but ‘LAN net’.
- Port range starts from IMAPS to IMAPS (or 993 to 993)
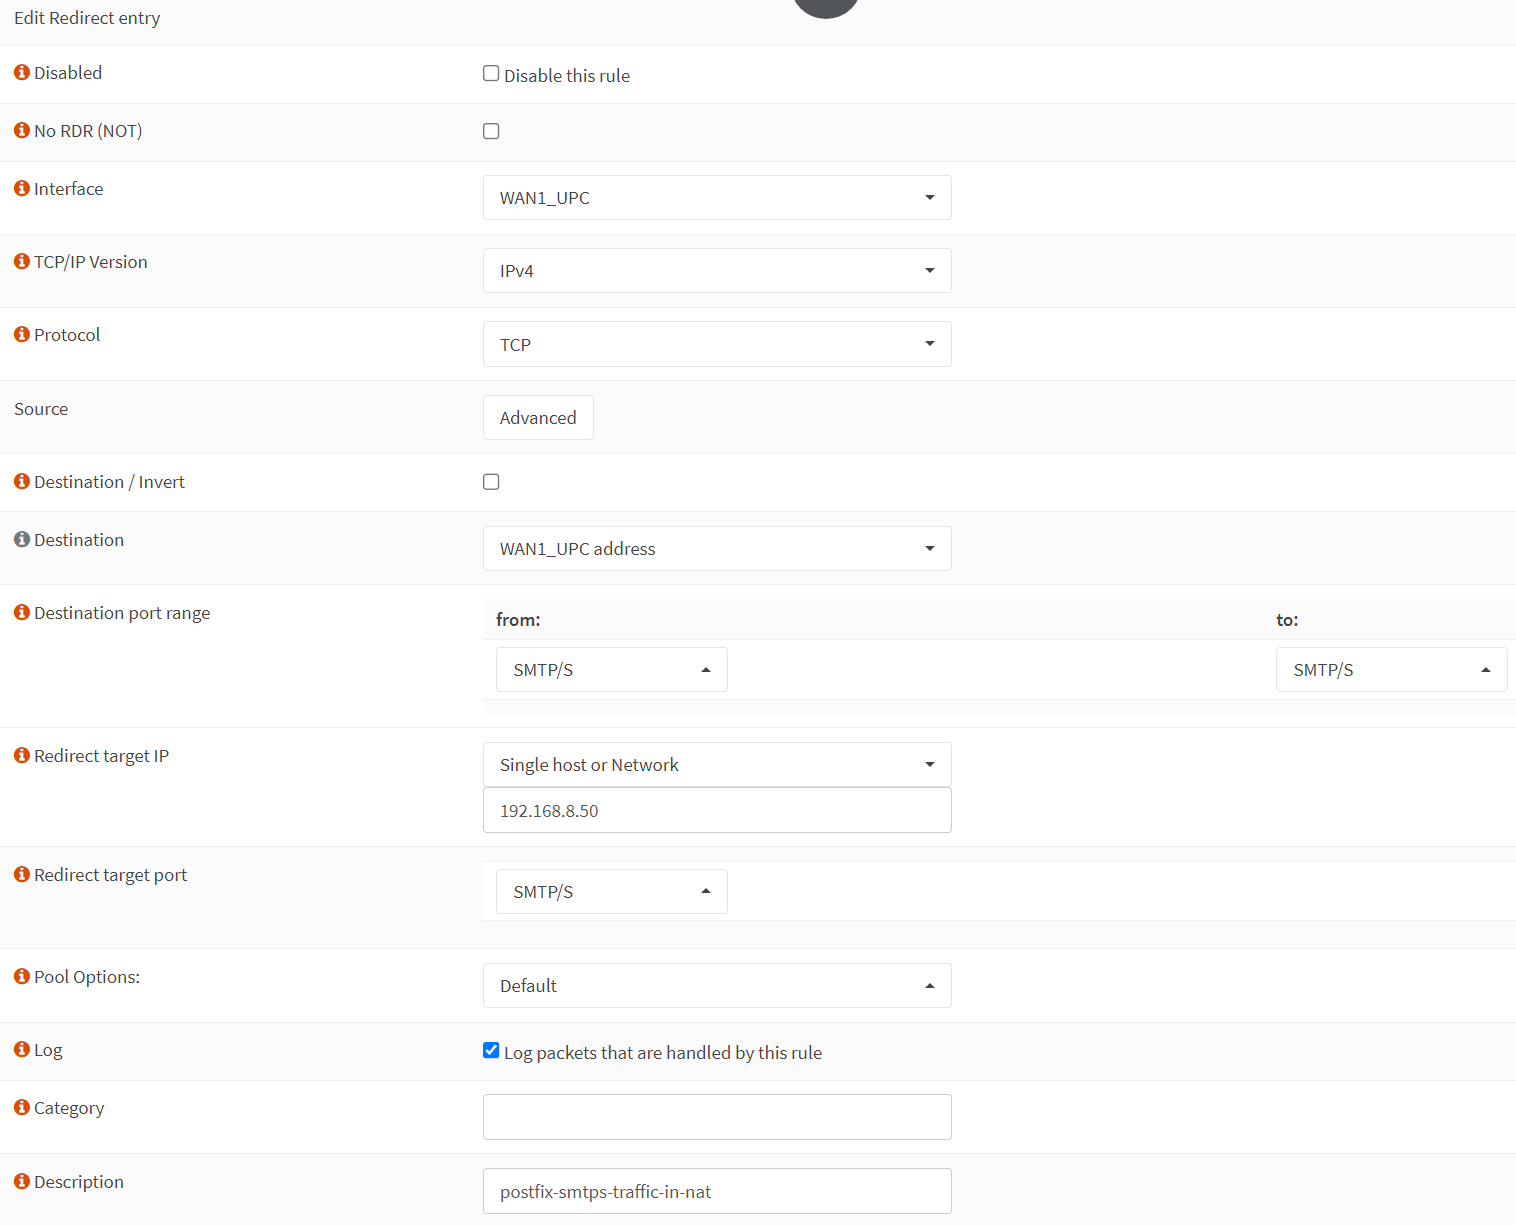
- Rule 5: Port 465 (SMPTS)
- As before,the Destination is not ‘This firewall’ but ‘LAN net’
- Port range starts from SMTPS to SMPTS (or 465 to 465). Alternatively, you can use port 587 if you manually define it (then you must be consistent even with the NAT rule and how you connect your email client).
- NAT rule for port 25
- On OPNSense, go to Firewall → NAT → Port Forward and create a new rule.
- Interface: your WAN
- TCP/IP: IPv4
- Protocol: TCP
- Destination: WAN address
- Destination port range: SMTP to SMTP (or select other and manually type in 25 to 25)
- Redirect target IP: the IP of your mail server
- Redirect target port: SMTP
- Log it in for debugging purposes
- Everything else leave as default or tweak as per your needs.

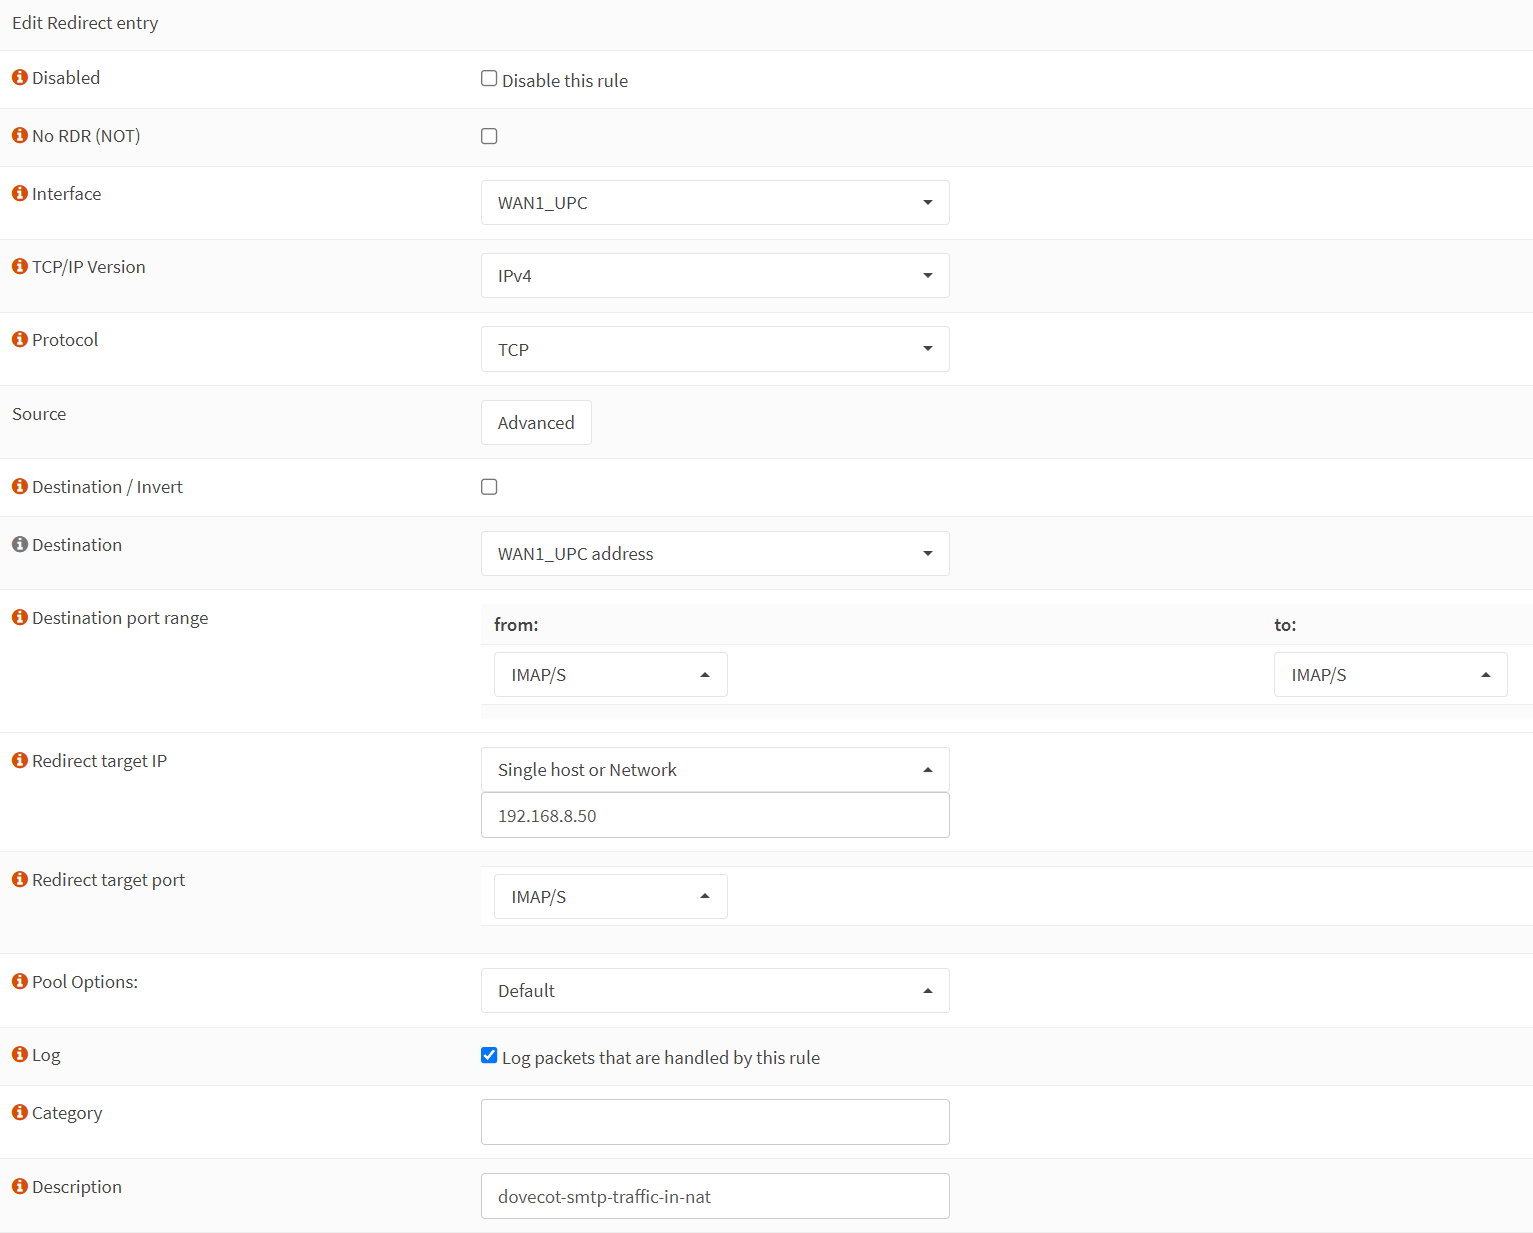
- NAT rule for port 993 (IMAPS)
- On OPNSense, go to Firewall → NAT → Port Forward and create a new rule.
- Interface: your WAN
- TCP/IP: IPv4
- Protocol: TCP
- Destination: WAN address
- Destination port range: IMAPS to IMAPS (or select other and manually type in 993 to 993)
- Redirect target IP: the IP of your mail server
- Redirect target port: IMAPS
- Log it in for debugging purposes
- Everything else leave as default or tweak as per your needs.
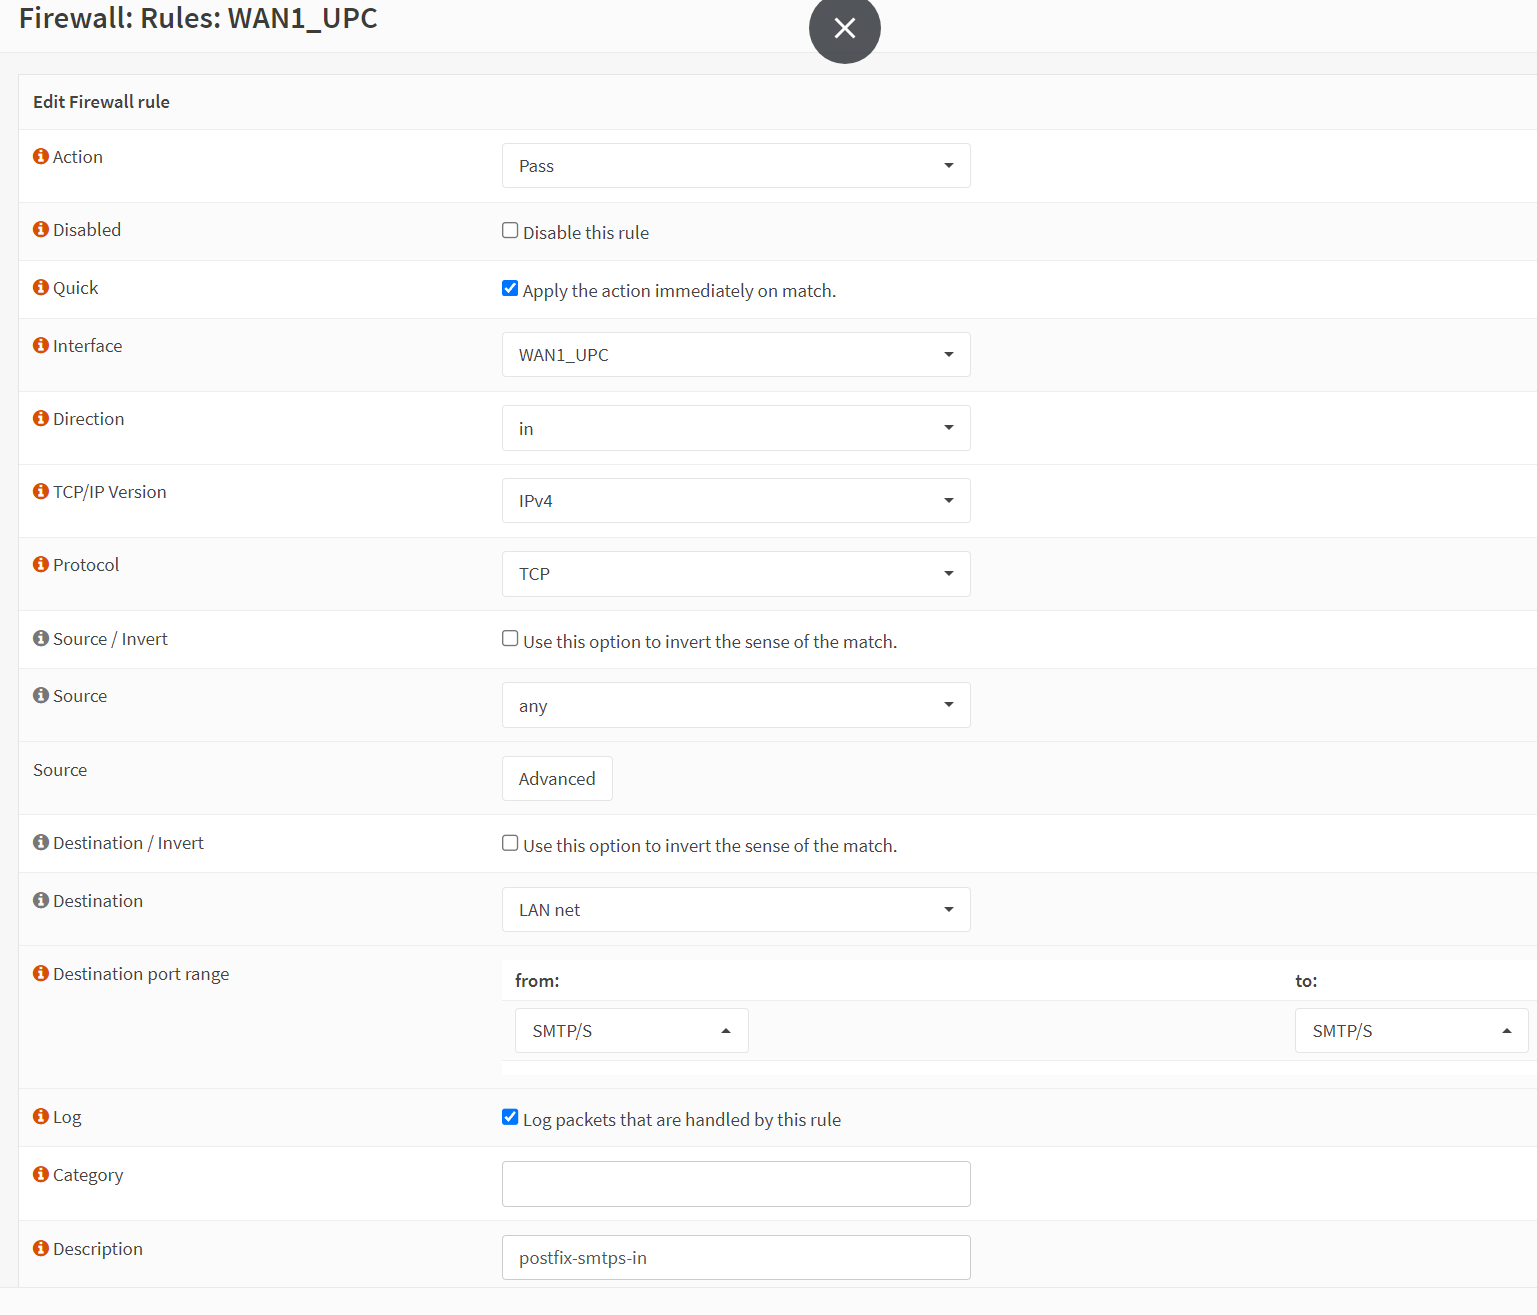
- NAT Rule for port 465 (SMPTS)
- As above, use port 465 or SMTPS
- Upon creation of the NAT rules, remember to click on the ‘Apply’ button in OPNSense to activate it.
Dynamic DNS for our ‘mail’ DNS record on CloudFlare with OPNSense
- In order to make sure that our mail server is reachable even if our ISP changes the public-facing IP address, you can leverage OPNSense’s DDNS service with CloudFlare.
- In CloudFlare, create a token that can handle records for your domain:
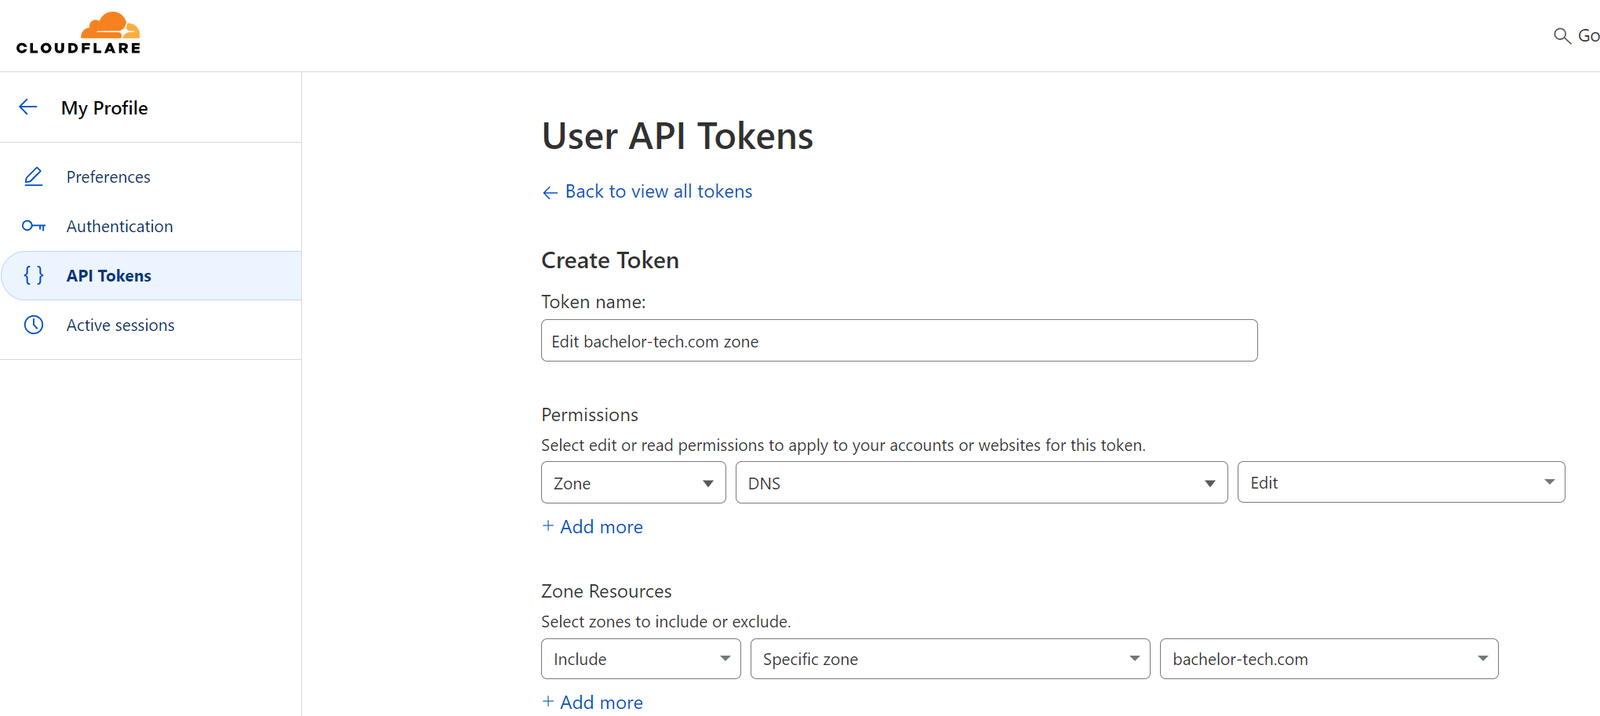
- Confirm the creation of the token and save it somewhere safe.
- In OPSense, go to Services → Dynamic DNS → Settings → and click on the + sign.
- From the list, choose:
- Service: CloudFlare
- Username: the word ‘token’
- Password: the long token ID that you have received from CloudFlare
- Zone: your domain’s name
- Hostname: the A or CNAME record that you want to edit
- Check ip method - use ‘freedns’

- Once done, click on the ‘Apply’ button and check the Log file under Settings to see that it completed successfully. You can even change the IP in CloudFlare to something else and wait 1-2 minutes to see that it changes in CloudFlare. Cool, hmm?
SSL termination for web services
- Whereas for postfix and dovecot (IMAP), we will use the OPNSense firewall and NAT rules to the mail server and terminate SSL there, we will terminate SSL on OPNSense using haproxy for the web services.
- This is required if you run more than one website and want to use your public IP for those as well (rather than just running a TCP passthrough, which does not care about hostnames, since it is L4 vs L7).
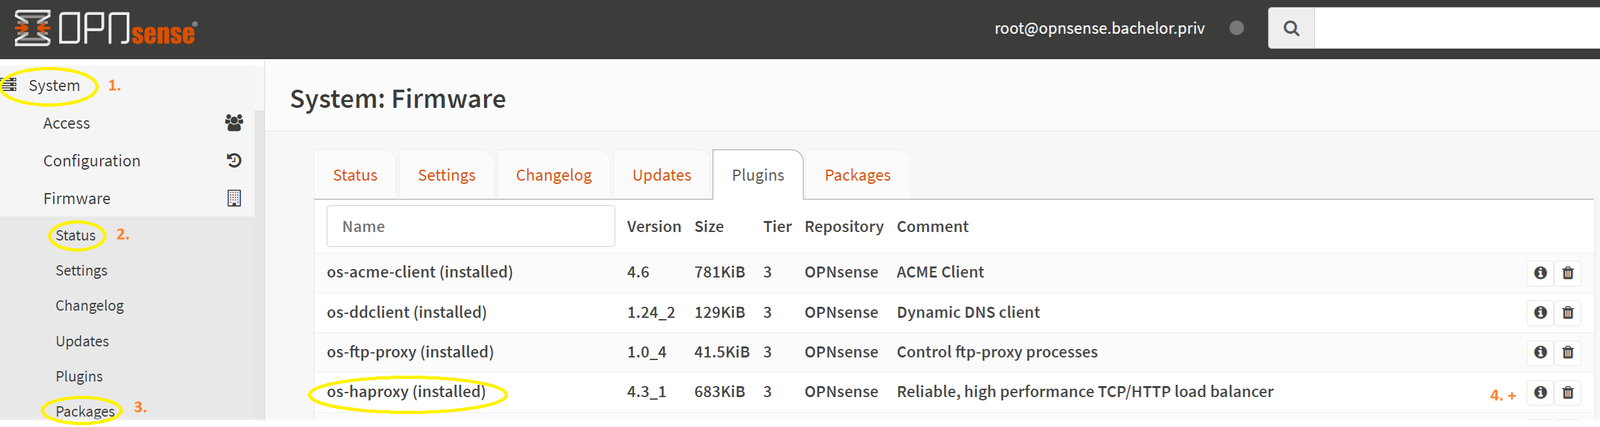
- In OPNSense, go to System → Status → Plugins and make sure that the os-acme-client is installed (if not, click on the + sign to install it).
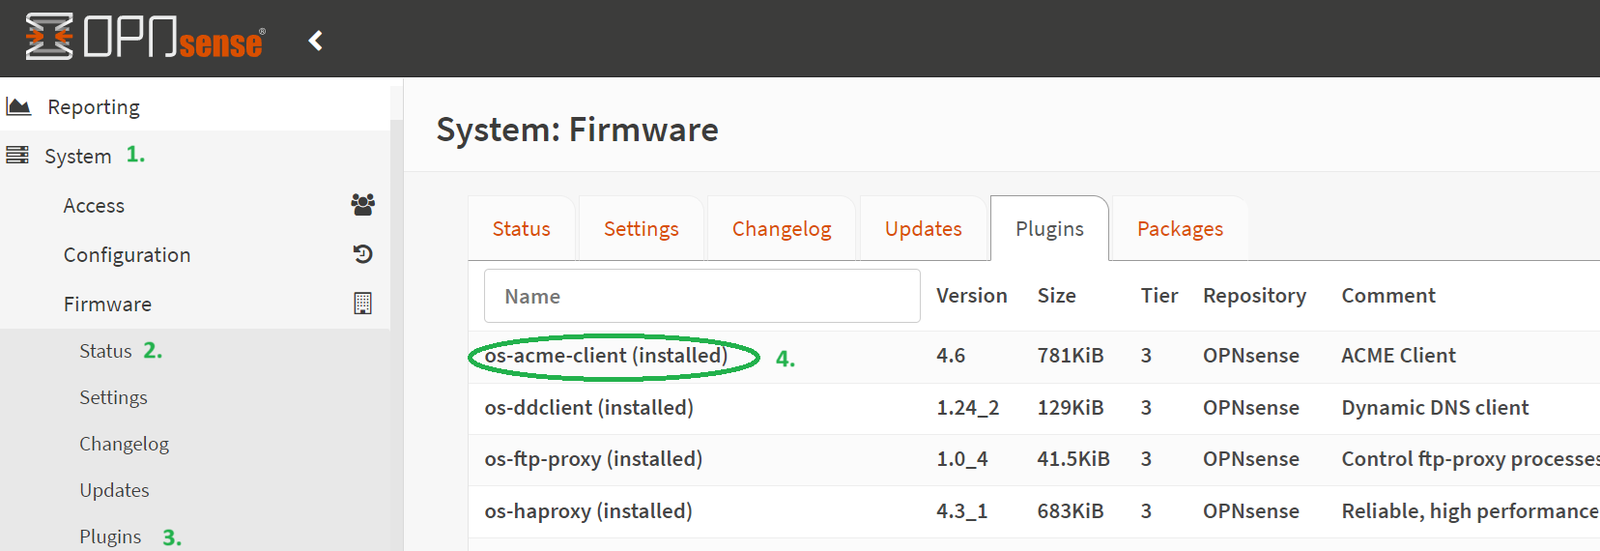
- Then go to Services → ACME Client → Accounts. Create a new account with Let’s Encrypt. Fill in the name (ideally the name of the domain for easier tracking) and your email address. The email address should be something you actually use so that you can get warned in case renewal fails in the future.

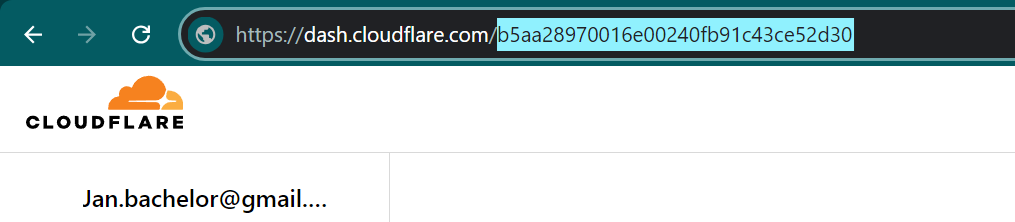
- Then go to the ‘Challenges Type’ section menu item on the left (within ACME Client) and add a new challenge type. The challenge type should be DNS-01 using the Cloudflare.com service. Leave some sleep time just in case. Then as your CF Account ID, copy over the ID from your CloudFlare account (after dash.cloudflare.com).
- The API Token is the same as we created earlier for Dynamic DNS.

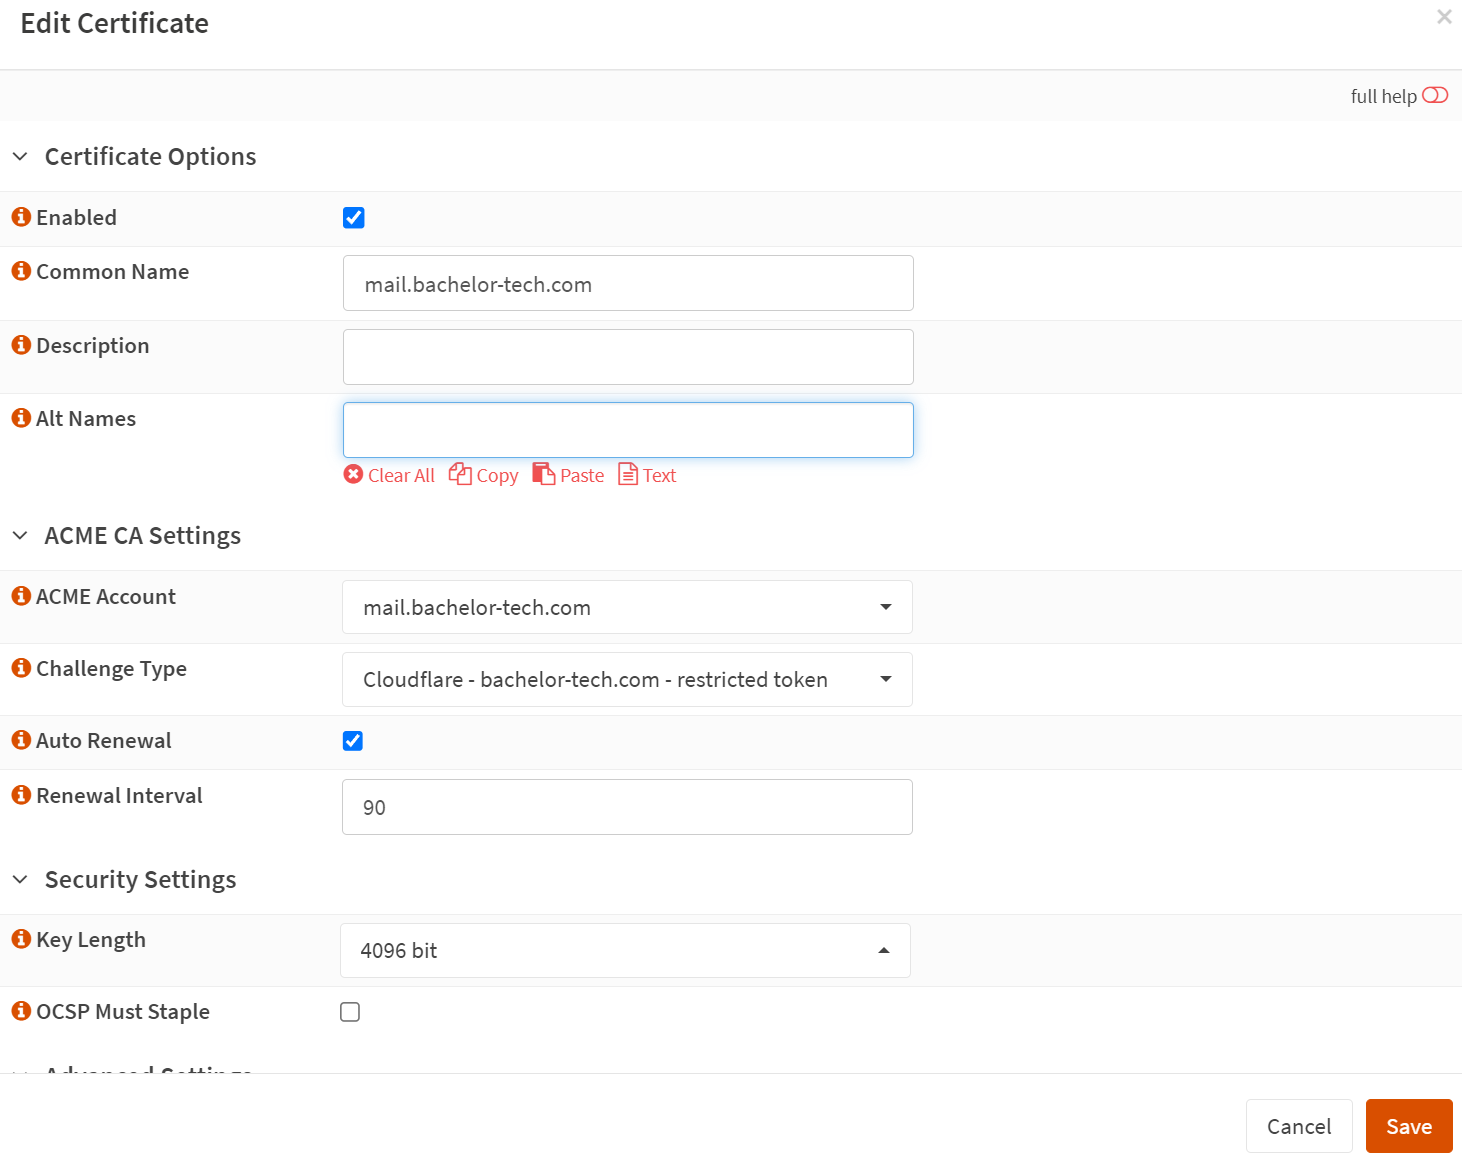
- Then lastly, go to the ‘Certificates’ section within the ‘ACME Client’ menu on the left and create a new certificate using the challenge type and the cert authority you defined earlier:
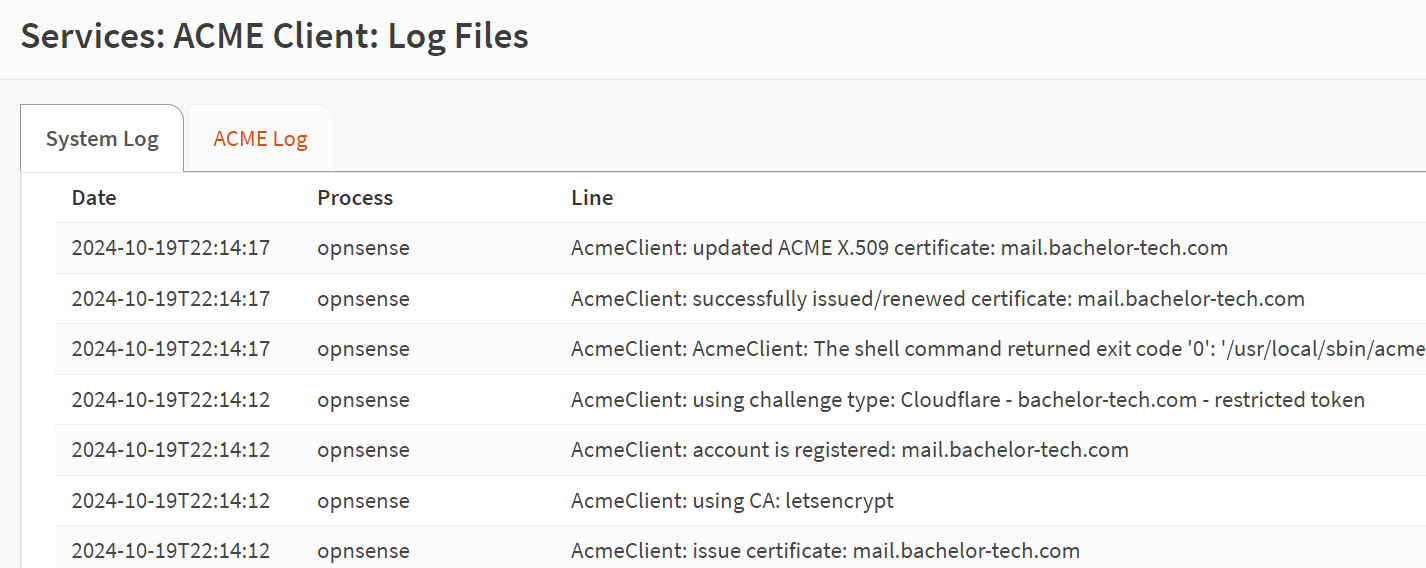
- Wait for a bit and check the ‘Log Files’ menu option on the left to see what the result was. If successfully created (or updated), it may look similar to the output below:
HAProxy on OPNSense - SSL Termination:
- Sources:
- This guide covers set up on OPNSense. We will need to open traffic for nginx web server, so that we can reach the admin web interface + RoundCube, both installed on the iRedMail server.
- If you do not have haproxy installed on your OPNSense instance, you can install it under System → Firmware → Packages - find os-haproxy and click on the + symbol to install it.
- Under Services → HaProxy → Settings, go to Real Servers → Real Servers and add a new host. In this guide, we will use port 8082 that will be forwarded internally on the LAN to the iRedMail VM.
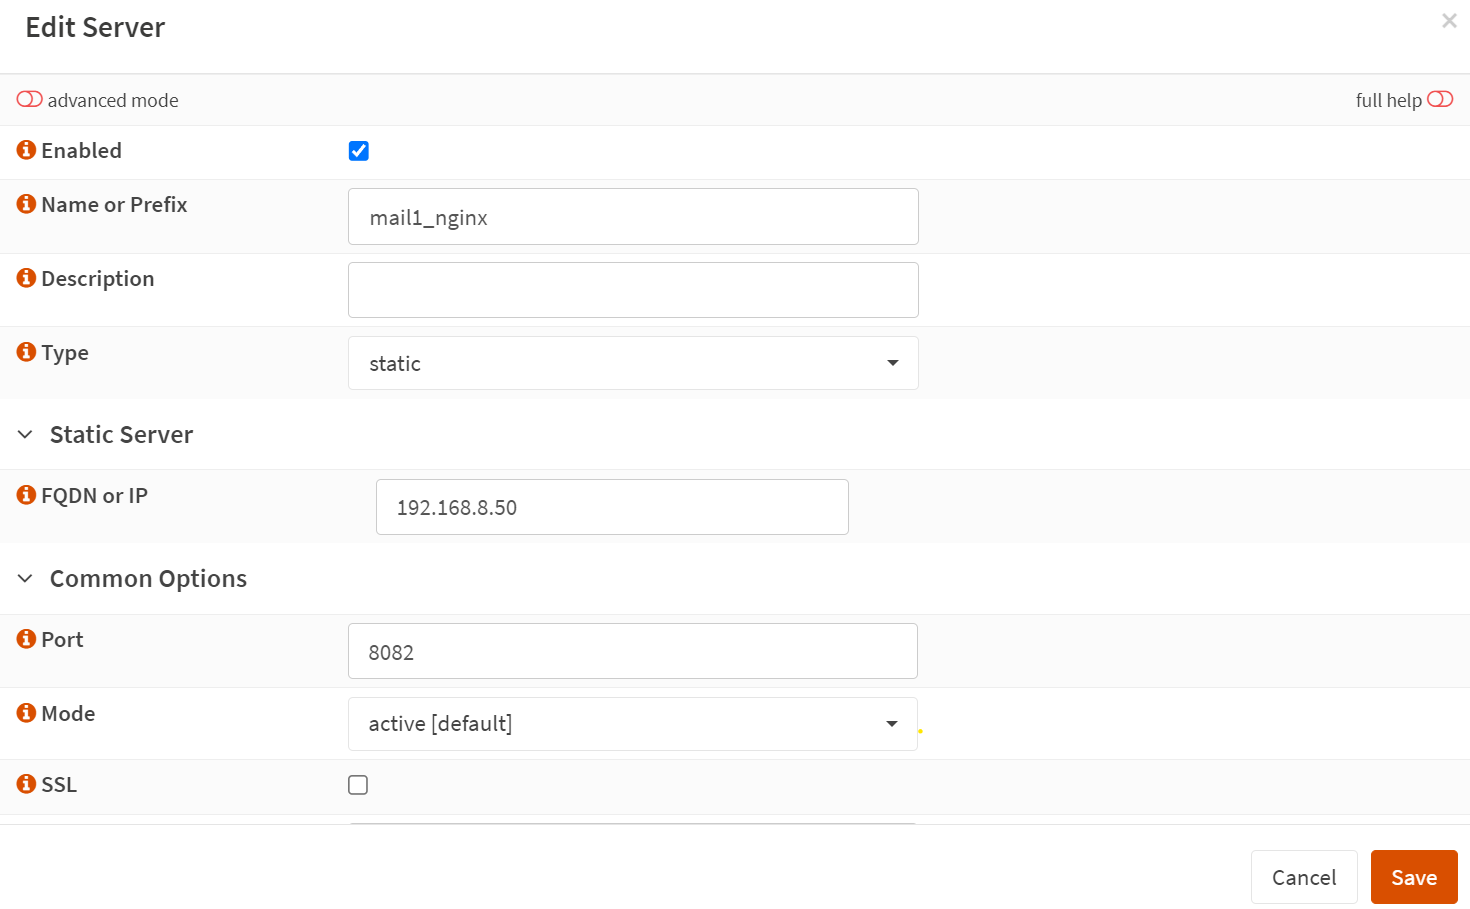
- Make sure the ‘Enabled’ tick box is ticked.
- Now go to Virtual Services → Backend pools and add a new host there:

- Let’s define a condition. Go to Rules & Checks → Conditions and create a new condition:

- Now we can set up a rule what to do if the condition is met. Go to Rules & Checks → Rules and create a new rule:

- In the rule, we say that if the condition is met, traffic should be forwarded to the backend host we have created. Yet there is no service listening in the front-end yet to handle the traffic.
- Go to Virtual Services → Public Services and unless you have a service there already, add a new one that listens on port 80.

- Once done, click on the ‘Test syntax’ button and only click on ‘Apply’ if everything is okay.
Services To Be Installed On Our Mail Server (OPTIONAL READ):
- Source: iRedmail documentation
- Please note that there are usually more config and log files available for each service, I only highlight the ones you may need during our set up.
- nginx → web server to display the admin interface (iRedAdmin) and webmail (RoundCube)
- Config files:
- /etc/nginx/nginx.conf → definition of the base user (e.g. www-data), max worker connections and additional resources to include.
- /etc/nginx/sites-enabled/default.conf → default config for unencrypted communication, server and location directives
- /etc/nginx/sites-enabled/default-ssl.conf → default config for encrypted comms, server and location directives
- Log files:
- /var/log/nginx/access.log → the default location for the access log.
- /var/log/nginx/error.log → the default location for the error log.
- Config files:
- dovecot → SMTP functionality
- Config files:
- /etc/dovecot/dovecot-mysql.conf → used to query mail users and passwords for MySQL / MariaDB engine.
- /etc/dovecot/dovecot-pgsql.conf → used to query mail users and passwords on PostgreSQL engine.
- /etc/dovecotr/dovecot-used-quota.conf → store and query per-user email quota.
- Log files:
- /var/log/dovecot/dovecot.log → log of changes to the dovecot service
- /var/log/dovecot/imap.log → IMAP connection logs
- Config files:
- postfix → for IMAP/LMTP/LDA
- Config files:
- /etc/postfix/main.cf → most config that we will be working with
- /etc/postfix/master.cf → transport-related settings
- /etc/postfix/mysql/*.cf → configs for MySQL / MariaDB
- Log file: /var/log/mail.log
- Config files:
- iRedAPD → a postfix policy server (default port 7777)
- Config file: /opt/iredapd/settings.py
- Log file: /var/log/iredapd/iredapd.log
- iRedAdmin → web application (PHP-based, hence why we use nginx with the php-fpm package)
- Config file: /opt/www/iredadmin/settings.py
- Log file: /var/log/uwsgi/app/iredadmin.log
- mariadb → database engine to store data in
- Config files
- /etc/mysql/my.cnf → modify basic parameters like port number
- /etc/mysql/mariadb.conf.d/50-server.cnf → server-related config (inc. SSL certificates)
- /etc/mysql/mariadb.conf.d/50-client.cnf → client-related config
- Log file: by default, it is integrated with syslog (run
sudo cat /var/log/syslog | grep mysql)
- Config files
- mlmmj → a simple and slim mailing list manager (MLM) inspired by ezmlm. It works with many different Mail Transport Agents (MTAs).
- Config file: /opt/mlmmjadmin/settings.py
- Log file: /var/log/mlmmjadmin/mlmmjadmin.log
- spamassassin → spam filtering service - called by amavis, not executed as a daemon
- Config file: /etc/mail/spamassassin/local.cf
- Log file: /var/log/mail.log
- clamav → antivirus scanner
- Config files
- /etc/clamav/clamd.conf → basic behavior of the AV
- /etc/clamav/freshclam.conf → AV database configuration
- Log file:
- /var/log/clamav/clamav.log → records of findings (must be activated via clamd.conf - remove the ‘#’ to uncomment a line starting with ‘#LogFile’.
- /var/log/clamav/freshclam.log → AV database update log
- Config files
- RoundCube - webmail (optional but recommended to install)
- Config file: /opt/www/roundcubemail/config/config.inc.php → here we can disable the requirement to run on HTTPS internally
- Log file: postfix log is used by default
- php-8.2 inc. the fpm package that is used for compatibility with nginx
- fail2ban (optional) - auto-ban repeated failed login attempts
- Config file: /etc/fail2ban/jail.local
- Log file: /var/log/fail2ban.log
- nftables (optional) → a new generation iptables firewall (can be replaced by ufw)
- netdata → system application monitor
- amavis (amavisd-new) → analysis and filtering capabilities, works with postfix and spamassasin, uses external content filters and changes ratings of senders. Helps with the generation of the DKIM record
- Config file: /etc/amavis/conf.d/50-user
- Log file: stored in postfix logs by default
- rsyslog → the ‘rocket-fast’ system for log processing
VM preparation on Proxmox - QEMU agent:
- Install the QEMU agent (Proxmox) for better monitoring and soft shut downs (important esp. if you will be running a db on it as well).
sudo apt install qemu-guest-agent
sudo systemctl enable qemu-guest-agent- Then on the VM, run ‘shutdown now’ and make sure the VM properly switches off.
- On the Proxmox node, go to the VM:

- Start the VM again and run the following command to ensure that the agent is running.
systemctl status qemu-guest-agent- You should now be able to see more details about your VM in the Proxmox console for your VM under ‘Summary’
- If unsure, SSH into the Proxmox host and run:
    qm agent <vmid> ping    # No errors means it got through
    qm agent <vmid> info    # Prints out all kinds of details about the VM
With the network, firewall, DNS and SSL termination all in place, the next part installs iRedMail itself and gets you into the web admin tools.
Enjoying this tutorial?
This site is a non-profit project. If it saved you some time, you can support it by getting Jan some coffee.
☕ Buy me a coffee
Comments