Part 3 - Trust your cluster with data, recovery and self-healing automation
Go to previous section Download Markdown
October 29, 2025
Table of Contents
Entrust your Galera Cluster with data
-
Let’s export data from your existing database (assuming you have a single MariaDB instance and want to migrate a database or more into this HA galera cluster).
-
In this case, we will consider migrating a WordPress instance, as those are quite common still.
-
Log into the web server via SSH and find the wp-config.php file.
# The exact path may differ
cd /opt/www/html/bachelor-tech
nano wp-config.php- Copy paste information about the DB:
- DB user
- DB password
- DB name
- Head to the new galera cluster and SSH into ANY of the nodes.
mysql -u root -p

-- Creates a new database for WordPress. You can skip this if the import file creates it.
CREATE DATABASE wordpress_db;

-- This is the main command. It grants a user full rights to the wordpress_db
-- ONLY when connecting from your app's specific IP address. Replace the IP with your web server's.
GRANT ALL PRIVILEGES ON wordpress_db.* TO 'wordpress_user'@'X.Y.I.Z' IDENTIFIED BY 'strong_db_password';
#  GRANT ALL PRIVILEGES ON iriskayan_com_db.* TO 'iriskayan_com_user'@'192.168.%' IDENTIFIED BY 'YourWordPressDbPassword';

-- Applies the new permissions immediately.
FLUSH PRIVILEGES;- Connect via SSH to your original MariaDB database and run an MySQL dump command to export its data.
mysqldump -u root -p wordpress_db > /tmp/wordpress_backup.sql- Then from that machine, assuming you have rsync installed, you can rsync that file to one of the nodes in the cluster. For a quick transfer, you can temporarily disable ufw (or you can temporarily allowlist it).
- We do not need to switch off the firewall on the Galera cluster, since we have previously allowed it for the same subnet (unless you set it up differently). If you do get blocked and need to quickly copy it over, then on the Galera node, you can run
sudo systemctl stop ufwand then start it back on afterwards.
# On the original MariaDB single instance, change the following to suit your SSH port, file names and IP:
rsync -rvz -e 'ssh -p 2222' --progress /tmp/your_exported_db.sql [email protected]:/tmp
Data copying process from a single node to a cluster node

rsync -rvz -e 'ssh -p 2222' --progress /tmp/yourfile.sql [email protected]:/tmp- Let’s import it into your new cluster - connect to the node in your cluster where you copied the data over and import it.
mysql -u root -p your_galera_db < /path/to/db.sql- Advanced cases only: for DBs that are larger than 50 GB in size and if your cluster does not contain much data otherwise, you could consider running
mysql -u root -p -e "SET wsrep_on=OFF; SOURCE /path/to/your/db.sql;" db_dump.sql. The additional command turns off Galera’s replication for each INSERT command, as Galera must replicate and get approval (certify) for each of these transactions across all nodes in the cluster. So essentially, we say ‘just execute all of the following commands locally without replicating them one-by-one’ and the replication will start only after it is all done. However, then we would need to perform a full State Snapshot Transfer (SST), such as by logging into each node, switching mariadb off, removing the content of/var/lib/mysql/and then switching it back on. In most cases, this approach is not needed. - Let's verify that the data is available on other nodes. Connect to another node and run this command:
# On another Galera node:
mariadb -u root -p

-- OPTION 1 - list the size of all the DBs in your instance:
SELECT
    table_schema 'DB Name',
    SUM(data_length + index_length) 'Size in Bytes',
    ROUND(SUM(data_length + index_length) / 1024 / 1024, 2) 'Size in MiB'
FROM information_schema.tables
GROUP BY table_schema;

-- OPTION 2 - Examine the size of a particular DB
SELECT
    SUM(data_length + index_length) 'Size in Bytes',
    ROUND(SUM(data_length + index_length) / 1024 / 1024, 2) 'Size in MiB'
FROM information_schema.tables
WHERE table_schema = 'your_db'
# WHERE table_schema = 'bachelor_tech_com_db'
GROUP BY table_schema;
Troubleshooting Import
- If they differ in size - slight variations are ok. However, if we are talking about several or more MBs of difference, then be on alert. Re-importing will not help.
Option 1 - InnoDB tables are being used
- Likely, you have some
MyISAMorMEMORYtables while Galera transfers onlyInnoDBtables. Let’s verify that by comparing the fully imported DB versus another one that the DB was supposed to replicate to but did not fully:
# On the original node where you imported the DB into:
mysql -u root -p

USE your_db;

SELECT
    TABLE_NAME,
    ENGINE,
    TABLE_ROWS AS 'Rows',
    ROUND((DATA_LENGTH + INDEX_LENGTH) / 1024 / 1024, 2) AS 'Total MiB'
FROM
    information_schema.TABLES
WHERE
    TABLE_SCHEMA = 'iriskayan_com_db'
AND ENGINE IN ('MyISAM', 'MEMORY');- The output will show the size of each table for engines
MyISAMandMEMORY. See below for a comparison between the original and another node to which it was supposed to replicate:
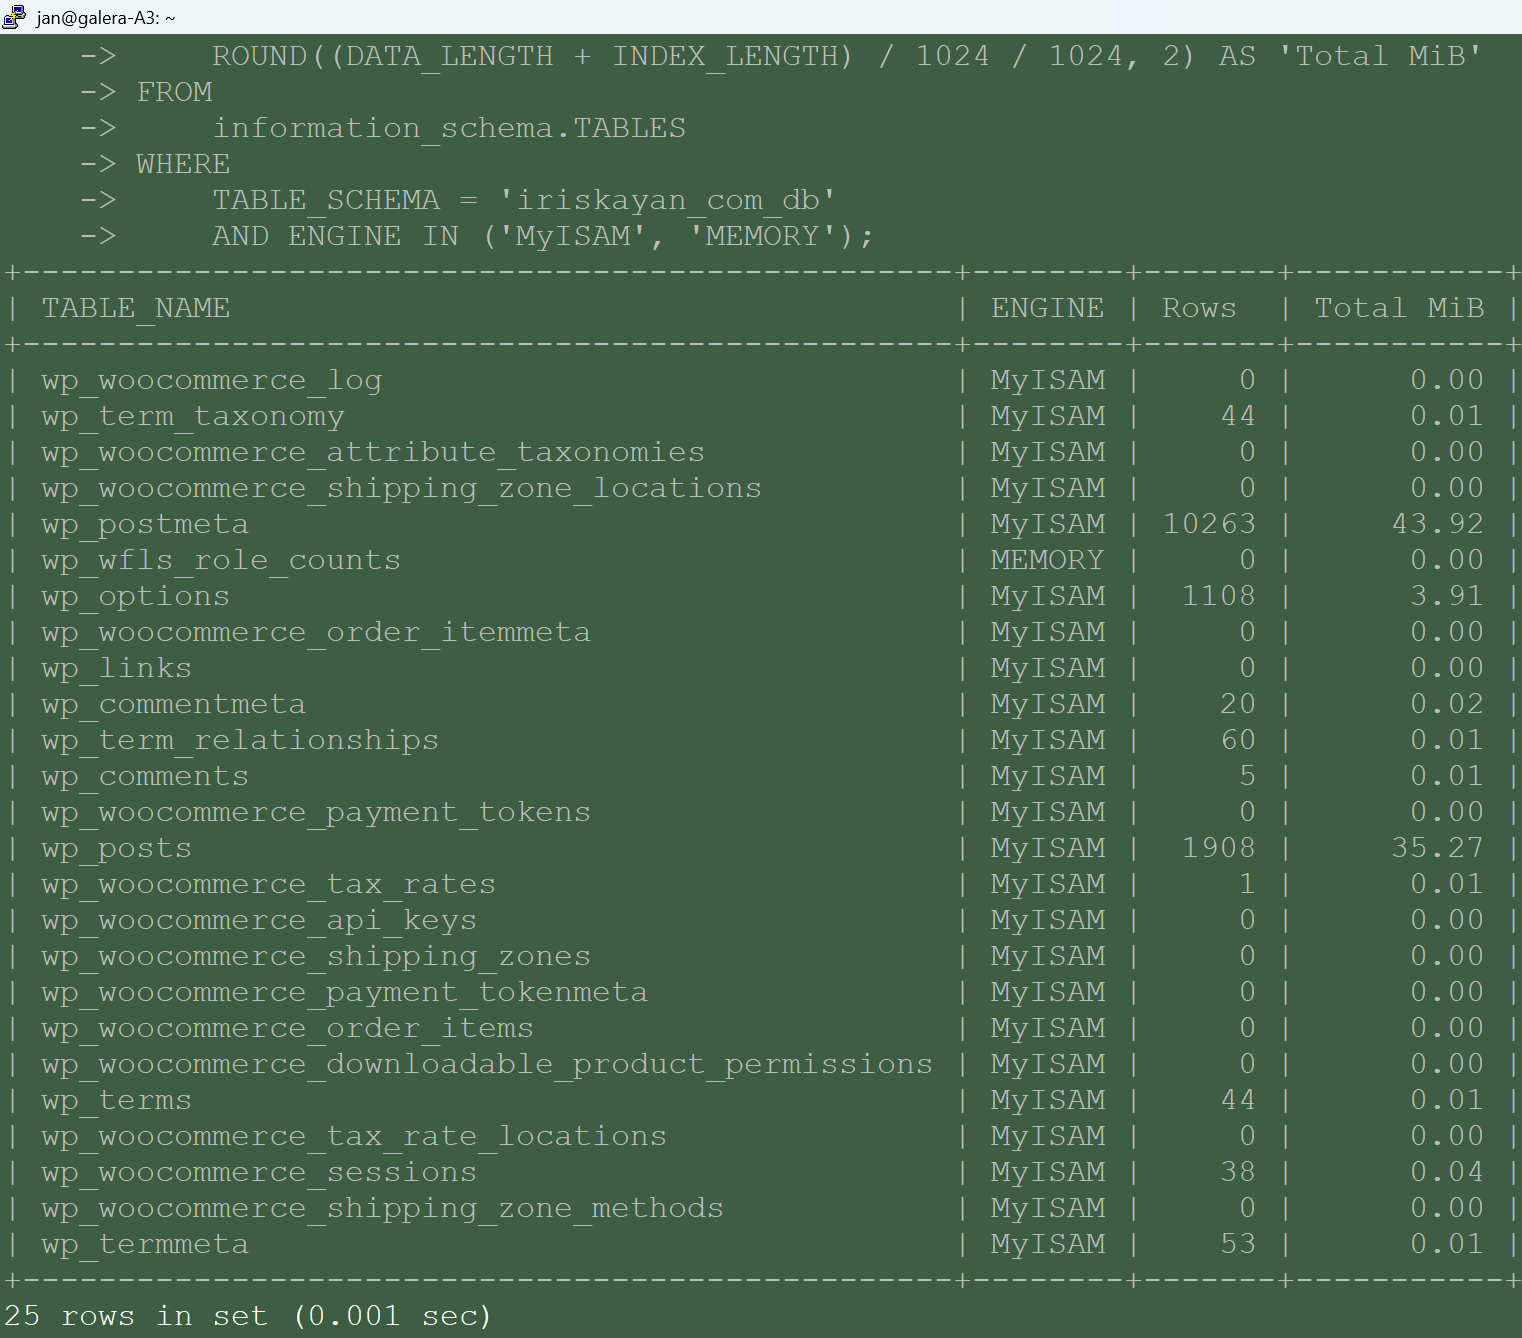
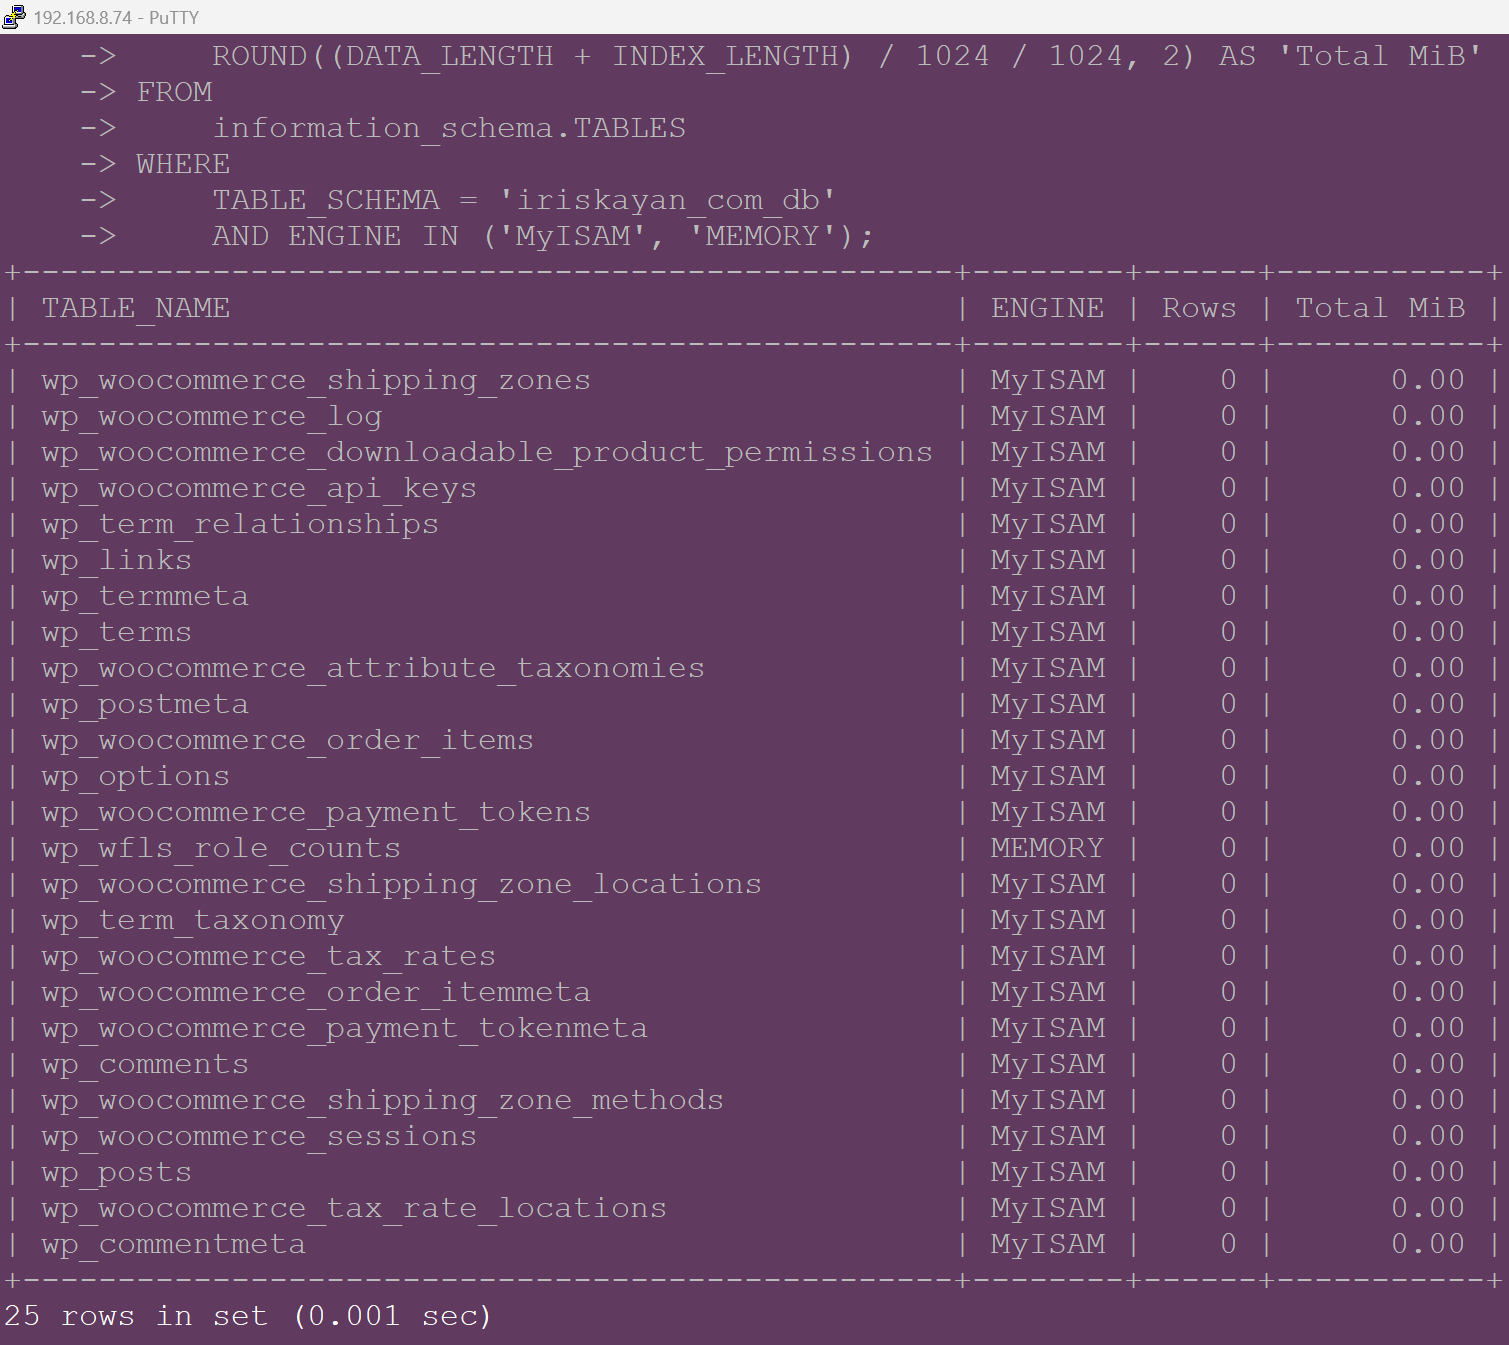
- As you can see, the tables of this engine type were not replicated. This is by design. Galera's "synchronous" replication (its certification-based replication) relies on the storage engine being transactional. This means the engine must support ACID properties, especially the ability to rollback a transaction.
- InnoDB: Is fully transactional and supports rollback. This makes it suitable for Galera's replication mechanism.
- MyISAM: Is not transactional. It doesn't support rollbacks. Once a change is made, it's final. If a conflict occurs during certification, Galera has no way to undo the changes already made locally on the MyISAM table, leading to data inconsistency. See MariaDB’s official guide.
- MEMORY: Is also not transactional and shares the same limitations as MyISAM regarding replication consistency.
- So how do we remedy the situation? Thankfully, it is relatively simple. We will need to change the engine type in the dump and re-import it back. Let’s start by removing the DB from our cluster:
# Login and remove the DB from the cluster:
mysql -u root -p

# Remove it and create a fresh new one:
DROP DATABASE your_db;
CREATE DATABASE your_db;

# Grant privileges as before:
GRANT ALL PRIVILEGES ON wordpress_db.* TO 'wordpress_user'@'X.Y.I.Z' IDENTIFIED BY 'strong_db_password';
FLUSH PRIVILEGES;
EXIT;

# Modify the table properties from the MySQL dump:
sed \
  -e 's/ENGINE=MyISAM/ENGINE=InnoDB/g' \
  -e 's/ENGINE=MEMORY/ENGINE=InnoDB/g' \
  /tmp/mydb_backup.sql > /tmp/mydb_fixed.sql

# Re-import it:
mysql -u root -p your_db < /tmp/your_db_fixed.sql
#mysql -u root -p iriskayan_com_db < /tmp/iriskayan_db_fixed.sql
Option 2 - low memory limit in the MariaDB configuration (less likely the case). How to check? On any Galera cluster node:
mysql -u root -p

SELECT
    VARIABLE_NAME,
    VARIABLE_VALUE AS 'Value in Bytes',
    ROUND(VARIABLE_VALUE / 1024 / 1024, 2) AS 'Value in MB'
FROM information_schema.GLOBAL_VARIABLES
WHERE VARIABLE_NAME IN ('wsrep_max_ws_size', 'max_allowed_packet');- This will reveal the values in megabytes. We have configured the
max_allowed_packetbefore, but in case you skipped this step or stuck to your own config - if the value is anything smaller than 256 MB, you could change it in the MariaDB config file:
nano /etc/mysql/mariadb.conf.d/60-galera.cnf

# Locate or add these rows:
max_allowed_packet = 512M
wsrep_max_ws_size = 512M-
Congratulations on your data import! Now you just need to change the configuration in your web application to point to the virtual IP address that your load balancer operates with. That is also where you can observe where the traffic is going.
-
Once all done, verify that your cluster is fully operational with these commands:
SHOW STATUS LIKE 'wsrep_cluster_size';
SHOW STATUS LIKE 'wsrep_local_state_comment';
SHOW STATUS LIKE 'wsrep_connected';
SHOW STATUS LIKE 'wsrep_ready';- What you want to see is:
wsrep_cluster_size: 5+ (whatever number makes sense)wsrep_local_state_comment: Syncedwsrep_connected: ONwsrep_ready: ON
- Once you exit mariadb’s SQL environment, you can also run this from your command line to see the segment and weights. For example, in my case, I have a Site 2 with just two MariaDB nodes, so it is set up as ‘segment: 2’ with more weights to balance it out (4 nodes on Site 1, 2 nodes on Site 2):
 mysql -u root -p -e "SHOW VARIABLES LIKE 'wsrep_provider_options';" | tr ';' '\n' | grep -E 'segment|weight'
  gmcast.segment = 2
  pc.weight = 2
Beyond the set up - recovery & self-healing options
What are the most common scenarios when a quorum is lost and thus the Galera cluster fails?
- Case 1: No Arbitrator and half of the nodes go down: Imagine a case where you do not have an Arbitrator (as mentioned in the previous chapter when we use the Raspberry Pi for it) and one of the two Proxmox nodes where we run the Galera containers goes down. Then we would not have a majority of votes and the cluster would stop serving traffic.
- Case 2: Power outage - all nodes go down: This can also happen (or more like will happen at some point whether you like it or not). When you start them up, you will notice that the cluster is not working anyway!
In either case, the cluster has to be recovered manually to prevent data loss. So it is a feature, not a bug! Please refer to this article if you have been affected by the cluster shutdown (or are just simulating it).
In a nutshell, the idea is to SSH into each node and verify which one is safe to bootstrap (the result should be 1 on one of them), then you can start a new cluster on that node. Once it is back up, you will need to restart MariaDB on each cluster node.
cat /var/lib/mysql/grastate.dat | grep safe_to_bootstrap

# Run this on whichever node results in 1:
sudo galera_new_cluster

# Watch the logs for changes
tail -n 50 /var/log/mysql/error.log

# Restart MariaDB on OTHER nodes
sudo systemctl restart mariadb
Self-healing options
- Automation would be the key here. Firstly, we would run an Ansible playbook that connects to each node, verifies which node went down the last and attempts to recover it, restarting each MariaDB instance or even the entire container.
- If that fails, we could use a tool like Terraform to start new MariaDB instances from our container template and then Ansible to trigger a playbook to run updates on each container, connect them into a cluster and to check if it can extract the dumps from a node and if not, to download them from a last known backup and import them.
- We would also need to automatically update items in the back-end pool in our Load Balancer (such as by leveraging OPNSense API for HAProxy).
Such an approach definitely warrants its own article - let me know in the comments below if you are interested!
This concludes our rather comprehensive guide on how to deploy a Galera Cluster using technologies like Proxmox, OPNSense, HAProxy and LXC containers. Feel free to share your own experience and stack, perhaps this guide could be expanded to account for more options in the set up.
Self-Healing Automation of your Galera Cluster
You might argue that the process we have been through related to setting up a new Galera node is rather very manual. You are correct! Yet we have options for a faster recovery in case a node goes down. From the point of having a template ready, we can utilize Ansible, create a playbook that would do the following:
- The trigger: Your monitoring tool (such as Zabbix) detects failure of a node and will trigger a webhook of our Ansible playbook.
- Step 1: The playbook’s first step is to leverage the
community.general.proxmox_lxcmodule to force-stop that node identified by its IP address or hostname. - Step 2: The same module can be used to create a new container from template, setting our desired parameters for CPU, RAM and to assign it the same MAC address, which would result in DHCP giving it the same IP address. Boot it up.
- Step 3: As soon as it boots up, connect in via SSH using a key (that we set up previously in the template), we stop the mariadb service and using Ansible’s
template module, we modify the60-galera.cnffile located in/etc/mysql/mariadb.conf. An example is below:
# ...

wsrep_cluster_name="{{ cluster_name }}"
wsrep_cluster_address="gcomm://{{ cluster_ips }}"
wsrep_sst_auth = "{{ sst_username }}:{{ sst_password }}"

wsrep_node_address = "{{ node_ip }}"
wsrep_node_name = "{{ node_name }}"
wsrep_sst_receive_address = "{{ node_ip }}"- Step 4: We start the mariadb service and tail the logs to confirm that a successful SST took place. If errors are found, a notification is shot out requesting further manual intervention (this could be for cases when a quorum is lost or if something in the network is preventing the traffic to get through).
Would you like a step-by-step guide? Leave a comment and some magic may happen 😇
Enjoying this tutorial?
This site is a non-profit project. If it saved you some time, you can support it by getting Jan some coffee.
☕ Buy me a coffee
Comments