Part 1 - Build the template container and deploy your Galera LXC cluster
Download Markdown Go to next section
October 29, 2025
Table of Contents
Galera Cluster - what is it and why is it good for your home set up

- A MariaDB Galera Cluster is a type of database setup that keeps your data synchronized across multiple servers (nodes) in real-time. Its main purpose is to provide high availability and prevent data loss.
- Think of it like a team of scribes writing the same book simultaneously. When one scribe adds a sentence, they all instantly add the exact same sentence to their copy, ensuring every book is always identical.
A Galera Cluster for MariaDB is a synchronous multi-master database solution - to break it down:
- Multi-Master: Unlike traditional setups where you have one main database and several read-only copies, a Galera cluster allows you to read and write to any node in the cluster. This distributes the workload and eliminates a single bottleneck.
- Synchronous Replication: When you run a transaction (like
INSERT,UPDATE, orDELETE) on one node, it doesn't complete until it has been successfully replicated and confirmed by all other nodes in the cluster. This guarantees that all nodes have the exact same data at the exact same time, preventing data inconsistencies.
Advantages of having a Galera cluster
- Redundancy: Each Proxmox node holds a full, independent copy of the database. If one entire Proxmox server crashes, goes down for maintenance, or loses power, your database service continues to operate - there is no single point of failure.
- Automatic Failover: Applications connected to the database can simply redirect their queries to the remaining online nodes. Since all nodes are masters and have identical data, the transition is seamless with no downtime for the application and no data loss.
- Easy Maintenance: You can perform maintenance on one Proxmox host (like kernel updates or hardware upgrades) by shutting down its MariaDB VM. The rest of the cluster continues to run without issue. Once the maintenance is done and the node rejoins, Galera automatically synchronizes it with any changes that occurred while it was offline.
The role of an Arbitrator
- Imagine that you have two proxmox nodes each with two galera nodes and one Proxmox node goes down. That means that 50% of the nodes are down and there is no majority.
- This would result in the Galera cluster failing to operate as it requires a majority. An Arbitrator is a separate device that holds no data but helps determine which part of the cluster is healthy, preventing a split-brain scenario.
- We will use an Arbitrator later in our set up using a simple Raspberry Pi.

Benefits for Home or Hybrid Setups
- At Home: If you have two or more physical machines running Proxmox, you can create an enterprise-grade, fault-tolerant database for critical home services like Home Assistant, Nextcloud, your websites and other development projects. If one server fails, your smart home or personal cloud stays online.
- Hybrid Mode: This is where it gets really interesting. You can run one Proxmox node at home and another one on a cloud server (like a cheap VPS or dedicated server) or it could be someone else’s home who has a decent connection (or two). The Galera Cluster can span both locations over a VPN (like WireGuard). This gives you geographic redundancy. If your home loses internet or power, the cloud node takes over, ensuring your database is always accessible. This is a cost-effective way to achieve disaster recovery without owning multiple physical locations.
In this guide, we will focus on the home set up but can cover a multi-site set up in the near future.
Pre-requisites
- You have one or more Proxmox nodes (or another type 1 hypervisor such as VMWare, Harvester, etc.).
- You have one or more OPNSense units (can be virtualized but then it is best deployed with CARP on two or more Proxmox nodes)
- You have downloaded an LXC container of your favorite Linux distro. This guide covers Debian 13 (Trixie). Preferably, give the container a name that indicates it will be used as a template, such as ‘galera-template’. We can then have a cluster ‘A’ with numbers 1-4, for example ‘galera-A1, galera-A2, etc.’.
- Optional: A Raspberry Pi used as the fifth member of a quorum (no data stored).
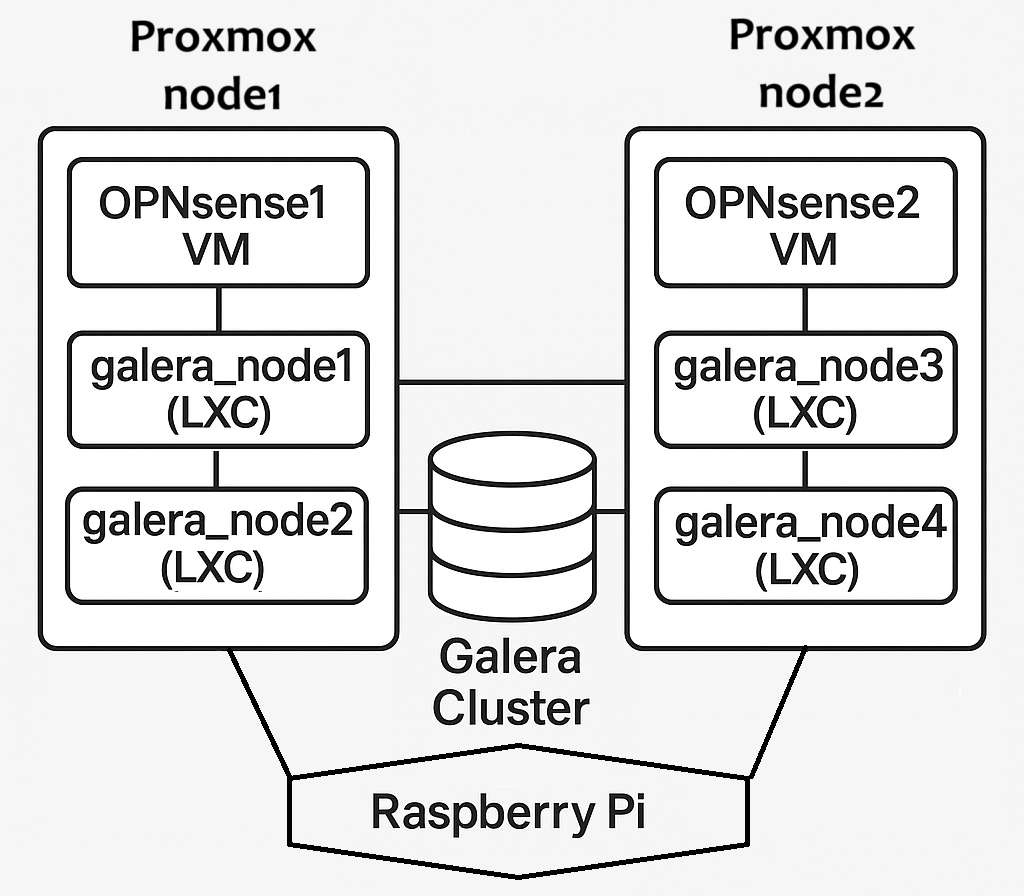
- Here is the full diagram for our set up:
Create your first container as a template on Proxmox
- This will save us work: we will update the LXC to the newest version and install services that we will need on it without necessarily configuring them in detail.
- We will then turn the container into a template and create additional nodes from it.
- We will leave the network settings on DHCP and use our firewall (OPNsense in my case) to set up a static lease for each container later on.
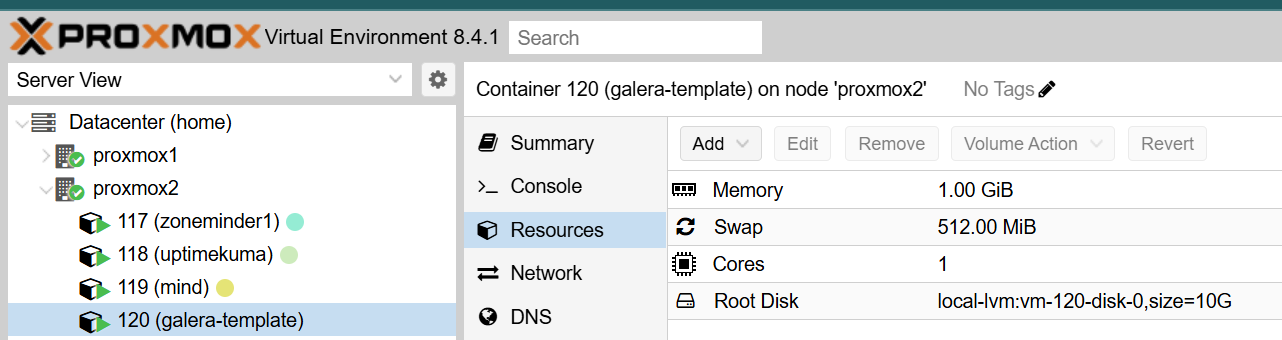
- Start the container and log in. You can be fancy and do so from the Proxmox node itself by connecting to its Shell/SSH.
# Start the LXC if not already running
pct start 120

# Log into its shell
pct enter 120

# Perform a system update & upgrade
apt update && apt upgrade
apt upgrade apt -y

# Install prerequisite packages
sudo apt install -y dirmngr ca-certificates apt-transport-https curl

# Download and install a combo of MariaDB server + client + galera with a backup client + firewall + ssh + cron
apt install mariadb-server mariadb-client mariadb-backup galera-4 rsync nano ssh ufw cron fail2ban ncdu -y- In case you are still using a root account, let’s create another user that we can use instead:
# Create a user
adduser <username>

# Add the user into the list of admins
usermod -aG sudo jan

# Switch into that user
su jan
Create an SST user on your LXC template
- Relevant documentation: mariadb-backup SST method
- Previously,
rsyncwas the method used for syncing between nodes. The challenge with this method is that while the update is being sent by the ‘donor’ node, the receiving ‘joiner’ node is not accepting other traffic. - With the mariadb-backup method, traffic is still being accepted even while the sync is in progress. This is achieved by using a
socatutility, which must be installed on both ‘donor’ and the ‘joiner’ nodes. - There are two types of syncs:
- IST is used when a node has only been offline for a short time. It just asks for the missing transactions from the donor's cache (
gcache). - SST is a full copy of the entire dataset, which is what invokes the
wsrep_sst_methodscript (mariabackuporrsync).
- IST is used when a node has only been offline for a short time. It just asks for the missing transactions from the donor's cache (
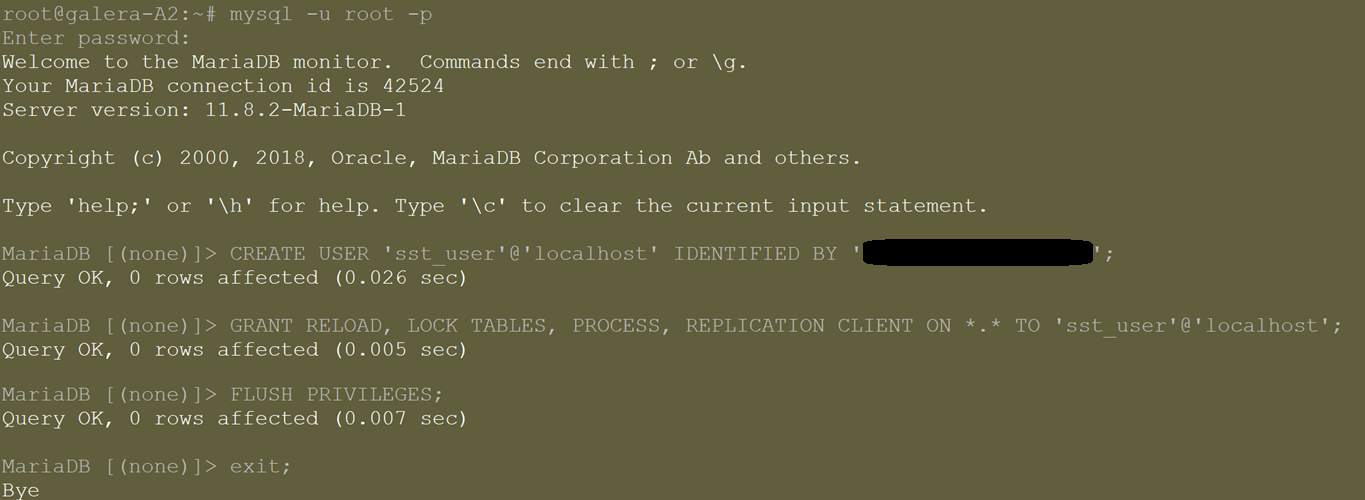
- We will need to create a user in MariaDB with a password on all future nodes in our cluster, so let’s do it on the template.
# Log into your MariaDB instance
mariadb -u root -p

CREATE USER 'sst_user'@'localhost' IDENTIFIED BY 'YourSSTPassword';
GRANT RELOAD, LOCK TABLES, PROCESS, REPLICATION CLIENT ON *.* TO 'sst_user'@'localhost';
FLUSH PRIVILEGES;
EXIT;
Security Hardening & Logging on Galera template LXC
Change the default SSH port
To modify the default SSH port, edit the following file (do not accidentally swap it with ‘ssh_config’, as that one will not lead to the desired change).
nano /etc/ssh/sshd_config    # In case you do not have sudoers (above) installed, use 'su -' and then run this command without sudo
sudo systemctl restart ssh
ss -tulpn | grep 22 # You should see a line that includes [::]:2222- The output should be similar to the one following:

- Then try connecting to the container via SSH again.
Configure MariaDB Logging
- Even if we launch the mariadb service (daemon), there will be no logs by default, unless we allow them specifically. And we will need them - not just for troubleshooting, but for fail2ban as well.
# Create a folder for logs and set up permissions
mkdir /var/log/mysql
chown mysql:mysql /var/log/mysql
chmod 2750 /var/log/mysql

nano /etc/mysql/mariadb.conf.d/50-server.cnf

# Change the bind address from 127.0.0.1
bind-address            = 0.0.0.0

# Un-comment these two lines
general_log_file       = /var/log/mysql/mysql.log
log_error = /var/log/mysql/error.log- Save and exit and restart the mariadb service:
# Restart the mariadb service
systemctl restart mariadb

# Simulate an error:
mysql -u someuser

# Check that an error was produced - this is important for fail2ban
tail -n 5 /var/log/mysql/error.log
Configure Fail2Ban
Set up fail2ban for repeated failed login attempts (just in case).
# Create your own jail file
nano /etc/fail2ban/jail.local

# Copy paste the following (adjust as you see fit)
[mariadb]
enabled   = true
port   = 3306
filter = mysqld-auth
logpath   = /var/log/mysql/error.log
findtime  = 3600
maxretry  = 5
bantime   = 360
ignoreip = 127.0.0.1/8 ::1- It would be good to verify that it works, as the template will be used for all other instances:
systemctl reload fail2ban
systemctl restart mysql

# Allow temporary access to your instance using user 'root' - the password
mariadb -u root -p

# Replace the IP below with your testing host ip
GRANT ALL PRIVILEGES ON *.* TO 'randomuser'@'192.168.8.73'
  IDENTIFIED BY 'some-long-random-password' WITH GRANT OPTION;
FLUSH PRIVILEGES;
EXIT;

# Now grab another host that has mariadb-client package installed and run a few of these:
mysql -h <your_galera_template_host_ip> -u blablah -plalala

# You should expect an error saying 'Access denied for user ...'

# Now hop on the galera template container and run the following to see the stats:
fail2ban-client status mariadb- In case you hit the limit, the error will change from ‘Access denied for user..’ to ‘Can’t connect to server on…’. That is how you know that machine was banned.

- You can access all banned IP addresses from different monitored services using this command:
fail2ban-client banned - To un-ban an IP address, run the following:
fail2ban-client set mariadb unbanip <offending_ip_address>- Lastly, let’s remove that unlimited access from the testing host:
mysql -u root -p

DROP USER 'root'@'192.168.8.73';
FLUSH PRIVILEGES;
EXIT;
Configure ufw (firewall)
- Let's configure allowed ports on the firewall for SSH, rsync, MySQL and deny HTTP/HTTPS
ufw allow proto tcp from 192.168.8.0/24 to any port 2222 # Allow comms for SSH from your subnet
ufw allow proto tcp from 192.168.8.0/24 to any port 3306 # Allow HAProxy to reach out for health checks and forward traffic
ufw allow proto tcp from 192.168.8.0/24 to any port 4567 # Handles galera replication traffic (TCP)
ufw allow proto udp from 192.168.8.0/24 to any port 4567 # Handles galera replication traffic (UDP)
ufw allow proto tcp from 192.168.8.0/24 to any port 4568 # Used for Incremental State Transfer (IST)
ufw allow proto tcp from 192.168.8.0/24 to any port 4444 # Rsyncd to transfer data for SST (mysqldump)
ufw deny http # We are not running a web server here so no need
ufw deny https # Same as above
ufw deny ftp # No FTP server needed here
ufw reload # Reload firewall rules
ufw enable # Enforce the firewall- You may also wish to add rules for your monitoring service, such as Uptime Kuma / Zabbix. While it is out of scope of this article, here are some examples:
ufw allow proto tcp from 192.168.8.0/24 to any port 10050 # Port for Zabbix no.1
ufw allow proto tcp from 192.168.8.0/24 to any port 10051 # Port for Zabbix no.2
ufw allow proto tcp from 192.168.8.0/24 to any port 3001 # Port for UptimeKuma- In case you make a mistake and need to revert it, once ufw is enabled, you can run the following:
# Display all rules by number
ufw status numbered

# See the output of all the rules and choose which one you want to delete. Example:
# ufw delete 1- The end result can be something like this:
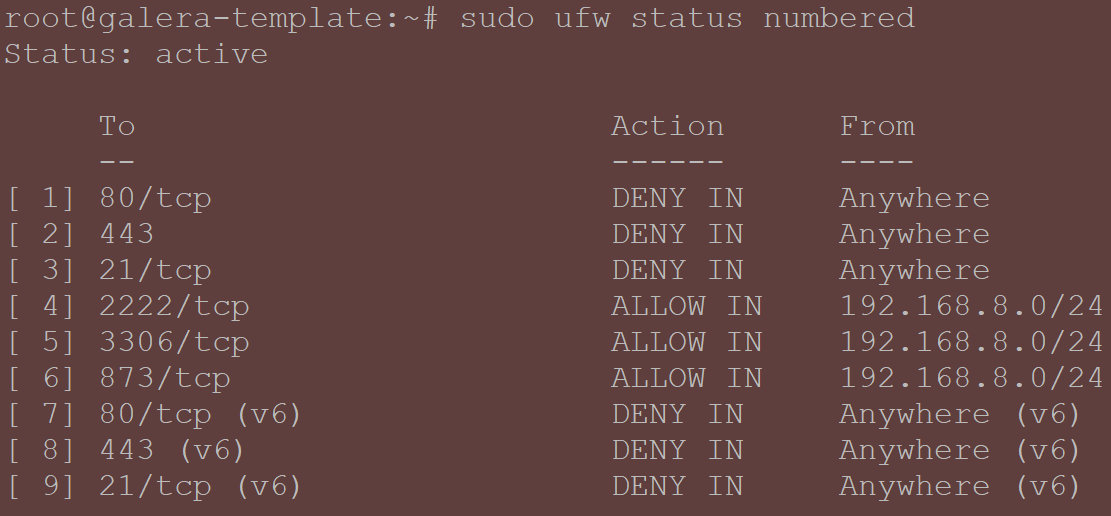
- Just in case you are deploying the MariaDB instance as a VM instead of a container, then remember to install the qemu agent (not applicable for LXCs).
MariaDB Secure Installation script
-
Let’s run the pre-packaged ‘
mariadb-secure-installation’ script from the shell of any of the MariaDB container instances:- You will be asked to provide the root password
- ‘Switch to unix socket authentication’: Choose ‘n’
- ‘Change the root password?’: change it if it is not already secure / different from the others. Preferably use a long password saved in your trusted password vault.
- ‘Remove anonymous users’: Choose ‘y’
- ‘Disallow root login remotely’: Choose ‘y’
- ‘Remove the test database and access to it’: Choose ‘y’
- ‘Reload privilege tables’: Choose ‘y’
-
For more explanation and screenshots of each step, check out Linuxteck's guide.
-
This should be all for security hardening.
# Leave the container
exit

# Shut the container down (if you are connecting from Proxmox - if not, switch it off from the GUI).
pct stop <CT_ID>
Turn the MariaDB container to a template
So now we have a container prepared and need to turn it into a template and then create the actual MariaDB galera nodes from the template.
- In Proxmox GUI, right click on the CT template and select ‘Convert to template’.
- Then right click on the newly created template and choose ‘Clone’.
- Choose an adequate hostname, such as ‘galera-A1’, which indicates it will be the first node in cluster A (since you may have more clusters in the future).
- Storage is typically local-lvm unless you have shared storage between Proxmox nodes set up.
- Mode: Full Clone

In the future, we can keep this template updated by creating an instance from it, updating it and then turning it back into a template.
What is the difference between a Full vs Linked Clone in Proxmox?
Just a little stop in case you have not had to deal with this one before, and why I would strongly recommend ‘Full Clone’ for a DB container.
- A Full Clone is a full independent copy of the template’s disk image:
- Disk operation: It's a byte-for-byte copy. If your template's disk is 8GB, a full clone will immediately occupy 8GB of space on your storage.
- Independence: Once created, it has no connection to the original template. You can delete the template, and the full clone will continue to run without issues.
- Creation Speed: This is the slowest method, as Proxmox must read every block from the template and write it to the new location.
- A linked clone is a lightweight, dependent copy that shares the template's disk image:
- Disk operation: While light because it works as snapshots (starting with zero difference), it uses a "copy-on-write" mechanism. There is therefore a performance penalty on the first write to a block, as that data block must first be copied from the template to the clone's own storage area before it can be modified. This is the main reason for not using linked clones for database servers (unless you do not need many write operations at all).
- Independence: A linked clone requires the original template to exist. One cannot delete the template if it has dependent (linked) clones.
- Creation Speed: Nearly instantaneous. Since no data is copied initially, a linked clone can be created in just a couple of seconds.
Deploy 4x LXC containers on 2x Proxmox nodes
Let’s say that you created your first container. Good! Let’s assign it a static IP.
- Since we are using OPNSense, let’s copy the MAC address in Proxmox and find it in OPNSense to assign it something meaningful for our set up.
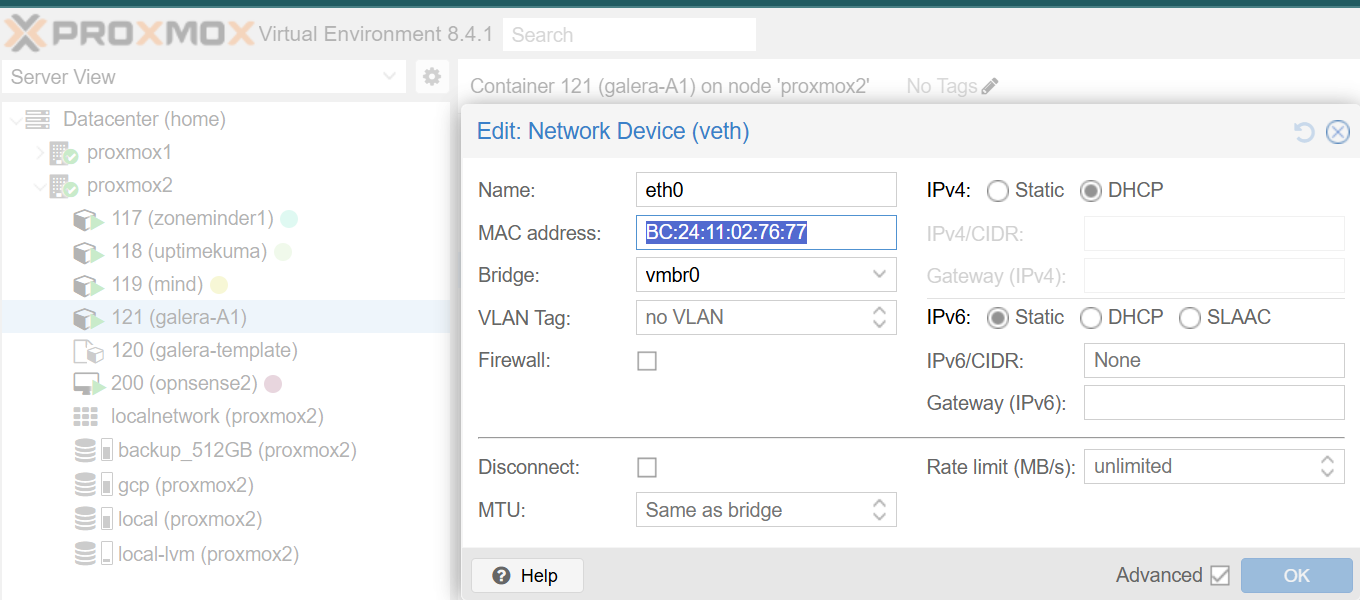
- In OPNSense GUI, head to ‘Services’ > ‘ISC DHCPv4’ > ‘[LAN]’ interface and scroll down to ‘DHCP Static Mappings for this interface.’. Click on the + sign there to add a new MAC address.
- Paste the MAC address and fill in our details like hostname / description, as you prefer. Click on the ‘Save’ button at the bottom of the page and then on the ‘Apply’ button to kick the change into effect.

- Proceed with creating other containers in Proxmox and assigning them static IPs in the same way.
- If you have more Proxmox nodes, move an even number to another one - so for 4 containers, you can have two in proxmox1 and two on proxmox2. Simply right click on the container and click on the ‘Migrate’ button.
- Then switch the node on (or restart it if it was on already) and SSH into each using an SSH key or password using the newly assigned IP address, as per your set up.
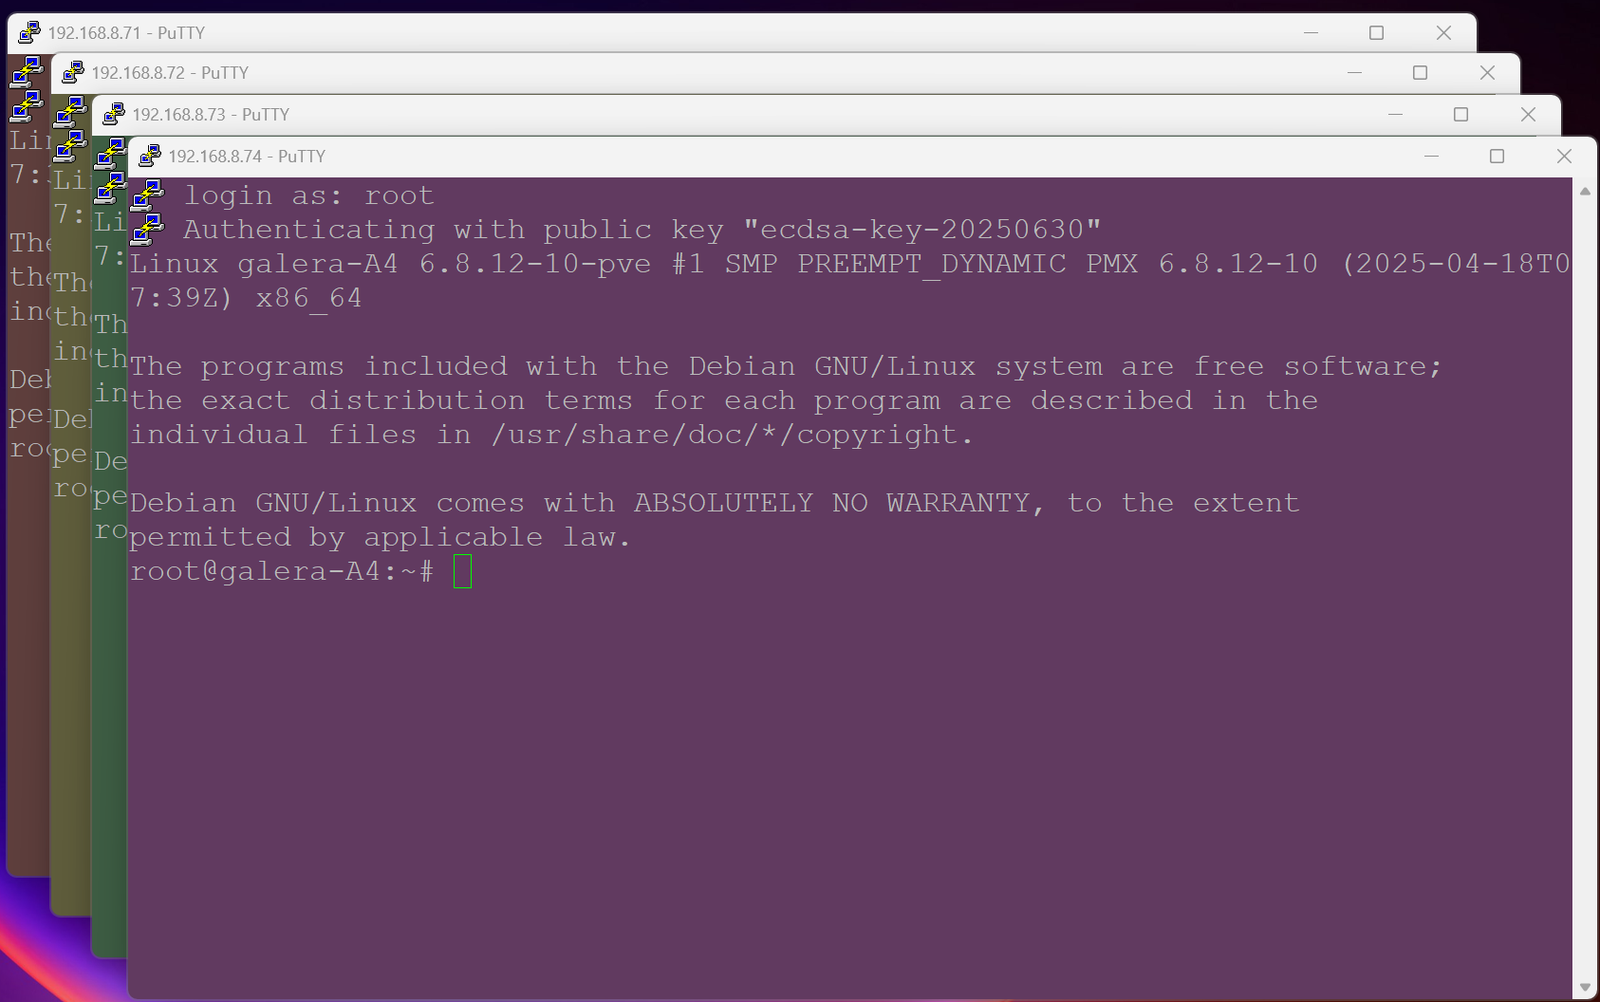
- On node galera-A1:
systemctl stop mariadb
nano /etc/mysql/mariadb.conf.d/60-galera.cnf

[mysqld]
# MySQL-related settings
bind-address = 0.0.0.0
binlog_format = ROW
default_storage_engine = InnoDB
innodb_autoinc_lock_mode = 2

# This setting provides better write performance at a small risk of data
# loss on OS crash (not just DB crash). In a multi-node cluster, this is an acceptable
# and common setting, as data exists on other nodes.
innodb_flush_log_at_trx_commit = 2
innodb_log_file_size = 256M
innodb_log_buffer_size = 64M

# A shorter lock wait timeout fails faster in a cluster environment,
# which is generally preferred over long waits.
innodb_lock_wait_timeout = 60

# The InnoDB buffer pool is the most critical performance setting.
# Set this to ~70% of the server's available RAM if it's a dedicated database server.
innodb_buffer_pool_size = 800M

# Skip trying to resolve names since we are using IP addresses
skip-name-resolve

# Allow for more attempts to prevent HAProxy from being blocked
max_connect_errors = 1000

# Logs not only errors but warnings, too (older more compatible method from log_error_verbosity)):
log_warnings = 1

wait_timeout = 1800
interactive_timeout = 1800
max_allowed_packet = 1G

[galera]
# Galera Provider Configuration
wsrep_on=ON
wsrep_provider=/usr/lib/galera/libgalera_smm.so

# Note: The gcache stores writesets for nodes that briefly disconnect.
# A larger gcache allows for a longer disconnect time before a full SST is required.
wsrep_provider_options="gcache.size=512M;gcs.fc_limit=128;gcs.fc_factor=0.8"

# Galera Cluster Configuration (ADJUST - same on each node)
wsrep_cluster_name="clusterA"
# Info about each node (ADJUST - same on each node + add a witness if you have one)
wsrep_cluster_address="gcomm://192.168.8.71,192.168.8.72,192.168.8.73,192.168.8.74"

# The newer non-blocking method is mariadb, the older one is rsync (ports need to be opened!)
wsrep_sst_method = mariabackup

# SST user for syncinging, same for each node. UPDATE!
wsrep_sst_auth = sst_user:YourSSTPassword

# Galera Node Configuration (ADJUST FOR EACH NODE)
wsrep_node_address = "192.168.8.71" # <-- CHANGE THIS ON EACH NODE
wsrep_node_name = "galera-a1"      # <-- CHANGE THIS ON EACH NODE
wsrep_sst_receive_address = "192.168.8.71" # <-- CHANGE THIS ON EACH NODE- Once done, do not yet try starting the mysql service, because it will fail due to not seeing any node in the cluster yet (not even itself). Instead, initiate the new cluster and check that you can see one unit (do this only once!):
# Initiate the galera cluster from the first node:
galera_new_cluster

# Check that the output shows '1'
mysql -e "SHOW STATUS LIKE 'wsrep_cluster_size';"

# Now start the MariaDB service!
systemctl start mariadb- The result of the mysql query should look like this:

- Now let’s ensure that there is an SST user set up (on each of your nodes, no need to have that on the witness node):
# This ensures the user can connect from the subnet used for the Galera nodes:
CREATE USER IF NOT EXISTS 'sst_user'@'192.168.%' IDENTIFIED BY 'YourPassword';

# These are the standard "Donor" permissions for mariabackup
GRANT RELOAD, PROCESS, LOCK TABLES, REPLICATION CLIENT ON *.* TO 'sst_user'@'192.168.%';

# MariaDB 11.x also likes BINLOG MONITOR
GRANT BINLOG MONITOR ON *.* TO 'sst_user'@'192.168.%';

FLUSH PRIVILEGES;- Let’s head to the ‘galera-A2’ node and set it up in a similar way - just ensure to change the last few rows.
systemctl stop mariadb

nano /etc/mysql/mariadb.conf.d/60-galera.cnf

# Copy the same config file as above with the difference in the last two rows:

# Galera Node Configuration (ADJUST FOR EACH NODE)
wsrep_node_address = "192.168.8.72" # <-- CHANGE THIS ON EACH NODE
wsrep_node_name = "galera-a2"      # <-- CHANGE THIS ON EACH NODE
wsrep_sst_receive_address = "192.168.8.72" # <-- CHANGE THIS ON EACH NODE

# Exit with save. Do not start a new cluster by running 'galera_new_cluster'.

# Start the MariaDB service:
systemctl start mariadb

# Verify that the service started and the node joined the cluster
systemctl status mariadb

# Check how many nodes are in the cluster
mysql -e "SHOW STATUS LIKE 'wsrep_cluster_size';"- Here is how the output may look like:
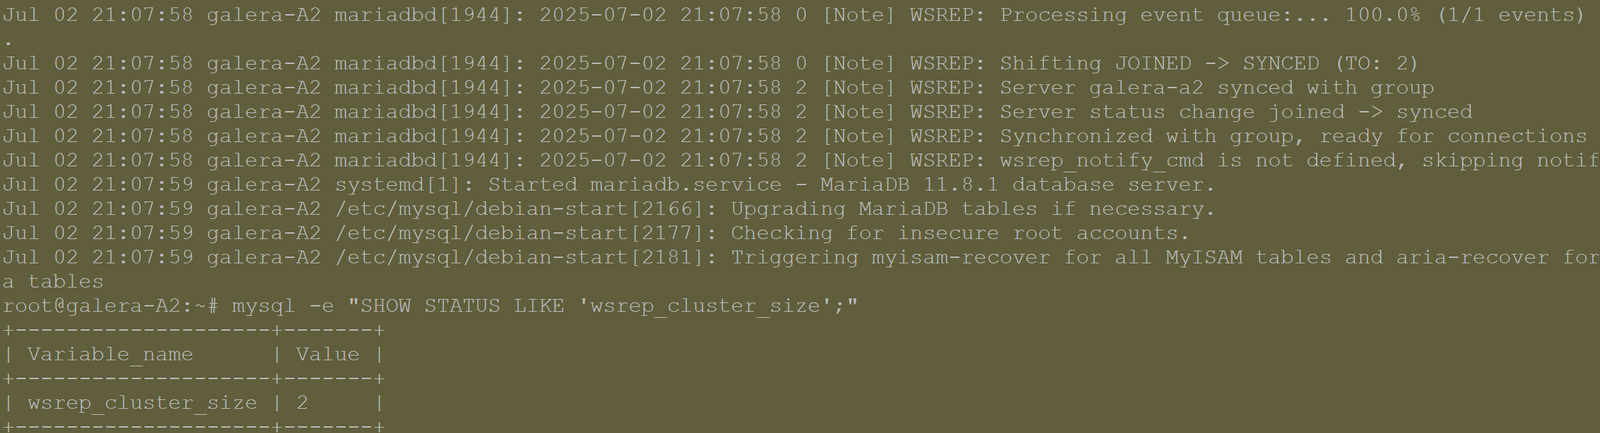
-
Rinse and repeat with ‘galera-A3’ and ‘galera-A4’, each time:
- Stop the MariaDB service
- Edit the
60-galera.conffile - Copy paste the full config that we used on the ‘galera-A1’ node.
- Edit the last two rows to capture the node’s IP and hostname.
- Start the MariaDB service again (or reboot the container).
- Configure the
sst_userto ensure snapshot-based backups work during short outages.
-
Once all four nodes have been added to the cluster, you can run
mysql -e "SHOW STATUS LIKE 'wsrep_cluster_size';"on any of them and should get the value of 4.

- Note: This user is not used for the health check itself, because HAProxy does not support health checks that require a password.
- We can also create a user that would be used in the future to run validation tests to confirm that the connection works to different containers from each OPNSense firewall.
mariadb -u root -p

-- Create the user for the first and second OPNsense nodes (or if you have more)
CREATE USER 'haproxy_check'@'opnsense_node1_ip_here' IDENTIFIED BY 'your_password_here';
CREATE USER 'haproxy_check'@'opnsense_node2_ip_here' IDENTIFIED BY 'your_password_here';

-- Grant the ability to connect to the server and run commands for health checks
GRANT USAGE ON *.* TO 'haproxy_check'@'opnsense_node1_ip_here';
GRANT REPLICATION CLIENT ON *.* TO 'haproxy_check'@'opnsense_node1_ip';

GRANT USAGE ON *.* TO 'haproxy_check'@'opnsense_node2_ip_here';
GRANT REPLICATION CLIENT ON *.* TO 'haproxy_check'@'opnsense_node2_ip';

-- Apply the new permissions
FLUSH PRIVILEGES;- To ensure that you have got it right, run the following:
SELECT User, Host FROM mysql.user;- The output should look similar to:
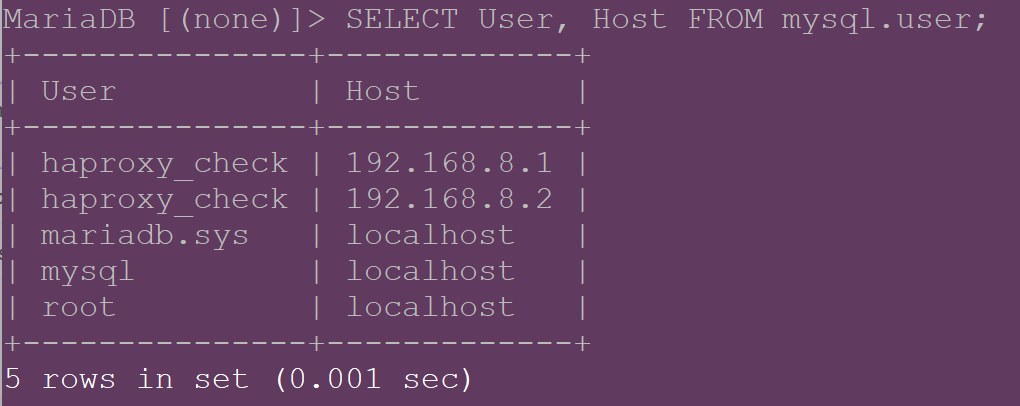
- In case you made an error and need to remove something, then run the following (edited as required):
mariadb -u root -p

DROP USER 'haproxy_check'@'opnsense_node1_ip_here';
DROP USER 'haproxy_check'@'opnsense_node2_ip_here';
FLUSH PRIVILEGES;
EXIT;
With all four nodes up and talking to each other, the next part puts HAProxy in front of them and confirms the cluster actually survives a failure.
Enjoying this tutorial?
This site is a non-profit project. If it saved you some time, you can support it by getting Jan some coffee.
☕ Buy me a coffee
Comments