Bachelor Tech
  • Home
  • Tutorials
  • Tips
  • Portfolio
  • About Jan
  • Contact Jan
Category:

Linux

LinuxProxmox

How to get LXC containers for Proxmox outside of ready-made templates

by Jan Bachelor June 30, 2025
written by Jan Bachelor
  • Let’s say you want to run Debian 13 (Trixie) but there is no standard template for it in Proxmox. What if you want to run one?
No Debian 13 container in Proxmox library of templates?

LinuxContainers.org for the rescue!

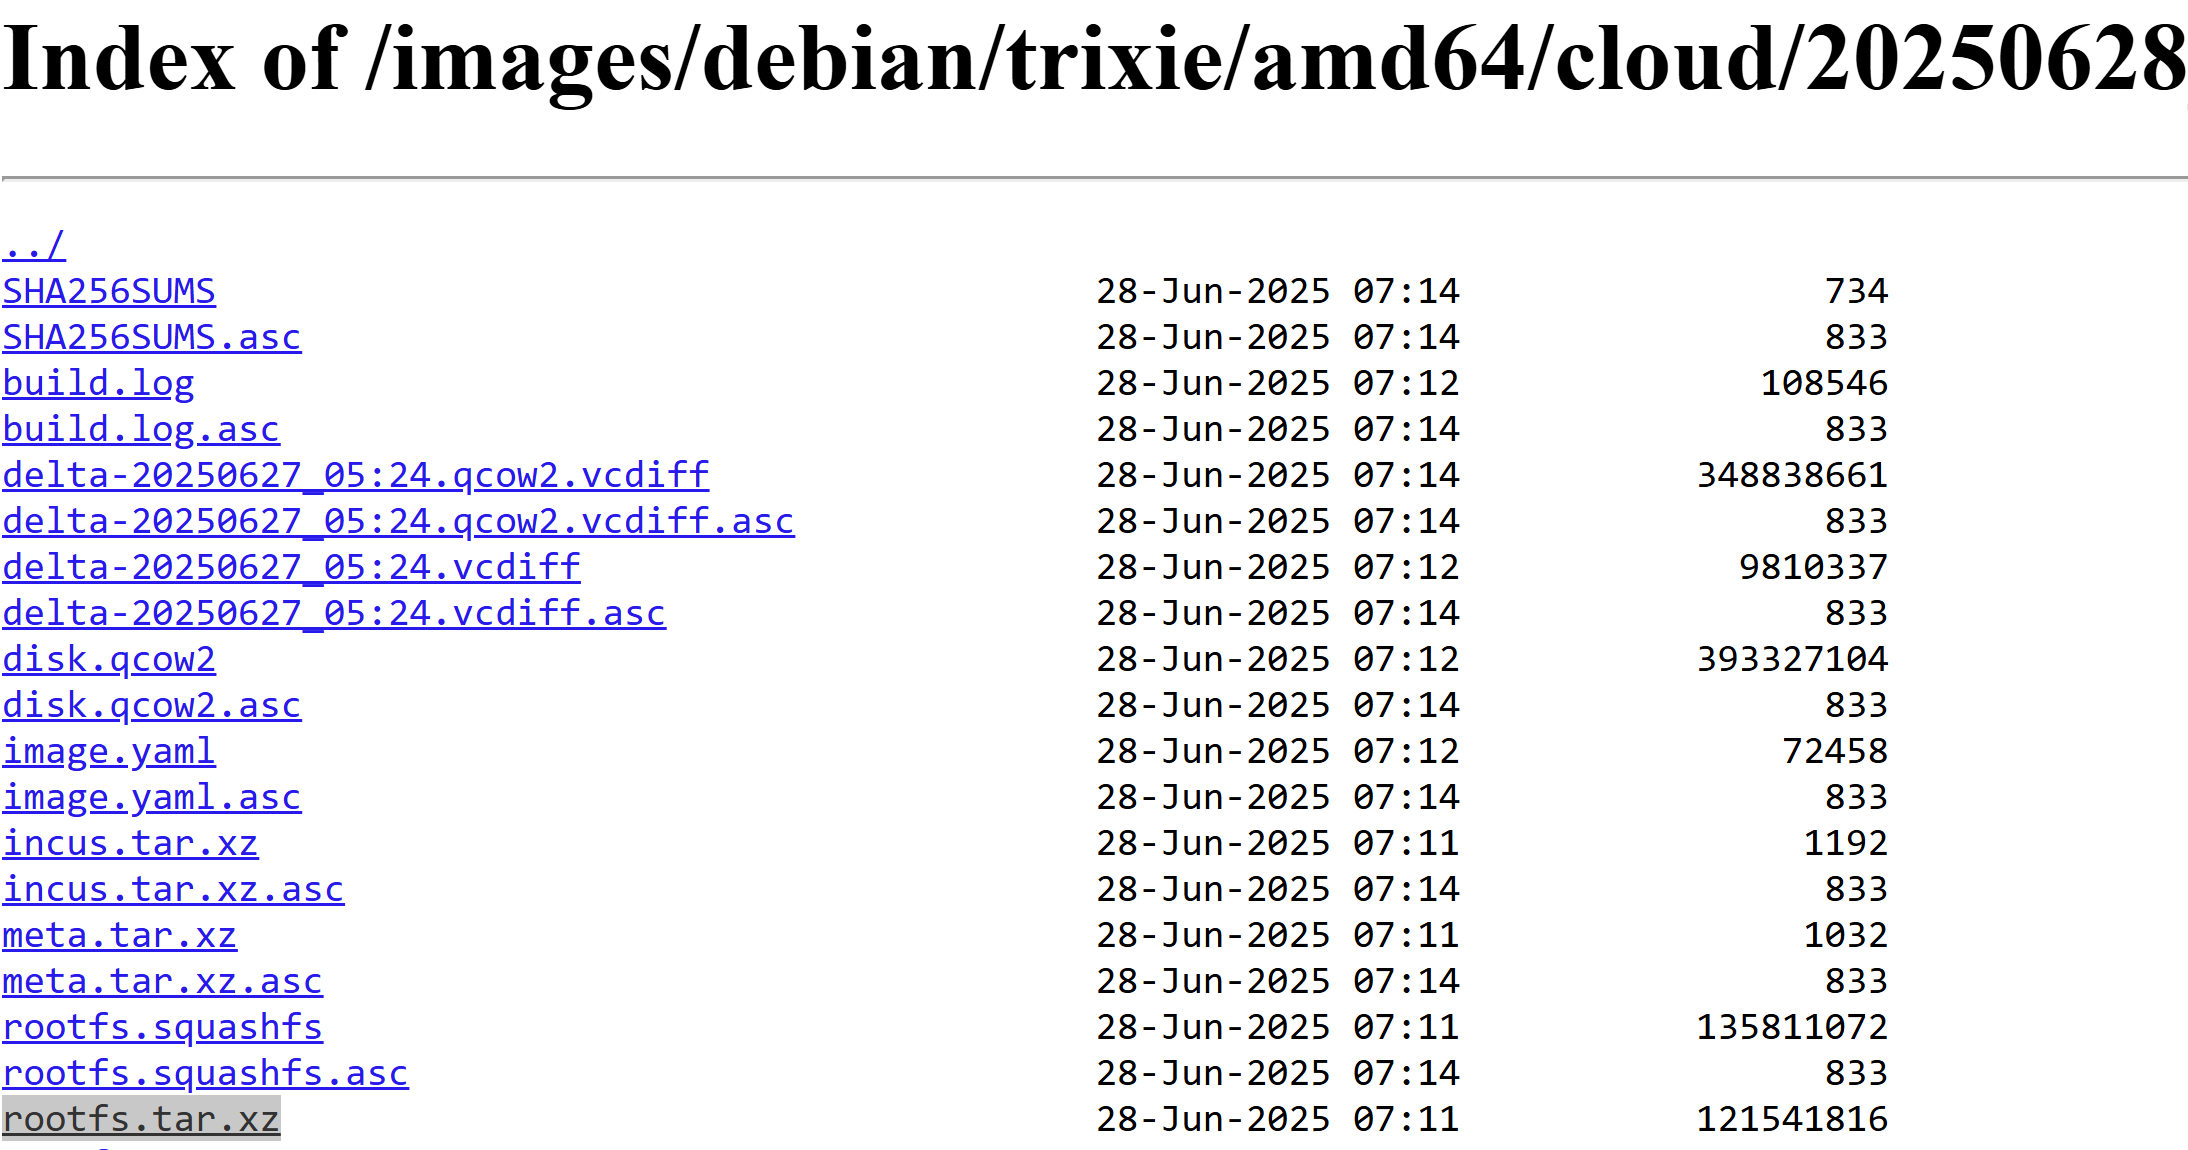
  • Such cases may happen but do not worry, there is a way around it! Simply go to LinuxContainers.org and find your desired one. You will find that the actual image name called ‘rootfs.tar.xz’.
A Debian Trixie LXC available on LinuxContainers.org
  • Head to your Proxmox node and connect to it via shell or via SSH.
  • Go to the following folder and download + rename the CT image:
cd /var/lib/vz/template/cache/
# Replace the URL of the one you are after
wget https://images.linuxcontainers.org/images/debian/trixie/amd64/cloud/20250628_05:24/rootfs.tar.xz
# Rename it to something that makes sense to you:
mv rootfs.tar.xz debian-13-trixie-lxc-2025-06-28.tar.xz
  • Now you could head to Proxmox’s GUI and create the container from there. However, if you are on Proxmox 8 (which is powered by Debian 12) and try creating a CT with Debian 13, you will inevitably hit an issue with the new networking service that is used in Trixie:
Failed installation of Debian 13 from Proxmox 8.4.1 GUI
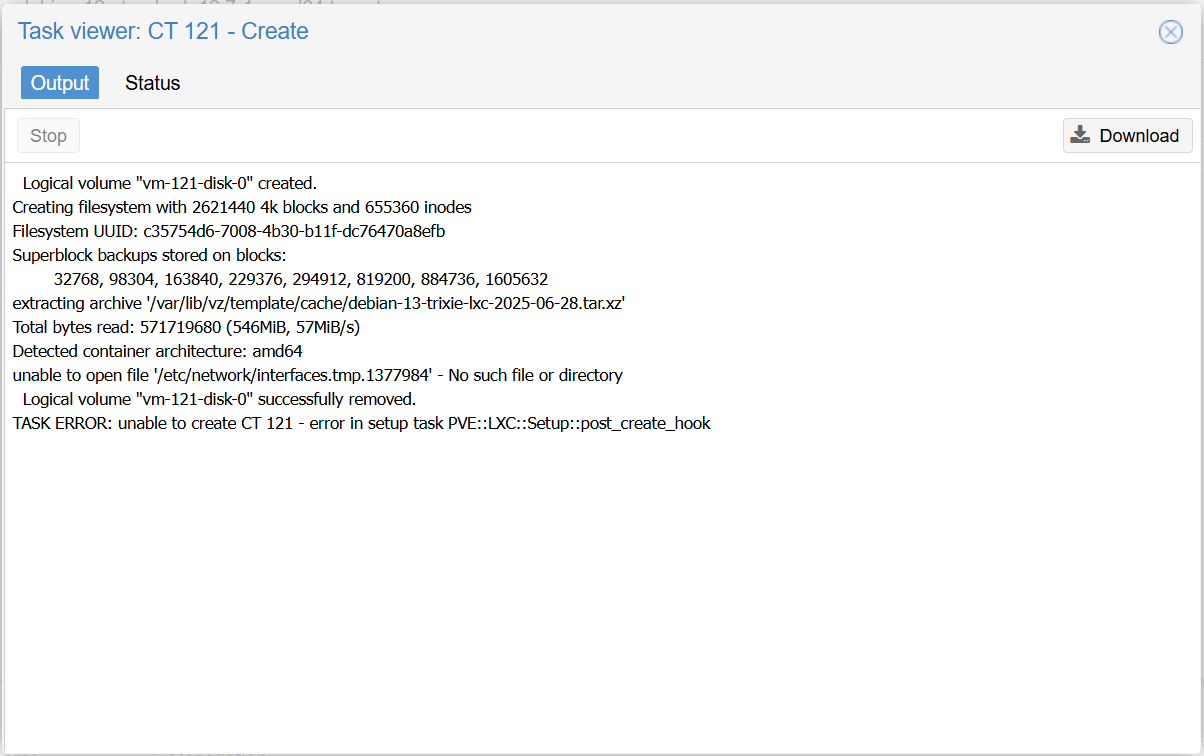
  • The way around it is to create the container from the Proxmox shell and skipping the networking part initially.
pct create <CT_ID> \
/var/lib/vz/template/cache/debian-13-trixie-lxc-2025-06-28.tar.xz \
--storage <YOUR_STORAGE> \
--rootfs <YOUR_STORAGE>:10 \
--hostname <HOSTNAME> \
--memory 1024 \
--cores 1 \
--password <YOUR_PASSWORD>
--ssh-public-key ~/.ssh/<YOUR_PUB_KEY>
  • Replace the values as follows:
    • <CT_ID> : Choose an available one.
    • <YOUR_STORAGE>: local storage name such as ‘local-lvm’.
    • <HOSTNAME>: of the CT, such as deb13
    • <YOUR_PASSWORD>: root pwd to log in with. Do not use special characters.
    • <YOUR_PUB_KEY>: this parameter is optional, you can skip it if you do not have one.
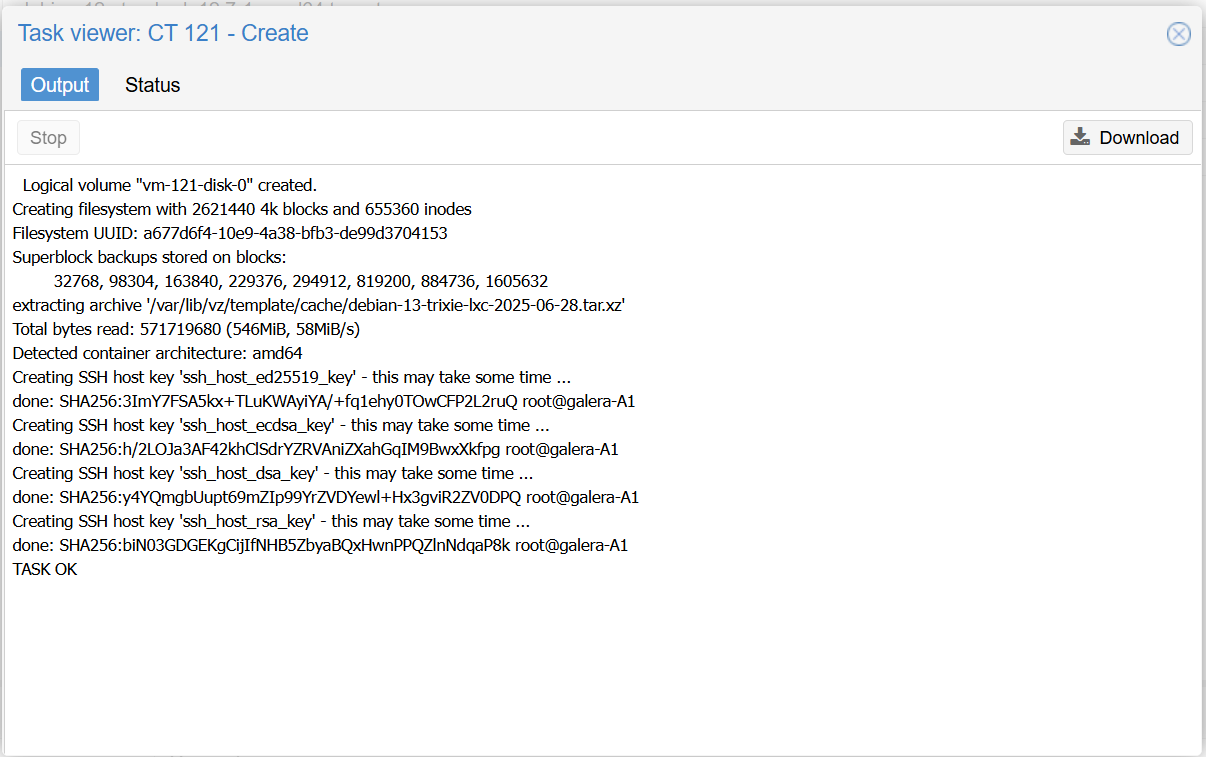
  • And voila, straight after passing the command, I can see the result in Proxmox’s GUI tab:
Successfully created CT from Proxmox’s shell (skipping network details).
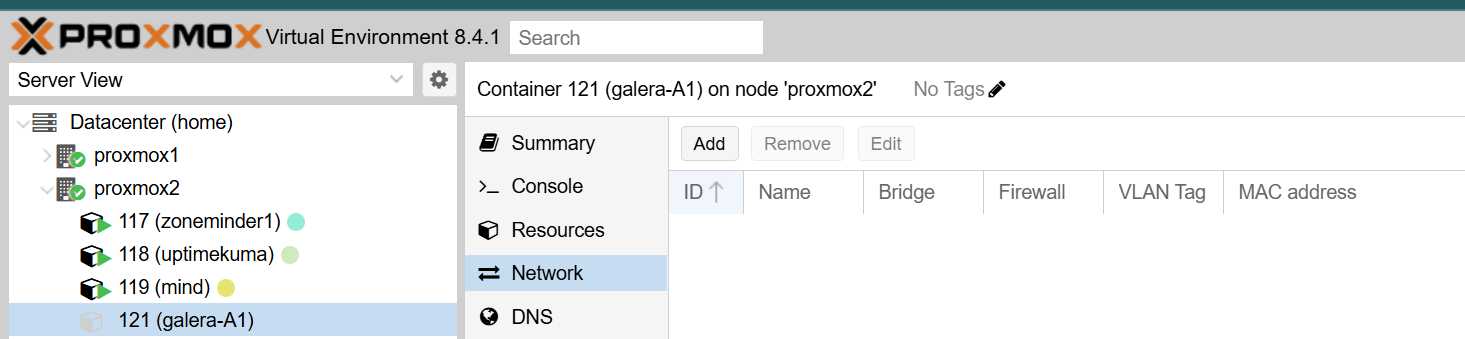
  • When viewing from Proxmox’s web GUI, you will notice that there is not network tab in there:
View of the created CT – no network adapters/settings yet
  • Now we can continue using the Proxmox shell to start the container (or you can do so from the GUI), log into it and create a folder in which the network adapter will be created later.
# Start the container
pct start <CT_ID>

# Enter the container's command line
pct enter <CT_ID>

# Inside the container, create the directory
mkdir /etc/network

# Exit the container's shell
exit

# Shut the container down so we can add the network device
pct shutdown <CT_ID>

# Add a network interface to the container (assuming you use vmbr0 for LAN and are okay with DHCP).
pct set <CT_ID> --net0 name=eth0,bridge=vmbr0,ip=dhcp

# Start the container again
pct start <CT_ID>

# Switch the network interface on + add DHCP
ip link set eth0 up
dhclient eth0

# Verify connectivity
ip addr | grep eth0

# To make it pernament, run the following:
apt update
apt install ifupdown2
reboot
  • What we did there by creating the folder and assigning the port was to make the generic Debian 13 image compatible with the way Proxmox manages a container’s network configuration – until Proxmox itself gets updated to work with it smoothly.
  • This means that this article may not age well but the idea behind it remains.

Take aways

In summary, you can:

  • Download newest versions of LXC images from trusted sources like LinuxContainers.org
  • You can use the Proxmox shell to circumvent what the GUI cannot do and even create scripted solutions to start/configure/stop containers.
  • Create containers with certain settings missing (like for networking) in case the current version of Proxmox struggles to work with it.

And that is all there to it! You can now use the container as usual.

June 30, 2025 0 comments
0 FacebookWhatsappEmail
LinuxProxmox

How to join two Proxmox nodes into a cluster (PVE 8.x)

by Jan Bachelor May 4, 2025
written by Jan Bachelor

Pre-requisites:

  • Each node is on the same version.
  • They can talk to each other on the local network. If possible, connect them directly, the guide below will expand on how.
  • They can resolve each others hostnames (so that we do not need to rely on IP addresses, as the API communication requires a certificate, which needs to be issued to a valid subject (not an IP address).

Connect the Proxmox nodes via a direct physical line:

  • Let’s say that each Proxmox node has an available physical interface via which they can communicate with each other. In the case below, it is en3s0, i.e. the third port on the device.
  • Instead of relying on LAN communication via a router, we can connect them directly. This way, even if the LAN comms fails, they can still talk to each other regardless of what happens on the network.
  • Firstly, have a look at your Proxmox node to see what interface is available. You might need to free one up to use it for this dedicated line. In the case below, the physical ports 3-6 are used for LAN traffic. We will need to remove the port no.3 to free it for another virtual interface.
Review your available interfaces to use for a dedicated corosync line between nodes
  • Under the node (proxmox1) → System → Network, click on the ‘Create’ button and select ‘Linux bridge’.
    • Provide the IPv4/CIDR information that applies to the specific node. Since we just need two nodes, we can use the /30 subnet that allows for us to 2 hosts (since one is the network address and the other the broadcast address). If you plan to add more nodes, you can set up the subnet to something larger, such as /29 (up to 6 usable hosts) or /28, (up to 16 usable hosts).
    • Write down the name of the physical interface that you decided to use beforehand. In this case, it is enp3s0, i.e. the third NIC on the device.
Create a new virtual network interface on each node with your chosen IP range.
  • Do the same on the second node with the difference that the IPv4/CIDR is different in the fourth octet, i.e. 10.0.0.2/30. The port number can be different, although having a mirrored set up is easier in the long-run.

Ensure that they can talk to each other

  • Check that the nodes have proper names and can reach each other. See this article on how to rename a node.
  • From the shell of each node, add the connection in the /etc/hosts file:
jan@proxmox1:~$ sudo nano /etc/hosts

# Add these two lines (adjust it to the IPs and names that you use):
10.0.0.1 proxmox1
10.0.0.2 proxmox2
  • Do the same on the second node.
  • After saving it, run a test from each:
jan@proxmox1:~$ ping proxmox2
PING proxmox2.bakalar.priv (10.0.0.2) 56(84) bytes of data.
64 bytes from proxmox2 (10.0.0.2): icmp_seq=1 ttl=64 time=1.06 ms

jan@proxmox2:~$ ping proxmox1
PING proxmox1.bakalar.priv (10.0.0.1) 56(84) bytes of data.
64 bytes from proxmox1 (10.0.0.1): icmp_seq=1 ttl=64 time=0.260 ms

Create a PVE cluster

  • On version 8.x, initiate a cluster with the first node as its only member. In this case, I call the cluster name as ‘home’ – feel free to change the name:
sudo pvecm create home
  • You can then review the corosync.config file to see what it produced:
jan@proxmox1:~$ sudo nano /etc/pve/corosync.conf
  • In case a different IP was used because the proxmox nodes are inter-connected via another interface, you can change the IP address to match the one that you dedicated under the ‘ring0_addr’.
  • Then connect to the second node and run the following:
jan@proxmox2:~$ sudo pvecm add proxmox1
  • Review the output. We can see that:
    • You need to log in with the first node’s root password.
    • Accept the connection.
    • If you have them connected via more than just that one link, you might end up with a different IP address than expected.
Join the second node to your cluster
  • Review the /etc/pve/corosync.conf file one more time:
jan@proxmox1:~$ sudo nano /etc/pve/corosync.conf

logging {
  debug: off
  to_syslog: yes
}

nodelist {
  node {
    name: proxmox1
    nodeid: 1
    quorum_votes: 1
    ring0_addr: 10.0.0.1
  }
  node {
    name: proxmox2
    nodeid: 2
    quorum_votes: 1
    ring0_addr: 10.0.0.2
  }
}

quorum {
  provider: corosync_votequorum
}

totem {
  cluster_name: home
  config_version: 2
  interface {
    linknumber: 0
  }
  ip_version: ipv4-6
  link_mode: passive
  secauth: on
  version: 2
}
  • Troubleshooting: In case you struggle, you can also run this command to see more details about how each node is configured: corosync-cfgtool -s

BONUS: Add a Rapsberry PI quorum member to prevent split-brain scenarios

Corosync works on a quorum-based system where majority is needed. In the ideal case, there would be three nodes. We can utilize a low-powered device such as a Raspberry Pi as a quorum-only member without actually having to run Proxmox on it.

  • On each Proxmox node, install:
apt install corosync-qnetd corosync-qdevice
  • On a Rapsberry PI (Debian-based), install:
sudo apt install corosync-qnetd
sudo systemctl enable corosync-qnetd
sudo systemctl start corosync-qnetd
  • Then on either node on the proxmox cluster, run:
pvecm qdevice setup <raspberrypi-hostname-or-ip>
  • Lastly, run pvecm status to see if the third member is in there:
Result of the ‘pvecm status’ command with the third quorum member
May 4, 2025 0 comments
0 FacebookWhatsappEmail
LinuxProxmox

How to Rename a Proxmox Node

by Jan Bachelor May 4, 2025
written by Jan Bachelor

In case you run Proxmox and realize that you would like to change the hostname, for example when about to join two nodes together into a cluster, you can proceed in the following way:

  • Run ‘hostnamectl’ to see what you have set at the moment.
  • Rename it in the following files:
/etc/hostname
/etc/hosts
/etc/postfix/main.cf
  • Then rename it in active by running ‘hostnamectl set-hostname your-node-name’
  • Verify that it is set correctly by running ‘hostnamectl’
  • Restart these proxmox-related services:
systemctl restart pvedaemon
systemctl restart pvestatd
systemctl restart pveproxy
  • In case you open your node’s web interface at this point, you will notice that the old node is still there with its VMs in an unknown state. You will need to move files from one pve to another. Let’s say we renamed it from ‘node1’ to ‘proxmox1’. You would need to run the following:
# Modify these lines to your own hostnames! 
# From node1 to proxmox1:
mv /etc/pve/nodes/node1/lxc /etc/pve/nodes/proxmox1/lxc
mv /etc/pve/nodes/node1/qemu-server /etc/pve/nodes/proxmox1/qemu-server

The above will move information about all the containers and VMs onto the new node name. It is recommended to do a reboot of the node afterwards.

May 4, 2025 0 comments
0 FacebookWhatsappEmail
AndroidFreeNASLinux

How to mount an NFS share on an Android box

by Jan Bachelor February 3, 2024
written by Jan Bachelor

Do you have a home NAS plus an Android TV (box) or a phone connected to a non-smart TV and want to mount the NAS onto the Android device to watch your movies on a TV? Then check out this article!

Continue Reading

February 3, 2024 3 comments
0 FacebookWhatsappEmail

Course Steps

Recent Comments

  • Jan Bachelor on Dynamic DNS Set Up with DuckDNS on OPNSenseHi Jake, that's awesome, congratulations on getting…
  • Jake on Dynamic DNS Set Up with DuckDNS on OPNSensefollowed guide above to the T and all is working. i…
  • Fastbrain on Dynamic DNS Set Up with DuckDNS on OPNSenseThanks for the guide. For some reason, after follow…

Other courses

OPNSense in HA with CARP with dual WANs

June 30, 2025

Never again forget about important dates with MIND!

June 30, 2025

Install iRedMail Mail Server As Proxmox VM With...

October 31, 2024

Remote Bucket Storage for Proxmox VM Backups

August 16, 2024

Concur Alternative: Import Employees’ Credit Card Expenses to...

January 19, 2024
Bachelor Tech
  • Home
  • Tutorials
  • Tips
  • Portfolio
  • About Jan
  • Contact Jan

Recent Posts

  • How to get LXC containers for Proxmox outside of ready-made templates

  • How to join two Proxmox nodes into a cluster (PVE 8.x)

  • How to Rename a Proxmox Node

Facebook Twitter Instagram Pinterest Linkedin Youtube

All Rights Reserved. The theme was customized from Soledad, see PenciDesign