In case you have created the YAML and Terraform files in a new repo, you will need to ensure that they are pulled into AWX. If you are working on an existing repo, then just run a sync job.
Add Your Gitea Project (if not done already):
- Go to Resources -> Projects.
- Click Add.
- Name:
Gitea - Infrastructure - Source Control Type:
Git - Source Control URL: Your Gitea repo URL.
- Add your Gitea credential (you can create it in Gitea as read only – see my previous guide)
- Click Save and let it sync.
Create the Job Template (after a sync from Gitea):
- Go to Resources -> Job Templates.
- Click Add -> Add Job Template.
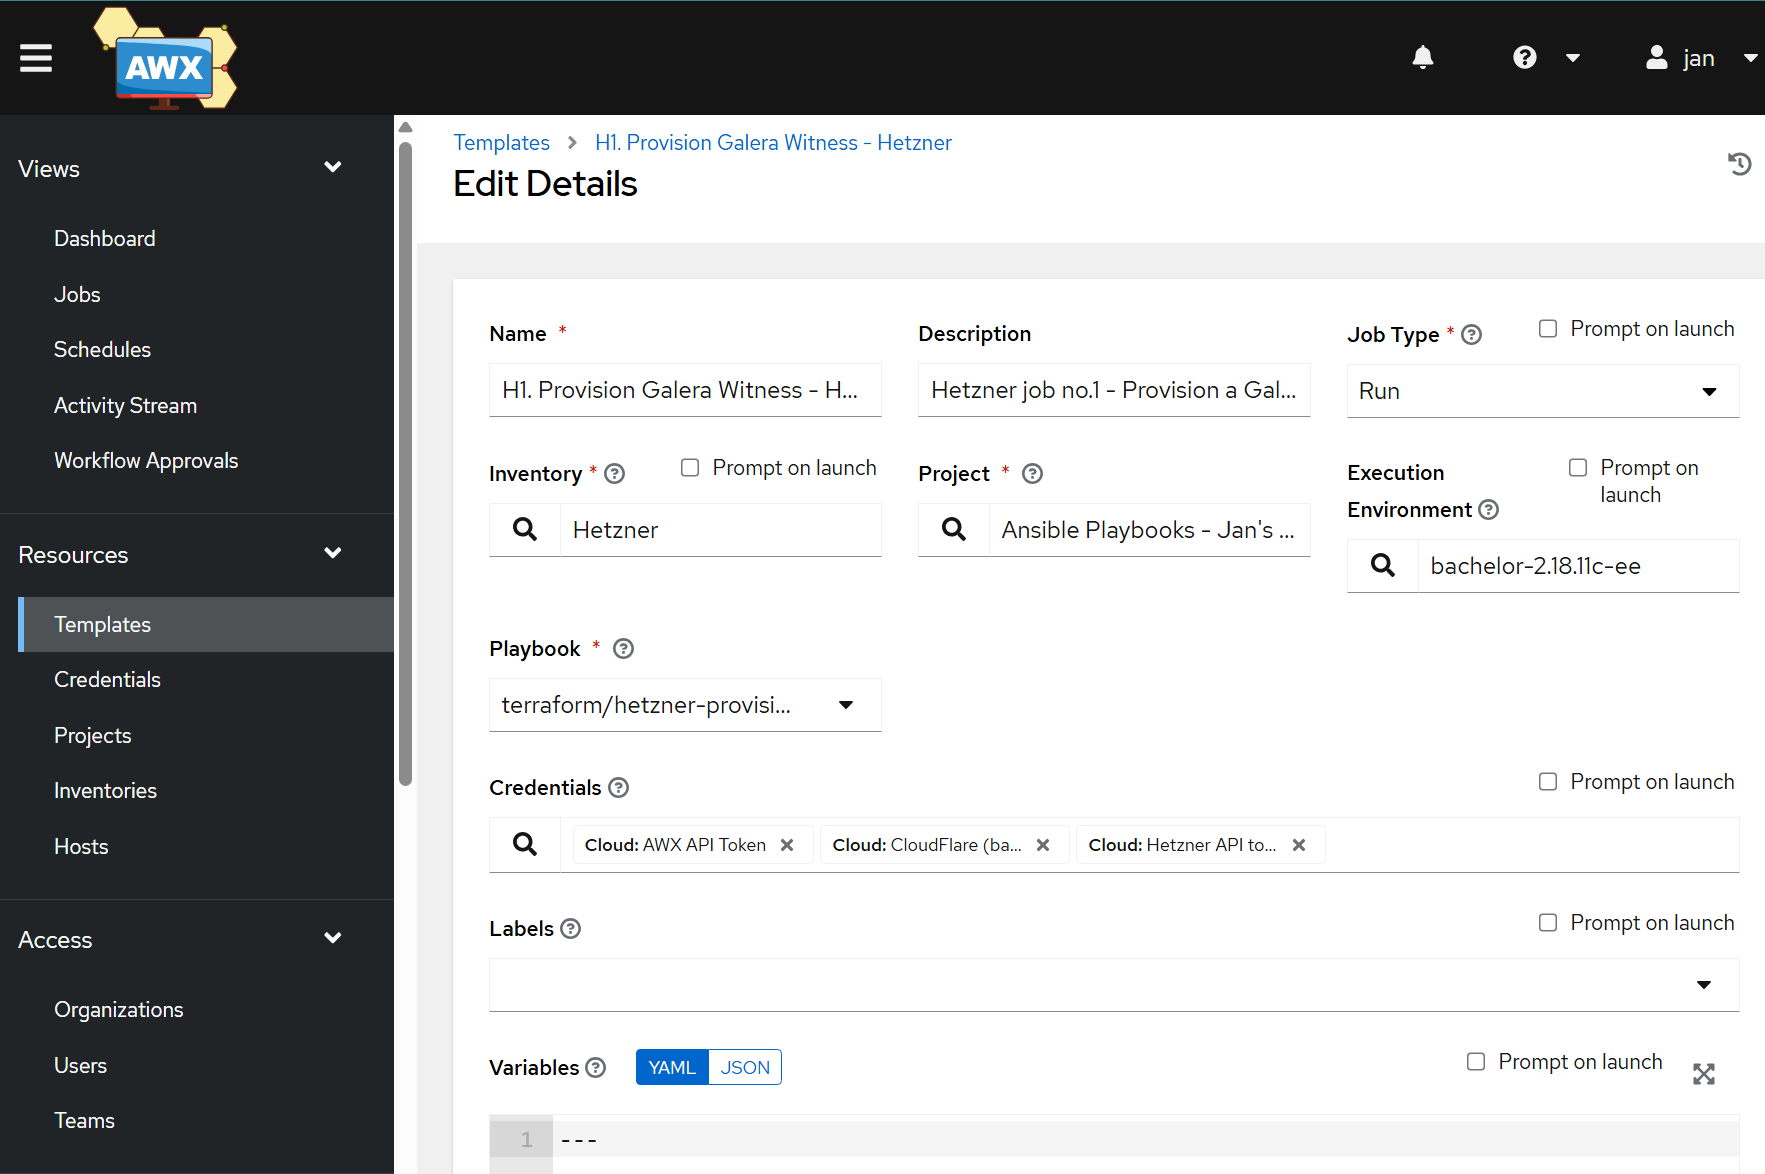
- Name:
H1. Provision Galera Witness - Hetzner - Job Type:
Run - Click on the Credentials tab. Add the
AWX API Tokencredential and theHetzner API Tokencredential and theCloudFlare API token(so 3 in total!). - Project: Select your
Gitea - Infrastructureproject. - Playbook:
provision-witness.yml(This should pop up from your Gitea project). - Execution Environment: Select your existing environment (see my previous step-by-step guide on how to create one – you will need modules like
community.generalfor Terraform to work). - Inventory: Select the
localhostitem we created earlier. - Click Save and Launch it.
- It’s such a nice feeling to see the automation works for you!

- The output of from the template log running – what we see in there:
- The IP address was provided.
- The VPS was added into inventory.

- Now ,check the inventory in AWX!

Troubleshooting the 1st template
Lots of things can go wrong, starting from little YAML-related syntax mistakes to certain commands not working on your distro or version of choice.
- Lots of things can go wrong, starting from little YAML-related syntax mistakes to certain commands not working on your distro or version of choice.
- Potential issues before the VPS is created:
- Missing
community.generalin your EE → cannot call Terraform - Missing
hetzner.hcloudin your EE → cannot interface with Hetzner - Missing
ansible_connection: localin your localhost host results in errors related to the inability to match a host - Your cloud-config file (
provision-witness-hetzner.yml) does not start with the#cloud-configline on the first line, making it non-recognizable when executed on the VPS. - Cloud init script issues → one part completes and the rest does not – check the logs above in detail.
- Firewall rules in Hetzner do not get created → check the syntax against the official TF Hetzner documentation in case there have been changes.
- Re-running the template fails – have you manually removed both the VPS and the firewall rules in Hetzner?
- Or the other way – if you get
Error: name is already used (uniqueness_error, 97cc8f7bf626fbe0084738ed7d6b0cdd) with hcloud_firewall.witness_fw, it means that you are running the job again, removed the VPS but forgot to remove the firewall rule in Hetzner. - during re-creation of the VPS, you forgot to remove the firewall rules, making the job fail.
- Unable to find your host or script – ensure that you have synced your project playbook (synced from Gitea).
- MariaDB repo issues – check the newest version for your distro on MariaDB’s mirror.
- Firewall-related errors – such as when you enter a hostname and only IP addresses are accepted.
- Missing
- Some challenges you may run after the VPS creation:
- Whatever error you may experience once the VPS is created, you can find it in one of the two log files called
cloud-init.logandcloud-init-output.log. Let me know in the comments below if you get stuck or would like to understand what the errors in the logs mean (unless you prefer to use AI to interpret for you!). - To get to those logs, open your respective project in Hetzner and go to the details about your server.
- Go to the Rescue tab and scroll down to click on the ‘Reset Root Password’ button.
- A new root password is generated, save it.
- Use the console button in the top right area to console it. Enter
rootfor the username and manually type in the generated password. You will get into the VPS. Check the following logs:
- Whatever error you may experience once the VPS is created, you can find it in one of the two log files called
# The output from cloud-init (the initial commands)
sudo nano /var/log/cloud-init.log

# The output of the RUN commands
sudo nano /var/log/cloud-init-output.log
So now, since we have our first template running smoothly and can re-create the VPS with a click of a button and save it in our inventory, we can run additional job against it to configure it further. Let’s do that!