How to create High Availability for a Web Server using Syncthing and HAProxy (on OPNSense)
January 14, 2025
Table of Contents
- 1. Introduction
- 2. Clone your only web server VM
- 3. Configure HAProxy with the web server instances
-
4. Set up Syncthing on your existing web server
- What is Syncthing?
- Key Features of Syncthing:
- Major supported platforms include:
- Install Syncthing on each web server
- Configure systemd with Syncthing
- Access Syncthing from your computer
- Connect the headless Syncthing instances & share Content
- Enable the ‘recycle bin’ function for your shared folders
- 5. Troubleshooting Syncthing
- 6. Monitor Syncthing jobs with UptimeKuma
- 7. Run a test with your website
- 8. Alternatives to Syncthing & Wrap Up
1. Introduction
Running a single web server is a gamble. No matter how stable your hardware is, maintenance updates, accidental misconfigurations, or hardware failures can take your site offline instantly. In a professional environment, we solve this with High Availability (HA), running multiple copies of the server so that if one goes down, the others pick up the slack.
Typically, setting up HA for dynamic CMS sites like WordPress is complex because you have to synchronize two things: the database and the files (uploads, plugins, themes, core files).
In this guide, we are tackling the file synchronization and traffic routing aspect. We will transform a standalone Nginx web server into a resilient cluster using Proxmox for virtualization, OPNsense (HAProxy) for load balancing, and Syncthing for real-time, peer-to-peer file replication. By the end of this tutorial, you will have a setup where you can reboot one server while your website stays online, with file uploads syncing between nodes automatically.
Initial situation
- One web server VM running nginx with a PHP module that supports running WordPress sites.
- WP Core files will be managed via another solution (Gitea source version control); we will only tackle the ‘/uploads’ folder.
- VM runs on Debian 12 or 13 and is headless
- You have OPNSense with HAProxy installed as a plugin OR a separate HAProxy server that you know how to handle already (screenshots provided are from OPNSense).
Where are we trying to get
- Have two or more web server VM instances running on preferably different hardware (such as two Proxmox hosts).
- We want to split traffic that reaches HAProxy between the two or more web server instances.
- If a user uploads a file, it will become almost immediately available on the other web server VM(s).
What we will do in a nutshell
- Clone a VM from one Proxmox node to another and change its network configuration on OPNSense.
- Set up HAProxy on OPNSense (new back-end, new front-end, rules, etc.).
- Verify that traffic goes between the nodes correctly while there is no sync between them.
- Set up syncthing on each web server VM to transfer files whenever there is a change. Verify it by uploading a file in WordPress.
- Consider limitations of syncthing to justify using Gitea for WP core files, plugins and themes.
What we are NOT addressing in this article:
- DB high availability - check out my other article on that one.
- The deployment of Gitea for WP core, plugins and themes - a separate tutorial will be needed for this.
- VM web server security hardening / nginx set up - it is assumed you have that handled already.
2. Clone your only web server VM
We need to create an additional web server with the same configuration - the best way is to clone it and reconfigure it. Alternatively, you can set it up from scratch.
Clone & configure your VM with Proxmox
- It is highly recommended to take a backup or a snapshot of your existing web server before proceeding.
- Assuming that you have a Type 1 hypervisor deployed of some kind (Proxmox, VMWare, Hyper-V, Harvester, etc.), start by cloning the VM to your other physical server.

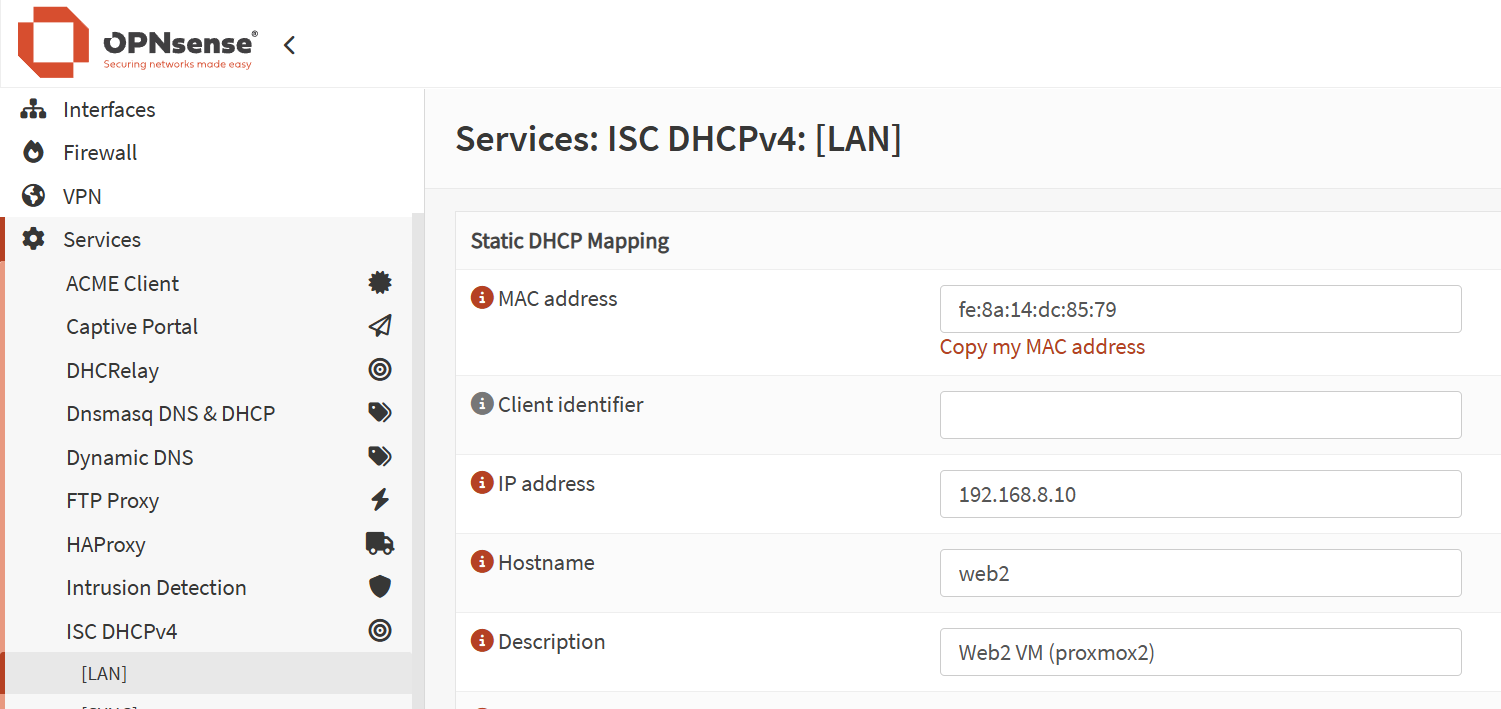
- Once done, do not switch the VM on. Rather, copy paste its MAC address and head over to your DHCP server to assign it another static IP that you will be referring to from now on.
- If you use OPNSense, you will find it under ‘Services’ (based on which DHCP server you use, the older one is called ‘ISC DHCPv4’).
- It is also recommended to add this VM into your Unbound Override to be reachable more easily from other sites (even if you will be setting them up in the future). In OPNSense, go to ‘Services’ → ‘Unbound DNS’ → Overrides and add your new host there.

- You can now safely switch on the VM. The respective services should run on it, although no traffic is served, as HAProxy does not know about it. Then SSH in and let’s change the hostname:
# Replace 'web2' with the hostname you prefer.
hostnamectl set-hostname web2

# Optional: Modify the /etc/hosts file and add a line for both of your web servers
nano /etc/hosts
127.0.1.1       web2.yourdomain.tld       web2
3. Configure HAProxy with the web server instances
Now we have two (or more) clones of the web server instance. We can configure HAProxy to route traffic to either instance, such as by using round robin. This is a similar approach to when we configured a Galera cluster in my previous guide.
Current HAProxy setup
- For web traffic to work, it is expected that you already have a back-end pool set up - we will simply need to add your cloned web server into the physical devices and into the back-end pool and configure cookie persistence.
- As a recap, in HAProxy, we distinguish between the following terms:
- Physical server(s) - what port they listen on, what type of service it is
- Back-end pool(s) - which physical server is to be use for this or that back-end
- Condition(s) - e.g. host string bachelor-tech.com
- Rule(s) - e.g. if condition is met, use this back-end
- Public Services / Front-end(s) - that is where rules are matched
Add new web server VM(s) into HAProxy
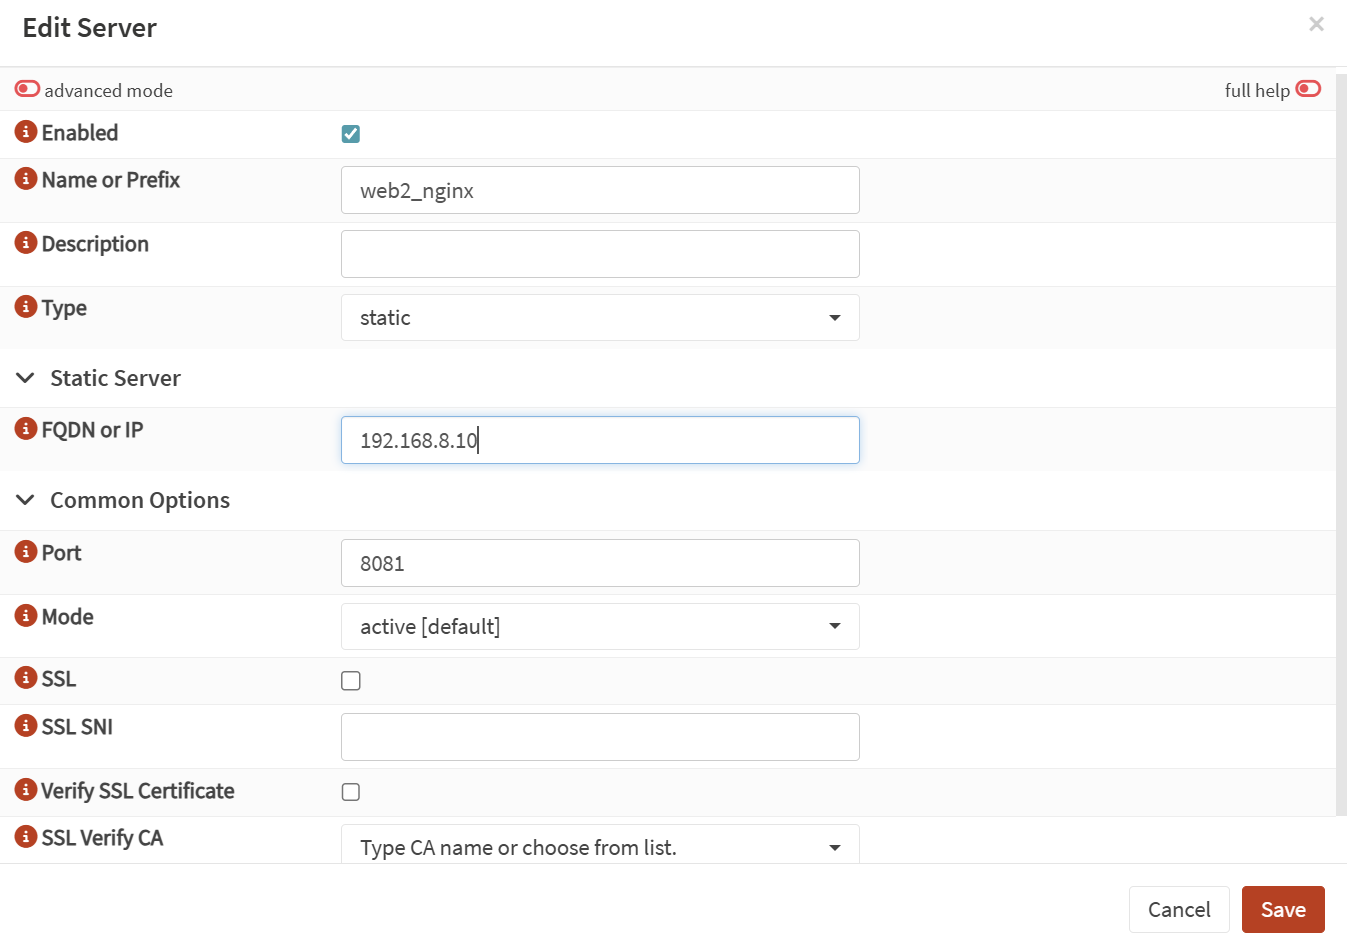
- When running HAProxy on OPNSense as a plugin, you can get the job done via the web GUI. On OPNSense, go to ‘Services’ → ‘HAProxy’ → ‘Settings’ and click on the ‘Real Servers’ tab. You can clone an existing one or add a new one for the additional web server VM.
Update your back-end pool
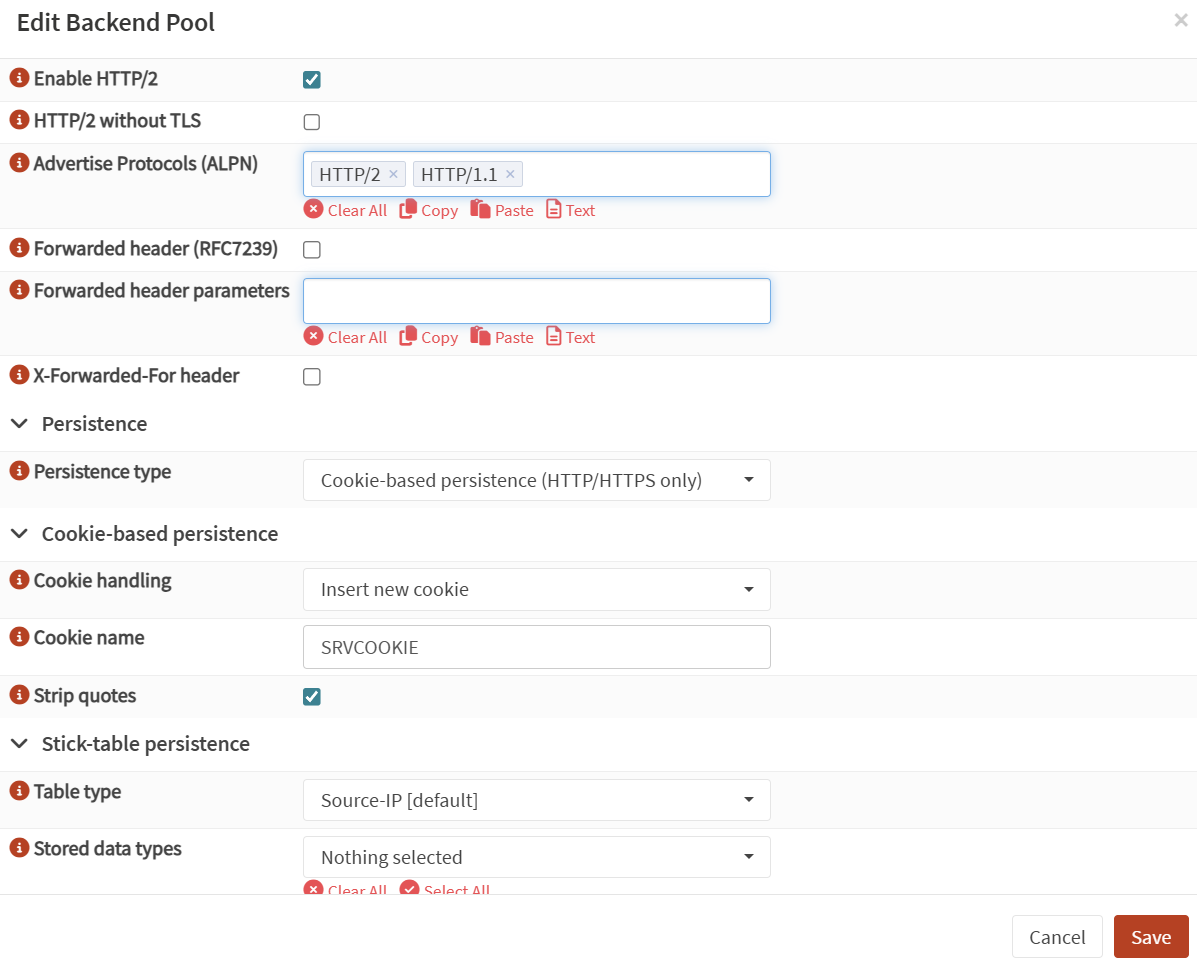
- Add the VM into your back-end pool. From ‘Real Servers’, move to ‘Virtual Services’ → ‘Backend Pools’. Find your existing pool (or create a new one if you are setting up a new web server cluster).

- For session persistence (as uploaded data may take a few seconds to appear on the other web server), we will need to configure
cookie-based persistence, which means that existing connections will be served from the same web server unless that VM becomes unavailable. The rest can be left as default.
Push config from main to backup (OPNSense / pfSync)
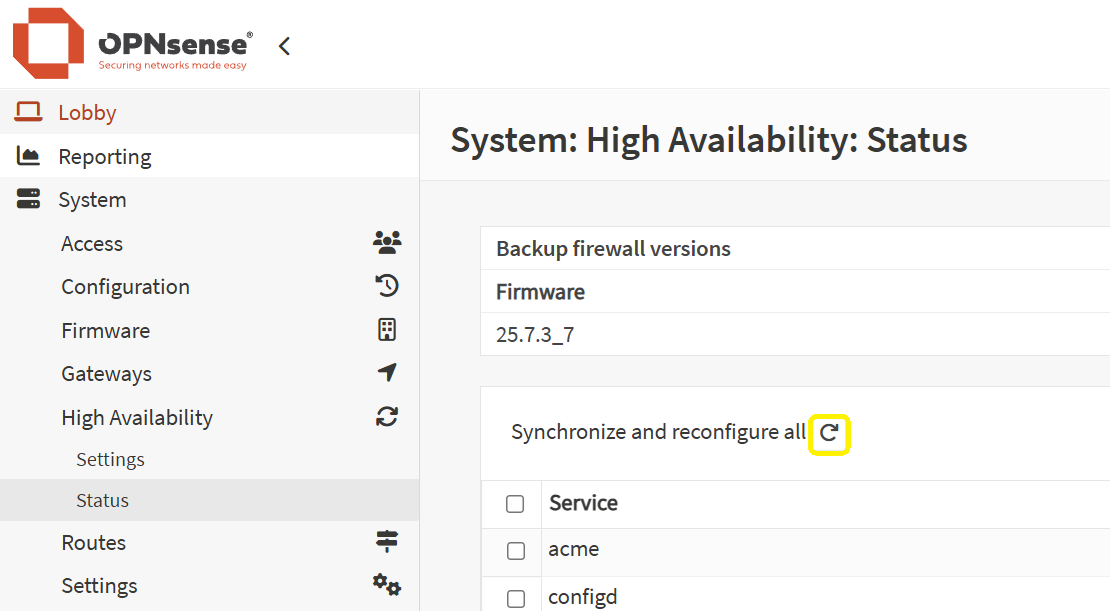
- In case you run your OPNSense or pfSync in a HA cluster, once you are happy with the config, remember to push it from the main node to the backup one(s).
- Go to ‘System’ - ‘High Availability’ - ‘Status’ . Either sync just the services you changed or all of them, as highlighted in the screenshot.
4. Set up Syncthing on your existing web server
Since we have the infrastructure part prepared, we can head over to installing and setting up Syncthing. Before we do that, let’s look into what Syncthing is and what platforms it supports.
What is Syncthing?
- Sources: 1, 2
- It is a free and open-source file synchronization application that allows you to securely sync files between two or more computers in real time. Unlike traditional cloud storage services like Dropbox or Google Drive, Syncthing is a decentralized, peer-to-peer solution. This means your files are stored only on your own devices, and you have complete control over your data.
- At its core, Syncthing works by having a "folder" on one device that you want to keep in sync with a folder on another device. Any changes made to the files in one folder are automatically propagated to the other. This process is secure, with all communication encrypted using TLS
Key Features of Syncthing:
- Decentralized: There is no central server that could be a single point of failure or a target for data breaches.
- Private and Secure: Your data is your data alone. All communication is encrypted, and only explicitly trusted devices can connect to each other.
- Open Source: The source code is publicly available, allowing for transparency and community contributions.
- File Versioning: Syncthing can be configured to keep old versions of files, protecting you from accidental deletions or unwanted changes.
- Web GUI: Configuration and monitoring are done through a simple and powerful web-based graphical user interface.
Major supported platforms include:
- Linux: All major distributions are supported, with dedicated packages for many.
- Windows: A native installer is available for seamless integration.
- macOS: Can be installed via Homebrew or by downloading the binary.
- Android: A dedicated application is available on the Google Play Store and F-Droid.
- BSD: Including FreeBSD, OpenBSD, and NetBSD.
- Solaris: Supported through community contributions.
- NAS Devices: Many Network Attached Storage devices, such as those from Synology and QNAP, can run Syncthing.
Install Syncthing on each web server
- Assuming you are on a headless Debian instance, on Web1 VM, perform the following steps to download and install Syncthing (also as per their documentation):
# In case it is not already installed:
sudo apt install apt-transport-https

sudo mkdir -p /etc/apt/keyrings
sudo curl -L -o /etc/apt/keyrings/syncthing-archive-keyring.gpg https://syncthing.net/release-key.gpg

# Add the "stable-v2" channel to your APT sources:
echo "deb [signed-by=/etc/apt/keyrings/syncthing-archive-keyring.gpg] https://apt.syncthing.net/ syncthing stable-v2" | sudo tee /etc/apt/sources.list.d/syncthing.list

sudo apt-get update
sudo apt-get install syncthing- You need to decide which user will run the Syncthing service:
- Option 1 - the service that your web server (such as nginx) runs as - such as
www-data. Yet this user should not have a login shell available and we would therefore need to at least set up its home directory. We will be going with this option. - Option 2 - run it as your own user (not as root for security reasons).
- Option 1 - the service that your web server (such as nginx) runs as - such as
- Let’s create a custom location for syncthing’s configuration that is reachable by whatever user you decided to run it as:
mkdir /opt/syncthing-config
chown -R username:username /opt
Configure systemd with Syncthing
- Let’s modify the service settings by creating an
override.conffile (to ensure that subsequent updates to the Syncthing app will not erase our settings). This way, we can set up a permanent home folder.
sudo systemctl edit [email protected]

### Editing /etc/systemd/system/[email protected]/override.conf
### Anything between here and the comment below will become the new contents of the file

[Service]
ExecStart=/usr/bin/syncthing serve --home="/opt/syncthing-config" --no-browser --no-restart

### Lines below this comment will be discarded
...

# Save and exit

# Reload the daemon & start it
sudo systemctl daemon-reload
sudo systemctl start [email protected]
# Set the daemon to launch on boot
sudo systemctl enable [email protected]
💡 Note
Note: Some guides will be asking you to modify the config.xml file by changing the address on which the instance runs from localhost (127.0.0.1) to 0.0.0.0. This is NOT desired for our set up when we share files between servers. By making the interface available on the LAN, we open up an attack surface that would otherwise not be there. Yes, this can be mitigated by a firewall service where you whitelist only certain endpoints to have access to it + fail2ban for repeated failed login attempts (if you set up a username/password for the web GUI) + by enabling the web GUI to run on HTTPS only. For long-term usage, do not utilize this shortcut and rather create a tunnel between the instances.
Access Syncthing from your computer
- Now to access the web GUI when you are on a headless machine without exposing the web GUI to the LAN, we can create a secure tunnel between your computer and the web server VM.
- Assuming you are on a Windows machine, open a terminal (PowerShell) window and run the following:
ssh -p <port> -L 9090:localhost:8384 user@ip

# In my case, this was
ssh -p 2222 -L 9090:localhost:8384 [email protected]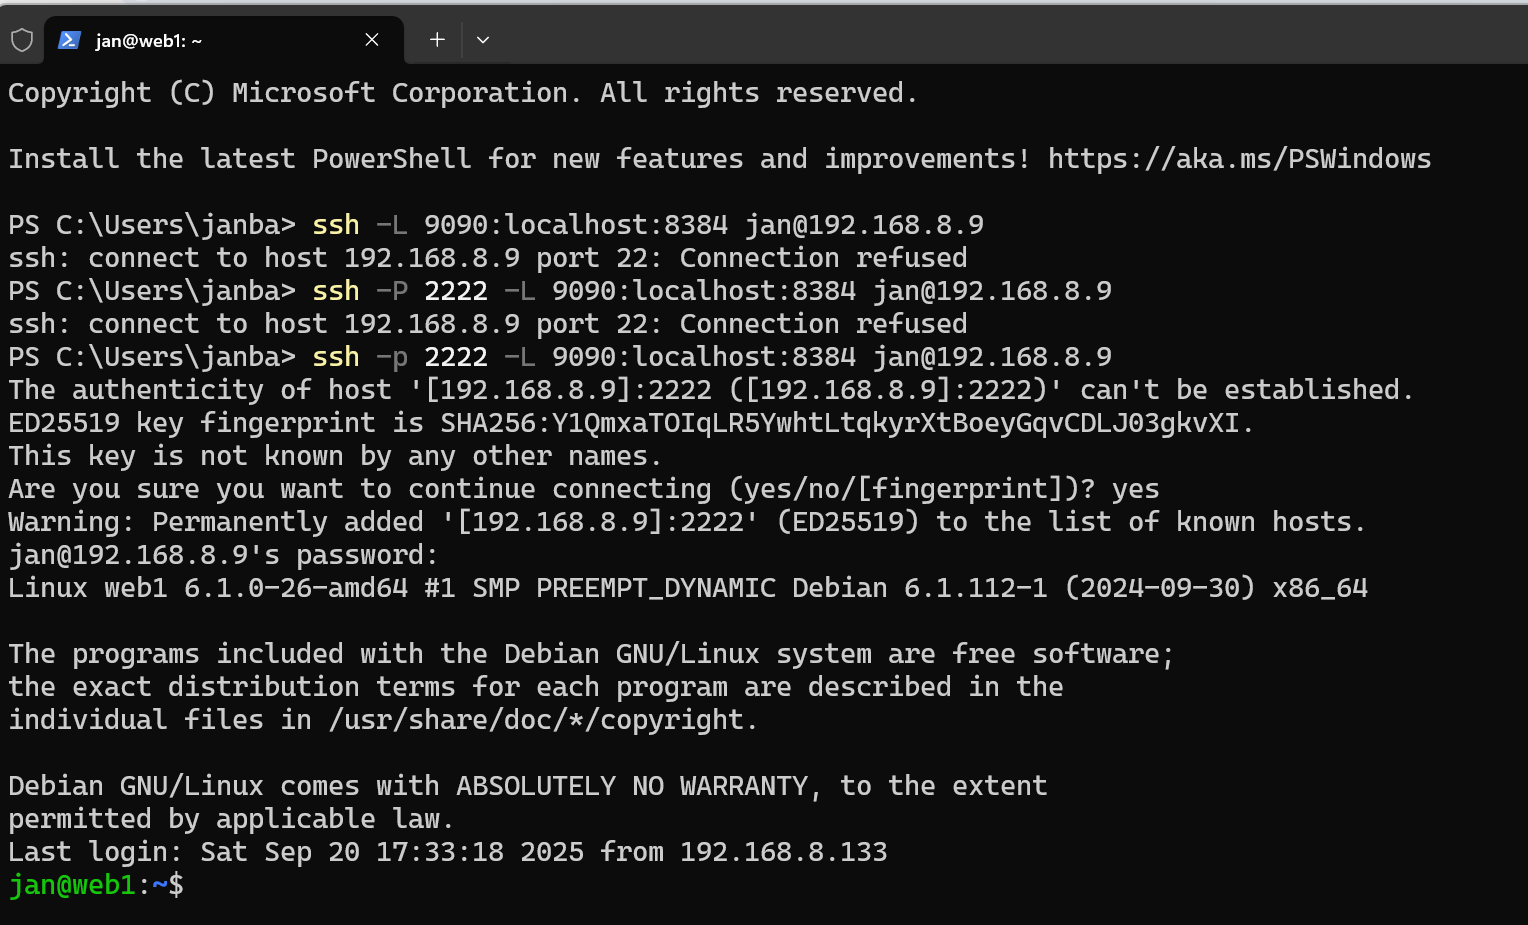
- What we did here was to map the web1’s port 8384 to our own localhost on port 9090. So on your computer, open the web interface and type: http://localhost:9090 .
- Voila! Keep the terminal window open to keep the tunnel operational.

- Now do the same on web2 and any other instances you have, just use another port for your localhost to map into, such as 9091.
Connect the headless Syncthing instances & share Content
-
Assuming that you have created a tunnel for each instances on your non-headless computer, you can now reach the web UI of each instance.
-
On the
web1web UI, go to Actions > Show ID. A long device ID string will be displayed. Copy it. -
On the
web2web UI, click + Add Remote Device on the bottom right. Paste the Device ID fromweb1. Give it a recognizable name, likeweb1. Click Save -
Back on the
web1web UI, you will see a notification banner at the top asking to connect toweb2. Click Add Device to approve the connection. -
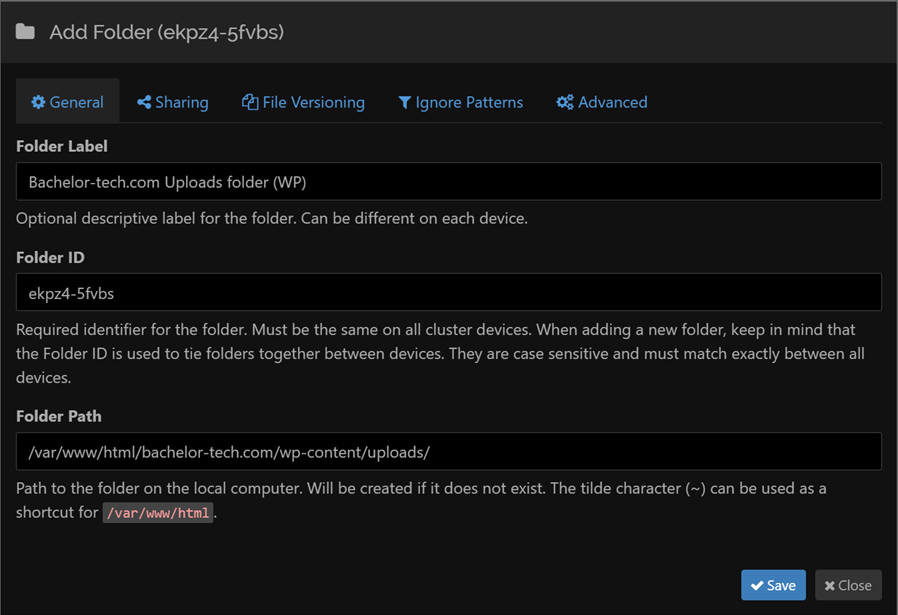
To share a folder - such as the ‘uploads’ folder for WordPress:
- On web1 (for example), click on ‘Add folder’.
- Fill in the folder label (for you to know what it is in the future)
- As ‘Folder Path’, provide the exact full path - ensure that the user you are running it under has read+write access.
💡 Note
Note: If you ever need to change the user under which syncthing runs, follow this order:
Enable the ‘recycle bin’ function for your shared folders
One highly recommended setting to enable is a "bin" for your shared folders. Imagine a WordPress user accidentally deletes an image from the Media Library, or a plugin update goes wrong and wipes a configuration file. Because Syncthing syncs changes instantly, that file will disappear from all web servers simultaneously.
-
To prevent this, we can configure File Versioning.
- Open the Syncthing Web GUI.
- Click Edit on your synchronized folder (e.g.,
wp-content/uploads). - Go to the File Versioning tab.
- Select Trash Can File Versioning.
- Set the number of days (e.g.,
14days).
-
Where do the deleted files go? When a file is deleted on one node, Syncthing on the other nodes won't just permanently delete it. Instead, it moves the file into a hidden folder located at the root of your sync path:
.stversions -
How to recover a file: Since this folder is hidden, you won't see it in a standard file browser. You can access it via the command line to restore lost data. Below is an example:
# Navigate to your sync folder
cd /var/www/html/bachelor-tech.com/wp-content/uploads/.stversions

# List hidden files to confirm the folder exists
ls -la

# Restore it by moving it back one folder above
cp my-deleted-image.jpg ../
5. Troubleshooting Syncthing
There are a few cases when your intervention may be needed over time as your run Syncthing. Let’s take a look at them to be familiar, you can even simulate them before valuable data is synced over.
Issue no.1: Syncthing Data Loss Situation
- Imagine if the folder you sync on the
web2VM gets unexpectedly deleted. What happens? Let’s go through an example scenario - a WordPress instance’s uploads folder is synced betweenweb1andweb2VM. Then the uploads folder onweb2gets deleted. - By default, web1 will keep the data and web2 will stop with an error.

- What we want to prevent is a situation in which Syncthing will think that
web2has the newest version and deletes everything away in the respective folder onweb1(you would achieve that by just creating an empty file called.stfolderin the folder to sync, which makes it feel quite fragile). So here is the safe method:- Pause syncing of this folder on all nodes.
- On the node with the data (e.g.
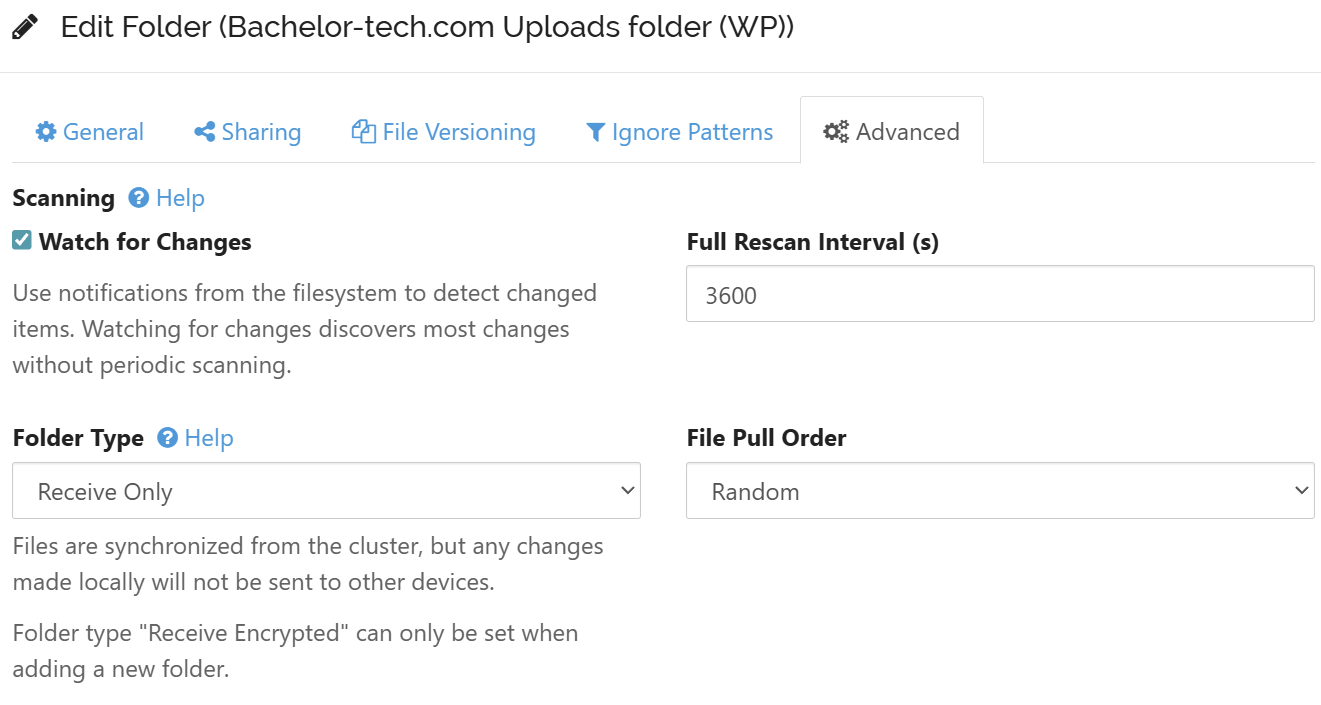
web1), edit the job → Advanced → set it to ‘Send only’. This will prevent it from losing the data.

- On the node with no data (e.g.
web2), edit the job → Advanced → set it to ‘Receive only’. This will make it download the files and no data will be lost.
- On the node with no data, ensure the path exists with the correct permissions, e.g.
# Create the missing folder (if missing):
mkdir /path/to/uploads/.stfolder
# mkdir -p /var/www/html/bachelor-tech.com/wp-content/uploads/.stfolder
- Now you will see an option to ‘Revert local changes’. Click on that.
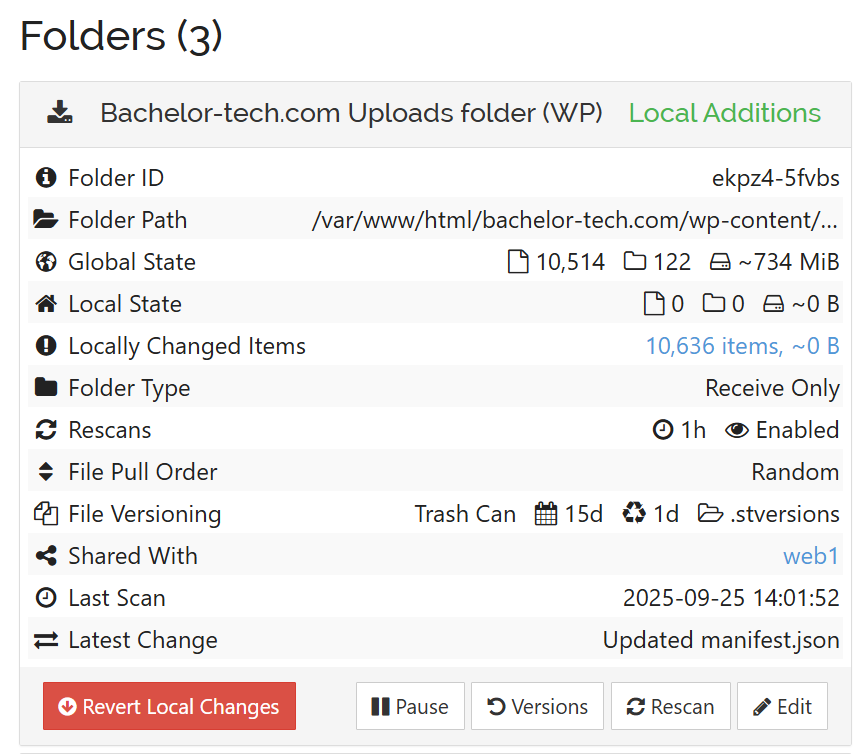
- Un-pause the jobs on all nodes and watch the magic. Then remove the over-riding option, as in the future,
web2may receive data that will need to be synced toweb1.
That is all! Now if you had the web server VM excluded from traffic, such as in HAProxy’s load balancing back-end, then you can add it back. In fact, it may be best to set the newly modified VM as the only VM in the back-end to perform tests to ensure that nothing is missing.
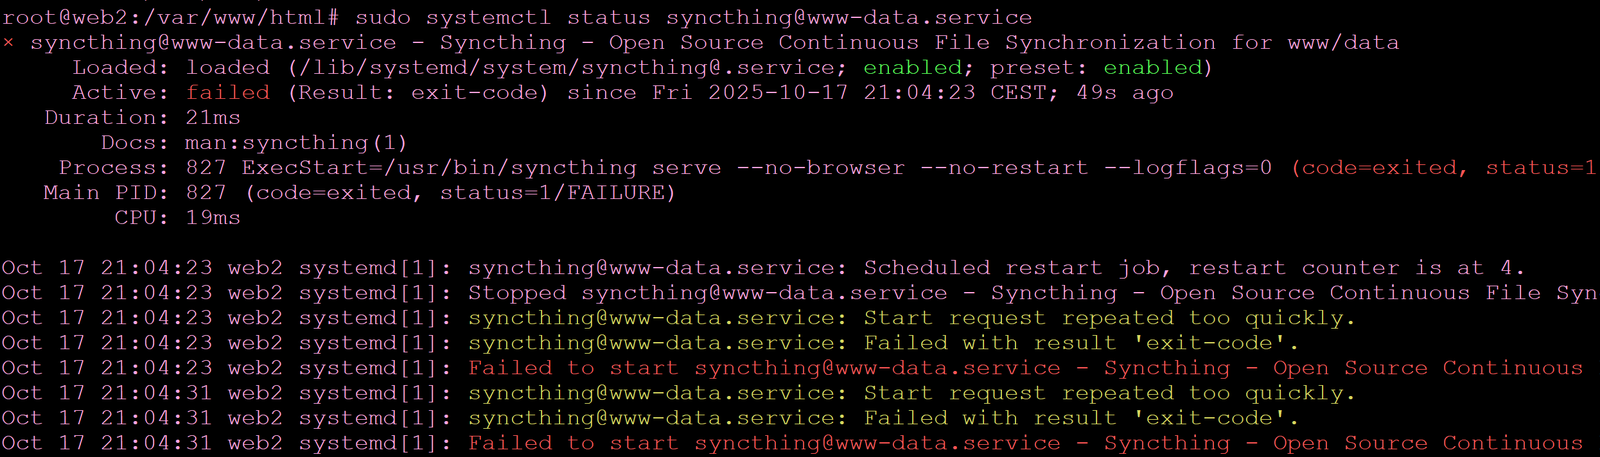
Issue no.2: Service not coming up
- In case you face a situation when the service is not starting, as shown below:
- There are a few things to verify:
- Check the journal in
journalctl -xeu [email protected] - Ensure that a config file is available for this user by running
sudo runuser -u username -- syncthing paths- check that the path exists (you can also move it away for a test that it starts up in case it is invalid).- Verify that the same user has the correct file permissions for these files. cd into the config folder and run sudo
chown -R username:username .→ then restart the syncthing service.
- Verify that the same user has the correct file permissions for these files. cd into the config folder and run sudo
- Check the journal in
Issue no.3: Web server change - preserving the Syncthing ID (identity)
Another situation that may occur is if you need to move away (or re-create) one Syncthing instance on another server. Alternatively, you may get into this situation if you simply moved the service to run under a different user.
- By default, a new installation generates a new Device ID, which means you would have to go to every other node in the cluster to "Remove" the old device and "Add" the new one. To avoid this, you can migrate the identity.
- If you want to use the previous set of keys and you still have access to the previous instance’s config, you will need to locate the encryption keys (
cert.pemandkey.pem). - There are also
https-cert.pemandhttps-key.pem. These only control the SSL certificate for the GUI. You generally don't need to migrate these unless you have a specific reason to preserve the browser trust for the GUI page itself. - These two files mathematically derive the Device ID. If you copy them to the new instance's configuration folder, the new instance will essentially "impersonate" the old one, and your cluster will continue syncing without any configuration changes on the other nodes.
You will need to locate the previous set of keys. Here are some ideas for where to look:
ls -la <one_of_these_below:>
~/.config/syncthing/
~/.local/state/syncthing/
/var/www/html/.local/state/syncthing/ # If this was www-data's default folder- Then you can migrate the identity (mostly the two keys but can also migrate the
config.xmlif it is safe to start):
# Stop the new Syncthing service
sudo systemctl stop [email protected]

# Let's say you want to move them to the /opt/syncthing-config folder
mv old-folder/* /opt/syncthing-config/.

# Fix permissions (for example to the www-data user)
sudo chown www-data:www-data /opt/syncthing-config/cert.pem
sudo chown www-data:www-data /opt/syncthing-config/key.pem
# or just to the whole folder
sudo chown www-data:www-data /opt/syncthing-config/*

# Start the Syncthing instance again
sudo systemctl start [email protected]- Then re-create the tunnel for your computer to verify that the identity was successfully transferred.
6. Monitor Syncthing jobs with UptimeKuma
What we want to prevent is a situation when the sync breaks for any reason and users would be hitting your websites and some of them would not be able to reach or see that background image, cover photo or another resource. For this reason, we need to keep an eye on the sync jobs. In this tutorial, we will cover integrating monitoring with Uptime Kuma.
Monitor all Syncthing jobs per VM on UptimeKuma
Using this approach, we will be able to monitor all sync jobs in one script per a web server VM. This means that if one sync job will be down, the service will be treated as all down, which may not always be the case - just keep it in mind. I can update this guide with how to monitor individual jobs, yet it does get tedious when you have more than two web servers.
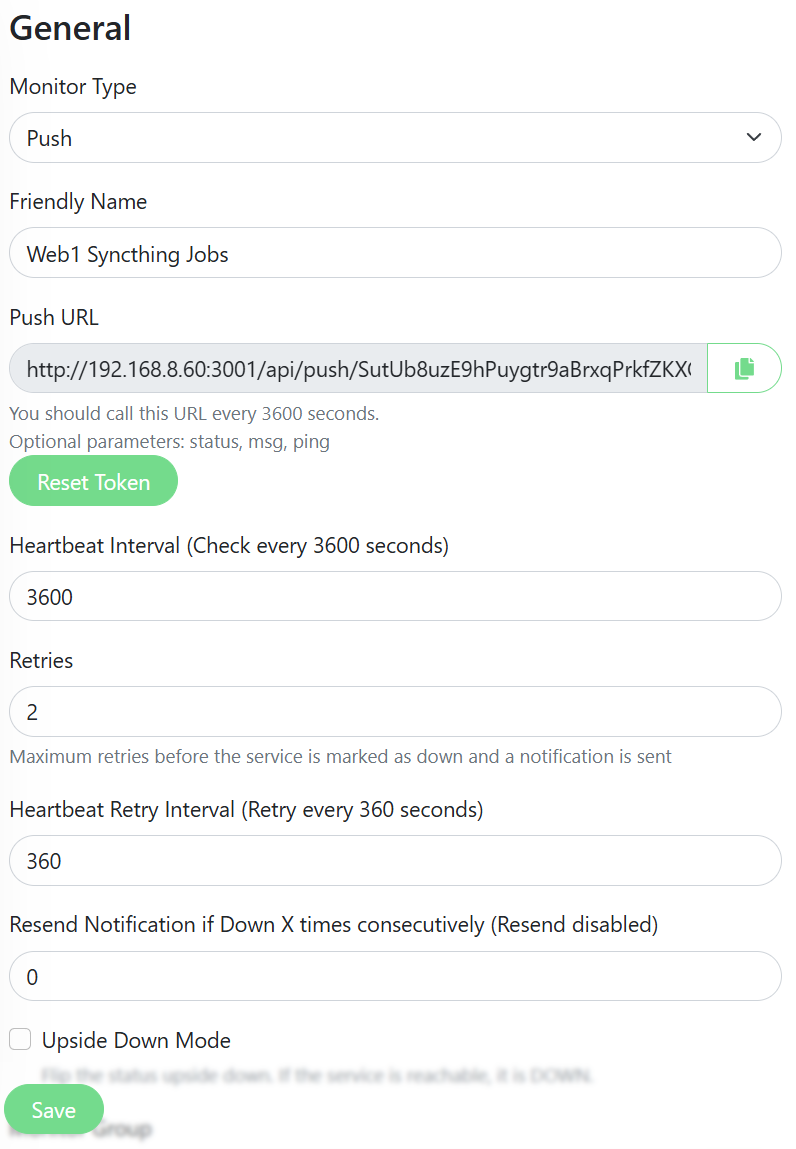
- Log into Uptime Kuma’s dashboard, click on ‘Add New Monitor’ and select the passive ‘Push’ type. Give it a friendly name such as ‘Web1 Syncthing jobs’. Copy the generated Push URL. A job of this type is only needed to run once an hour, so the time can be set to 3600 or higher (unless you sync mission critical sync jobs). Save it.
- Open the Syncthing Web UI, go to ‘Actions’ → ‘Settings’. Select the ‘General’ tab. Note your API key there. If you are on a headless machine and cannot connect easily/directly, you can create a secure tunnel from your device, such as by running
ssh -p 22 -L 9090:localhost:8384[email protected](and then you can reach the web GUI locally onhttp://127.0.0.1:9090).

- SSH into your web server VM. We will use a Bash script for the purpose:
# Install curl and jq in case you don't have them
sudo apt install curl jq -y

# Create a folder under /opt where we will store our future syncthing scripts on this server.
mkdir /opt/syncthing-monitor

# Grant yourself the necessary rights for this folder (replace the username with yours):
sudo chown jan:jan /opt/syncthing-monitor

# Create a script:
nano /opt/syncthing-monitor/syncthing_monitor.sh

# Copy paste the following text and edit it with your API key and URL

#!/bin/bash
# A universal Syncthing monitor script that checks all folders on a host
# and sends a single consolidated status to an Uptime Kuma push monitor.
#
# Used for debugging:
# set -x

# --- Configuration ---
# Your Syncthing instance URL and port.
SYNCTHING_HOST="http://localhost:8384"

# Your Syncthing API Key (found in Actions > Settings > General).
# This key is specific to the server this script runs on.
SYNCTHING_API_KEY="YOUR_API_KEY"
#SYNCTHING_API_KEY="your-syncthing-api-key-here"

# The Uptime Kuma push URL for THIS SERVER's Syncthing instance.
UPTIME_KUMA_PUSH_URL="http://x.x.x.x:3001/api/push/CODE" # Do not include ?status=up&msg=OK&ping=
#UPTIME_KUMA_PUSH_URL="http://192.168.8.60:3001/api/push/your-push-token-here"

# Set to 1 to treat paused folders as 'down', set to 0 to ignore them.
TREAT_PAUSED_AS_DOWN="1"

# --- Full Paths to Commands ---
# Use 'which curl' and 'which jq' on your system to find these paths.
CURL_CMD="/usr/bin/curl"
JQ_CMD="/usr/bin/jq"

# ---------------------
# A short delay to prevent errors if the script starts before the Syncthing
# API is ready after a system reboot.
sleep 15

# --- Functions ---

# Sends a status update (up/down) and a message to the configured Uptime Kuma URL.
# Arguments:
#   $1: status ("up" or "down")
#   $2: message (string)
send_kuma_update() {
    local status="$1"
    local message="$2"
    # The 'curl' command sends the GET request to the Uptime Kuma push URL.
    $CURL_CMD -s --get --connect-timeout 10 \
        --data-urlencode "status=$status" \
        --data-urlencode "msg=$message" \
        "$UPTIME_KUMA_PUSH_URL" > /dev/null
    echo "Sent status '$status' to Uptime Kuma: $message"
}

# Checks the status of a single Syncthing folder.
# This function will ONLY produce output if there is an error.
# Arguments:
#   $1: folder_id
#   $2: folder_label
#   $3: is_paused ("true" or "false")
check_single_folder_status() {
    local folder_id="$1"
    local folder_label="$2"
    local is_paused="$3"

    # First, check the paused state, but only if the configuration flag is enabled.
    if [[ "$TREAT_PAUSED_AS_DOWN" -eq 1 && "$is_paused" == "true" ]]; then
        echo "Warning for folder '$folder_label' (ID: $folder_id): Syncing is paused."
        return
    fi

    # If not paused (or if we're ignoring paused folders), check the sync status for errors.
    local folder_status
    folder_status=$($CURL_CMD -s -H "X-API-Key: $SYNCTHING_API_KEY" -H "Referer: Syncthing" "$SYNCTHING_HOST/rest/db/status?folder=$folder_id")

    # Check if we got a valid JSON response.
    if [[ -n "$folder_status" && "${folder_status:0:1}" == "{" ]]; then
        local folder_state
        folder_state=$(echo "$folder_status" | $JQ_CMD -r '.state // "unknown"')

        if [[ "$folder_state" == "error" ]]; then
            echo "Error on folder '$folder_label' (ID: $folder_id): The folder is in an error state. Check permissions or path."
        fi
    else
        # This handles cases where the API is up but gives a bad response for a folder.
        echo "Warning on folder '$folder_label' (ID: $folder_id): Received empty or invalid API response."
    fi
}

# --- Main Loop ---
echo "Starting universal Syncthing monitor for all folders on this host."

while true; do
    echo "----------------------------------------"
    echo "Performing check at $(date)"

    # First, get the configuration for all folders from the Syncthing API.
    # Use the 'Referer' header to satisfy Syncthing's CSRF protection.
    all_folders_config=$($CURL_CMD -s -H "X-API-Key: $SYNCTHING_API_KEY" -H "Referer: Syncthing" "$SYNCTHING_HOST/rest/config/folders")

    # Check if the API call was successful. If not, the API is likely down.
    if [[ -z "$all_folders_config" || "${all_folders_config:0:1}" != "[" ]]; then
        send_kuma_update "down" "Fatal: Syncthing API cannot be reached or returned invalid data. Is the service running?"
        echo "Error detected. Retrying in 60 seconds."
        sleep 60
        continue # Skips the rest of this loop iteration and tries again.
    fi

    # This variable will store all error messages found during the checks.
    aggregated_errors=""

    # We use a robust for-loop with jq to handle potential spaces in folder labels.
    folder_count=$(echo "$all_folders_config" | $JQ_CMD '. | length')
    for i in $(seq 0 $((folder_count - 1))); do
        # Extract all necessary info for the current folder
        folder_info=$(echo "$all_folders_config" | $JQ_CMD ".[$i]")
        folder_id=$(echo "$folder_info" | $JQ_CMD -r '.id')
        folder_label=$(echo "$folder_info" | $JQ_CMD -r '.label')
        is_paused=$(echo "$folder_info" | $JQ_CMD -r '.paused')

        echo "Checking folder: '$folder_label' ($folder_id)"
        # Run the check for the current folder and capture any error message it produces.
        single_folder_error=$(check_single_folder_status "$folder_id" "$folder_label" "$is_paused")

        # If an error message was returned, append it to our aggregate list.
        if [ -n "$single_folder_error" ]; then
            # Add a newline for nice formatting if we already have other errors.
            if [ -n "$aggregated_errors" ]; then
                aggregated_errors+=$'\n'
            fi
            aggregated_errors+="$single_folder_error"
        fi
    done

    # After checking all folders, decide on the final status.
    if [ -z "$aggregated_errors" ]; then
        # If the error string is empty, everything is OK.
        send_kuma_update "up" "All Syncthing folders are syncing OK."
        echo "All checks passed. Next check in 1 hour."
        sleep 3600
    else
        # If we have errors, send a 'down' status with the detailed messages.
        send_kuma_update "down" "$aggregated_errors"
        echo "Error(s) detected. Retrying in 60 seconds."
        echo "--- ERRORS ---"
        echo -e "$aggregated_errors" # -e interprets the newlines correctly
        echo "--------------"
        sleep 360
    fi
done
- Run the bash script, you should ideally see a positive response.

- Then check if Uptime Kuma registered it.

- You can then simulate an error by changing the folder ID in the script to something that does not exist, re-run the bash script and check the error in Kuma 😇
Set up local logging on each web server for Syncthing's monitor
- Now what we want is more robust logging and to set this up as a daemon (service) that starts during the VM’s boot. Let’s start with the service part.
# Make your script executable:
chmod +x /opt/syncthing-monitor/syncthing_monitor.sh

# Let's create a log file and give it the necessary permissions:
# Change your username as you need.
sudo touch /var/log/syncthing_monitor.sh.log
sudo chown jan:jan /var/log/syncthing_monitor.sh.log

# Create a service file name, ideally with a similar name to your script.
# Replace YOUR_USERNAME with yours and ensure the file names match.
sudo nano /etc/systemd/system/syncthing_kuma_monitor.sh.service

[Unit]
Description=Syncthing to Uptime Kuma Monitor
After=network.target

[Service]
User=YOUR_USERNAME
# Make sure this path is correct
ExecStart=sh -c '/opt/syncthing-monitor/syncthing_monitor.sh >> /var/log/syncthing_monitor.sh.log 2>&1'
Restart=always
RestartSec=15

[Install]
WantedBy=multi-user.target- Then refresh the daemon service and enable it.
sudo systemctl daemon-reload
sudo systemctl start syncthing_kuma_monitor.sh.service
sudo systemctl status syncthing_kuma_monitor.sh.service

# If the above goes well, then enable it after boot.
sudo systemctl enable syncthing_kuma_monitor.sh.service- Now regarding the log file, it will be stored under
/var/log/syncthing_monitor.sh.log. In case nothing is saved in there, make sure that:- Your
ExecStart=line starts withsh -c ‘file1 >> file2 2<&1’, as otherwise it sees it as three separate, plain-text arguments to pass to the script. It doesn't understand that>>is a special instruction for redirecting output. By encapsulating it this way, the ExecStart parameter passes the entire string inside the quotes (-c '...') as an argument to theshcommand. - Your user has access to it (without using sudo).
- The .service file points to it correctly.
- There are no ‘invisible lines in your script. You can fix those by running
sudo apt install dos2unixand thendos2unix /opt/syncthing-monitor/syncthing_kuma_your_script.sh.
- Your
Configure logrotate for our Syncthing monitor script
- To ensure that the log file does not get too huge over time, let’s use
logrotateto tackle it. This configuration will rotate the log weekly, keep 4 old compressed logs, and ensure the new log file is created with the correct permissions for your script to write to it.
sudo nano /etc/logrotate.d/syncthing_kuma_monitor

# Replace the username at the end with yours.

/var/log/syncthing_monitor.sh.log
{
    weekly
    missingok
    rotate 4
    compress
    notifempty
    create 0644 **jan jan**
}- Run a dry-run test. The output should indicate that the ‘log does not need rotating (log has already been rotated)’. There is no need to further reload/restart the logrotate service.
sudo logrotate -d /etc/logrotate.d/syncthing_kuma_monitor7. Run a test with your website
If the configuration is correct, your OPNSense back-end pool will be responding to incoming requests based on a round robin principle with a sticky cookie, so that your device stays connected to the single web server. How can you know which host you have reached?
- Here is how you can set up
X-Served-Byheader in nginx:
nano /etc/nginx/nginx.conf

# Find the http section and add it somewhere in there:

http {

# Include web VM hostname (added for debugging)
add_header X-Served-By $hostname;

..

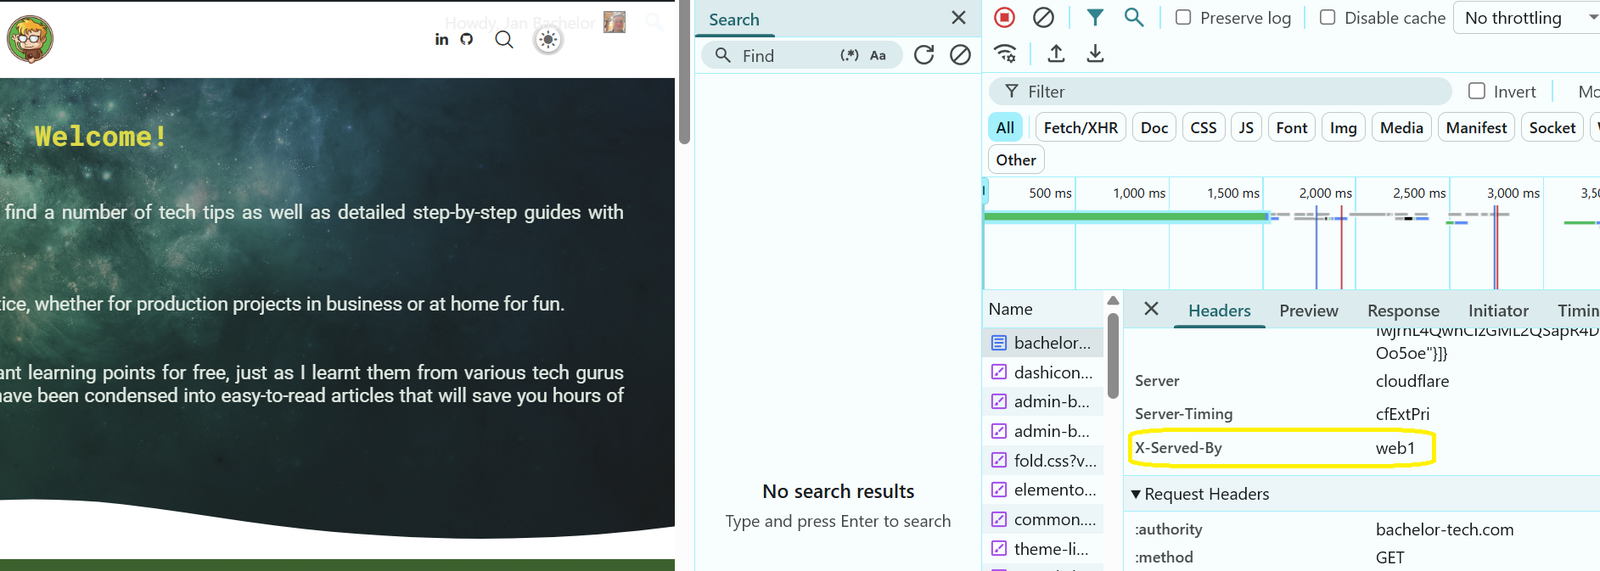
}- Access one of your self-hosted websites and identify the header.
- Activate the developer tools (
F12on Windows/Linux orOption + ⌘ + Jon a Mac) - Go to Network → find the first item in the list → Headers
- Scroll down in the headers to find the ‘X-Served-By’ header.
- Activate the developer tools (
- Try opening another incognito window to reach the other host. Now try uploading content on one host and see if it displays on the other. This could be an attachment, for example. Does it appear on the other host?
- If you cannot reach the other host this way after you have uploaded content to one, you can simply remove the host from the back-end pool to force the other one to be used.
When can this be useful?
- Sync issues - you upload a file and it vanishes upon page refresh - you can check which VM you were on during upload and after refreshing the page - if they differ, this could point to Syncthing not working or not distributing the content fast enough.
- A visitor reports that content loads differently from their end and you want to confirm which web server they are hitting.
8. Alternatives to Syncthing & Wrap Up
Some might argue that since Syncthing is not a filesystem and that the sync is asynchronous, the time required for other web nodes to receive the data may not be acceptable. This could be true for cases with high load or when you cannot utilize the sticky option. What are some other options?
Lsyncd (Live Syncing Daemon)
Originally, I intended to write this guide using lsyncd. It is a lightweight tool that uses the Linux kernel's inotify subsystem to watch for file changes in real-time and immediately triggers rsync to mirror them.
- Pros: Extremely efficient for one-way mirroring (Master -> Slaves). It is ‘closer to real-time’ than a scheduled cron job or
rsyncalone. - Cons: The project is currently in maintenance mode (fewer updates). It is strictly command-line based and can be harder to troubleshoot if the sync gets stuck. It also lacks the robust multi-master conflict resolution that Syncthing handles natively.
Distributed Filesystems (GlusterFS / Ceph)
Critics might argue that because Syncthing is asynchronous (meaning there is a slight delay before file XYZ appears on Server B), it isn't ‘true’ High Availability. For mission-critical high-traffic sites, using a distributed filesystem like GlusterFS or Ceph is the industry standard.
- Pros: True synchronous writes. When a file is uploaded, it effectively exists on all nodes instantly. You mount a shared drive (
/mnt/gluster) that all web servers read from simultaneously. - Cons: Significantly higher complexity and maintenance overhead. These systems are sensitive to network latency. While they technically can run over a site-to-site VPN, the performance penalty is usually severe compared to Syncthing, which handles slower WAN links gracefully.
DRBD (Distributed Replicated Block Device)
DRBD operates at the block level, sitting underneath the filesystem. You can think of it as ‘Network RAID 1’, mirroring raw data between two drives over the network.
- Pros: extremely fast and reliable data replication, open source.
- Cons: By default, DRBD is often deployed in Active-Passive mode (only one server can mount the drive at a time). To use it Active-Active (where both web servers write to it), you must use a cluster-aware filesystem like OCFS2 or GFS2. This adds a massive layer of complexity (fencing, quorum, STONITH) that usually requires a dedicated storage engineer to maintain properly.
Conclusion
This tutorial showed you how you can clone your existing single web server and configure it for HA with Syncthing. There are certainly other options, yet whichever option you go for needs to be installed, configured and monitored. With Syncthing, you have a handy GUI that you can reach for a quick overview of each job from the point of view of each node.
What we have not covered in this tutorial is how do you deploy code on each web server node (including updates). For example, if you have a WordPress site and apply plugin, theme and WP core updates, how will it propagate to the other web servers, since Syncthing covers only the wp-content folder? The answer here is not to add the entire virtual host to Syncthing, as that could lead to unexpected behavior and data loss. Rather, we can utilize Gitea for this purpose and pull content to each web server automatically once it is pushed from our testing environment. Let me know in the comments below if you are interested in such a guide 😇
Enjoying this tutorial?
This site is a non-profit project. If it saved you some time, you can support it by getting Jan some coffee.
☕ Buy me a coffee
Comments