While you might have a custom page on your reverse proxy side for when your nodes are down, you may not have one for nginx. Let’s create it.
- Create a custom snippet configuration file that we will then include with our nginx config:
sudo nano /etc/nginx/snippets/custom-error-403.conf

        error_page 403 /custom-403.html;
        location = /custom-403.html {
                allow all;
                root /var/www/html/;
                internal;
                sub_filter 'SERVER_ID' $hostname;  # Replace placeholder with hostname
                sub_filter_once on;
        }
- In the custom 403 error file, we point to the
/var/www/htmlfolder, which is typical for Ubuntu and Debian installations. Some other flavors may use/usr/share/nginx/html. The choice is yours 🙂 - Then let’s create the actual file:
sudo nano /var/www/html/custom-403.html
- The template I downloaded from this source – kudos to dr5hn.
<!DOCTYPE html>
<html lang="en">

<head>
    <meta charset="UTF-8">
    <meta name="viewport" content="width=device-width, initial-scale=1.0">
    <title>403 Forbidden</title>
    <style>
        @import url("<https://fonts.googleapis.com/css?family=Press+Start+2P>");

        html,
        body {
            width: 100%;
            height: 100%;
            margin: 0;
        }

        * {
            font-family: 'Press Start 2P', cursive;
            box-sizing: border-box;
        }

        #app {
            padding: 1rem;
            background: black;
            display: flex;
            height: 100%;
            justify-content: center;
            align-items: center;
            color: #54FE55;
            text-shadow: 0px 0px 10px;
            font-size: 6rem;
            flex-direction: column;
        }
        #app .txt {
            font-size: 1.8rem;
            text-align: center; /* This centers the text content */
            /* Removed justify-content and align-items as they don't apply here */
        }
        @keyframes blink {
            0% {
                opacity: 0;
            }

            49% {
                opacity: 0;
            }

            50% {
                opacity: 1;
            }

            100% {
                opacity: 1;
            }
        }

        .blink {
            animation-name: blink;
            animation-duration: 1s;
            animation-iteration-count: infinite;
        }
    </style>
</head>

<body>
    <div id="app">
        <div>403</div>
        <div class="txt"> Blocked by fail2ban (SERVER_ID)<span class="blink">_</span> </div>
    </div>
</body>

</html>
- Ensure that the html file is accessible to the user that executes nginx – in my case, this was
www-data:
sudo chown www-data:www-data /var/www/html/custom-403.html
- Now you can edit any of the sites where you would like to apply this config (such as in
/etc/nginx/conf.d/vaultwarden.conf) and add a snippet in there:
sudo nano /etc/nginx/conf.d/vaultwarden.conf

# Find the server directive and add the following:
include /etc/nginx/snippets/custom-error-403.conf;
- For completeness, here is the full Nginx Vaultwarden config file:
server {
    # We listen on 80 because HAProxy handles the SSL/HTTPS before it gets here.
    listen 8081;

    # Replace with your actual FQDN
    server_name vault.yourdomain.tld;

    # Handled below by the whitelisting script already - do not duplicate!
    # Replace OPNSense's IP with the actual one to block the right users with fail2ban:
    # set_real_ip_from 192.168.0.0/16; real_ip_header X-Forwarded-For; real_ip_recursive on;

    # Whitelist Cloudflare proxies & internal subnet:
    include /etc/nginx/snippets/trusted-proxies.conf;

    # Find the server directive and add the following:
    include /etc/nginx/snippets/custom-error-403.conf;

    # Block Banned IPs from fail2ban
    include /etc/nginx/blocklist.conf;

    # Allow large attachments (optional, but good for saving PDFs/Images in vault)
    client_max_body_size 128M;

    location / {
        proxy_pass <http://127.0.0.1:8000>;

        # WebSocket support (used by /notifications/hub)
        proxy_http_version 1.1;
        proxy_set_header Upgrade $http_upgrade;
        proxy_set_header Connection "upgrade";

        # Pass headers so Vaultwarden knows the real IP of the user, not just "127.0.0.1"
        proxy_set_header Host $host;
        proxy_set_header X-Real-IP $remote_addr;
        proxy_set_header X-Forwarded-For $proxy_add_x_forwarded_for;
        proxy_set_header X-Forwarded-Proto $scheme;
    }
}
- Then remember to reload the nginx service
sudo nginx -t
sudo systemctl reload nginx
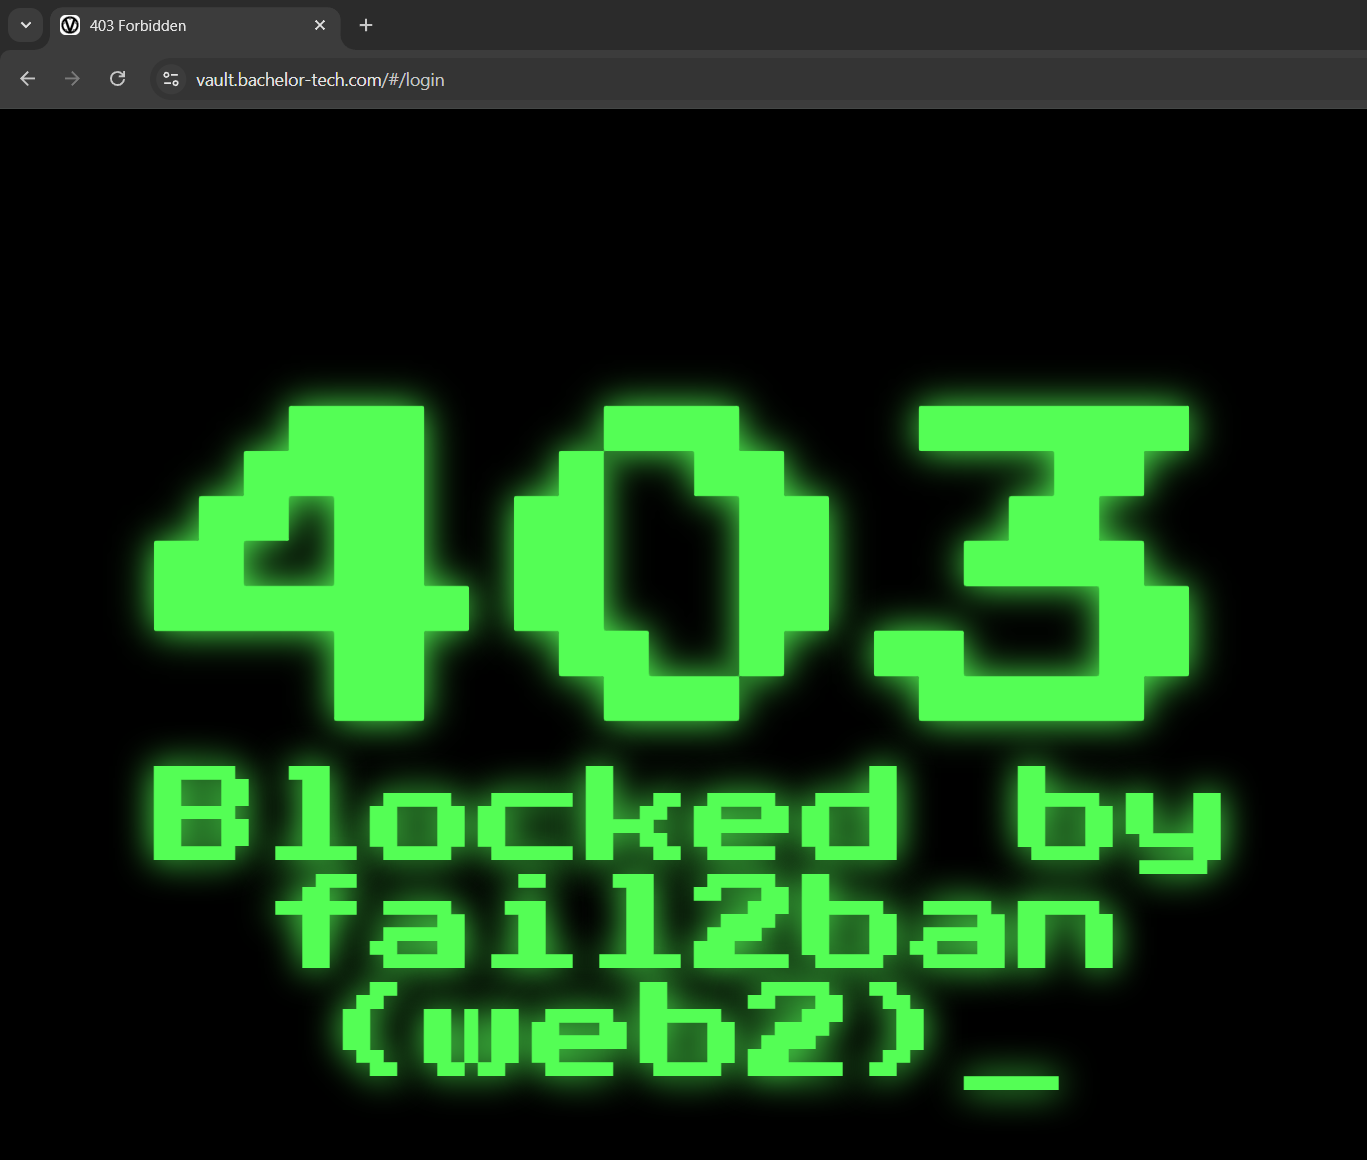
- Run a test (such as by repeatedly failing to log in while on a mobile network). In my case (zoomed in a bit), it looks like this – while indicating which web server blocked it. For production use, you may wish to modify it.
As mentioned before, if you have more nginx servers that you spread the load amongst, you would need to apply these steps on each of them.