There are three types of monitors that would be good to set up. If you only have one site or do not have your ‘witness’ site set up yet, then you can have all these checks running of just one UptimeKuma instance.
Monitor A. Site 3 – Website Uptime
Ths is best done on Site 3 (VPS – witness site), where you can monitor the service as a whole (e.g. does the website load regardless of which site it is being loaded from?).
- Monitor Type:
HTTP(s) - Friendly name:
Vaultwarden or similar - URL: Your actual URL
- Heartbeat: 30-600 seconds (1 to 10 minutes)
- Retries: 1-3
- Heartbeat Retry: a small amount, such as 30-60 seconds

Monitor B. Site 1+2 Docker Container Monitor
For UptimeKuma to see the container, we will need to deploy a Socket Proxy container. The idea is to use the proxy as a ‘gatekeeper’ that provides read-only access to UptimeKuma on a specific port. We will need to apply this on each web server node.
- Create a new folder and a compose file:
# Create a directory for the proxy
sudo mkdir -p /opt/socket-proxy-container

# Go into that directory
cd /opt/socket-proxy-container

# Create the compose file
sudo nano docker-compose.yaml
- Enter the following:
services:
  docker-socket-proxy:
    image: tecnativa/docker-socket-proxy
    container_name: docker-socket-proxy
    restart: unless-stopped
    # High privilege is required to access the raw docker socket
    privileged: true
    ports:
      - "2375:2375"
    volumes:
      # We give it access to the host's docker socket (read-only)
      - /var/run/docker.sock:/var/run/docker.sock:ro
    environment:
      # ENABLE specific read-only permissions
      - CONTAINERS=1 # Allows listing and checking container status
      - INFO=1       # Allows checking general docker info (optional)
      # BLOCK write permissions (security)
      - POST=0       # Blocks any commands that change state (restart/kill/create)
💡 Security Note: The socket proxy exposes read-only Docker API access on port 2375. In a homelab environment on a trusted LAN, this is generally acceptable. For stricter security, bind to a specific IP (
192.168.8.9:2375:2375) or implement firewall rules to allow only your UptimeKuma host on port2375. The most secure method would be to bind it tolocalhost(e.g.127.0.0.1:2375) only and use SSH tunneling, instead.
- Then start the container:
cd /opt/socket-proxy-container
sudo docker compose up -d

# Check that it is running together with the Vaultwarden container:
sudo docker ps -a
- On Site1/Site2 UptimeKuma, add a new monitor:
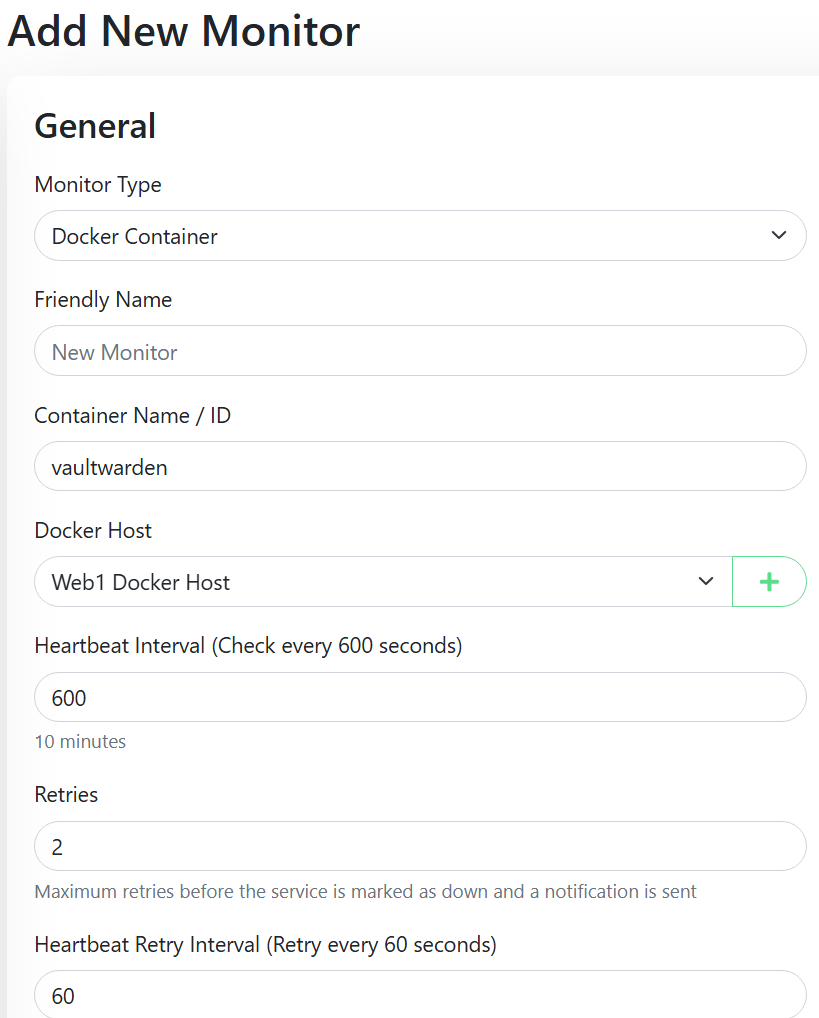
- Monitor Type:
Docker Container - Friendly name:
Web1 - Docker Monitor - Vaultwarden - Container name:
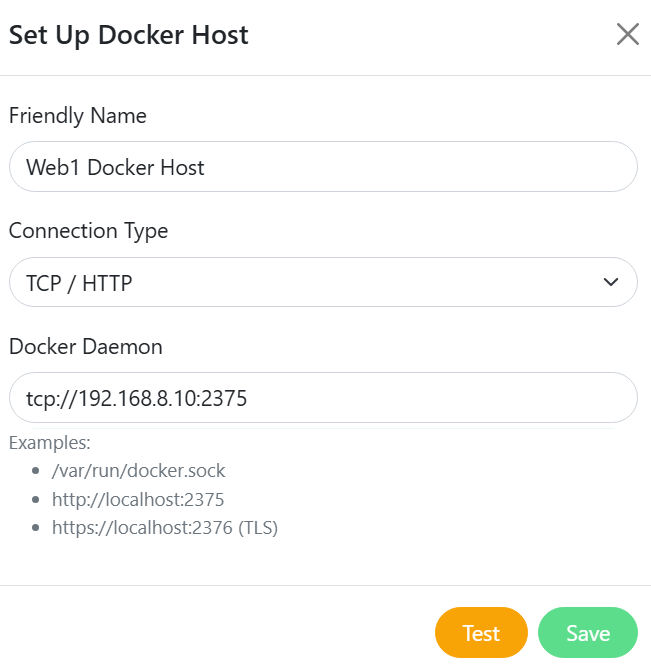
vaultwarden(as per how it’s shown when you rundocker container ps -aon your web server. - Docker host – add a new one:
- Friendly name:
Web1 Docker Host - Connection type:
TCP / HTTP - Docker Daemon:
tcp://192.168.8.9:2375(use your local IP with port 2375)
- Friendly name:
- Monitor Type:
- The overall monitor for
web1may look like this – remember to repeat this for each web server:
Monitor C. Site 1+2 Syncthing Monitor
The other thing that could stop working over time is Syncthing itself. We can leverage Syncthing’s API for that and push information regularly from each web server into UptimeKuma as a passive ‘push’ monitor.
You will get notified whenever ANY of the sync jobs are down or even paused, as per your config settings.
Since I have described this method already in my recent guide, please follow the steps from the the Syncthing Web HA tutorial.