For true High Availability (ideally on each site or at least on the main site), you should run your OPNSense in a master-backup configuration running on separate hardware on the same site.
- You would need to open a port for HTTPS communication and since your OPNSense HA relies on having the web interface running on port 443, you will need to open another port on HAProxy to receive web traffic on (I use port 4443 that the ISP-provided router changes from 443 to 4443). See here for more details on which ports to open for web traffic to work on OPNSense, followed up by NAT rules.
- Create a DNS record for your
vault.yourdomain.tldrecord pointing to the public IP of your OPNSense – you can follow these steps to set up dynamic DNS with Cloudflare.
- If you prefer a more secure set up, you do not actually need to expose a public DNS record, you can simply set one up on your network using tools such as Unbound DNS.
- Before setting up HAProxy, you should also set up an SSL certificate using the ACME plugin in OPNSense.
Add your ‘real’ hosts
In case you do not have it set up yet, apart from defining your web hosts (under the ‘Real Servers’ tab) with the local port (I’m using 8081), we should check the health of each web host.
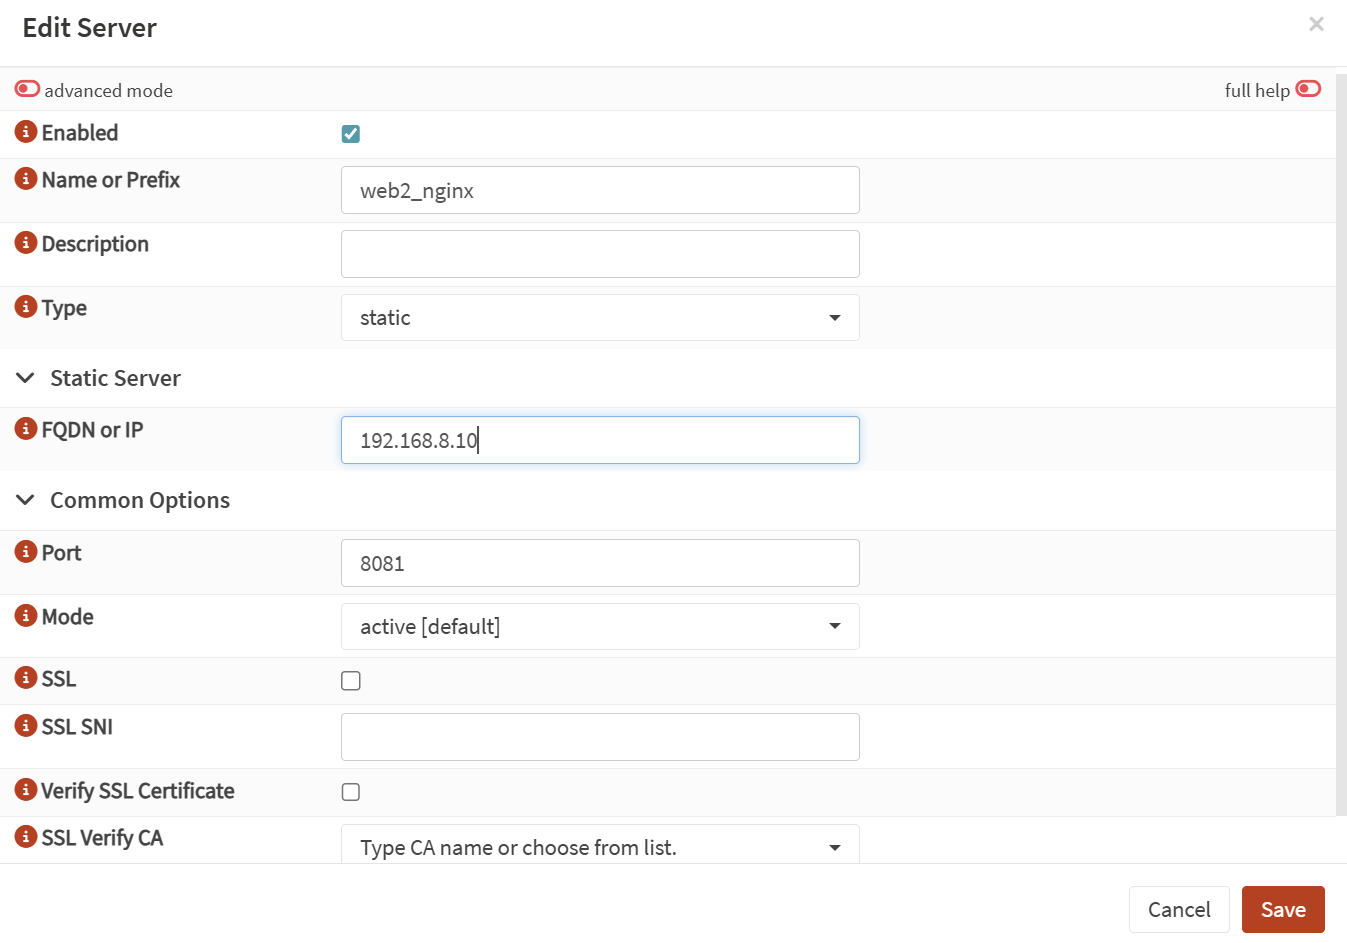
- In OPNSense, go to Services → HAPRoxy → Settings. Then move to the other menu and click on Real Servers → Real Servers. Add a new one for each of your web servers:
- Name:
web1_nginx - Type:
static - IP: your actual IP
- Port: your chosen port configured on nginx, e.g.
8081 - No SSL config here!
- Name:
Set up a health monitor
We should also ensure that there is a health check in place for the web servers.
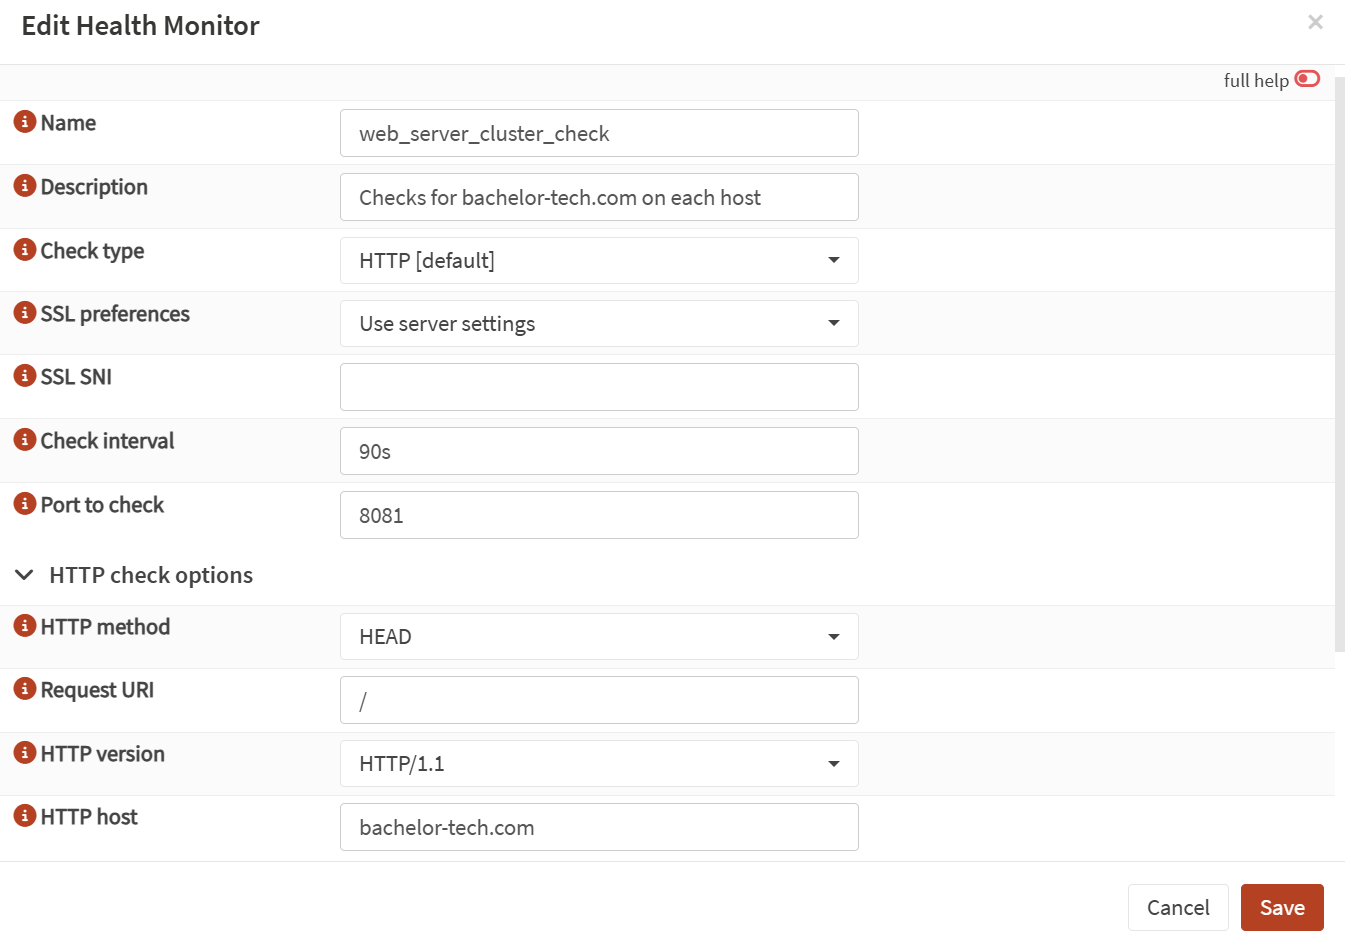
- Go to Rules & Checks → Health Monitors. Add a new monitor:
- Name:
web_server_cluster_check(or whatever you prefer) - Check type:
HTTP (default) - SSL preferences:
use server settings(default) - Check interval:
15-90s(you may get some false positives if too aggressive) - Port to check:
8081 - HTTP method:
HEAD - Request URI:
/ - HTTP version:
HTTP/1.1 - HTTP host:
yourdomain.tld
- Name:
Configure your back-end pool
You may already have a back-end pool configured for your existing web servers, yet we will need to create another pool with the same real hosts in it, since different parameters will need to be set up for Vaultwarden.
💡The challenge with the default session rate period is that it is typically about 10 seconds long as well as no pass-through option is defined, which would result in the client having to re-establish connection with the server (users would see having a ‘Connecting…’ spinning wheel appear regularly). While for example PHP-based applications receive a payload and close the connection after responding, for web sockets, we want the session to remain active.
- Create a new back-end pool as follows (enable the advanced options):
- Name:
backend_vaultwarden_nginx - Mode:
HTTP (Layer 7) - Balancing Algorithm:
Round Robin - Random Draws:
2(entirely up to you) - Proxy Protocol: none
- Servers: add your ‘real’ servers here
- …
- Enable health checking:
Ticked - Health monitor:
web_server_cluster_check(previously defined in the health check section) - Proxy Protocol:
none - Servers: add your web servers
- …
- X-Forwarded-For header:
Ticked - Persistence Type:
Cookie-based persistence - Cookie Handling:
Insert new cookie - Cookie name:
SRVCOOKIE(or another name as you desire) - Strip Quotes:
Ticked(Default) - Expiration Time:
1h(match your tunnel timeout) - …
- Connection Timeout:
5s(fail-over fast if the server is not responding) - Check Timeout:
5s(fail fast if health check fails) - Server Timeout:
3600s(allows the server to keep the pipe open) - Retries:
3(default) - Option pass-through:
timeout tunnel 3600s(tells HAProxy that it is a tunnel) - You can leave the rest as default unless you have other specifics in your set up.
- Name:
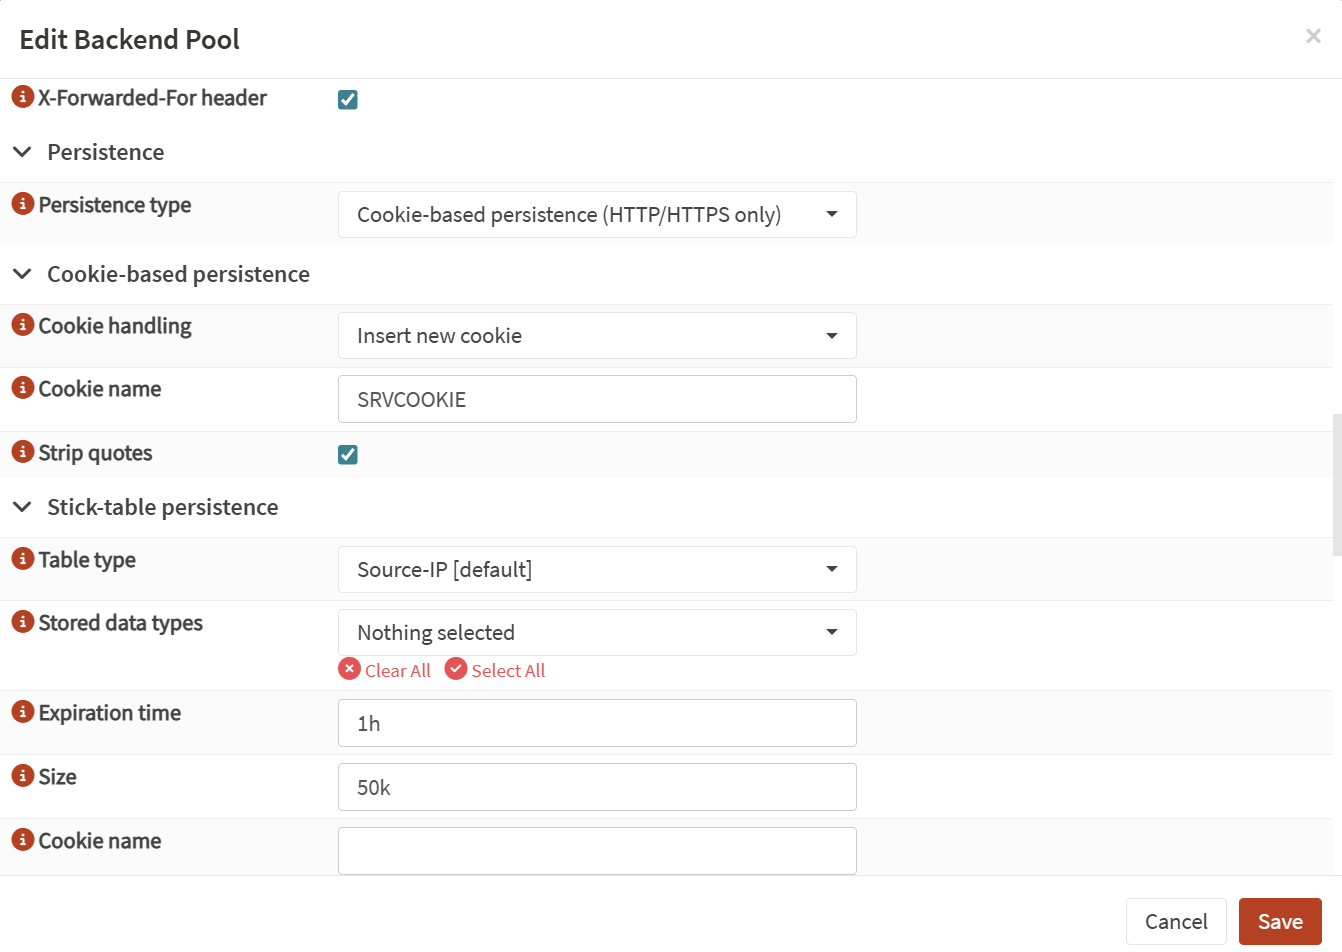
The most crucial part of the back-end pool set up – use a new pool with the existing web servers to configure cookie persistence + x-forwarded-for header + 1h expiration time (then scroll below for the other options mentioned above).
Configure a condition and a rule on HAProxy to listen to
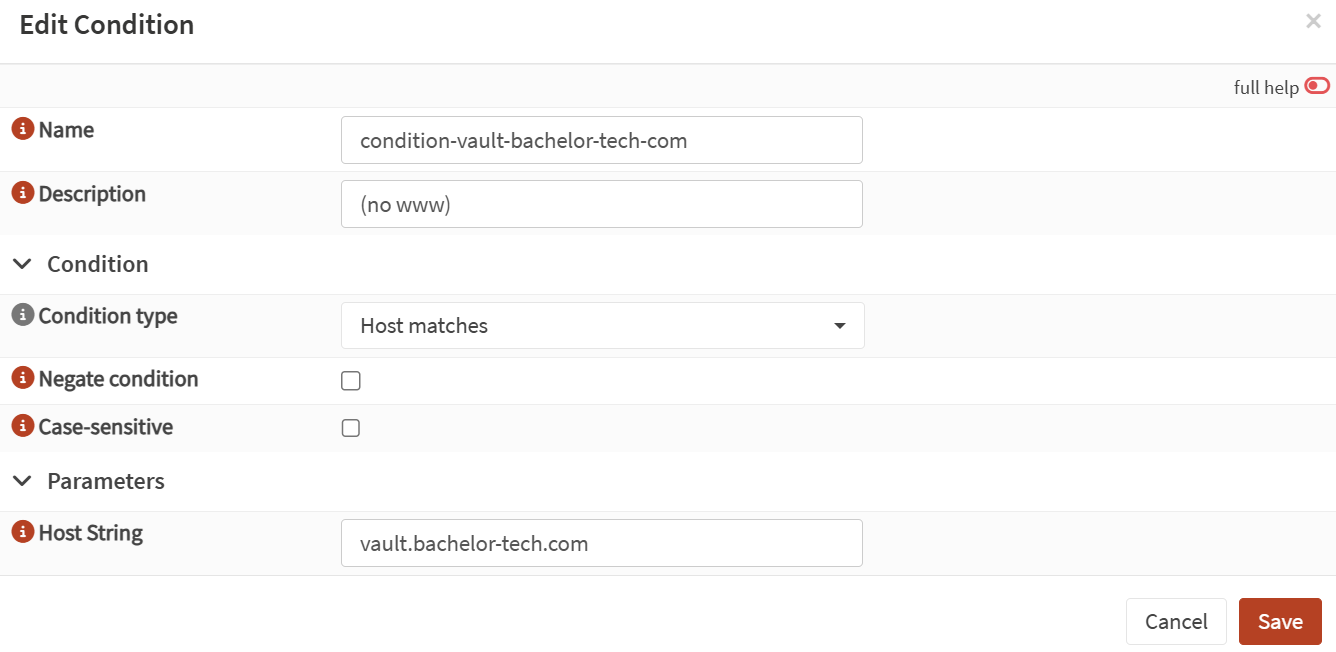
- While still under HAProxy’s settings, go to Rules & Checks → Conditions and add a new condition:
- Name:
condition-vault-your-domain-tld - Condition type:
Host matches - Host string:
vault.yourdomain.tld
- Name:
- And then still under Rules & Checks, go to Rules and add a new rule:
- Name: vault-your-domain-tld_match (do not use spaces)
- Test type:
IF - Select conditions:
condition-your-domain-tld(find your own) - Execute function: Use specified Backend Pool
- Use backend pool:
backend_vaultwarden_nginx(as defined previously)

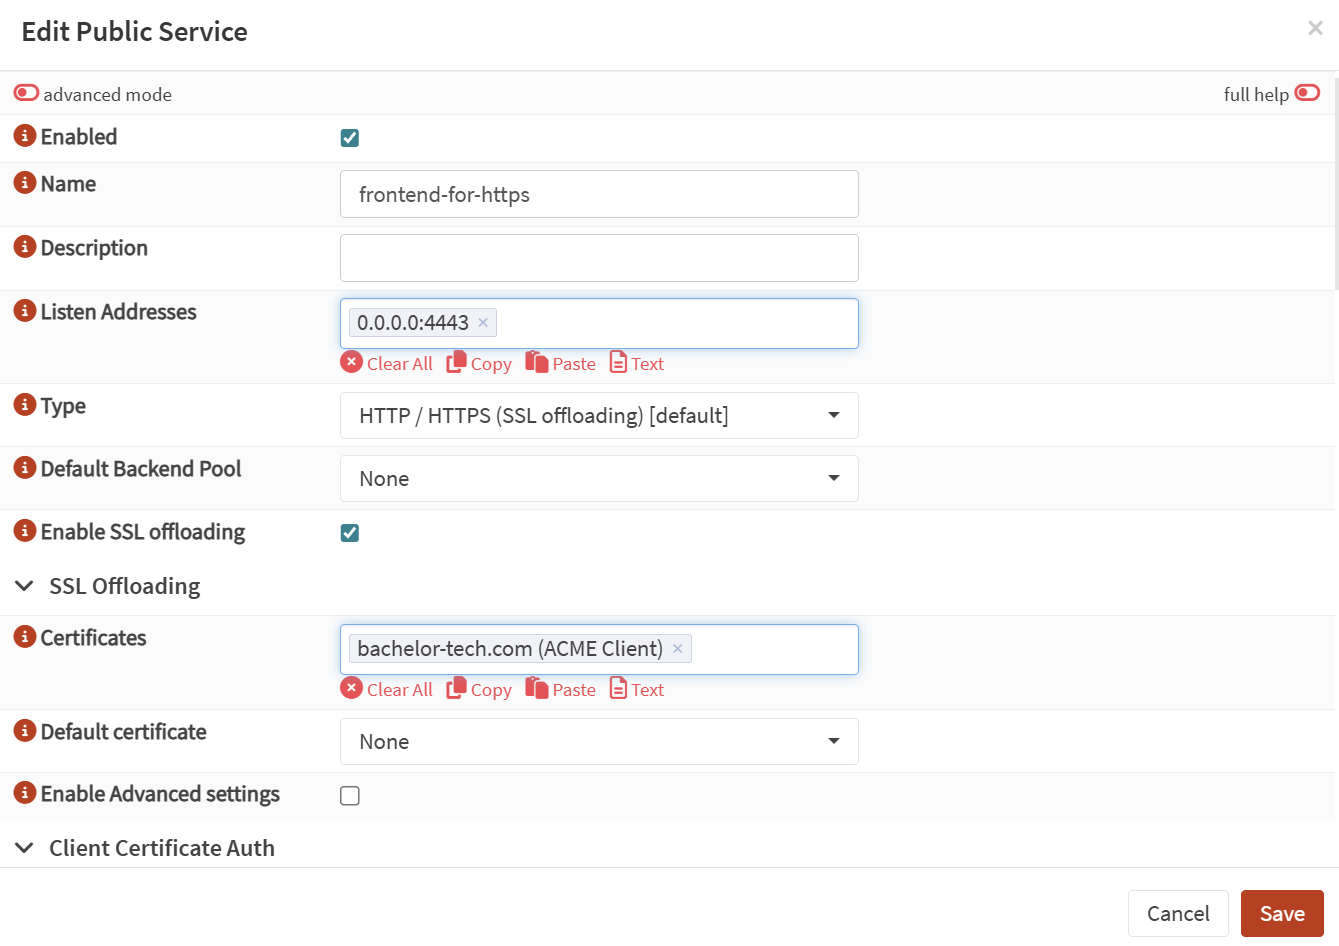
Set up your public (front-end) service
Go to Virtual Services → Public Services. If you already have one defined for HTTPS, then simply add the rule at the end, test & apply the syntax and you are done.
- If you have not set up HTTPS, then create a new one. The key here is to firstly have firewall rules set up to forward traffic to ‘This host’ on a port that HAProxy is listening to (must be different from the web interface that you use to access OPNSense!) and then in the ‘Public Service’ window, tick the ‘
SSL offloading’ box to ensure that traffic is decrypted on your LAN. You would need to use the ACME certificate created earlier.
💡 Ensure that you follow these steps on all of your sites to have the same config and can thus expect consistent behavior.