Change the default SSH port
To modify the default SSH port, edit the following file (do not accidentally swap it with ‘ssh_config’, as that one will not lead to the desired change.
- In the sshd_config, uncomment and change Port from 2222 to 22.
- Equally, uncomment this line:
PermitRootLogin prohibit-password. This will force only the SSH key to be used for a log in if using the root user. - Exit and run the following to restart the service and check that the system is expecting a different port number .
nano /etc/ssh/sshd_config    # In case you do not have sudoers (above) installed, use 'su -' and then run this command without sudo
sudo systemctl restart ssh
ss -tulpn | grep 22        # You should see a line that includes [::]:2222
- The output should be similar to the one following:

- Then try connecting to the container via SSH again. For more information, check out a more comprehensive guide on this topic.
Configure MariaDB Logging
- Even if we launch the mariadb service (daemon), there will be no logs by default, unless we allow them specifically. And we will need them – not just for troubleshooting, but for fail2ban as well.
# Create a folder for logs and set up permissions
mkdir /var/log/mysql
chown mysql:mysql /var/log/mysql
chmod 2750 /var/log/mysql

nano /etc/mysql/mariadb.conf.d/50-server.cnf

# Change the bind adddress from 127.0.0.1
bind-address            = 0.0.0.0

# Un-comment these two lines
general_log_file       = /var/log/mysql/mysql.log
log_error = /var/log/mysql/error.log
- Save an exit and restart the mariadb service:
# Restart the mariadb service
systemctl restart mariadb

# Simulate an error:
mysql -u someuser

# Check that an error was produced - this is important for fail2ban
tail -n 5 /var/log/mysql/error.log
Configure Fail2Ban
Set up fail2ban for repeated failed login attempts (just in case).
- Keep in mind that the fail2ban conf file is located under
/etc/fail2ban/jail.conf– in case you would like to change some values (such as to lower lock out time from 10 mins to 5 mins).
# Create your own jail file
nano /etc/fail2ban/jail.local

# Copy paste the following (adjust as you see fit)
[mariadb]
enabled   = true
port   = 3306
filter = mysqld-auth
logpath   = /var/log/mysql/error.log
findtime  = 3600
maxretry  = 5
bantime   = 360
ignoreip = 127.0.0.1/8 ::1
Just to clarify some of this terminology:
findtime: For how long will login attempts be counted for before it is consider a new session in seconds.maxretry: The number of failed login attempts allowed before banning an IP address.bantime: For how long will that IP address be banned for.ignoreip: To prevent jailing oneself. /8 represents the entire loopback network range, which includes all IP addresses from 127.0.0.1 to 127.255.255.255.
It would be good to verify that it works, as the template will be used for all other instances:
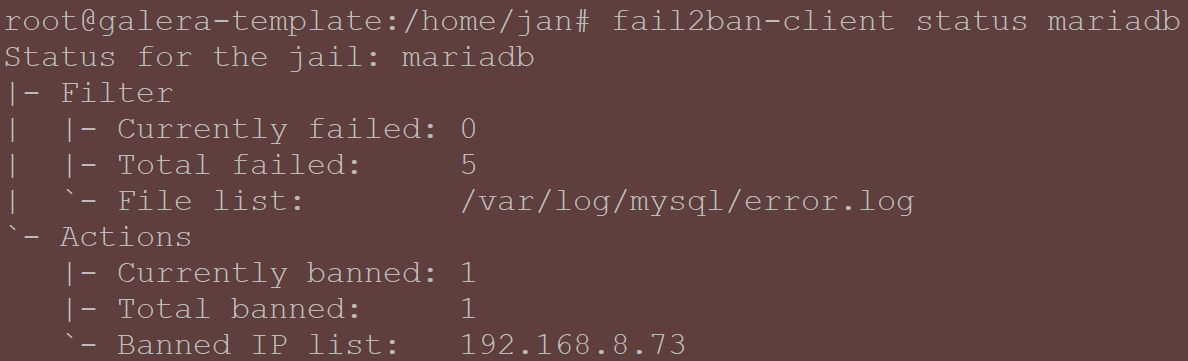
systemctl reload fail2ban
systemctl restart mysql

# Allow temporary access to your instance using user 'root' - the password
mariadb -u root -p

# Replace the IP below with your testing host ip
GRANT ALL PRIVILEGES ON *.* TO 'randomuser'@'192.168.8.73'
  IDENTIFIED BY 'some-long-random-password' WITH GRANT OPTION;
FLUSH PRIVILEGES;
EXIT;

# Now grab another host that has mariadb-client package installed and run a few of these:
mysql -h <your_galera_template_host_ip> -u blablah -plalala

# You should expect an error saying 'Access denied for user ...'

# Now hop on the galera template container and run the following to see the stats:
fail2ban-client status mariadb
In case you hit the limit, the error will change from ‘Access denied for user..’ to ‘Can’t connect to server on…’. That is how you know that machine was banned.
- You can access all banned IP addresses from different monitored services using this command:
fail2ban-client banned - To un-ban an IP address, run the following:
fail2ban-client banned
set mariadb unbanip IP <offending_ip_address>
Lastly, let’s remove that unlimited access from the testing host:
mysql -u root -p

DROP USER 'root'@'192.168.8.73';
FLUSH PRIVILEGES;
EXIT;
Configure ufw (firewall)
Let’s configure allowed ports on the ufw firewall for SSH, rsync, MySQL and deny HTTP/HTTPS, even if your galera nodes will be behind a firewall and a reverse proxy configuration.
ufw allow proto tcp from 192.168.8.0/24 to any port 2222 # Allow comms for SSH from your subnet
ufw allow proto tcp from 192.168.8.0/24 to any port 3306 # Allow HAPRoxy reaching out for health checks + for forwarding traffic
ufw allow proto tcp from 192.168.8.0/24 to any port 4567 # Handles galera replication traffic (TCP)
ufw allow proto udp from 192.168.8.0/24 to any port 4567 # Handles galera replication traffic (UDP)
ufw allow proto tcp from 192.168.8.0/24 to any port 4568 # Used for Incremental State Transfer (IST)
ufw allow proto tcp from 192.168.8.0/24 to any port 4444 # Rsyncd to transfer data fpr SST (mysqldump)
ufw deny http # We are not running a web server here so no need
ufw deny https # Same as above
ufw deny ftp # No FTP server needed here
ufw reload # Reload firewall rules
ufw enable # Enforce the firewall
You may also wish to add rules for your monitoring service, such as Uptime Kuma / Zabbix. While it is out of scope of this article, here are some examples:
ufw allow proto tcp from 192.168.8.0/24 to any port 10050 # Port fox Zabbix no.1
ufw allow proto tcp from 192.168.8.0/24 to any port 10051 # Port fox Zabbix no.2
ufw allow proto tcp from 192.168.8.0/24 to any port 3001 # Port fox UptimeKuma
In case you make a mistake and need to revert it, once ufw is enabled, you can run the following:
# Display all rules by number
ufw status numbered

# See the output of all the rules and choose which one you want to delete. Example:
# ufw delete 1
The end result can be something like this:

MariaDB Secure Installation script
- Let’s run the pre-packaged ‘mariadb-secure-installation’ script from the shell of any of the MariaDB container instances:
- You will be asked to provide the root password
- ‘Switch to unix socket authentication’: Choose ‘n’
- ‘Change the root password?’: change it if it is not already secure / different from the others. Preferably use a long password saved in your trusted password vault.
- ‘Remove anonymous users’: Choose ‘y’
- ‘Disallow root login remotely’: Choose ‘y’
- ‘Remove the test database and access to it’: Choose ‘y’
- ‘Reload privilege tables’: Choose ‘y’
- For more explanation and screenshots of each step, check out Linuxteck’s guide.
Note: In case you are deploying the MariaDB instance as a VM instead of a container, remember to install the qemu agent (not applicable for LXCs).
This concludes are chapter on security hardening. Let’s leave the container and shut it down.
# Leave the container
exit

# Shut the container down (if you are connecting from Proxmox - if not, switch it off from the GUI).
pct stop <CT_ID>