What we want to achieve is to fetch all VMs and containers from our Proxmox host(s) or Proxmox cluster. For that, we will need AWX to connect to Proxmox. Whether it is a cluster (like in the case below) or individual host, an API key in Proxmox is created on the ‘Datacenter’ level. So for a cluster, you create one key in that section and it applies to all your hosts in that cluster.
Add Proxmox API token for auto-discovery
- In your Proxmox UI, go to Datacenter -> Permissions -> Users
- Create a new user such as
ansible@pam. - Then go to Permissions → API Tokens. Click on the Add button, select the
ansible@pamuser, give it an ID (e.g.,awx_token). Do not check “Privilege Separation”. This means that the API key will be treated with the same permissions as we grant to this system user. - Copy the Token ID and the Secret aside for later (I recommend using a password vault such as
Bitwardenor the self-hosted variant calledVaultwarden).- It would be better to isolate them, so that only the API key has this access, but in my experience with Proxmox 8.4, the permissions did not propagate when applied just to the key.
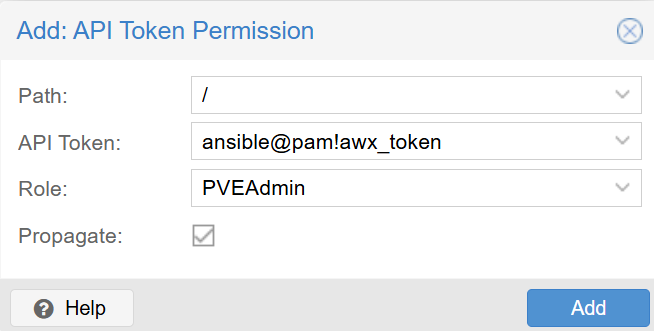
- Now click on just the Permissions section and click on the Add button.
- Path: /
- API token:
ansible@pam!awx_token - Role:
PVEAdmin - Propagate: yes, tick the box
Add the credential into AWX
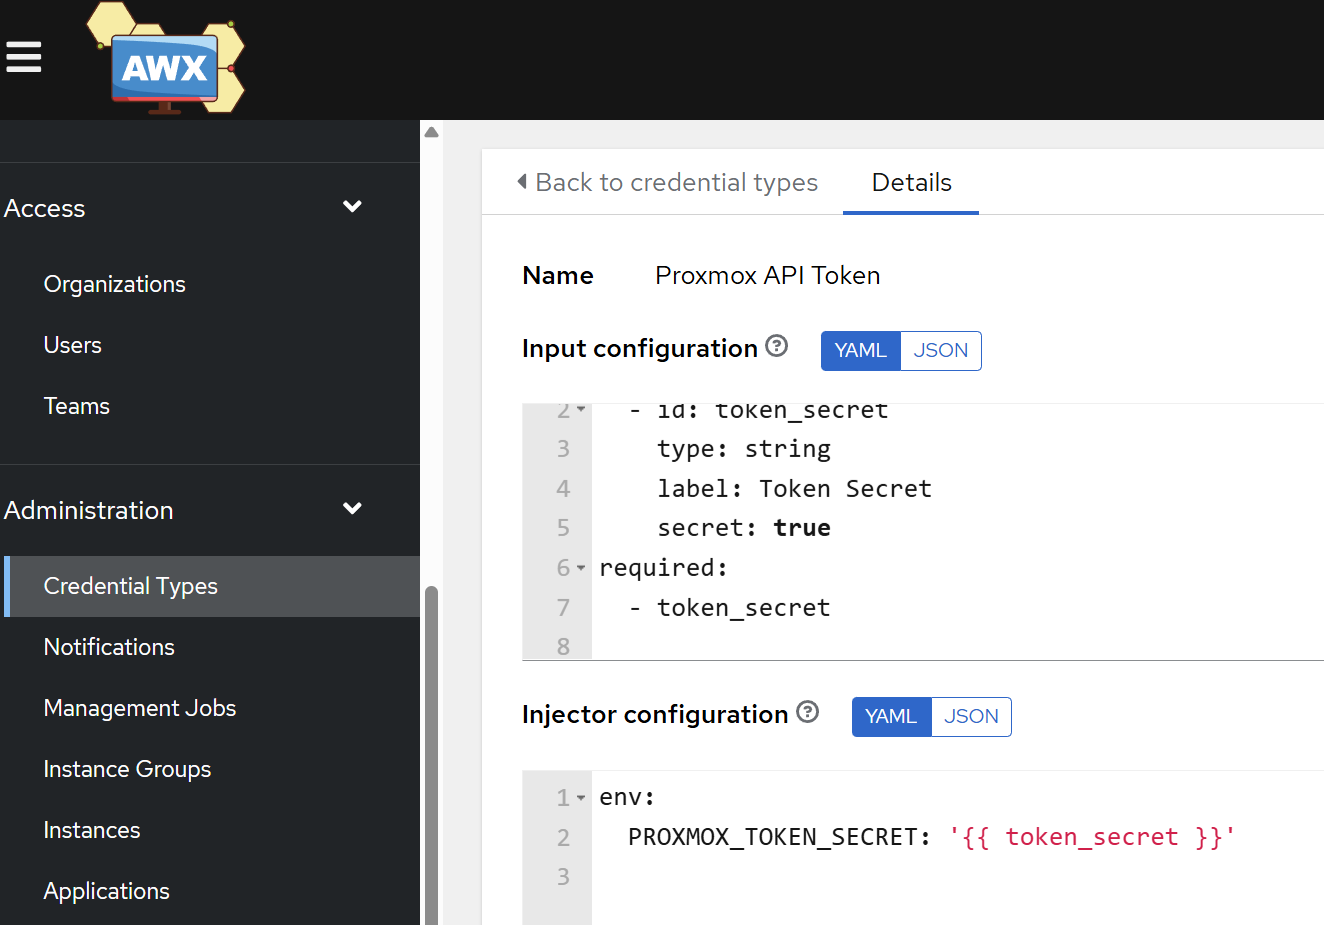
- In AWX, scroll down to Administration → Credential types. Add a new credential.
- In the input configuration add the following:
---
fields:
  - id: token_secret
    type: string
    label: Token Secret
    secret: true
required:
- For injector configuration, use the following:
---
env:
  PROXMOX_TOKEN_SECRET: '{{ token_secret }}'
- By doing so, we now have a type of credential that we can use later in our project. But before we create that, we also need to set up a repo.
Create the Gitea Repo & Files
This tells AWX what to do and which tools to use.
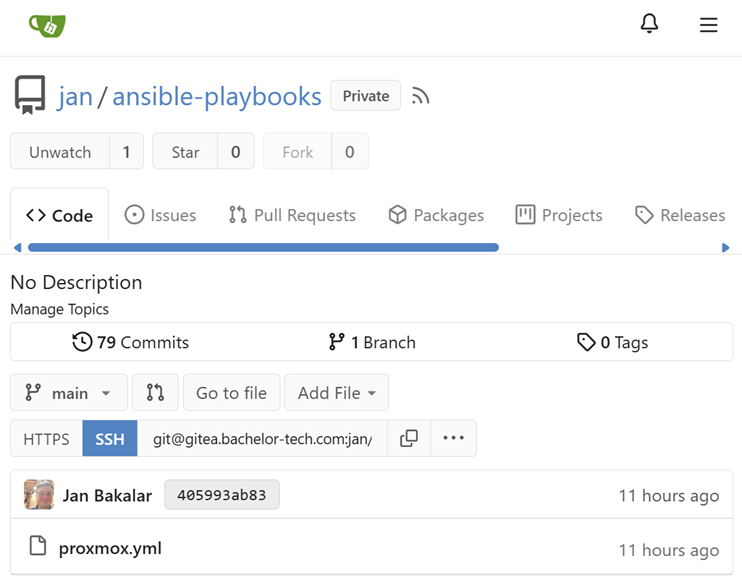
- Log into your Gitea and create a new private repository. Let’s call it
ansible-playbooks(you can leave the rest to its defaults). - In this new repository, create a file and one folder called
proxmox.yml– create this in the main/root directory.- The file name is not flexible, as per the Community Proxmox documentation in Ansible. The file name must end with
.proxmox.yml, so we can simplify it by just calling it that.
- The file name is not flexible, as per the Community Proxmox documentation in Ansible. The file name must end with
- If you completed the step with the load balancer/reverse proxy handling your request, then the URL parameter will actually be your
https://hostname.domain.tld(no port specified as the default 443 applies, since HAProxy’s front-end listens on that one). The file should look as follows:
# proxmox.yml

---
# Details about our Proxmox cluster or instance + how to reach it:
url: https://proxmox.bachelor-tech.com
validate_certs: true
user: ansible@pam
token_id: awx_token

# Specify which tool (plugin) we will need from our toolbox (EE) and
# what extras are we interested that the plugin provides.
plugin: community.proxmox.proxmox
want_facts: true
qemu_extended_statuses: true

# Group the fetched hosts based on their tags in Proxmox to these categories:
groups:
  webservers: "'web' in (proxmox_tags_parsed|list)"
  mailservers: "'mail' in (proxmox_tags_parsed|list)"
  databases: "'database' in (proxmox_tags_parsed|list)"
  gaming: "'gaming' in (proxmox_tags_parsed|list)"
  network: "'network' in (proxmox_tags_parsed|list)"
  productivity: "'productivity' in (proxmox_tags_parsed|list)"
  cctv: "'cctv' in (proxmox_tags_parsed|list)"
  monitoring: "'monitoring' in (proxmox_tags_parsed|list)"
  debian_hosts: "'debian' in (proxmox_tags_parsed|list)"
  opnsense_hosts: "'opnsense' in (proxmox_tags_parsed|list)"
  ubuntu_hosts: "'ubuntu' in (proxmox_tags_parsed|list)"
  nginx: "'nginx' in (proxmox_tags_parsed|list)"
  nodejs: "'nodejs' in (proxmox_tags_parsed|list)"
  windows: "'windows' in (proxmox_tags_parsed|list)"
  # Applies to all Proxmox VMs and LXCs for snapshots to distinguish them from bare-metal hosts
  all_proxmox_guests: "proxmox_vmid is defined"

# Additional settings - tag for virtuals that use port 2222 for SSH + fetch network details +
# modify the default description field in the 'Hosts' tab
# Note if the 'Description' field is already filled in AWX, you will need to flush away your hosts and re-run the job.
compose:
  ansible_port: "2222 if '2222' in (proxmox_tags_parsed|list) else 22"
  ansible_host: "(proxmox_name + '.bakalar.priv') if proxmox_vmtype == 'qemu' else (proxmox_hostname + '.bakalar.priv')"
  _awx_description: "'Dynamically imported from ' + (proxmox_node | string)"
- Otherwise you will need to specify the IP plus port 8006, such as
1.2.3.4:8006, so it will look as follows:
# Part of proxmox.yml with just the IP and no cert validation
---
url: <https://1.2.3.4:8006>
validate_certs: false
- To explain:
url: The IP or hostname of any node in your cluster.token_id: The ID you gave your token (e.g.,awx_token).- Note that there is no
token_secretas per the documentation. This is because we have outsourced it as a new credential type in AWX, which is more secure.
- Note: We do not need to have a
collections/requirements.ymlfile in the repo to download and install our modules (likecommunity.proxmox), since we have already created it in our custom execution environment (EE).
- What if you have more than one Proxmox host and they are not in a cluster? You would simply need to have more .yml files for that, such as
proxmox1.ymlandproxmox2.yml. In each, you would provide its unique credentials for theAPI key. The rest of the syntax can be the same. AWX will simply merge them into the same Hosts section.
Add a limited read-only collaborator account into Gitea
- Instead of using your own or a repo-wide token, create a new account in Gitea and confirm the email registration.
- Then log back into your main user, find the ansible repo, go to Settings → Collaborators and add this limited account.
- Assign it read only permissions.

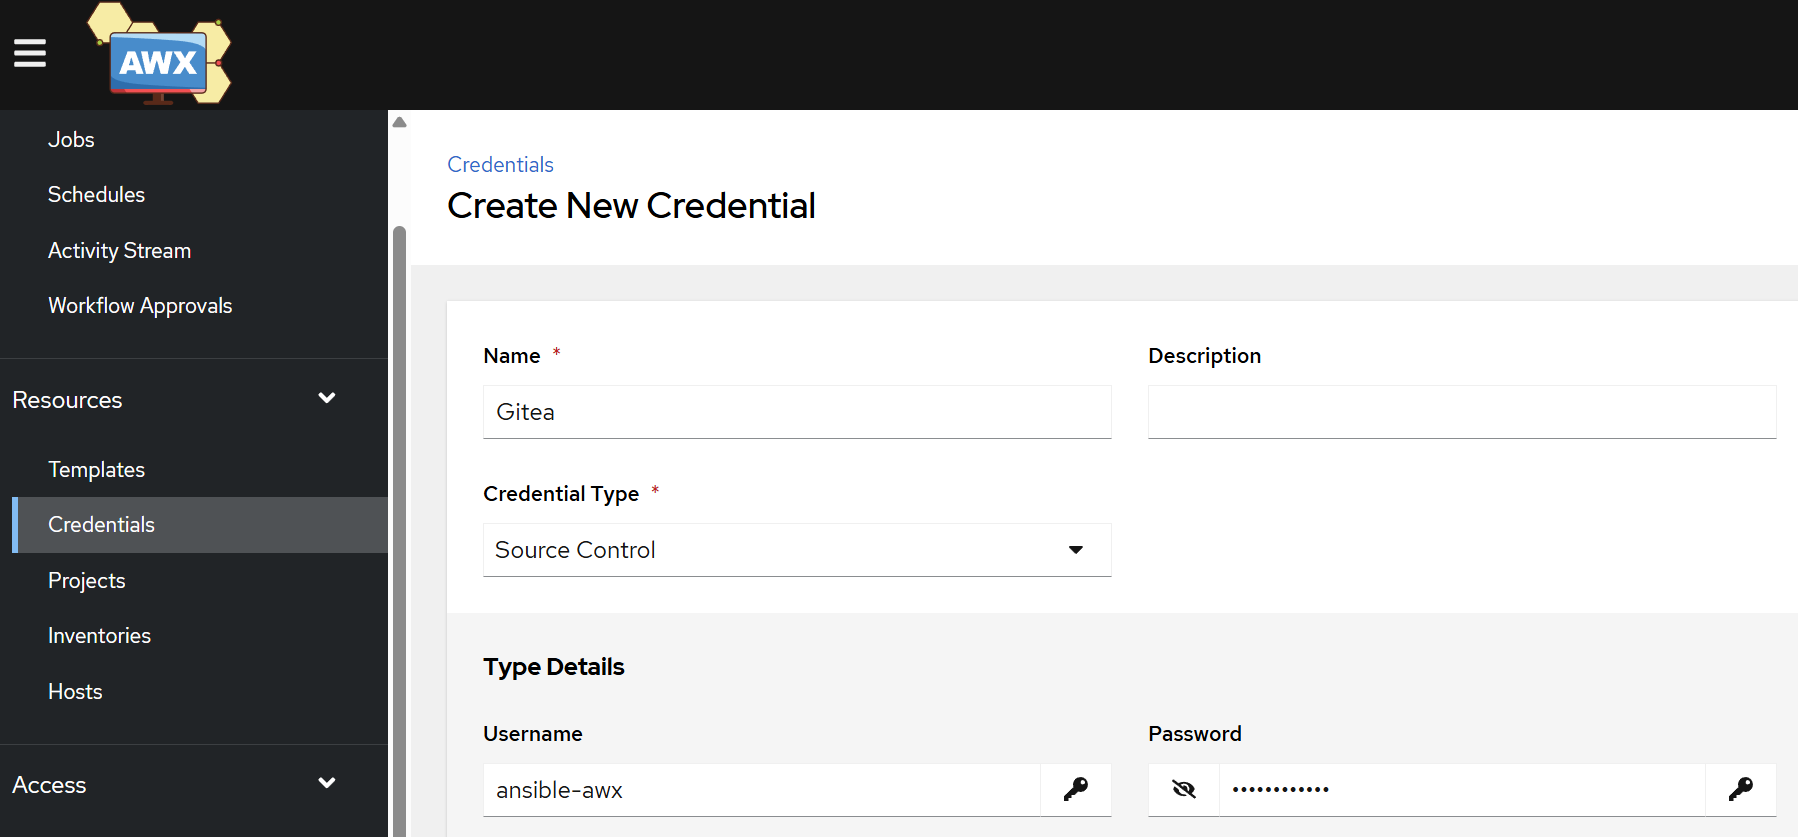
Create credentials in AWX for Gitea
- Go to Resources → Credentials → Add.
- Fill in the form:
- Name: Gitea (whatever you like)
- Credential type: Source control
- Fill in the username and password that you use to log into Gitea (this could be
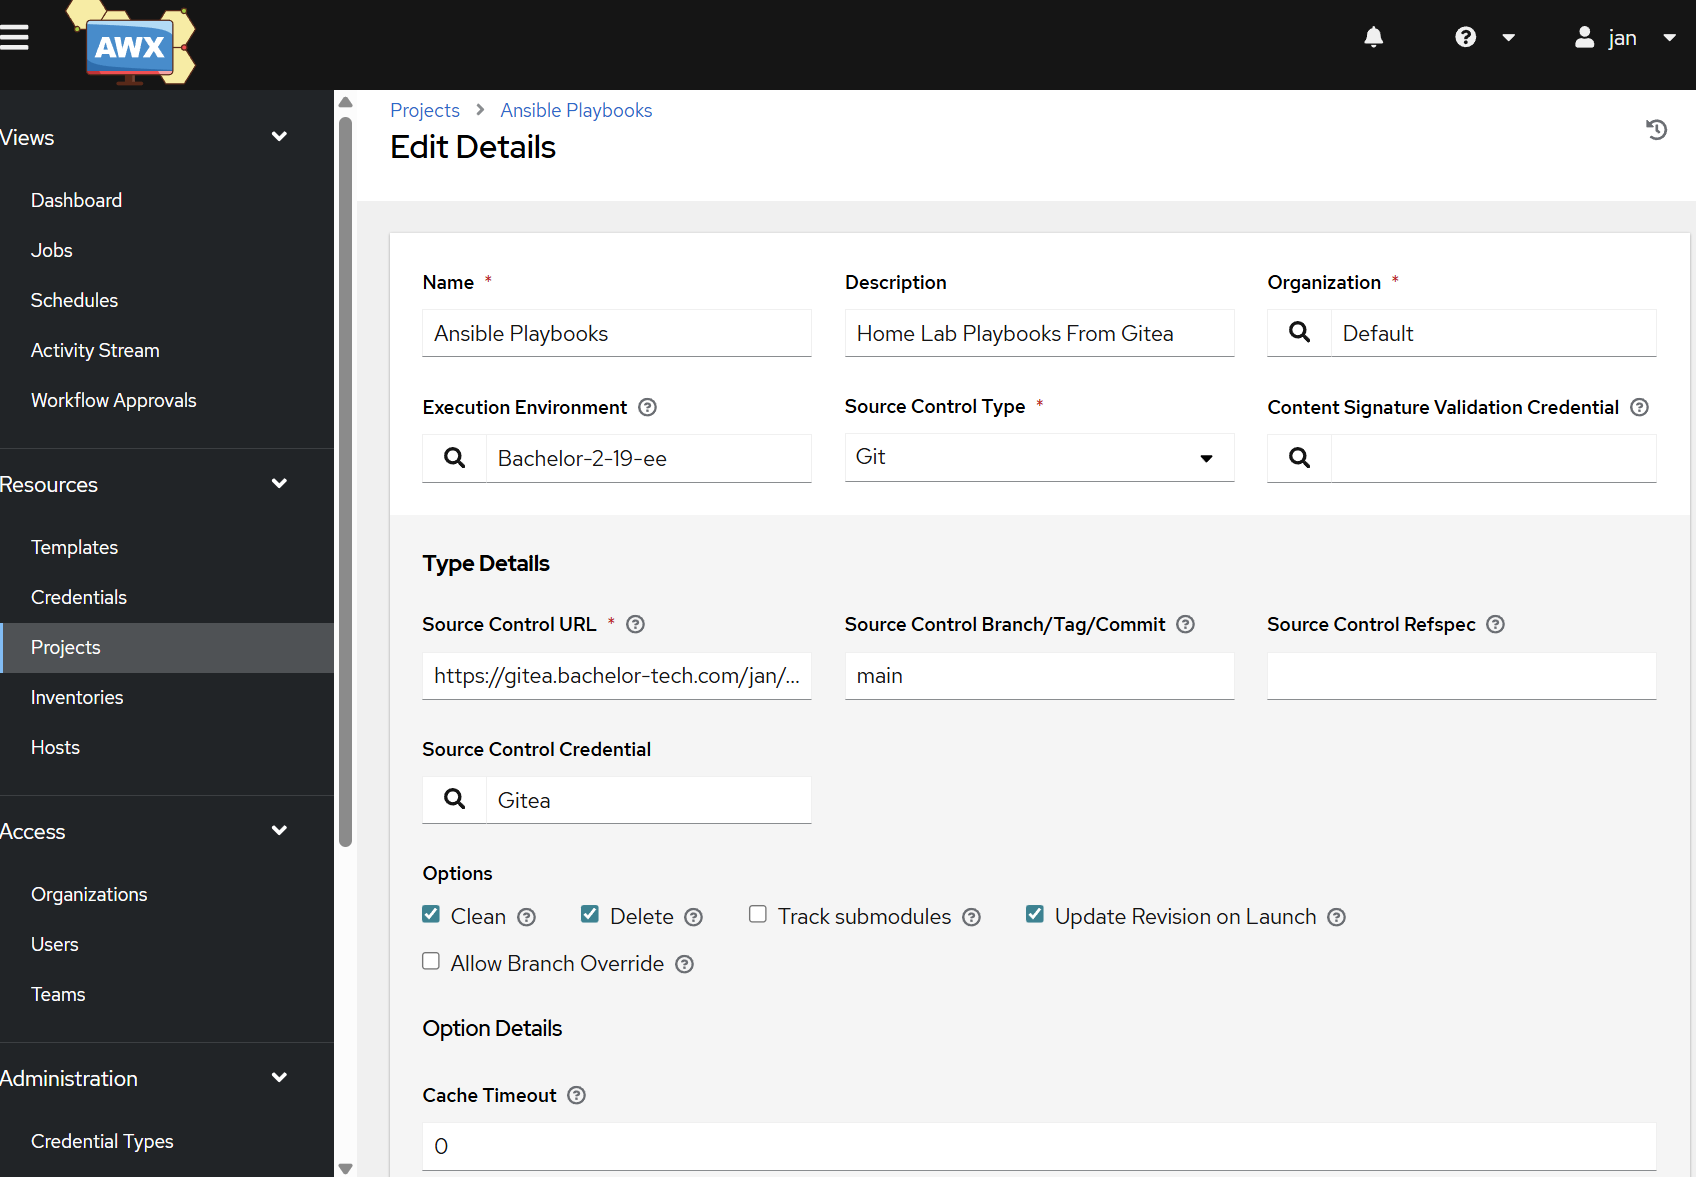
Connect AWX to Gitea (Create a Project)
This tells AWX how to find your Gitea repository.
- In AWX, go to Resources -> Projects.
- Click on the Add button.
- Name:
Ansible Playbooks - Source Control Type:
Git - Source Control URL:
https://git....git. - Source Control Credential:
Gitea(your credentials that you created in the previous step since it is a private repository). - Note: if your Gitea instance is reachable only locally, then rather use your Gitea’s direct IP + port number, such as http://GITEA_IP:3000, as the pod within the K3S cluster does not have access to your LAN and cannot resolve it internally.
- There are other settings such as the tick box to ‘Update Revision on Launch’, which makes it run a git pull on each job run. From my perspective, it is not necessary.
- Name:
- Click on the Save button. This will trigger a sync job.
- It may be good to pause for a second to think about what did the sync job do, what is it for?
- It’s helpful to think of your Gitea repository as a ‘recipe book’ and our AWX server as the ‘kitchen’. ****By running this sync job, we just told our kitchen (AWX) to pull down the latest copy of the recipe book (the Gitea repository). Previous pulls are deleted just in case.
- Essentially, the
awx-taskpod connects to the Gitea server, authenticates with the credentials, runs agit clone(orgit pullif done again) to copy the files from the private repo into a folder on the AWX server (under/var/lib/awx/projects/...). - What has NOT happened yet is that none of our Proxmox infrastructure was reached out to yet, no inventory was updated yet.
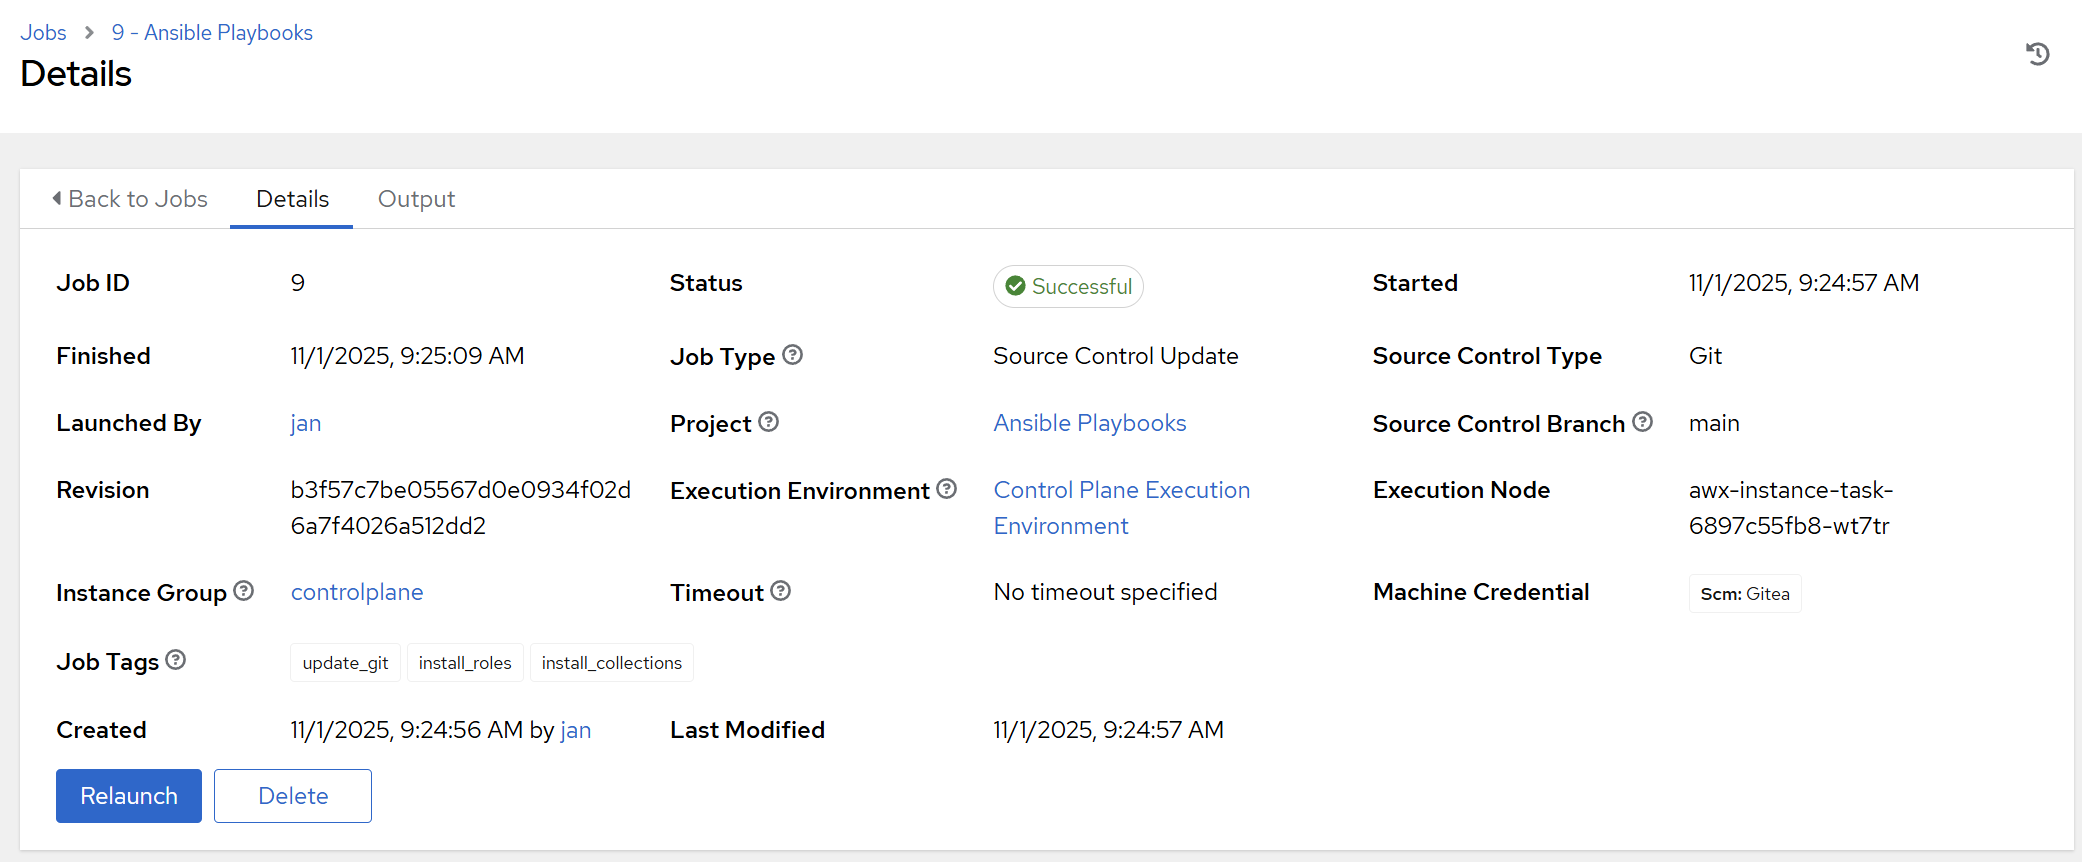
- If you get an error, you can click on the ‘Output’ button to check what the error number is:
503: likely a DNS issue – the task pod cannot resolve the hostname403: likely an authentication issue to Gitea401: path not found (wrong link to the Gitea server)Connection refused/timed-out: The path was found but Gitea is not running (service down).SSL-related errors– you link it to HTTPS but have no valid certificate (if you use reverse proxy, you may need to make configuration changes there).
Create an Inventory Source
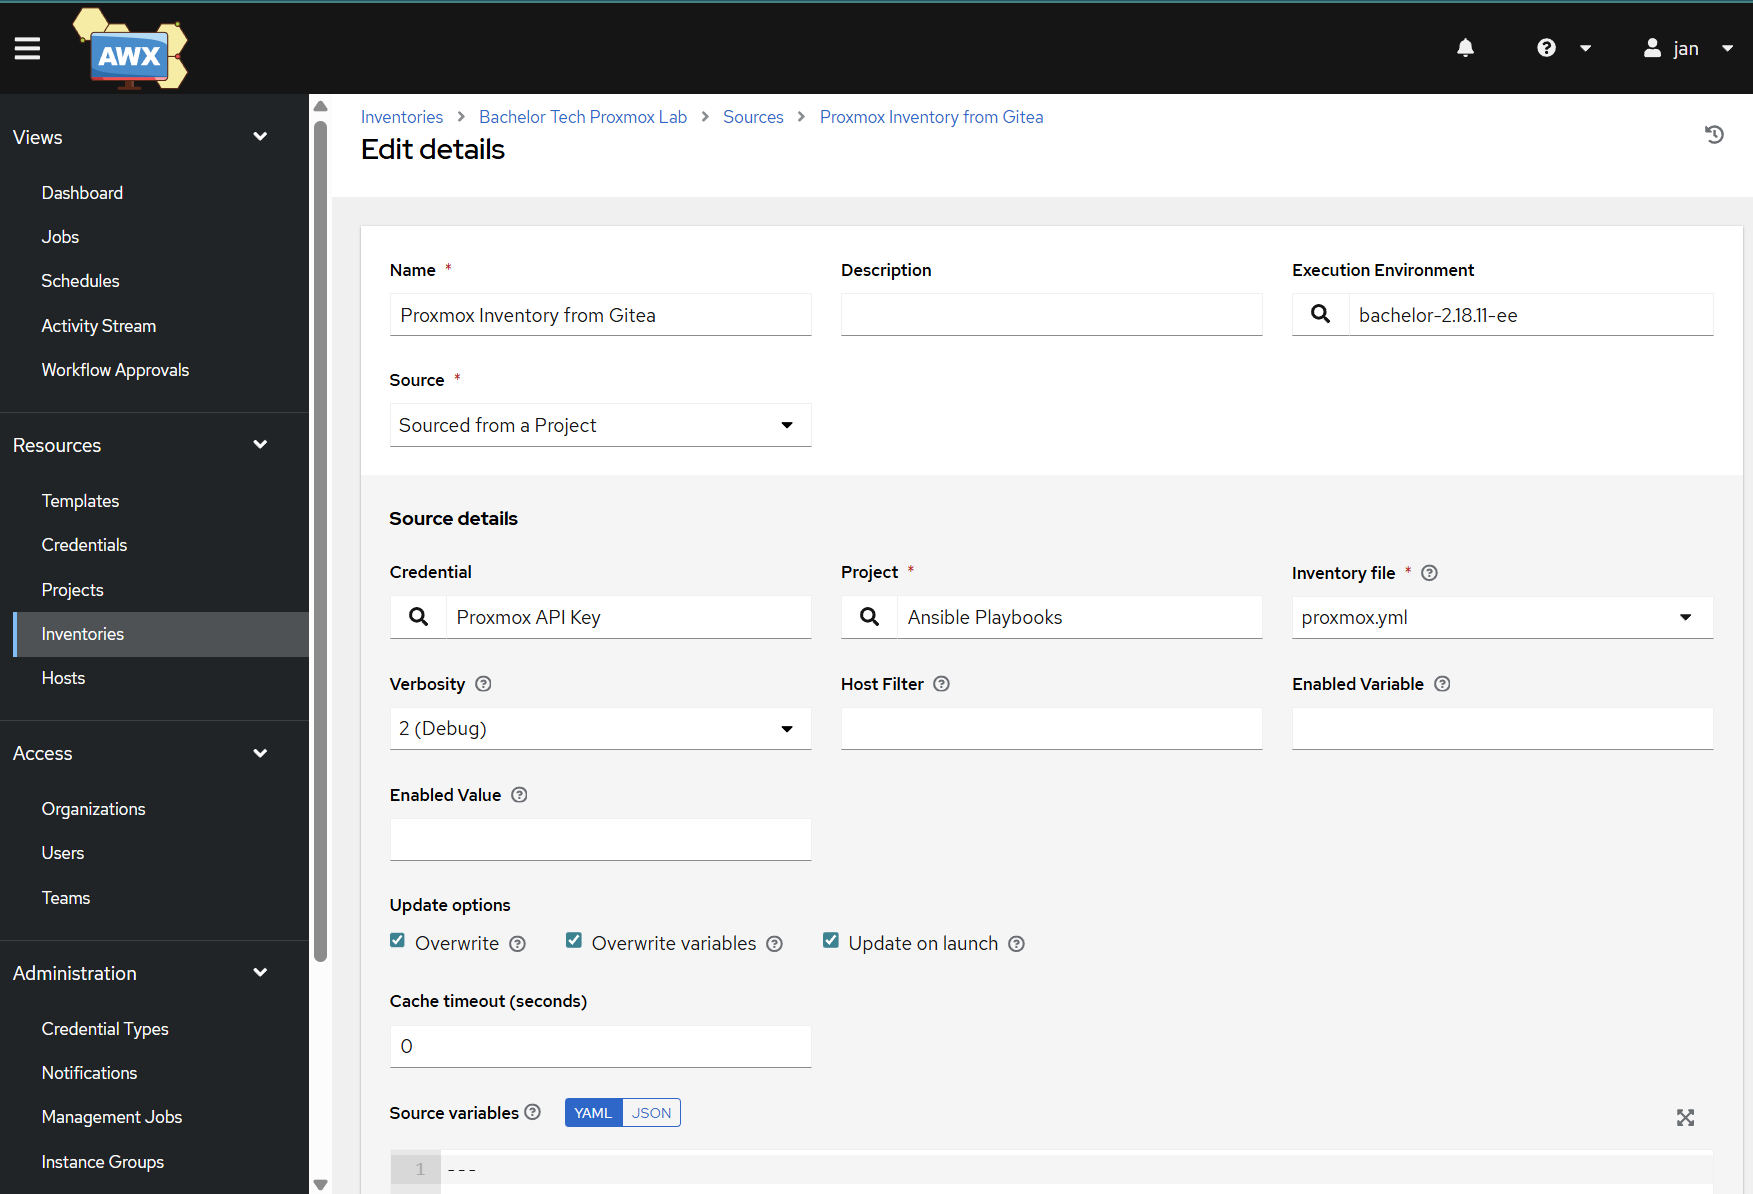
- This step will connect our Gitea project and the Proxmox API token to our inventory.
- In the AWX UI, go to Resources → Inventories.
- Click on the Add button and select the Add Inventory option. Give it a name of your liking.
- Select the Sources tab at the top.
- Click the Add button to create a new source. Give it a clear name such as
Proxmox Cluster Source. - Execution Environment: Select the
AWX Default EE (latest)or our custom environment can also do the same job. - Source: Select “Sourced from a Project” from the dropdown. New fields will appear.
- Credential: Click on the 🔍 icon and select your
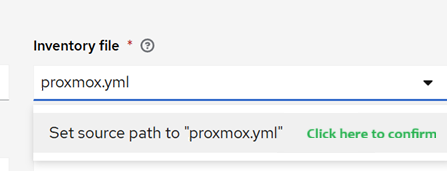
Proxmox API key, which we created earlier.Project: Click on the 🔍 icon and select yourAnsible Playbooksproject (the one you just synced).Inventory file: Click the dropdown and typeproxmox.yml(this is one of the files fetched from Gitea in the previous step). While the dropdown will appear empty, simply type it and then confirm the selection, so that the manually typed file name will stay there. It is a bit of a poor UI behavior. If you still struggle, save it without the file name and then edit it again
- Make sure the ‘Overwrite variables’ tick box is unchecked. It tells AWX to merge the file with the secret we are about to add, which we do not want.
- Credential: Click on the 🔍 icon and select your
- If all goes well, you should have it set up as following:
- Now save the job (if running again, also click on the ‘Sync’ button).
- Has the job completed successfully? If not, read the errors in the output log. An example is below:
- Your Proxmox API key has the right permissions within Proxmox – find it and click ‘Show Permissions’. It should reveal the the root level (/) with all sublevels underneath it – if it is empty, then the permissions did not propagate and only the Proxmox hosts themselves will be identified.
- You can reach your Gitea instance with the credentials you provided (using a direct IP address is often best since the
task podhas no knowledge of your internal DNS). - Check the syntax of the
proxmox.ymland therequirements.ymlfiles. Did you set the IP of your Proxmox host (can be in a cluster or a virtual IP) correctly?
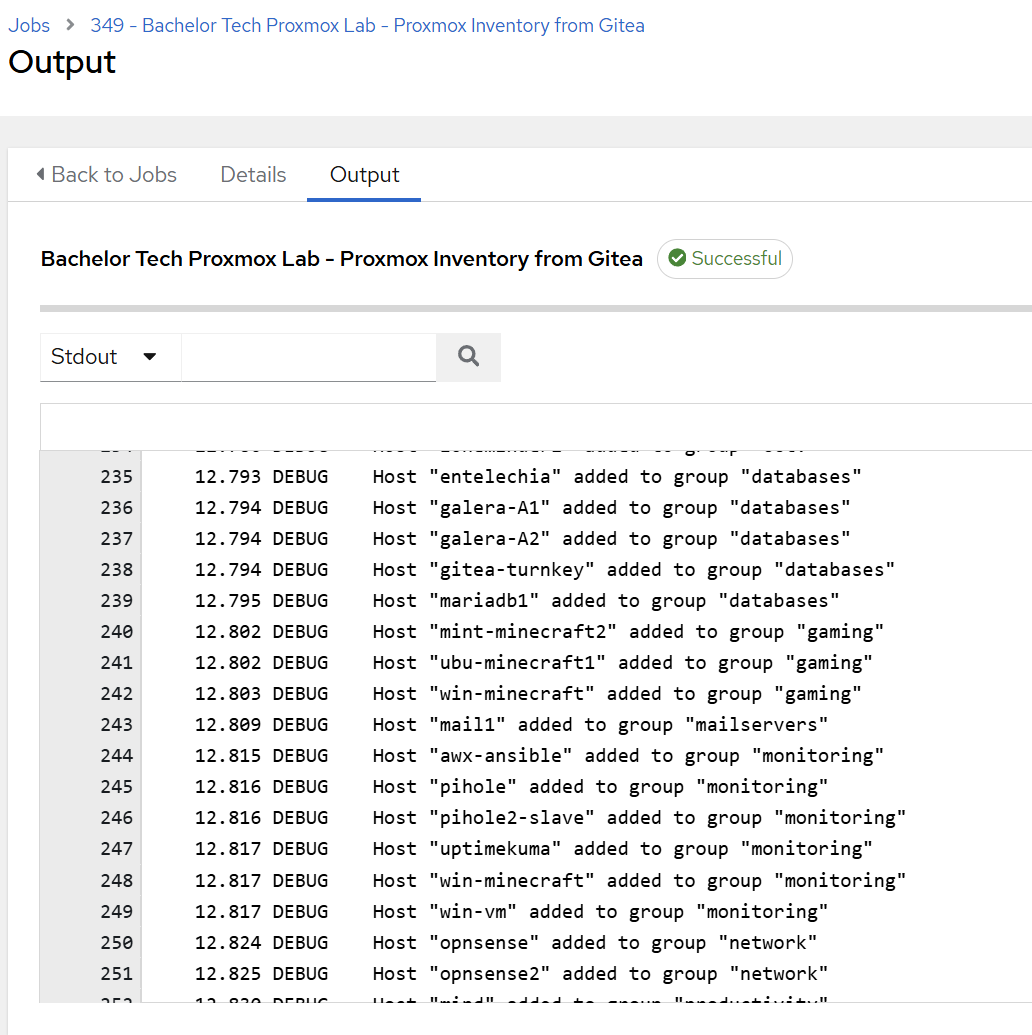
- In a successful run, you will see your VMs and LXCs being identified in the output log.
- You can also observe that thanks to the structure of our
.ymlfile, the hosts are being automatically added to groups based on their tags.
- You can also observe that thanks to the structure of our
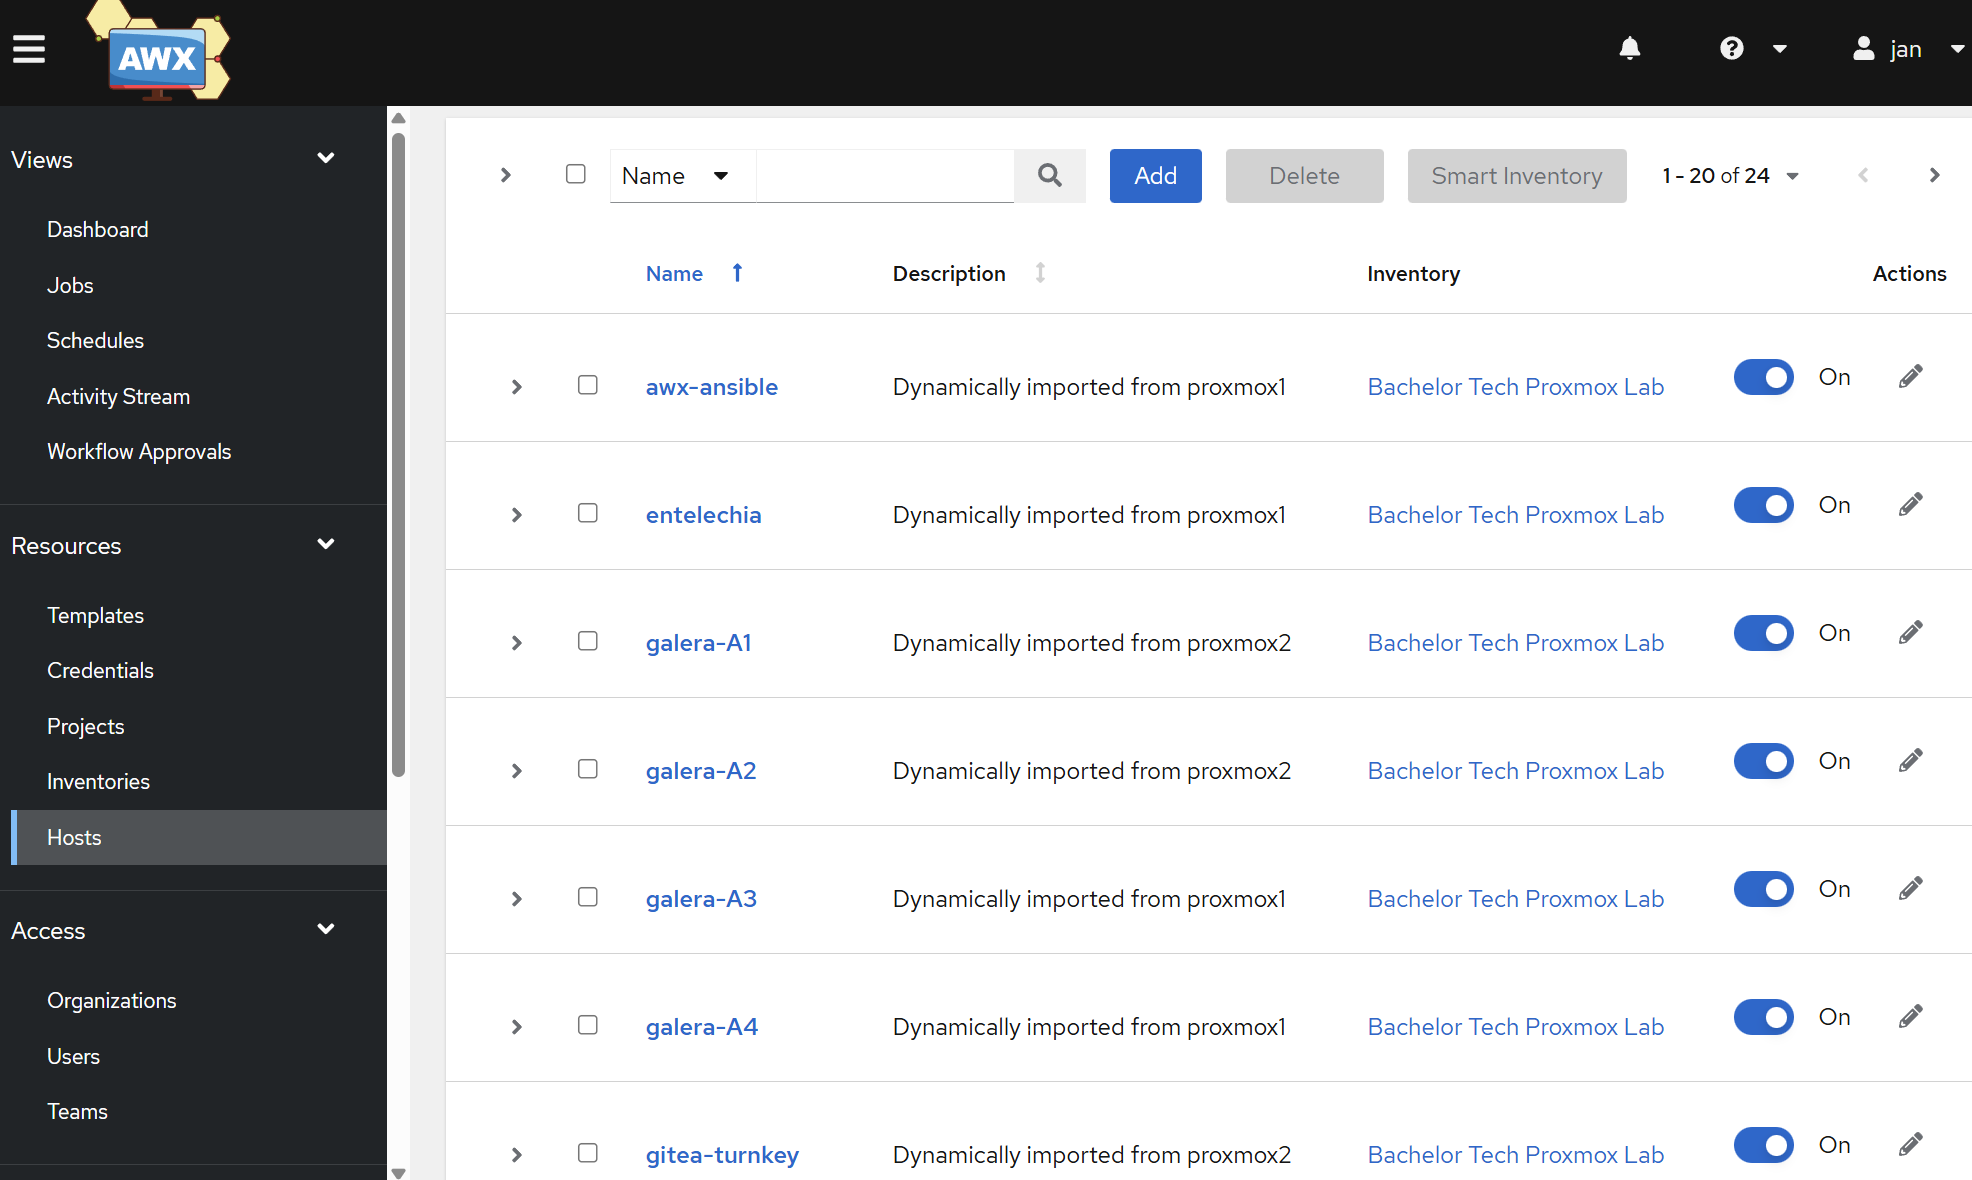
- Then you can check your hosts under Resources → Hosts. Are they all there?
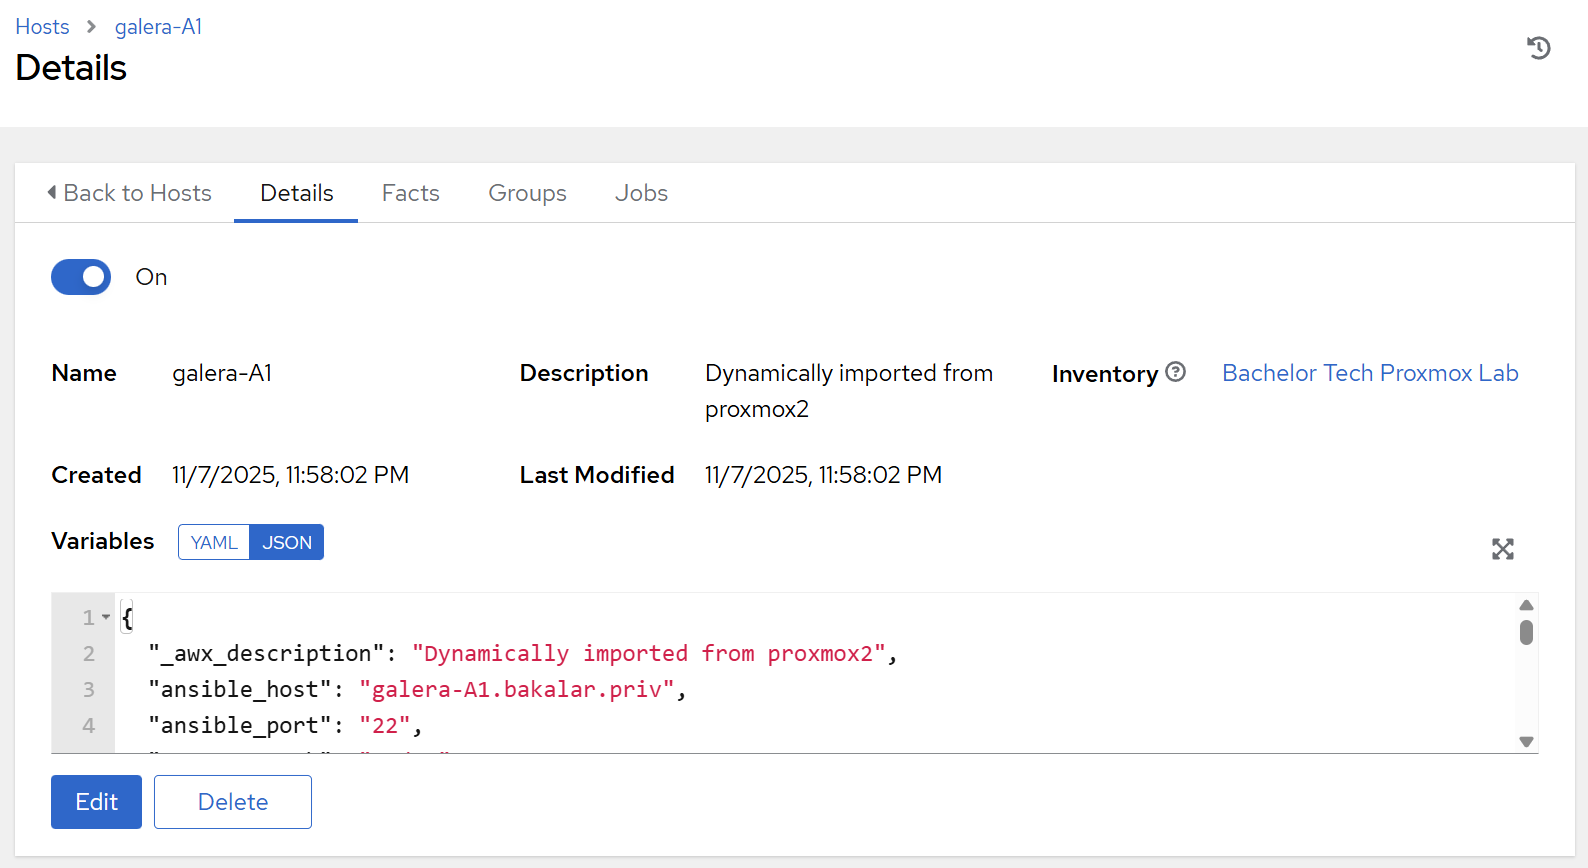
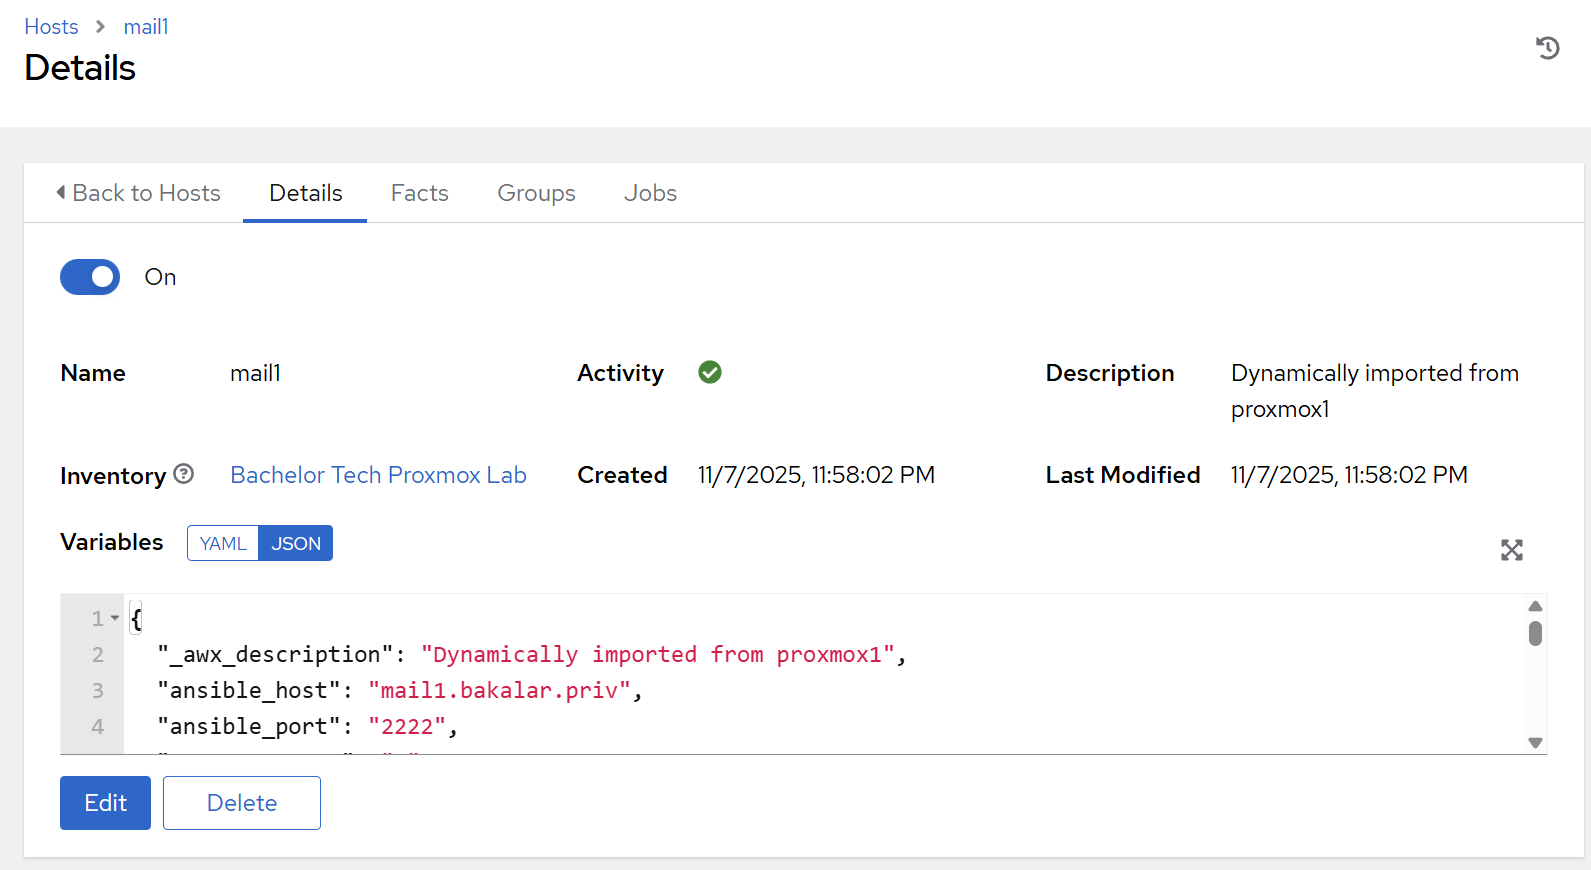
- Then click on a VM and an LXC to confirm that you can see their details including the custom variables that we added into the
proxmox.ymlfile, such asansible_portandansible_host. We will be needing those details later as we run patch management and other jobs.
- An example LXC host (a Proxmox container):
- An example VM host from Proxmox (notice a different port):
- If you do not see one of the custom variables in the log, it means that for the particular item (such as
ansible_host), there was something wrong with the syntax (such as a non-existing variable being referred to) and the the templating engine (jinja2) silently failed it. Take the entire .yml file and paste it into a YAML checker to ensure it is valid. - If none of the variables got inside plus you are seeing ‘imported’ instead of the dynamic description we created earlier (i.e. ’Dynamically imported from…’), it means that none of the compose block has been loaded. Check that you have executed the project playbook before triggering the inventory sync (or tick the box ‘Update on launch’, which trigger the playbook before running and essential run a
git pull.
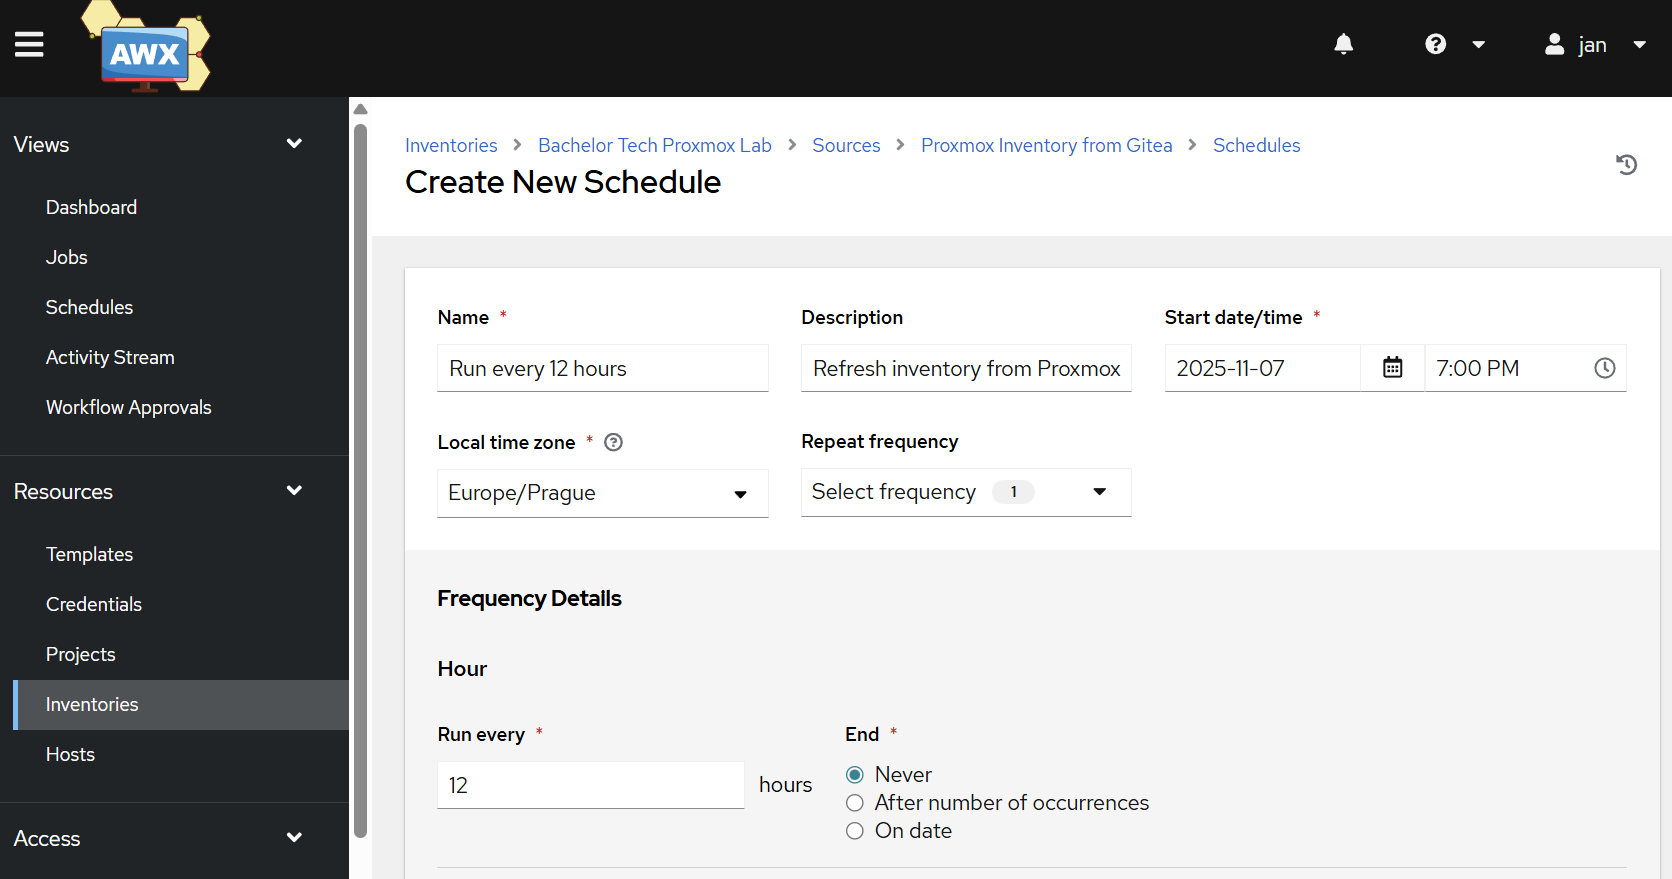
Run your inventory regularly
- In AWX, go to Resources→ Inventories. Click on your
Proxmox Labinventory. Click on the Sources tab. - Click on the NAME of your source (e.g.,
Proxmox Cluster Source), not the sync icon. - This will take you to its “Details” page.
- Click the Schedules tab at the top.
- Click the Add button.Fill out the schedule:
- Name:
Refresh inventory from Proxmox - Start Date: Set this to today.
- Start Time: Set this to a time you want it to run (e.g.,
07:00:00). - Run every: Type
12in the box and selectHoursfrom the dropdown. - End: You can leave this as “Never”. Confirm by clicking on the save button.
- Name:
So every 12 hours (or as you need), the inventory will be refreshed. This concludes our Step related to the initial set up of AWX. Now we can finally head into configuring playbooks related to regular OS patching and self-healing of our infrastructure in case of VM/LXC failure!