4. Create a custom Execution Environment (EE)
AWX has not been receiving updates for over a year now and the version of Ansible it ships with is old (2.15.3) and it does not work with the newest modules like the one we want to use, such as community.proxmox.proxmox, esp. if we want to use some advanced features of it, such as capturing tags. In addition, it uses an older version of Python and misses required libraries such as requests and proxmoxer (for Python).
Prepare the Build Environment
First, we need to log in to your jan@awx VM (the K3s host) and install dependencies:
# Start by takign a snapshot of your AWX VM and then SSH in.

# In case you do not have Docker on your VM yet:
sudo apt-get install -y ca-certificates curl
sudo install -m 0755 -d /etc/apt/keyrings
sudo curl -fsSL <https://download.docker.com/linux/debian/gpg> -o /etc/apt/keyrings/docker.asc
sudo chmod a+r /etc/apt/keyrings/docker.asc

# Add the repository to Apt sources:
echo \\
  "deb [arch=$(dpkg --print-architecture) signed-by=/etc/apt/keyrings/docker.asc] <https://download.docker.com/linux/debian> \\
  $(. /etc/os-release && echo "$VERSION_CODENAME") stable" | \\
  sudo tee /etc/apt/sources.list.d/docker.list > /dev/null
sudo apt-get update

# Install Docker Engine:
sudo apt-get install -y docker-ce docker-ce-cli containerd.io docker-buildx-plugin docker-compose-plugin

# Add your user to the 'docker' group to run docker without sudo
sudo usermod -aG docker $USER

# You need to log out and SSH back in for the group change to take effect!
exit
- Then let’s tackle the installation of Python and the
ansible-builder.
# Install pipx (Python's isolated package manager)
sudo apt update
sudo apt install -y pipx

# Install ansible-builder
pipx install ansible-builder

# Ensure binaries are in the PATH
pipx ensurepath
exit

# Re-login & test that you can query it
ansible-builder --version

# Create a workspace for your new EE
mkdir ~/custom-ee
cd ~/custom-ee
Create Your Definition Files
This is the core of your new EE. Inside the ~/custom-ee directory, create the following four files.
- Create the
execution-environment.ymlfile. It tells ansible-builder what to do.- At the time of the writing of this article, the newest version of ansible available was
2.20.0. In 2.19 earlier in 2025, the Ansible team introduced some larger-scale changes in syntax and variable handling to which not all of the collections have yet been adjusted. Therefore, we will use version2.18.11released on 2025-11-04, which is still being actively maintained and works without issues. - See Ansible core release page and release notes specifically for 2.18.11.
- At the time of the writing of this article, the newest version of ansible available was
nano execution-environment.yml

version: 3

images:
  base_image:
    # In case you use a newer version, remember to check what latest version of Python it uses!
    name: 'registry.fedoraproject.org/fedora:43'

dependencies:
  ansible_runner:
    package_pip: 'ansible-runner'

  ansible_core:
    # This is the corrected version that meets the 2.17+ requirement
    package_pip: 'ansible-core==2.18.11'

  python_interpreter:
    python_path: '/usr/bin/python3.14'

  galaxy: 'requirements.yml'
  python: 'requirements.txt'
  system: 'bindep.txt'

additional_build_steps:
  prepend_base: |
    # Install the specific python version we're about to use
    # This ensures it exists before the pip_install command (above) runs
    RUN dnf install -y python3.14 python3.14-pip && dnf clean all

  # This will add the commands at the end of the Dockerfile build
  append_final: |
    # We must use RUN to execute shell commands
    # 1. Install the tool for managing DNF repositories (equiv. of software-properties-common)
    RUN dnf install -y dnf-plugins-core && \
        # Add the official HashiCorp repo for Fedora
        dnf config-manager addrepo --from-repofile=https://rpm.releases.hashicorp.com/fedora/hashicorp.repo && \
        # Install the Terraform binary
        dnf install -y terraform && \
        # Clean up the DNF cache to keep the image small
        dnf clean all
nano requirements.yml

---
---
collections:
  # Manage Proxmox resources
  - name: community.proxmox
  # Manage Windows devices
  - name: ansible.windows
  # Manage MySQL / MariaDB resources
  - name: community.mysql
  # Add/remove hosts in Zabbix for automation purposes
  - name: community.zabbix
  # Administer Grafana graphs
  - name: community.grafana
  # Manage AWX resources such as adding/removing hosts
  - name: awx.awx
  # Manage Hetzner resources
  - name: hetzner.hcloud
  # Manage OPNSense
  - name: oxlorg.opnsense
  # Net tools for Ansible (such as the 'become' elevation feature)
  - name: ansible.netcommon
  # Various modules for apps like Gitlab, Slack, Terraform, ufw, Datadog
  # nginx, apache, Telegram, ZFS, Sophos UTM, SNMP, Scaleway, Redis, etc.
  - name: community.general
  # For managing GCP resources like buckets
  - name: google.cloud
  # For Docker deployments
  - name: community.docker
- What are some of the most commonly used collections? You can access the Ansible website to check them out. I put together the following list from this article and in this older article.
---
collections:
  - name: awx.awx
  - name: azure.azcollection
  - name: amazon.aws
  - name: theforeman.foreman
  - name: google.cloud
  - name: openstack.cloud
  - name: community.proxmox
  - name: community.general
  - name: community.vmware
  - name: community.docker
  - name: oxlorg.opnsense
  - name: hetzner.hcloud
  - name: ovirt.ovirt
  - name: kubernetes.core
  - name: ansible.posix # Useful for RHEL admins + csh and fish shell
  - name: ansible.windows
  - name: redhatinsights.insights
  - name: community.grafana
  - name: community.mysql
  - name: community.zabbix
- Pick and choose the ones you would utilize now and in the near future, so that you do not need to worry about re-creating and re-importing the image again soon. For example, if you plan to deploy a hybrid set up with a few VMs in Hetzner, then you may wish to install
hetzner.hcloud(see the dedicated Ansible page). - Create the
requirements.txtfile. It specifies additional Python libraries to install.
nano requirements.txt

# Required by the Proxmox community collection:
proxmoxer
requests
# Required by the Windows collection:
pywinrm
# Required by the OPNSense collection:
httpx
xmltodict
# Required for GCP module:
google-auth
google-cloud-storage
# Required for Docker:
docker
- Create the bindep.txt file. It lists system-level packages that Python packages might need to compile.
nano bindep.txt

# Required for most of our collections
python3-devel
krb5-devel
# Required for SSH connections
openssh-clients
Build the New Execution Environment
Now you’re ready to build. You are still in the ~/custom-ee directory.
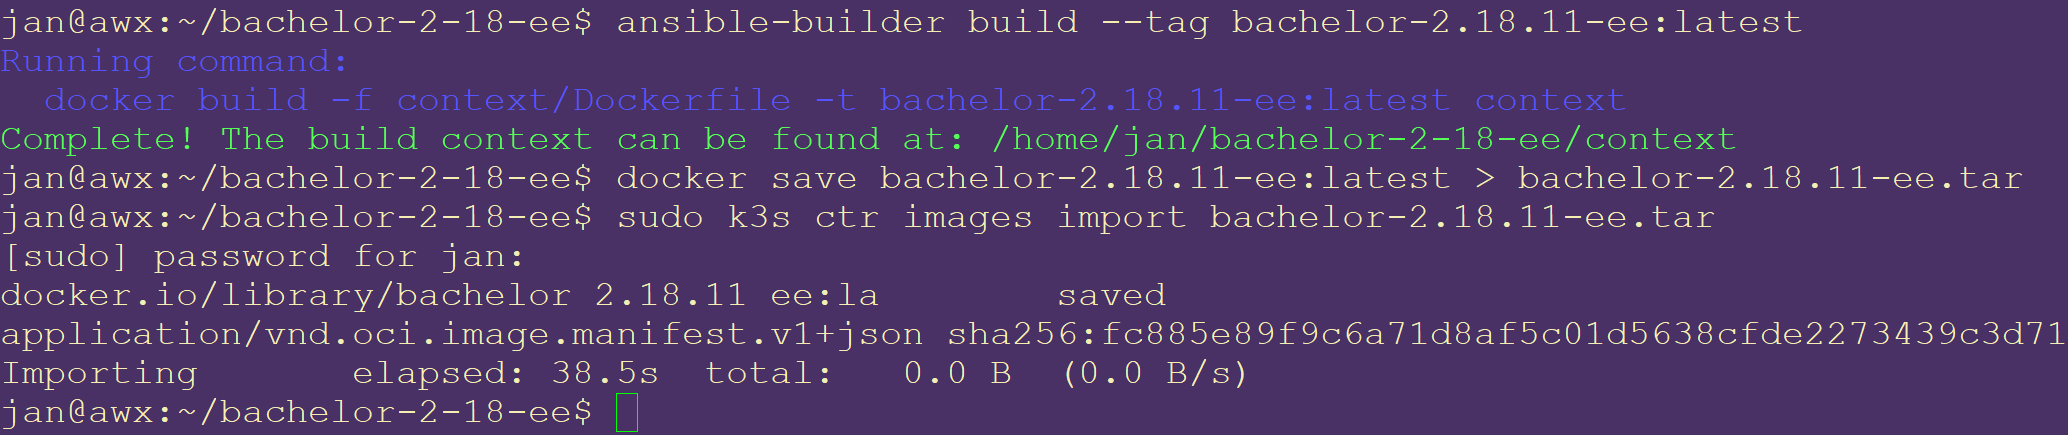
This command tells ansible-builder to read your files and build a new local container image tagged as my-custom-ee:latest.
ansible-builder build --tag my-custom-ee:latest
This will take a long time (3-5 minutes). It has to download the base image, create a new Dockerfile, install all your dependencies, and build the new image.
- If errors occur, read what is it about carefully. For example, if the base image is no longer available, look into the official documentation for recommendations and other sources.
Import the Image into K3s
The new image my-custom-ee:latest now exists just in our VM’s Docker image cache. The K3s cluster cannot see it.
We need to export it from Docker and import it into the K3s (containerd) image store.
# Save the Docker image to a .tar file
docker save my-custom-ee:latest > my-custom-ee.tar

# Import the .tar file into K3s's image store
sudo k3s ctr images import my-custom-ee.tar
After this, K3s will be able to find my-custom-ee:latest locally.
Configure AWX to Use Your New EE
This is the final part of this Step. Let’s go back to the AWX web UI.
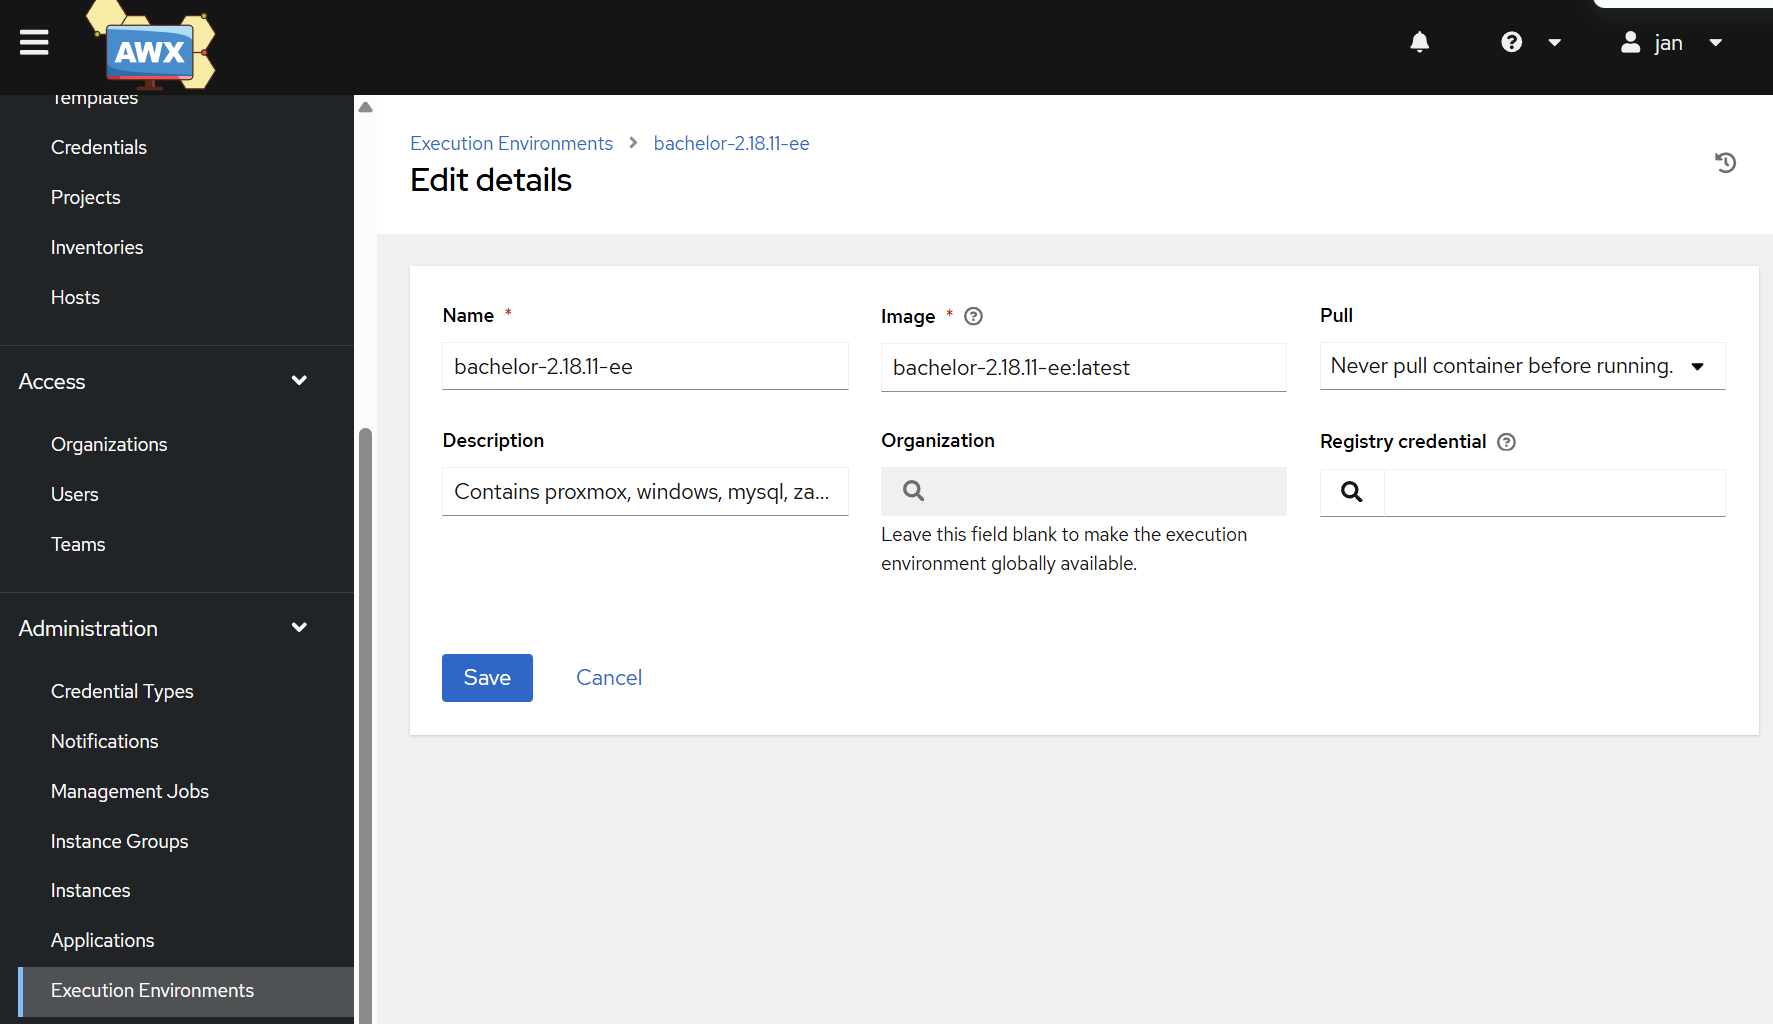
1. Create the New Execution Environment
- Go to Administration → Execution Environments.
- Click Add.
- Name:
My Custom EE (Ansible 2.18.11) - Image:
my-custom-ee:latest(This must exactly match the tag you used). - Pull: Set this to
Never. It tells AWX to not try to pull from the internet and to use the local image we just imported. - Click Save.
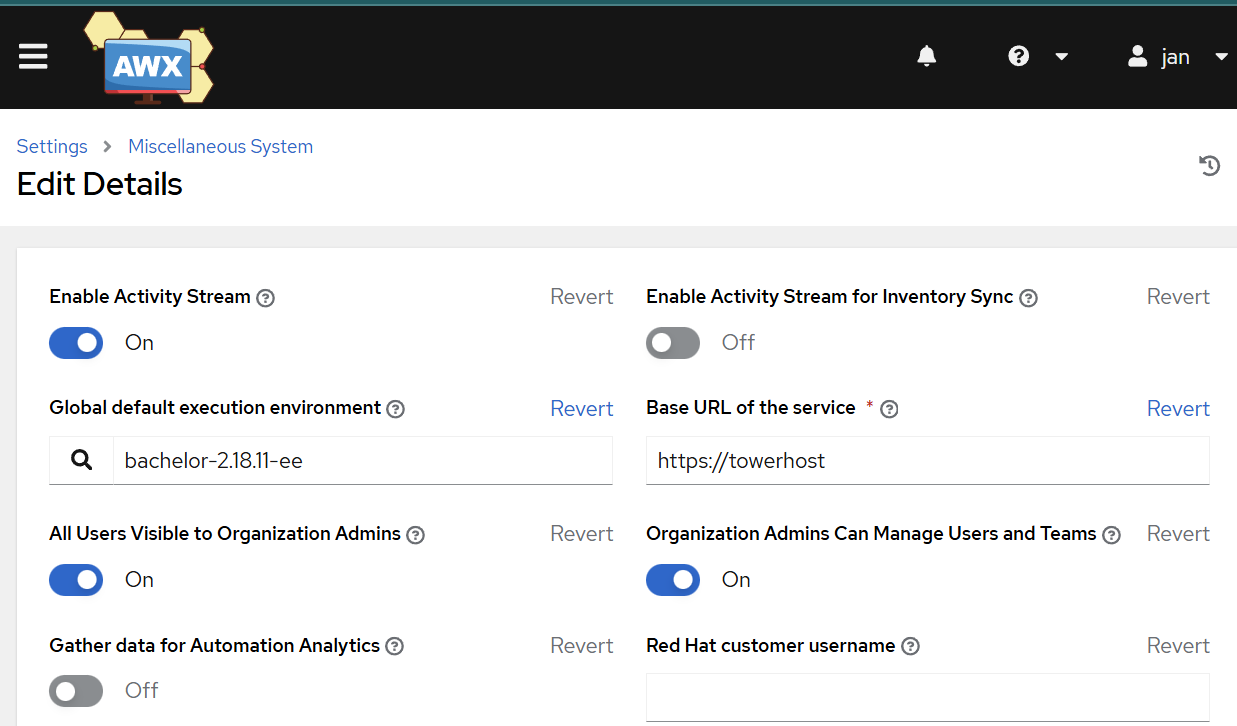
- Set Your New EE as the Default
- Go to Administration → Settings.
- Click on Miscellaneous System settings.
- Click on the Edit button.
- Find the Global default execution environment field.
- Click on the 🔍 icon and select your new
My Custom EE (Ansible 2.18.11).
- Click Save.
What have we achieved in this Step? We will be able to call the
community.proxmox and other modules in order to fetch details from Proxmox API to finally get our inventory! Let’s go ahead and configure that as well.