This part is only applicable if you have more than one Proxmox host and they are in a cluster. Individual hosts can be treated separately (we will cover that later). You can skip this Step if you do not have a need for having a virtual interface on which any of your Proxmox nodes in a cluster could be reached.
Create virtual IP on OPNSense
- What are we trying to achieve here? You could configure Ansible to just reach to one of your hosts – if they are in a cluster, it will be able to fetch information from your other nodes. Yet what if that host is down? What if you have playbooks prepared that are supposed to handle a Proxmox node failure but the node it is trying to reach is down? This is where a virtual IP (or VIP) is useful. We would want to configure it in such a way that it is resolvable only locally.
- The pre-requisite here is that you have a load balancer (such as HAProxy) and a local DNS resolved (such as Unbound). Ideally, both set up in HA themselves, as otherwise a single node outage would still impact us.
- In the case below, we will implement it in OPNSense that is set up in HA (see my previous tutorial on that).
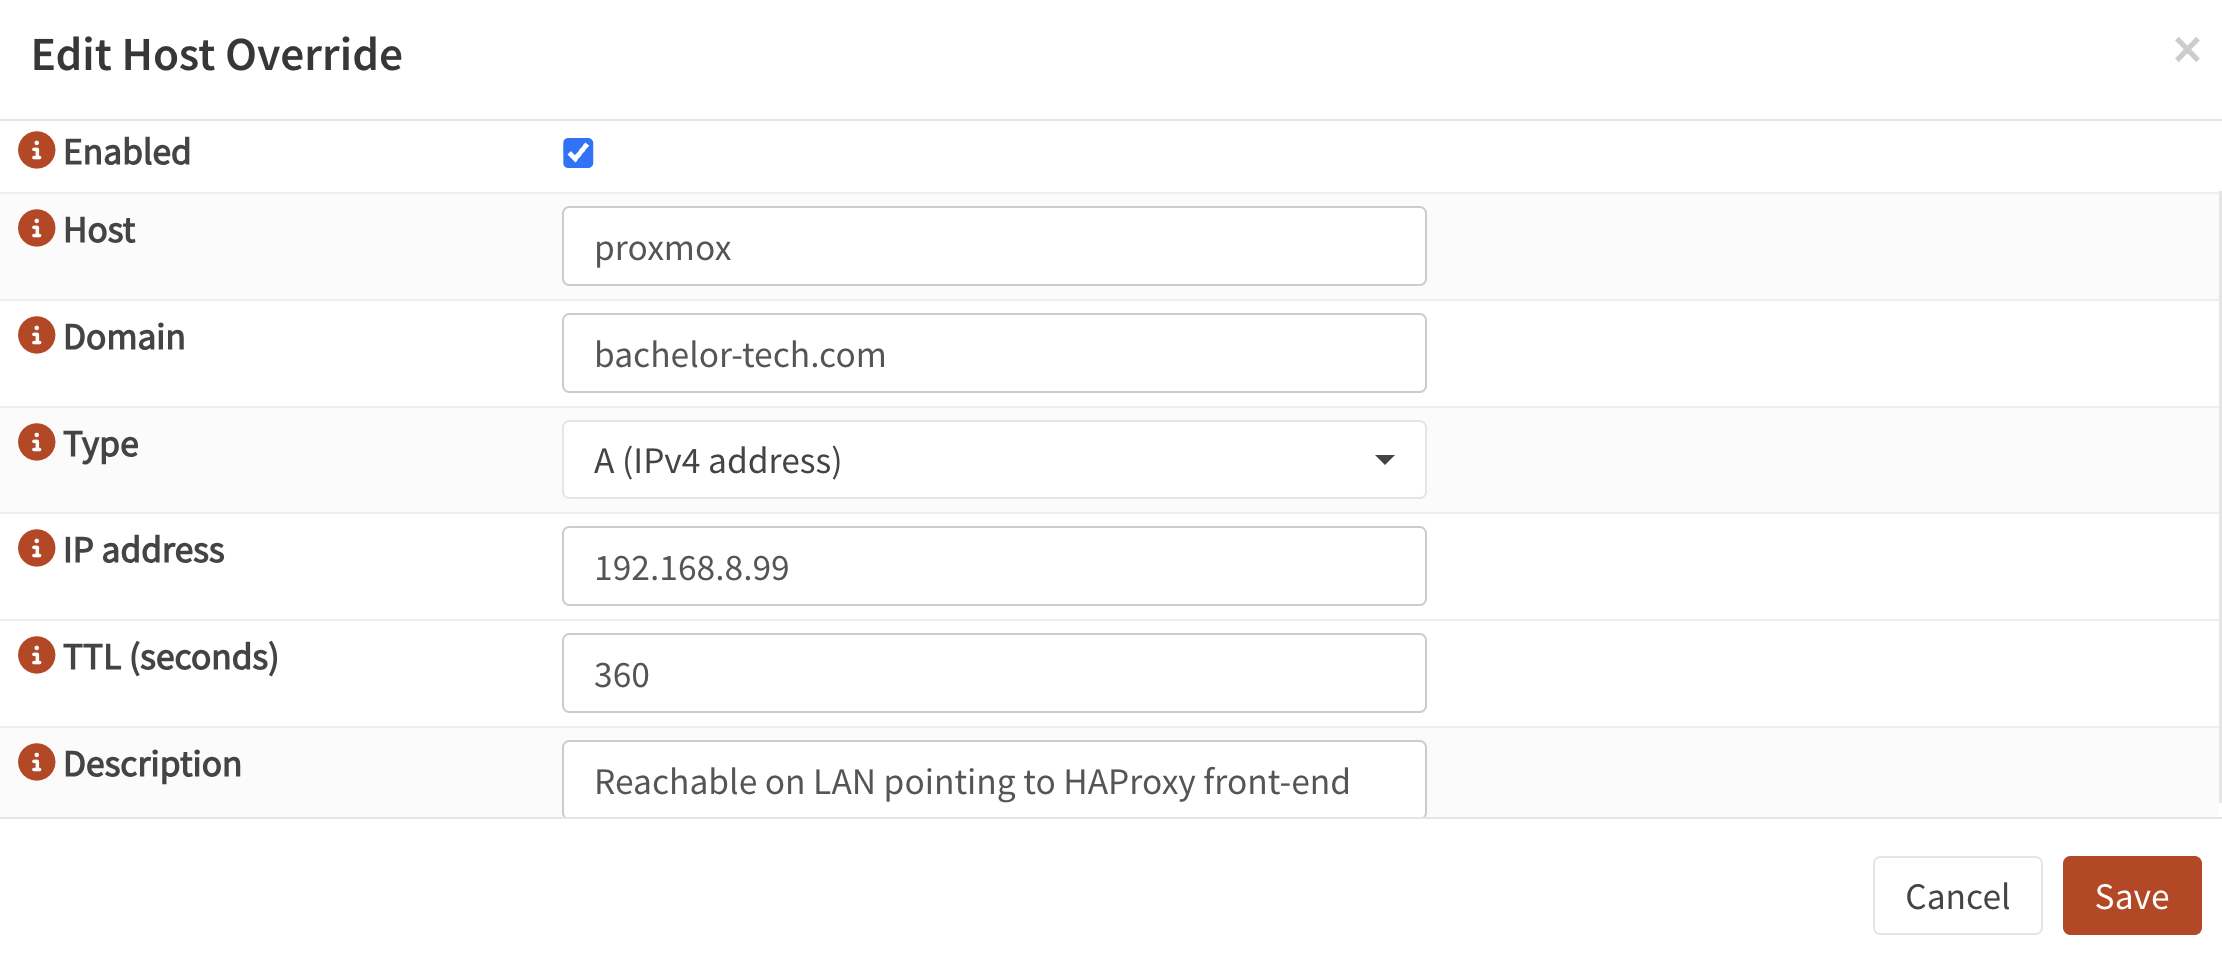
- On your primary OPNSense unit, go to Services → Unbound → Overrides . Add a new item by clicking on the + sign.
- Host:
proxmox(or similar) - Domain: a domain that you use that can receive an SSL certificate
- Type:
A (IPv4 address) - IP address: An address that will be allocated for this purpose on your LAN that is not on DHCP.
- TTL (seconds):
360 - Description: Proxmox cluster reachable on LAN forwarded to HAPRoxy front-end.
- Host:
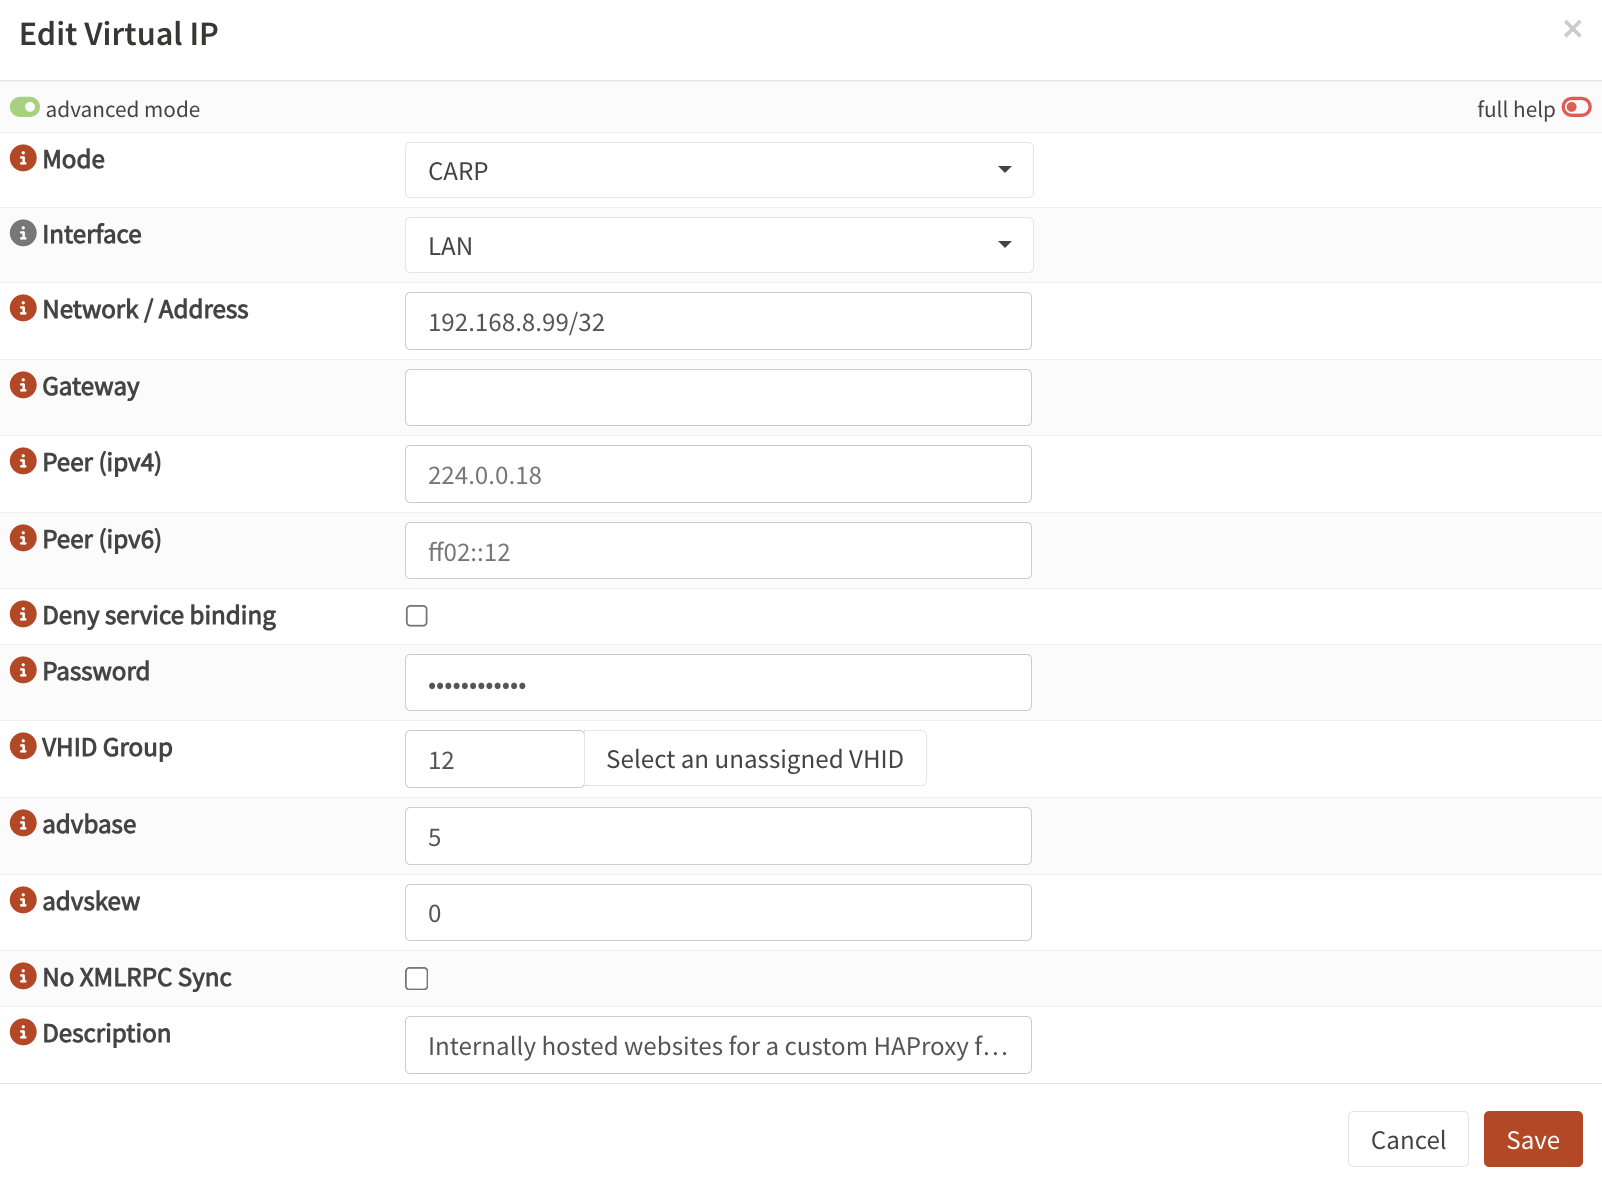
- Then go to Interfaces → Virtual IPs → Settings. Create a new record.
- Mode:
CARP - Interface:
LAN - Network IP: a free IP on your LAN that would not get assigned by DHCP and add /32
- Gateway: leave blank
- Password: set a unique password that will be shared amongst your OPNSense cluster
- VHID group: set a unique number that is not already in use
- advbase: same as above
- advskew:
0for main (higher value for backup nodes) – visible only in the ‘Advanced’ mode, you will need to enable that in the top left corner. - Description: Proxmox cluster virtual IP
- Mode:
- Apply the settings and connect to your backup OPNSense node(s) to set it up in the same way, just add a higher
advskewvalue for each to indicate that it is not themasterunit.
Create a SSL certificate (ACME)
I will keep this part short as typically, you would have had this already set up if you use OPNSense with any reverse proxy service.
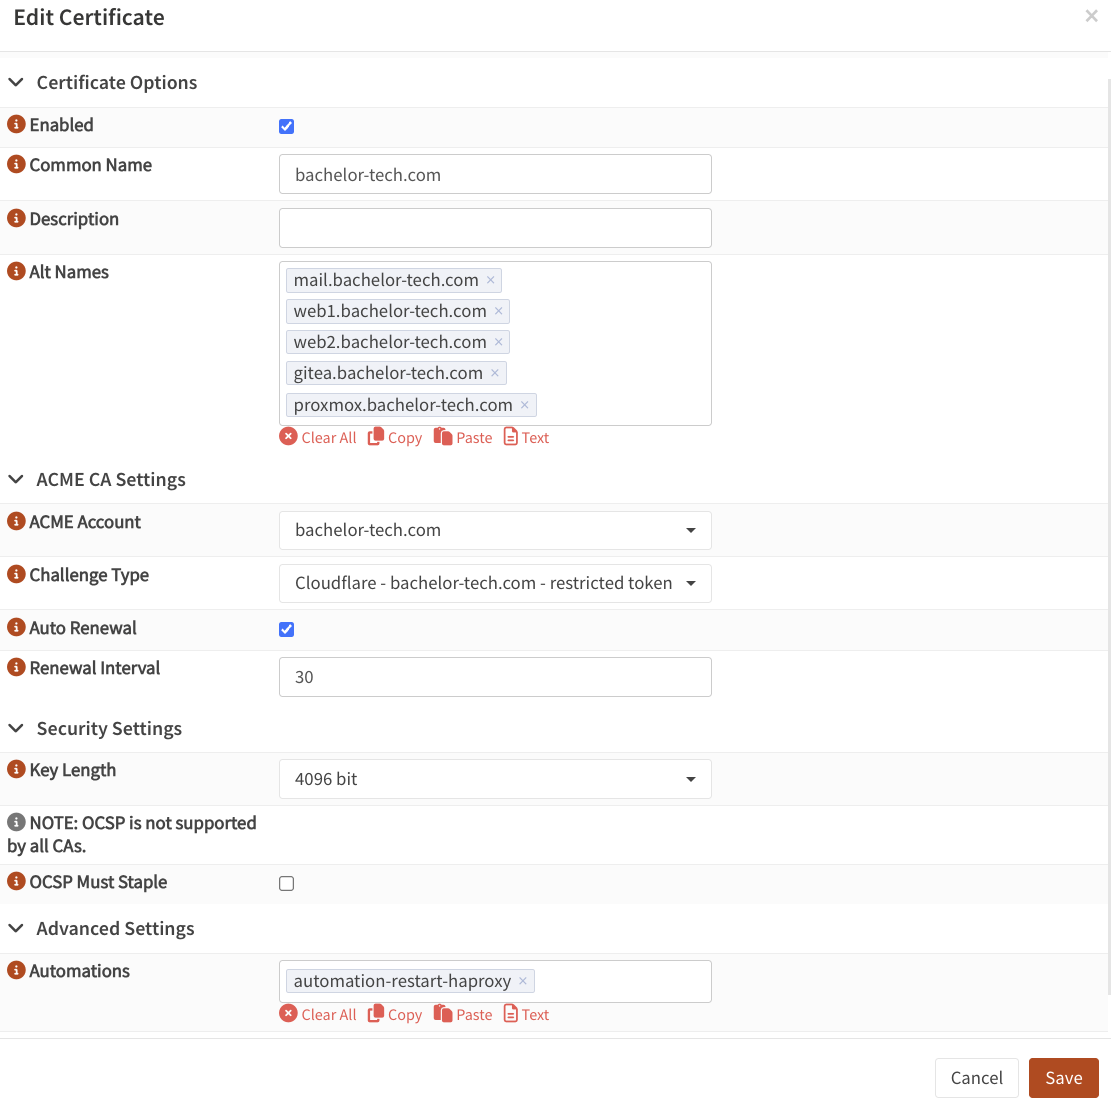
- Go to Services → ACME Client → Accounts. Set up an account there with Let’s Encrypt.
- Under ACME Client → Challenges, set up a verification type, such as DNS-01 to your DNS provider. With
CloudFlare, you can create a restricted token that will allow you to edit the zone of the domain you would use for this purpose (even if the subdomain will not be resolvable from the outside world). You would need to fill in the CF Account ID (token ID) + CF API token (secret) that you receive from your provider. - Note – if you have not set this up before, you will also need to set up two firewall rules on your WAN interface(s) that forwards (from any source and port) traffic on port 80 and 443 to ‘This Firewall’. If your ISP-provided router has firewall on, you would need to log into it and also forward ports 80 and 443 to the local IP of the OPNSense IP (or the CARP IP if you have OPNsense in HA). See this guide for more details.
- Under ACME Client → Certificates, request a new certificate for the domain you are trying to set it up for. Include your subdomain, such as
proxmox.yourdomain.tld. Select the ACME account and the type of challenge that you created before. Select auto-renewal. As automation, selectautomation-restart-haproxyto ensure that the new certs get applied.
- If you already have a cert on this domain, you can just add your
proxmox-related record into it. - Request a new/re-creation of the cert and observe the logs. It takes a few minutes. Then you have your cert that we can use for our reverse proxy and load balancer, HAPRoxy.
Configure HAPRoxy – Real Servers
- On your primary OPNSense unit, go to Services → HAProxy → Settings
- Click on Real Servers → select Real Servers.
- Create a new item by clicking on the + sign.
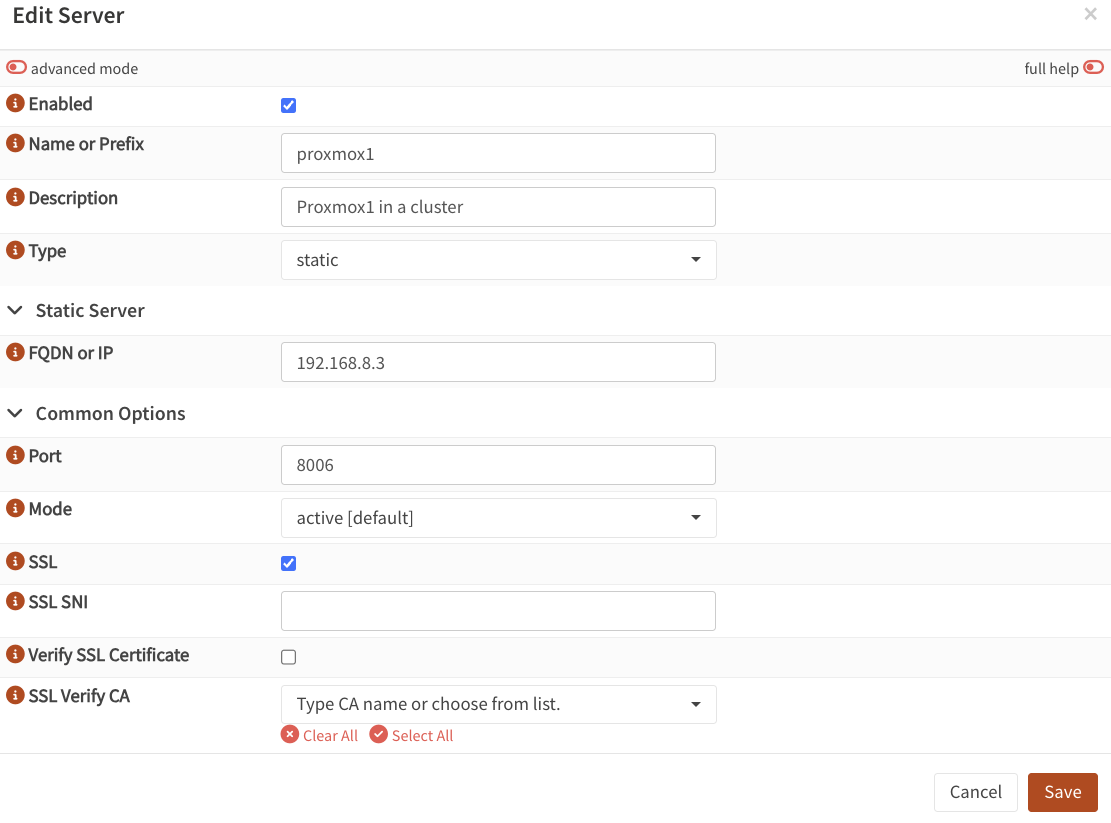
- Name:
proxmox1(or whatever you prefer) - Type:
static - IP: The specific IP of the Proxmox node
- Port:
8006 - SSL: tick this box, as Proxmox expects to exchange encrypted traffic, even with a self-signed cert on the local network.
- Verify SSL Certificate: make sure that is not ticked, as Proxmox operates on a self-signed certificate.
- Name:
- Do the same for the other hosts in your cluster.
Configure HAPRoxy – Health Check
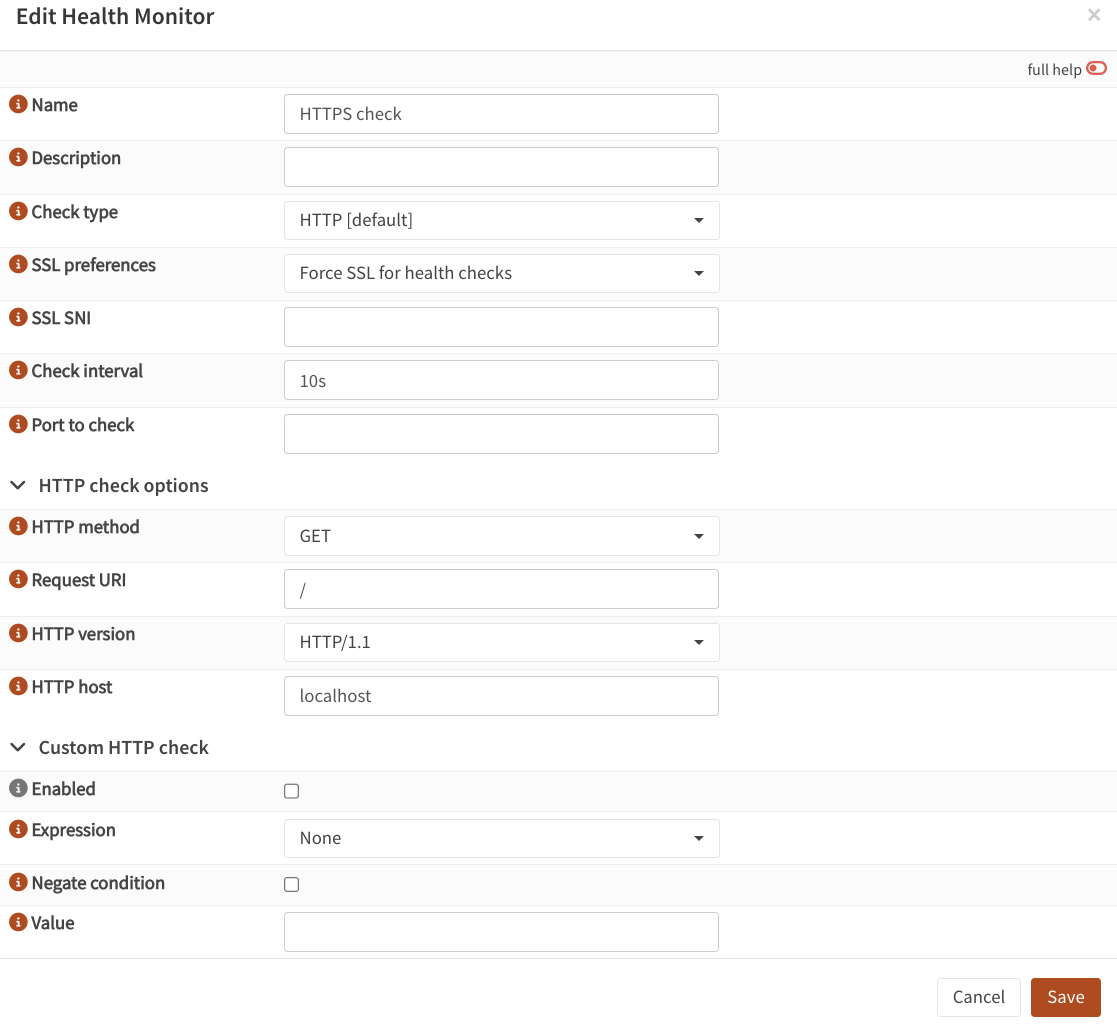
- Before we create our back-end, we will need to set up a way of checking the health of each Proxmox node. This should be a simple HTTPS check on port 8006.
- While still on HAProxy settings, go to Rules & Checks → Health Monitors. Add a new one.
- Name:
HTTPS check - Check type:
HTTP (default) - SSL preferences:
Force SSL for health checks - Check interval: 3-10 seconds
- HTTP method:
GET - Request URI:
/ - HTTP version:
HTTP/1.1 - HTTP host: leave it to default (localhost)
- Name:
Configure HAPRoxy – Backend Pool
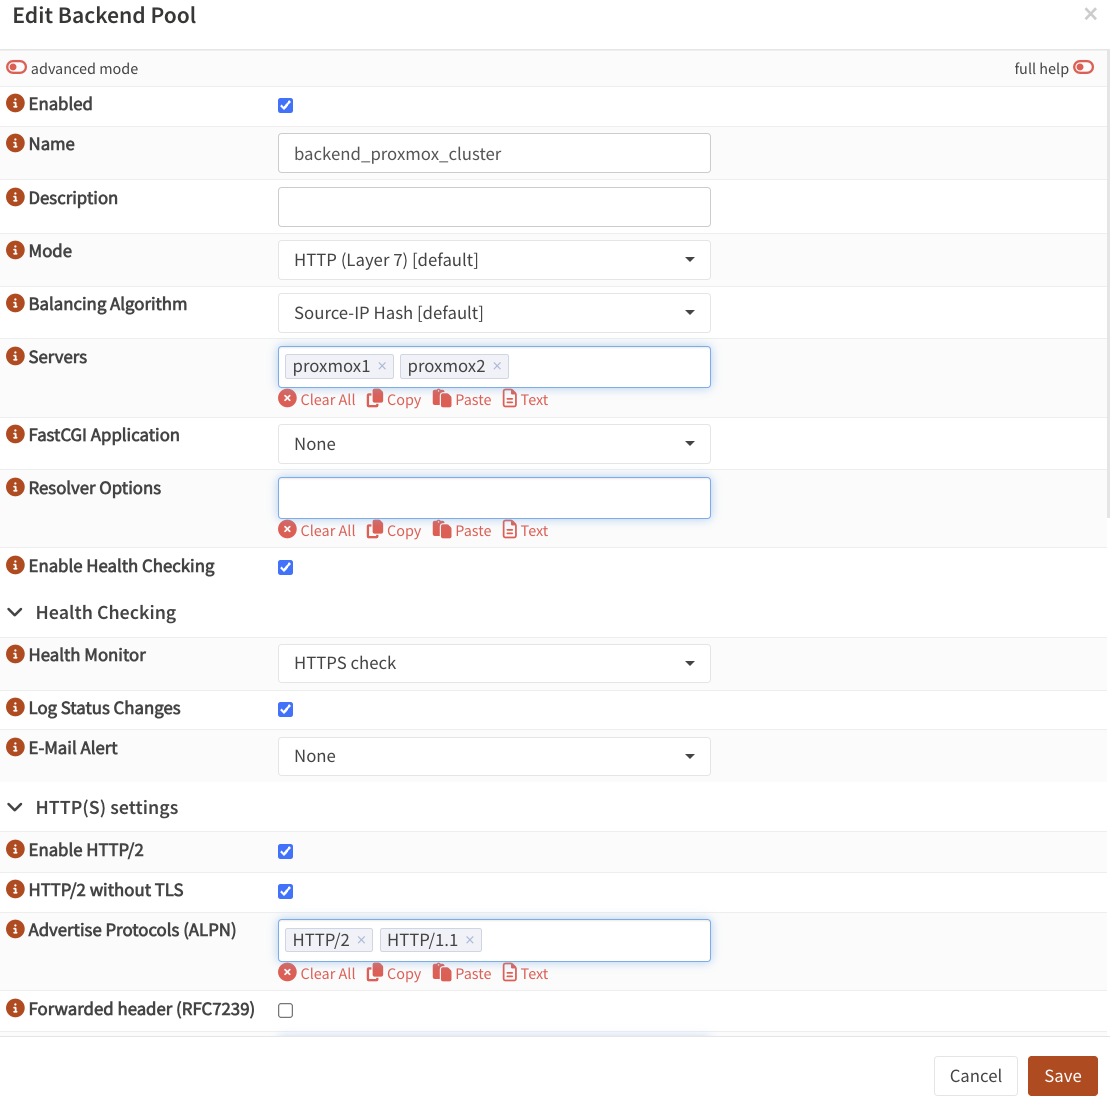
- Then go to Virtual Services → Backend Pools. Create a new item there as well.
- Enabled: ticked
- Name: some way of indicating this is your backend
- Mode:
HTTP - Balancing Algorithm: any,
round robinwill be switching it each time (see documentation). - Servers: what we defined before for all the nodes in our proxmox cluster
- Enable health checking: tick (these will be simple pings)
- Health Monitor: select the monitor we created in the previous step (e.g. HTTPS check).
- Log status changes: tick
- Enable HTTP/2: tick
- HTTP/2 without TLS: tick if you do not have your certs deployed
Configure HAProxy – Conditions & Rules
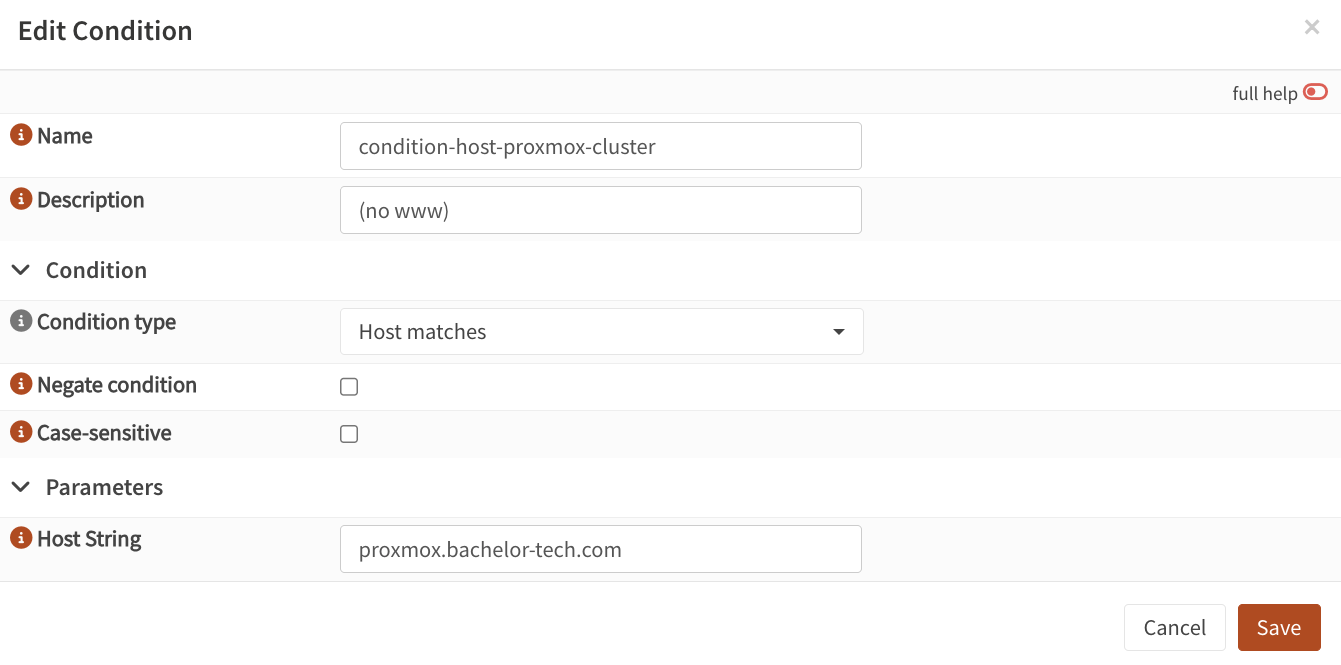
- Still within HAProxy Settings, go to Rules & Checks → Conditions. Create a new item.
- Give it a name such as
condition-host-proxmox-clusterCondition type:Host matchesHost string: your subdomain, such asproxmox.bachelor-tech.com
- Give it a name such as
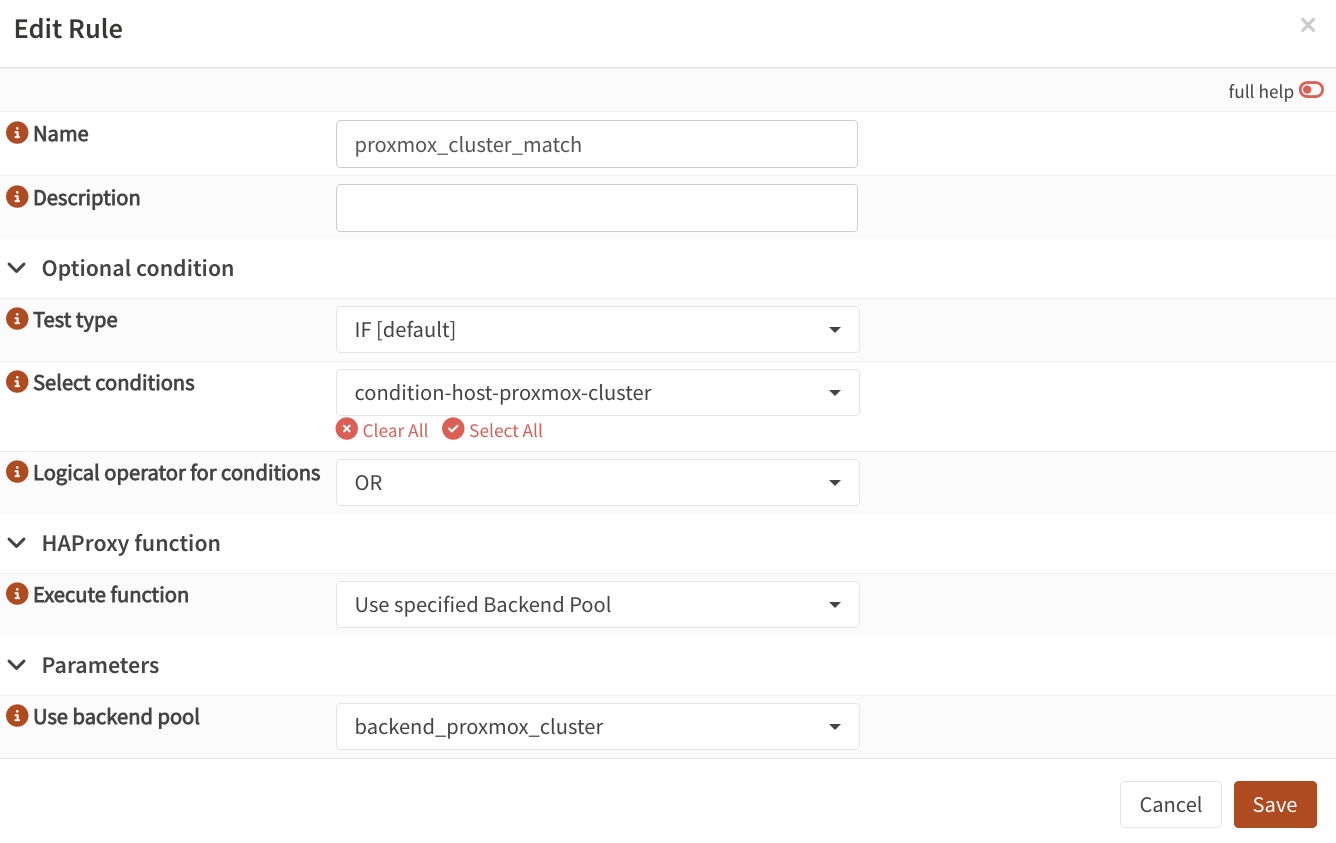
- Then proceed to Rules & Checks → Rules. Create a new item.
- Give it a name such as
proxmox-cluster-match. - Select conditions: find the one you created in the previous step, such as
condition-host-proxmox-cluster - Execute function:
Use specified Backend Pool - Use backend pool: select the back-end pool you created earlier, such as
backend_proxmox_cluster.
- Give it a name such as
Configure HAProxy – Front-end
- Now we can finally put that effort all together by setting up a front-end. In HAProxy Settings, go to Virtual Services → Public Services . Unless you have an item for this virtual IP created already (in which case you would just add the
proxmox_cluster_matchrule in it, proceed with creating a new item. - Name: distinguish it from other publicly reachable services in the name, such as
frontend-https-LAN-VIP - Listen address: your virtual IP on port 443, such as
192.168.8.99:443 - Type: HTTP / HTTPS (SSL offloading)
- Certificates: select the one you created in the ACME Client we configured earlier
- Enable HTTP/2: enable
- Select Rules: add the rule you created earlier, such as
proxmox_cluster_match
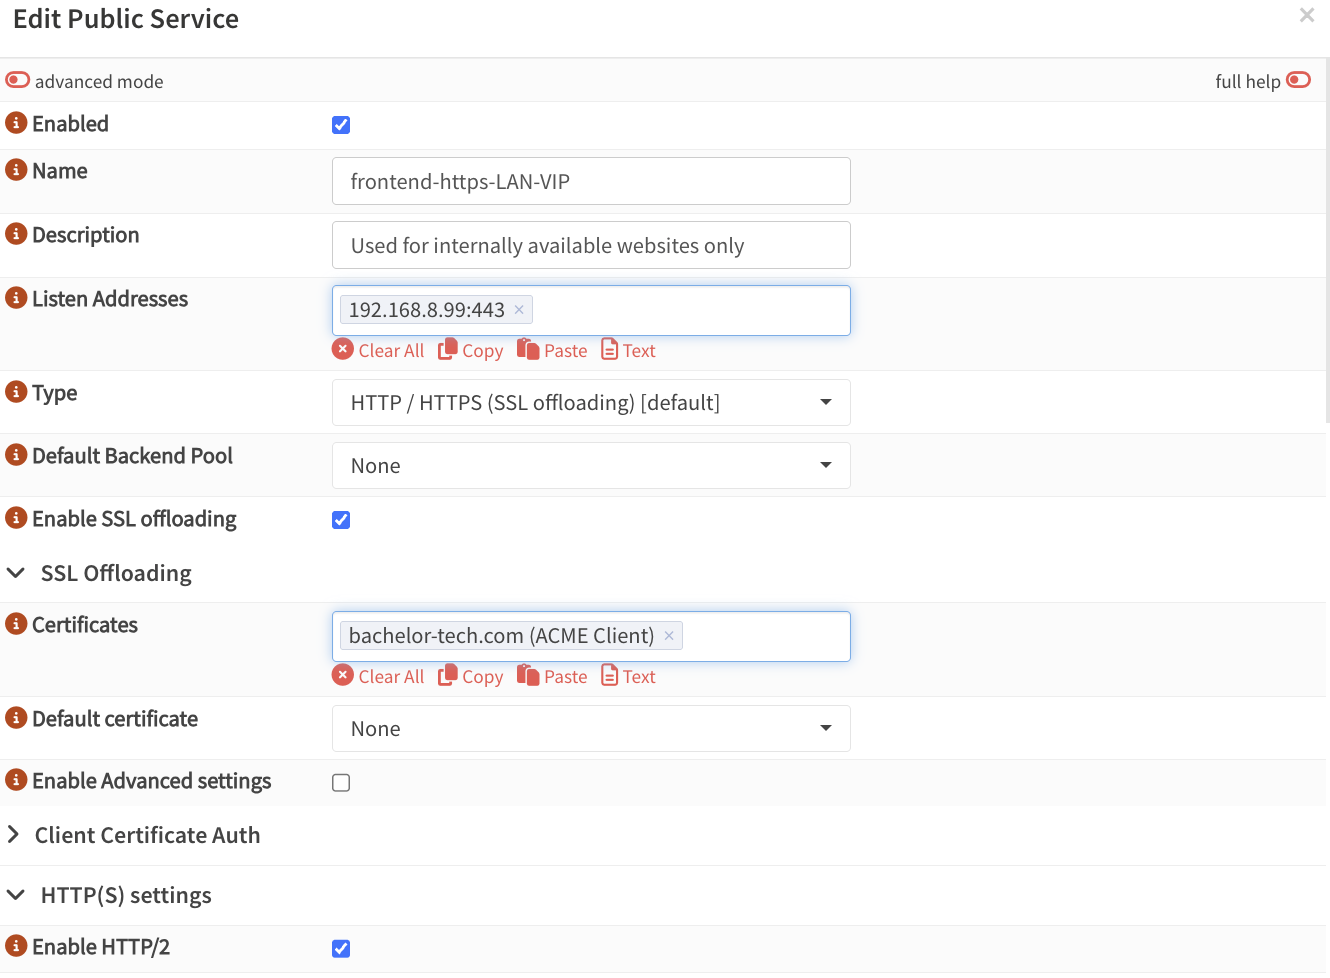
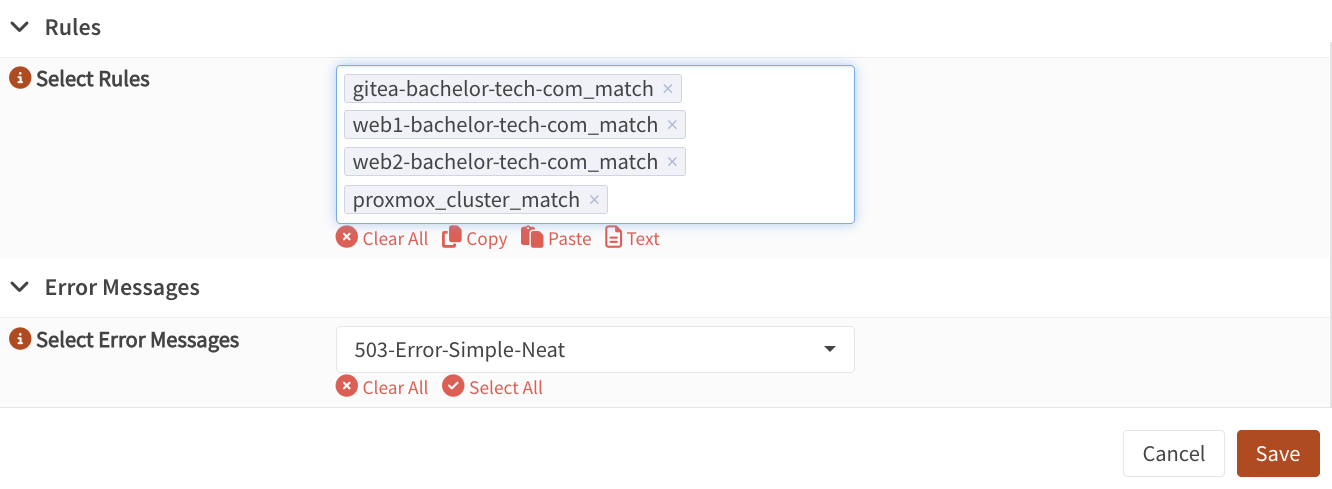
- I skipped some items in the screenshot above but kept the important ones. For example, I have a custom 503 error page that you may not – I can create another guide that covers that in the future.
- Save, test the syntax and then apply them.
- If the test fails, check why. It could be that you forgot to switch the back-end setting from TCP to HTTP, for example.
- If it works, then you should be able to reach the host on https://proxmox.yourdomain.tld (without specifying the port, since HTTPS goes natively to port 443).
Set up CoreDNS on your Kubernetes cluster
So now we can use our hostname with HTTPS to talk to Proxmox.
- The challenge is that the Kubernetes cluster that we deployed in the previous Step has no idea about how to resolve it locally. It is isolated from our LAN and if it reached to your public DNS records, it will not find it. Modifying the
/etc/hostsfile on your VM will also not help, since the K3S is isolated from it as well. - What we will need to do is to set up a forwarder to use our LAN gateway + we can manually define some manual hosts just in case.
- SSH into your AWX (Ansible) VM and configure
CoreDNS:
kubectl -n kube-system get configmap coredns -o yaml > coredns.yml

nano coredns.yml

# Modify the forward directive after the line that says: prometheus :9153
        forward . 192.168.8.254 # Set it to your local gateway

# Then look for a line 'NodeHosts: |' - change the IP as needed

NodeHosts: |
    192.168.8.25 awx
    192.168.8.99 proxmox.yourdomain.tld
kind: ConfigMap
- Once done, carry out a dry-run, apply it and restart the
CoreDNSservice:
# Dry-run to verify the syntax
kubectl apply -f coredns.yml --dry-run=client

# Apply the config
kubectl apply -f coredns.yml

# Restart CoreDNS to load the new config
kubectl -n kube-system delete pod -l k8s-app=kube-dns
- Test that you can resolve the host now:
# List your pods:
kubectl get pods -n awx

# Alternatively, get your pods with network details:
kubectl get pods -owide -n awx

# Connect to the task pod:
kubectl exec -it awx-instance-task-6897c55fb8-wt7tr -n awx -- /bin/bash

# Ping commands may not work but you can try the following:
getent hosts proxmox.yourdomain.tld
curl <https://proxmox.yourdomain.tld>
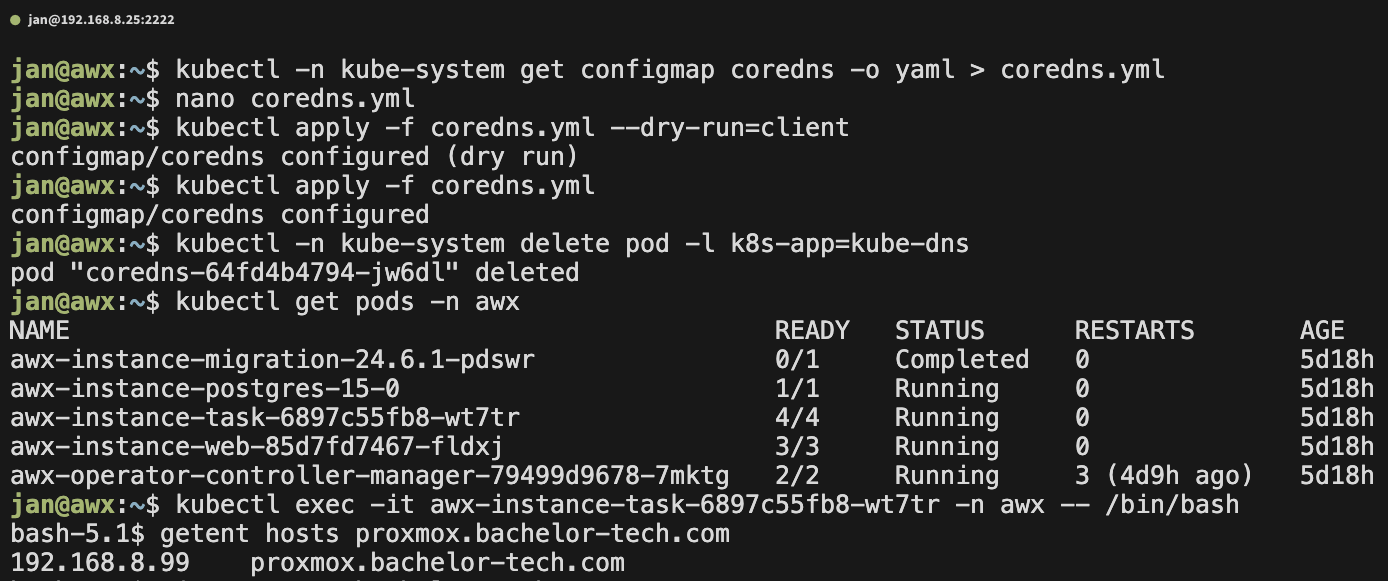
This proves that the K3s pods can resolve the URL to the right hostname (the virtual IP on OPNSense on which HAProxy listens on the front-end we created and handles SSL decryption and forwarding to the Proxmox cluster).